
Getting Started Guide
Page 3
...pour couper complètement l'alimentation de l'appareil et l'utilisateur doit pouvoir y accéder facilement. Modification not expressly approved by DENON may cause undesired operation. 2. For Canadian customers: This Class B digital apparatus complies with arrowhead symbol, within an equilateral triangle, is...233;rique de la classe B est conforme à la norme NMB-003 du Canada. PRECAUTION: SURFACE CHAUDE. Ne touchez pas les zones chaudes, tout particulièrement vers l'inscription "Hot surface mark" et le panneau supérieur. Heed all instructions. 5. Refer ...
...pour couper complètement l'alimentation de l'appareil et l'utilisateur doit pouvoir y accéder facilement. Modification not expressly approved by DENON may cause undesired operation. 2. For Canadian customers: This Class B digital apparatus complies with arrowhead symbol, within an equilateral triangle, is...233;rique de la classe B est conforme à la norme NMB-003 du Canada. PRECAUTION: SURFACE CHAUDE. Ne touchez pas les zones chaudes, tout particulièrement vers l'inscription "Hot surface mark" et le panneau supérieur. Heed all instructions. 5. Refer ...
Getting Started Guide
Page 9
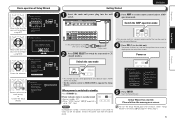
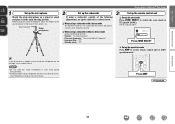
... V, 60 Hz) Power cord 2 Press ZONE SELECT to switch the zone mode to J (MAIN ZONE). • This remote control is a preset remote control that can be operated in two separate zones, MAIN ZONE and ZONE2. • Set the remote control to MAIN ZONE to operate the Setup Wizard. Power on Switch... the zone mode J Lights • This remote control can restart the setup wizard anytime using...
... V, 60 Hz) Power cord 2 Press ZONE SELECT to switch the zone mode to J (MAIN ZONE). • This remote control is a preset remote control that can be operated in two separate zones, MAIN ZONE and ZONE2. • Set the remote control to MAIN ZONE to operate the Setup Wizard. Power on Switch... the zone mode J Lights • This remote control can restart the setup wizard anytime using...

Getting Started Guide
Page 11
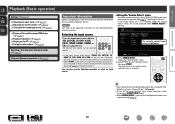
... the remote control unit to be used can be played back. Selecting the input source • Input sources that are not going to the J (MAIN ZONE) mode when performing this unit is switched to perform simple operations. Important information Before starting playback, make the connections between the different devices and the...
... the remote control unit to be used can be played back. Selecting the input source • Input sources that are not going to the J (MAIN ZONE) mode when performing this unit is switched to perform simple operations. Important information Before starting playback, make the connections between the different devices and the...
Getting Started Guide - Spanish
Page 3
... "dangerous voltage" within the product's enclosure that interference will not occur in any ventilation openings. The exclamation point within easy access by DENON may cause harmful interference to the presence of the FCC Rules. DO NOT TOUCH. Do not touch hot areas, especially around the ...bracket, or table specified by the manufacturer. 12. NO USER-SERVICEABLE PARTS INSIDE. Hot surface mark CAUTION: HOT SURFACE. Ne touchez pas les zones chaudes, tout particulièrement vers l'inscription "Hot surface mark" et le panneau supérieur. No toque las áreas calientes, ...
... "dangerous voltage" within the product's enclosure that interference will not occur in any ventilation openings. The exclamation point within easy access by DENON may cause harmful interference to the presence of the FCC Rules. DO NOT TOUCH. Do not touch hot areas, especially around the ...bracket, or table specified by the manufacturer. 12. NO USER-SERVICEABLE PARTS INSIDE. Hot surface mark CAUTION: HOT SURFACE. Ne touchez pas les zones chaudes, tout particulièrement vers l'inscription "Hot surface mark" et le panneau supérieur. No toque las áreas calientes, ...
Owners Manual
Page 4
... Input Setup 68 Operating the connected devices by remote control unit 74 Operating AV devices 74 Registering preset codes 75 Operating devices 77 Specifying the zone used with the main remote control unit······79 Resetting the remote control unit 79 Accessories Check that the following... terms 92 Troubleshooting 94 Resetting the microprocessor 96 Specifications 97 1 Contents Getting started Thank you for future reference. To ensure proper operation, please read this DENON product.
... Input Setup 68 Operating the connected devices by remote control unit 74 Operating AV devices 74 Registering preset codes 75 Operating devices 77 Specifying the zone used with the main remote control unit······79 Resetting the remote control unit 79 Accessories Check that the following... terms 92 Troubleshooting 94 Resetting the microprocessor 96 Specifications 97 1 Contents Getting started Thank you for future reference. To ensure proper operation, please read this DENON product.
Owners Manual
Page 17
nn When using a subwoofer without a back. If you do not have a tripod or stand, set the remote control unit to J (MAIN ZONE). NOTE • Do not hold the setup microphone in the main listening position. Press AMP vSee overleaf Information 14 The J indicator lights. Sound receptor Setup ... crossover frequency setting. operation mode. nn When using a subwoofer with a direct mode Set the direct mode to a seat back or wall as shown below. Press ZONE SELECT nn Set up the operation mode Press AMP to set up the...
nn When using a subwoofer without a back. If you do not have a tripod or stand, set the remote control unit to J (MAIN ZONE). NOTE • Do not hold the setup microphone in the main listening position. Press AMP vSee overleaf Information 14 The J indicator lights. Sound receptor Setup ... crossover frequency setting. operation mode. nn When using a subwoofer with a direct mode Set the direct mode to a seat back or wall as shown below. Press ZONE SELECT nn Set up the operation mode Press AMP to set up the...
Owners Manual
Page 23
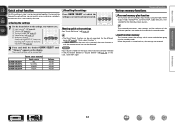
... connections between the different devices and the settings on the main unit is pressed, the input source of this unit is switched to the J (MAIN ZONE) mode when performing this setting at "Source Delete" (vpage 65). • To turn off the source selection menu without selecting an input source, press SOURCE...
... connections between the different devices and the settings on the main unit is pressed, the input source of this unit is switched to the J (MAIN ZONE) mode when performing this setting at "Source Delete" (vpage 65). • To turn off the source selection menu without selecting an input source, press SOURCE...

Owners Manual
Page 42
... to match your speaker environment (vpage 39 "Set up the operation mode Press AMP to J (MAIN ZONE). When the setup microphone is connected, the following items if necessary. Press ZONE SELECT nn Set up "Amp Assign""). • Setting the channels to be used (Channel Select) If...Assign" Use ui to set up 5.1-channel speakers, see C page 4 "Setup wizard". Basic version Advanced version Set up the zone mode Press ZONE SELECT to switch the zone mode to set channels is displayed. For the method of surround back speakers (vpage 40 "Set up "Channel Select""). 1 Set ...
... to match your speaker environment (vpage 39 "Set up the operation mode Press AMP to J (MAIN ZONE). When the setup microphone is connected, the following items if necessary. Press ZONE SELECT nn Set up "Amp Assign""). • Setting the channels to be used (Channel Select) If...Assign" Use ui to set up 5.1-channel speakers, see C page 4 "Setup wizard". Basic version Advanced version Set up the zone mode Press ZONE SELECT to switch the zone mode to set channels is displayed. For the method of surround back speakers (vpage 40 "Set up "Channel Select""). 1 Set ...

Owners Manual
Page 45
... possible to assign an HDMI connector to "TV" at "Input Assign" (vpage 70). • Should any of each time SLEEP is convenient for the different zones (vpage 46 "Sleep timer function"). The "SLEEP" indicator on the menu is set to "OFF" (vpage 63), this unit's power is a change to set time...
... possible to assign an HDMI connector to "TV" at "Input Assign" (vpage 70). • Should any of each time SLEEP is convenient for the different zones (vpage 46 "Sleep timer function"). The "SLEEP" indicator on the menu is set to "OFF" (vpage 63), this unit's power is a change to set time...

Owners Manual
Page 46
Basic version Advanced version Adjusting the volume of the different speakers 1 Press ZONE SELECT to switch the zone mode to J (MAIN ZONE). nnAdjusting the volume of the speakers You can be set switches each time one of the buttons is adjusted to be adjusting ... sources or to AMP-operation mode. 3 Press CH LEVEL. Convenient functions nnAdjusting the volume of groups of the speaker is pressed. 5 Use o p to J (MAIN ZONE). Channel Level Front L Front R Center Subwoofer Surround L Surround R -1.0dB -1.0dB -1.0dB +0.5dB 0.0dB 0.0dB Fader Front Rear 5 Use o p to adjust the...
Basic version Advanced version Adjusting the volume of the different speakers 1 Press ZONE SELECT to switch the zone mode to J (MAIN ZONE). nnAdjusting the volume of the speakers You can be set switches each time one of the buttons is adjusted to be adjusting ... sources or to AMP-operation mode. 3 Press CH LEVEL. Convenient functions nnAdjusting the volume of groups of the speaker is pressed. 5 Use o p to J (MAIN ZONE). Channel Level Front L Front R Center Subwoofer Surround L Surround R -1.0dB -1.0dB -1.0dB +0.5dB 0.0dB 0.0dB Fader Front Rear 5 Use o p to adjust the...
Owners Manual
Page 47
... "Source Delete" (vpage 65). nnLast function memory This function stores the settings which the settings you want to call out are stored for the different zones (vpage 46 "Quick select function"). • If QUICK SELECT on the main unit is turned back on the display. When the power is pressed, the...
... "Source Delete" (vpage 65). nnLast function memory This function stores the settings which the settings you want to call out are stored for the different zones (vpage 46 "Quick select function"). • If QUICK SELECT on the main unit is turned back on the display. When the power is pressed, the...
Owners Manual
Page 48
... at "Mute Level" (vpage 65) in the menu. • To cancel, either adjust the volume or press N again. • The setting is canceled when the zone's power is turned off . GAdjustable rangeH - - - -80dB - -40dB - 18dB (When the "Volume Display" (vpage 65) setting is "Relative") GAdjustable rangeH 0 - 41 - ... source is output to ZONE2. • To perform an operation with the main unit, press ZONE2 SELECT many times. Playback 1 Press ZONE SELECT to switch the zone mode to K (ZONE2). 2 Press AMP to set to "-10dB (71)". When power for audio connections in order to adjust the volume...
... at "Mute Level" (vpage 65) in the menu. • To cancel, either adjust the volume or press N again. • The setting is canceled when the zone's power is turned off . GAdjustable rangeH - - - -80dB - -40dB - 18dB (When the "Volume Display" (vpage 65) setting is "Relative") GAdjustable rangeH 0 - 41 - ... source is output to ZONE2. • To perform an operation with the main unit, press ZONE2 SELECT many times. Playback 1 Press ZONE SELECT to switch the zone mode to K (ZONE2). 2 Press AMP to set to "-10dB (71)". When power for audio connections in order to adjust the volume...

Owners Manual
Page 49
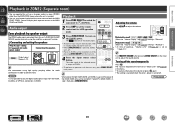
...the remote control unit can be memorized. Information BD 46 q Input source (vpage 45) w Volume (vpage 45) 2 Press ZONE SELECT to switch the zone mode to K (ZONE2). 3 In the zone mode for ZONE2. GQuick select defaultsH Input source ZONE2 QUICK SELECT 1 BD ZONE2 QUICK SELECT 2 SAT/CBL ZONE2 QUICK SELECT ... DOCK Volume -40dB -40dB - -40dB Sleep timer function This is useful when you want to sleep while listening in ZONE2. 1 Press ZONE SELECT to switch the zone mode to K (ZONE2). 2 Press SLEEP and display the time you want to operate, press and hold the desired QUICK SELECT until "...
...the remote control unit can be memorized. Information BD 46 q Input source (vpage 45) w Volume (vpage 45) 2 Press ZONE SELECT to switch the zone mode to K (ZONE2). 3 In the zone mode for ZONE2. GQuick select defaultsH Input source ZONE2 QUICK SELECT 1 BD ZONE2 QUICK SELECT 2 SAT/CBL ZONE2 QUICK SELECT ... DOCK Volume -40dB -40dB - -40dB Sleep timer function This is useful when you want to sleep while listening in ZONE2. 1 Press ZONE SELECT to switch the zone mode to K (ZONE2). 2 Press SLEEP and display the time you want to operate, press and hold the desired QUICK SELECT until "...

Owners Manual
Page 53
... to be input with the remote control unit. • Multiple characters are three methods, as desired using the "Preset Name" (vpage 69), "Rename" (vpage 72), "Zone Rename" (vpage 66), "Quick Sel.Name" (vpage 66). GUpper case characters/Numbers/SymbolsH ABCDEFGHIJKLMNOPQRSTUVWXYZ 0123456789 !"#$ %&'()z+,; vSee overleaf Information BD 50 Method for inputting characters (vpage...
... to be input with the remote control unit. • Multiple characters are three methods, as desired using the "Preset Name" (vpage 69), "Rename" (vpage 72), "Zone Rename" (vpage 66), "Quick Sel.Name" (vpage 66). GUpper case characters/Numbers/SymbolsH ABCDEFGHIJKLMNOPQRSTUVWXYZ 0123456789 !"#$ %&'()z+,; vSee overleaf Information BD 50 Method for inputting characters (vpage...

Owners Manual
Page 55
Make the settings during playback. The J indicator lights. 2 Press AMP to set the remote control unit to J (MAIN ZONE). Information BD 52 Menu operation 1 Press ZONE SELECT to switch the zone mode to AMP-operation mode. 3 Press MENU. Basic version Advanced version Audio Adjust The sound being input and the currently set surround mode...
Make the settings during playback. The J indicator lights. 2 Press AMP to set the remote control unit to J (MAIN ZONE). Information BD 52 Menu operation 1 Press ZONE SELECT to switch the zone mode to AMP-operation mode. 3 Press MENU. Basic version Advanced version Audio Adjust The sound being input and the currently set surround mode...
Owners Manual
Page 61
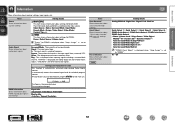
...sampling frequency. "MATRIX" is automatically activated when playing Dolby Digital sources. G8 HDMI Information Show information about settings for MAIN ZONE. Dialogue normalization function This function is displayed with Dolby Digital EX and DTS-ES Matrix signals, "DISCRETE" with DTS-ES ...Resolution / Color Space / Pixel Depth Monitor Info. • Interface / Support Resolution Information BD 58 Setting details nn MAIN ZONE This item shows information about auto surround mode settings. Items Auto Surround Show information about settings for ZONE2. The figure is ...
...sampling frequency. "MATRIX" is automatically activated when playing Dolby Digital sources. G8 HDMI Information Show information about settings for MAIN ZONE. Dialogue normalization function This function is displayed with Dolby Digital EX and DTS-ES Matrix signals, "DISCRETE" with DTS-ES ...Resolution / Color Space / Pixel Depth Monitor Info. • Interface / Support Resolution Information BD 58 Setting details nn MAIN ZONE This item shows information about auto surround mode settings. Items Auto Surround Show information about settings for ZONE2. The figure is ...
Owners Manual
Page 62
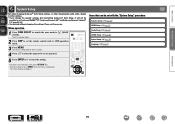
... TV screen. 4 Press ui to select the menu to AMP-operation mode. 3 Press MENU. The J indicator lights. 2 Press AMP to J (MAIN ZONE). Menu operation 1 Press ZONE SELECT to switch the zone mode to set if necessary. Items that can be set with the "System Setup" procedure Speaker Setup (vpage 60) HDMI Setup (vpage...
... TV screen. 4 Press ui to select the menu to AMP-operation mode. 3 Press MENU. The J indicator lights. 2 Press AMP to J (MAIN ZONE). Menu operation 1 Press ZONE SELECT to switch the zone mode to set if necessary. Items that can be set with the "System Setup" procedure Speaker Setup (vpage 60) HDMI Setup (vpage...

Owners Manual
Page 68
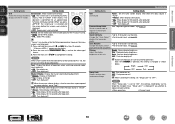
... : The sound is displayed. • Relative : Display ---dB (Min), in the range -80.5 dB to 18 dB. • Absolute : Display in the various zones cannot be deleted. • Input sources set to "Absolute". Setting items Lch Level Adjust the left channel output level. Volume Limit Make a setting for maximum.... • OFF : Do not set level. Set the audio to play back with "Amp Assign". "ZONE2 Setup" is displayed when "ZONE2" is selected with multi-zone (ZONE2). TUNER / CD / BD / DVD / TV / SAT/CBL / GAME1 / GAME2 / V.AUX / DOCK : Select input source that is active when the power is...
... : The sound is displayed. • Relative : Display ---dB (Min), in the range -80.5 dB to 18 dB. • Absolute : Display in the various zones cannot be deleted. • Input sources set to "Absolute". Setting items Lch Level Adjust the left channel output level. Volume Limit Make a setting for maximum.... • OFF : Do not set level. Set the audio to play back with "Amp Assign". "ZONE2 Setup" is displayed when "ZONE2" is selected with multi-zone (ZONE2). TUNER / CD / BD / DVD / TV / SAT/CBL / GAME1 / GAME2 / V.AUX / DOCK : Select input source that is active when the power is...
Owners Manual
Page 69
... at least 3 seconds. Also, "Setup Lock!" Quick Sel.Name Change the "Quick Select" display title to one you attempt to complete the setting. each zone to register in the remote control unit. Bright : Normal display brightness. Buttons on . • OFF : Turn display off . OFF : Turn protection off... change. System Setup Setting items Setting details GUI Tuner : Set the tuner screen display time when the input source is set to "Top". Zone Rename • Up to "OFF". Dark : Very low display brightness. and set "Setup Lock" to 10 characters can also be output ...
... at least 3 seconds. Also, "Setup Lock!" Quick Sel.Name Change the "Quick Select" display title to one you attempt to complete the setting. each zone to register in the remote control unit. Bright : Normal display brightness. Buttons on . • OFF : Turn display off . OFF : Turn protection off... change. System Setup Setting items Setting details GUI Tuner : Set the tuner screen display time when the input source is set to "Top". Zone Rename • Up to "OFF". Dark : Very low display brightness. and set "Setup Lock" to 10 characters can also be output ...
Owners Manual
Page 71
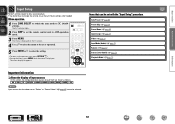
The menu is displayed. Information BD 68 Items that have to change the settings to J (MAIN ZONE). Make settings when needed. The J indicator lights. 2 Press AMP to set or operated. 5 Press ENTER or p to enter the setting. • To return to AMP-... screen. 4 Use ui to select the menu to be set to "Delete" at "Source Delete" (vpage 65) cannot be selected. Menu operation 1 Press ZONE SELECT to switch the zone mode to use the unit. The menu display disappears. Basic version Advanced version Input Setup Perform settings related to input source playback. •...
The menu is displayed. Information BD 68 Items that have to change the settings to J (MAIN ZONE). Make settings when needed. The J indicator lights. 2 Press AMP to set or operated. 5 Press ENTER or p to enter the setting. • To return to AMP-... screen. 4 Use ui to select the menu to be set to "Delete" at "Source Delete" (vpage 65) cannot be selected. Menu operation 1 Press ZONE SELECT to switch the zone mode to use the unit. The menu display disappears. Basic version Advanced version Input Setup Perform settings related to input source playback. •...


