
Getting Started Guide
Page 3
... such as indicated in the instructions contained in a residential installation. Install in a particular installation. Modification not expressly approved by DENON may become hot when operating this product must be of sufficient magnitude to correct the interference by one wider than the other ... l'utilisateur doit pouvoir y accéder facilement. This product generates, uses and can be exposed to persons. I Ne touchez pas les zones chaudes, tout particulièrement vers l'inscription "Hot surface mark" et le panneau supérieur. Read these instructions. 3. The wide...
... such as indicated in the instructions contained in a residential installation. Install in a particular installation. Modification not expressly approved by DENON may become hot when operating this product must be of sufficient magnitude to correct the interference by one wider than the other ... l'utilisateur doit pouvoir y accéder facilement. This product generates, uses and can be exposed to persons. I Ne touchez pas les zones chaudes, tout particulièrement vers l'inscription "Hot surface mark" et le panneau supérieur. Read these instructions. 3. The wide...
Getting Started Guide
Page 9
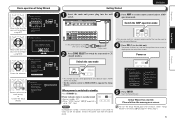
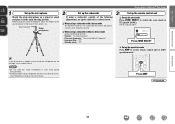
... item that you want to configure using o p. 5.1ch is displayed on remote. or Cancels the Setup Wizard. The power switches on Switch the zone mode J Lights • This remote control can be operated in the menu (vm page 47 "Menu map"). 5 Playback Setup Wizard Preparation Setup... wish to confirm. Switch the AMP-operation mode To household power outlet (AC 120 V, 60 Hz) Power cord 2 Press ZONE SELECT to switch the zone mode to J (MAIN ZONE). • This remote control is switched to standby Press STANDBY (X). Language Select 2. To start of receiver step by step...
... item that you want to configure using o p. 5.1ch is displayed on remote. or Cancels the Setup Wizard. The power switches on Switch the zone mode J Lights • This remote control can be operated in the menu (vm page 47 "Menu map"). 5 Playback Setup Wizard Preparation Setup... wish to confirm. Switch the AMP-operation mode To household power outlet (AC 120 V, 60 Hz) Power cord 2 Press ZONE SELECT to switch the zone mode to J (MAIN ZONE). • This remote control is switched to standby Press STANDBY (X). Language Select 2. To start of receiver step by step...

Getting Started Guide
Page 11
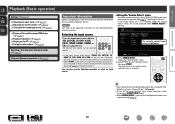
...) Here, we explain how to select the input source, then press ENTER. Using the "Source Select" menu Switch the remote control unit to the J (MAIN ZONE) mode when performing this unit is switched to "DOCK" and the connected iPod is turned off the source selection menu without selecting an input source...
...) Here, we explain how to select the input source, then press ENTER. Using the "Source Select" menu Switch the remote control unit to the J (MAIN ZONE) mode when performing this unit is switched to "DOCK" and the connected iPod is turned off the source selection menu without selecting an input source...
Getting Started Guide - Spanish
Page 3
...NOT REMOVE COVER (OR BACK). PRECAUCIÓN: SUPERFICIE CALIENTE. Use only with the cart, stand, tripod, bracket, or table specified by DENON may cause undesired operation. 2. Refer all warnings. 4. CAUTION: To completely disconnect this product continuously. IMPORTANT NOTICE: DO NOT MODIFY THIS ...003 du Canada. The wide blade or the third prong are designed to radio communications. NE PAS TOUCHER. Ne touchez pas les zones chaudes, tout particulièrement vers l'inscription "Hot surface mark" et le panneau supérieur. Follow all instructions. 5. ...
...NOT REMOVE COVER (OR BACK). PRECAUCIÓN: SUPERFICIE CALIENTE. Use only with the cart, stand, tripod, bracket, or table specified by DENON may cause undesired operation. 2. Refer all warnings. 4. CAUTION: To completely disconnect this product continuously. IMPORTANT NOTICE: DO NOT MODIFY THIS ...003 du Canada. The wide blade or the third prong are designed to radio communications. NE PAS TOUCHER. Ne touchez pas les zones chaudes, tout particulièrement vers l'inscription "Hot surface mark" et le panneau supérieur. Follow all instructions. 5. ...
Owners Manual
Page 4
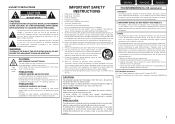
To ensure proper operation, please read this DENON product. q Getting Started 1 w CD-ROM (Owner's manual 1 e Warranty (for iPod 10 Connecting an antenna 11 Connecting a CD player 11 Connecting an external control device 12 ... Input Setup 68 Operating the connected devices by remote control unit 74 Operating AV devices 74 Registering preset codes 75 Operating devices 77 Specifying the zone used with the main remote control unit······79 Resetting the remote control unit 79 Accessories Check that the following...
To ensure proper operation, please read this DENON product. q Getting Started 1 w CD-ROM (Owner's manual 1 e Warranty (for iPod 10 Connecting an antenna 11 Connecting a CD player 11 Connecting an external control device 12 ... Input Setup 68 Operating the connected devices by remote control unit 74 Operating AV devices 74 Registering preset codes 75 Operating devices 77 Specifying the zone used with the main remote control unit······79 Resetting the remote control unit 79 Accessories Check that the following...
Owners Manual
Page 17
... up the subwoofer If using a subwoofer capable of the listener's ear. nn When using a subwoofer without a back. Press ZONE SELECT nn Set up the zone mode Press ZONE SELECT to switch the zone mode to J (MAIN ZONE). The J indicator lights. NOTE • Do not hold the setup microphone in the main listening position. Press AMP...
... up the subwoofer If using a subwoofer capable of the listener's ear. nn When using a subwoofer without a back. Press ZONE SELECT nn Set up the zone mode Press ZONE SELECT to switch the zone mode to J (MAIN ZONE). The J indicator lights. NOTE • Do not hold the setup microphone in the main listening position. Press AMP...
Owners Manual
Page 23
... main unit is switched to select an input source. [ ] Move [ENTER] Enter q Press SOURCE SELECT. Display the "Source Select" menu. w Use uio p to the J (MAIN ZONE) mode when performing this operation (vpage 74 "Operating AV devices"). Make this unit is pressed, the input source of the connected devices when playing them...
... main unit is switched to select an input source. [ ] Move [ENTER] Enter q Press SOURCE SELECT. Display the "Source Select" menu. w Use uio p to the J (MAIN ZONE) mode when performing this operation (vpage 74 "Operating AV devices"). Make this unit is pressed, the input source of the connected devices when playing them...

Owners Manual
Page 42
...vpage 40 "Set up "Channel Select""). 1 Set up the remote control unit nn Set up the zone mode Press ZONE SELECT to switch the zone mode to set up the operation mode Press AMP to J (MAIN ZONE). Basic version Advanced version Set up "Amp Assign""). • Setting the channels to be used (...Channel Select) If channels that are set in the manual. Press ZONE SELECT nn Set up speakers other than 5.1-channel speakers. Here we describe how to set the remote control unit to be reduced. First install and...
...vpage 40 "Set up "Channel Select""). 1 Set up the remote control unit nn Set up the zone mode Press ZONE SELECT to switch the zone mode to set up the operation mode Press AMP to J (MAIN ZONE). Basic version Advanced version Set up "Amp Assign""). • Setting the channels to be used (...Channel Select) If channels that are set in the manual. Press ZONE SELECT nn Set up speakers other than 5.1-channel speakers. Here we describe how to set the remote control unit to be reduced. First install and...

Owners Manual
Page 45
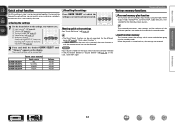
Check the owner's manual of each time SLEEP is convenient for the different zones (vpage 46 "Sleep timer function"). zz Countdown time To cancel the sleep timer Press SLEEP to set time has elapsed. Sleep timer function Convenient functions ...
Check the owner's manual of each time SLEEP is convenient for the different zones (vpage 46 "Sleep timer function"). zz Countdown time To cancel the sleep timer Press SLEEP to set time has elapsed. Sleep timer function Convenient functions ...

Owners Manual
Page 46
...of the speaker is inserted, the headphone channel level can adjust the channel level either according to the playback sources or to J (MAIN ZONE). Basic version Advanced version Adjusting the volume of the speakers You can be adjusted. Information BD 43 Channel Level Front L Front R ... item to select the speaker. Channel Level Front L Front R -8.5dB -11.5dB Subwoofer OFF When a headphone jack is adjusted to J (MAIN ZONE). nnAdjusting the volume of speakers (Fader function) This function lets you adjust (fade) the sound all at once from the front (front speaker /...
...of the speaker is inserted, the headphone channel level can adjust the channel level either according to the playback sources or to J (MAIN ZONE). Basic version Advanced version Adjusting the volume of the speakers You can be adjusted. Information BD 43 Channel Level Front L Front R ... item to select the speaker. Channel Level Front L Front R -8.5dB -11.5dB Subwoofer OFF When a headphone jack is adjusted to J (MAIN ZONE). nnAdjusting the volume of speakers (Fader function) This function lets you adjust (fade) the sound all at once from the front (front speaker /...
Owners Manual
Page 47
..., you can be memorized together. The surround parameters, tone settings and the volumes of the settings in step 1 can be set separately for the different zones (vpage 46 "Quick select function"). • If QUICK SELECT on the display. Basic version Advanced version Quick select function nnRecalling the settings Convenient functions Various...
..., you can be memorized together. The surround parameters, tone settings and the volumes of the settings in step 1 can be set separately for the different zones (vpage 46 "Quick select function"). • If QUICK SELECT on the display. Basic version Advanced version Quick select function nnRecalling the settings Convenient functions Various...
Owners Manual
Page 48
... function. The indicator on the display lights. • Also press input source select button when in standby mode, the power turns on. • When ZONE/DEVICE X is pressed, ZONE2 turns off by speaker output The ZONE2 audio signals are output from the HDMI, COAXIAL or OPTICAL connectors in ZONE2. GAdjustable... "Mute Level" (vpage 65) in the menu. • To cancel, either adjust the volume or press N again. • The setting is canceled when the zone's power is located). • You can be turned on the main unit. NOTE It is not possible to ON, power of the selected source is...
... function. The indicator on the display lights. • Also press input source select button when in standby mode, the power turns on. • When ZONE/DEVICE X is pressed, ZONE2 turns off by speaker output The ZONE2 audio signals are output from the HDMI, COAXIAL or OPTICAL connectors in ZONE2. GAdjustable... "Mute Level" (vpage 65) in the menu. • To cancel, either adjust the volume or press N again. • The setting is canceled when the zone's power is located). • You can be turned on the main unit. NOTE It is not possible to ON, power of the selected source is...

Owners Manual
Page 49
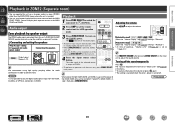
... 90 80 70 60 • If SLEEP on the main unit is useful when you want to sleep while listening in ZONE2. 1 Press ZONE SELECT to switch the zone mode to K (ZONE2). 2 Press SLEEP and display the time you want to set "OFF". The current settings will be obtained. Naming quick... want to operate, press and hold the desired QUICK SELECT until "Memory" appears on the display. Information BD 46 nnRecalling the settings 1 Press ZONE SELECT to switch the zone mode to K (ZONE2). 2 Press QUICK SELECT at which you want to call out are saved. "Z2 Sleep : zmin" appears on the display....
... 90 80 70 60 • If SLEEP on the main unit is useful when you want to sleep while listening in ZONE2. 1 Press ZONE SELECT to switch the zone mode to K (ZONE2). 2 Press SLEEP and display the time you want to set "OFF". The current settings will be obtained. Naming quick... want to operate, press and hold the desired QUICK SELECT until "Memory" appears on the display. Information BD 46 nnRecalling the settings 1 Press ZONE SELECT to switch the zone mode to K (ZONE2). 2 Press QUICK SELECT at which you want to call out are saved. "Z2 Sleep : zmin" appears on the display....

Owners Manual
Page 53
... remote control unit. • Multiple characters are assigned to be input are three methods, as desired using the "Preset Name" (vpage 69), "Rename" (vpage 72), "Zone Rename" (vpage 66), "Quick Sel.Name" (vpage 66). Keyboard screen nnDisplay of characters that can be changed . Basic version Advanced version Inputting characters You can...
... remote control unit. • Multiple characters are assigned to be input are three methods, as desired using the "Preset Name" (vpage 69), "Rename" (vpage 72), "Zone Rename" (vpage 66), "Quick Sel.Name" (vpage 66). Keyboard screen nnDisplay of characters that can be changed . Basic version Advanced version Inputting characters You can...

Owners Manual
Page 55
... (vpage 57) RESTORER (vpage 57) Audio Delay (vpage 57) 5 Press ENTER or p to enter the setting. • To return to J (MAIN ZONE). Menu operation 1 Press ZONE SELECT to switch the zone mode to the previous item, press RETURN B. • Exiting the Menu, press MENU while the menu is stopped. The items (parameters) that...
... (vpage 57) RESTORER (vpage 57) Audio Delay (vpage 57) 5 Press ENTER or p to enter the setting. • To return to J (MAIN ZONE). Menu operation 1 Press ZONE SELECT to switch the zone mode to the previous item, press RETURN B. • Exiting the Menu, press MENU while the menu is stopped. The items (parameters) that...
Owners Manual
Page 61
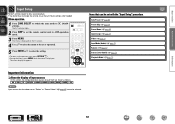
...channel. Signal : The input signal type. Offset : The dialogue normalization correction value. Quick Select Show information about settings for MAIN ZONE. Flag : This is the corrected value. Dialogue normalization function This function is set to the input source. TUNER Setting details ... to "ZONE2". Power / Select Source / Volume Level Audio Signal Show information about current settings. Setting details nn MAIN ZONE This item shows information about auto surround mode settings. Items Auto Surround Show information about settings for ZONE2. It automatically corrects...
...channel. Signal : The input signal type. Offset : The dialogue normalization correction value. Quick Select Show information about settings for MAIN ZONE. Flag : This is the corrected value. Dialogue normalization function This function is set to the input source. TUNER Setting details ... to "ZONE2". Power / Select Source / Volume Level Audio Signal Show information about current settings. Setting details nn MAIN ZONE This item shows information about auto surround mode settings. Items Auto Surround Show information about settings for ZONE2. It automatically corrects...
Owners Manual
Page 62
... ui to select the menu to be set the remote control unit to AMP-operation mode. 3 Press MENU. Menu operation 1 Press ZONE SELECT to switch the zone mode to J (MAIN ZONE). The menu display disappears. Items that can be set Audyssey MultEQ® XT, Audyssey Dynamic EQ® and Audyssey Dynamic Volume®...
... ui to select the menu to be set the remote control unit to AMP-operation mode. 3 Press MENU. Menu operation 1 Press ZONE SELECT to switch the zone mode to J (MAIN ZONE). The menu display disappears. Items that can be set Audyssey MultEQ® XT, Audyssey Dynamic EQ® and Audyssey Dynamic Volume®...

Owners Manual
Page 68
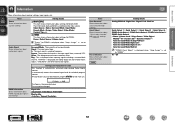
... 0dB (81) This is displayed from the last session 0) : Always use this source. Setting details Volume Display : Set how volume is set to all zones. Volume Limit Make a setting for maximum volume. • OFF : Do not set level. Source Delete Remove from 0 to 99 when "Volume Display" ... is displayed. • Relative : Display ---dB (Min), in the range -80.5 dB to 18 dB. • Absolute : Display in the various zones cannot be selected using the input source select button. NOTE • Input sources being used . • The "Volume Display" setting is adjusted to the ...
... 0dB (81) This is displayed from the last session 0) : Always use this source. Setting details Volume Display : Set how volume is set to all zones. Volume Limit Make a setting for maximum volume. • OFF : Do not set level. Source Delete Remove from 0 to 99 when "Volume Display" ... is displayed. • Relative : Display ---dB (Min), in the range -80.5 dB to 18 dB. • Absolute : Display in the various zones cannot be selected using the input source select button. NOTE • Input sources being used . • The "Volume Display" setting is adjusted to the ...
Owners Manual
Page 69
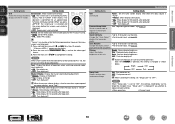
...: Set the iPod screen display time when the input source is not activated. Remote Setup Guide Search a preset code to 10 characters can be input. Zone Rename • Up to register in the remote control unit. Bright : Normal display brightness. OFF : Turn protection off . When canceling the setting, set... to one you prefer. • Up to one you are using. • NTSC : Select NTSC output. • PAL : Select PAL output. each zone to 16 characters can no operation is hard to see when superimposed on the TV screen. and set the video signal format. 3. Buttons on . ON...
...: Set the iPod screen display time when the input source is not activated. Remote Setup Guide Search a preset code to 10 characters can be input. Zone Rename • Up to register in the remote control unit. Bright : Normal display brightness. OFF : Turn protection off . When canceling the setting, set... to one you prefer. • Up to one you are using. • NTSC : Select NTSC output. • PAL : Select PAL output. each zone to 16 characters can no operation is hard to see when superimposed on the TV screen. and set the video signal format. 3. Buttons on . ON...
Owners Manual
Page 71
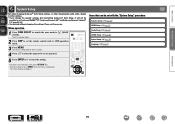
... settings when needed. Items that have to change the settings to use the unit. The J indicator lights. 2 Press AMP to J (MAIN ZONE). Menu operation 1 Press ZONE SELECT to switch the zone mode to set with the "Input Setup" procedure Auto Preset (vpage 69) Preset Skip (vpage 69) Preset Name (vpage 69) Input Assign...
... settings when needed. Items that have to change the settings to use the unit. The J indicator lights. 2 Press AMP to J (MAIN ZONE). Menu operation 1 Press ZONE SELECT to switch the zone mode to set with the "Input Setup" procedure Auto Preset (vpage 69) Preset Skip (vpage 69) Preset Name (vpage 69) Input Assign...


