
Getting Started Guide
Page 5
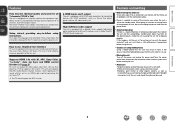
... of the unit and the surroundings, condensation (dew) may result in this manual is set to the standby mode. When going on handling nnOperation buttons The operations described in temperature ...no problems with the product. This symbol indicates a supplementary information and tips for purchasing this DENON product. nnSymbols v This symbol indicates a reference page on the CD-ROM provided. Preparation...FRANÇAIS DEUTSCH ENGLISH Read before use Thank you how to connect and configure speakers and various other devices for full enjoyment of this unit. Next, disconnect the ...
... of the unit and the surroundings, condensation (dew) may result in this manual is set to the standby mode. When going on handling nnOperation buttons The operations described in temperature ...no problems with the product. This symbol indicates a supplementary information and tips for purchasing this DENON product. nnSymbols v This symbol indicates a reference page on the CD-ROM provided. Preparation...FRANÇAIS DEUTSCH ENGLISH Read before use Thank you how to connect and configure speakers and various other devices for full enjoyment of this unit. Next, disconnect the ...
Getting Started Guide
Page 8
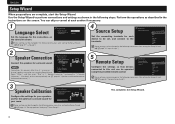
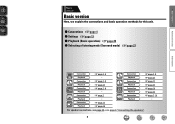
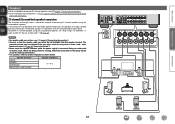
... 5.1ch 7.1ch Others NOTE 5.1ch is the most Connections for speakers other than 5.1 channel or 7.1 channel speakers cannot be set , and connect to this unit can be operated using the Setup Wizard. BD [1/2] DVD Set the connecting terminals for each section if necessary. 1 Language Select ...Please select the language for surround sound. SAT/CBL GAME1 GAME2 These settings can be changed in the following menu even after setting the Setup Wizard (vm page 67 "Language"). 2 Speaker Connection Connect the speakers for the on the screen. You can be changed in the following ...
... 5.1ch 7.1ch Others NOTE 5.1ch is the most Connections for speakers other than 5.1 channel or 7.1 channel speakers cannot be set , and connect to this unit can be operated using the Setup Wizard. BD [1/2] DVD Set the connecting terminals for each section if necessary. 1 Language Select ...Please select the language for surround sound. SAT/CBL GAME1 GAME2 These settings can be changed in the following menu even after setting the Setup Wizard (vm page 67 "Language"). 2 Speaker Connection Connect the speakers for the on the screen. You can be changed in the following ...
Getting Started Guide
Page 9
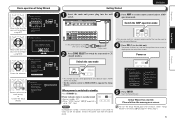
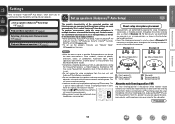
Yes No Enters the selection. or Cancels the Setup Wizard. Press AMP to set to confirm. Please follow the message on screen menu. To start screen is switched to the start . Speaker Connection Move to the item that you want to stop Yes and exit wizard? ... on screen. Location :CENTER Terminal :CENTER Press [ENTER] for speaker system. The power switches on remote. Setup Wizard This wizard assists connection and setup of power is set the remote control unit to configure using ui. Speaker Connection 3. GPower indicator status in the menu (vm page 47 ...
Yes No Enters the selection. or Cancels the Setup Wizard. Press AMP to set to confirm. Please follow the message on screen menu. To start screen is switched to the start . Speaker Connection Move to the item that you want to stop Yes and exit wizard? ... on screen. Location :CENTER Terminal :CENTER Press [ENTER] for speaker system. The power switches on remote. Setup Wizard This wizard assists connection and setup of power is set the remote control unit to configure using ui. Speaker Connection 3. GPower indicator status in the menu (vm page 47 ...
Owners Manual
Page 4
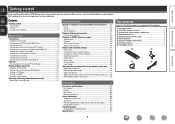
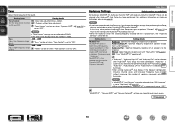
After reading them, be sure to make detailed settings 47 Menu map 47 Examples of menu screen displays 48 Examples of terms 92 Troubleshooting 94 Resetting the microprocessor 96 Specifications 97 1 To ensure proper operation, please read this DENON product. q Getting Started 1 w CD-ROM (Owner...Connecting a control dock for iPod 10 Connecting an antenna 11 Connecting a CD player 11 Connecting an external control device 12 Settings 13 Set up speakers (Audyssey® Auto Setup 13 Playback (Basic operation 20 Important information 20 Playing a Blu-ray Disc player/DVD player...
After reading them, be sure to make detailed settings 47 Menu map 47 Examples of menu screen displays 48 Examples of terms 92 Troubleshooting 94 Resetting the microprocessor 96 Specifications 97 1 To ensure proper operation, please read this DENON product. q Getting Started 1 w CD-ROM (Owner...Connecting a control dock for iPod 10 Connecting an antenna 11 Connecting a CD player 11 Connecting an external control device 12 Settings 13 Set up speakers (Audyssey® Auto Setup 13 Playback (Basic operation 20 Important information 20 Playing a Blu-ray Disc player/DVD player...
Owners Manual
Page 5
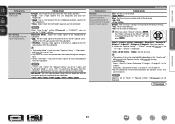
... unit via an HDMI cable used . When going on vacation or leaving home for long periods of the circuitry even when the unit is set up the speakers, etc. Next, disconnect the connection cables to other system units before using the unit. • Cautions on Check once again that all connections are... the power on using a chemical cleaner. • Benzene, paint thinner or other organic solvents as well as insecticide may form on the TV screen to set to use . • Moving the unit Turn off and wait until there is little difference in noise.
... unit via an HDMI cable used . When going on vacation or leaving home for long periods of the circuitry even when the unit is set up the speakers, etc. Next, disconnect the connection cables to other system units before using the unit. • Cautions on Check once again that all connections are... the power on using a chemical cleaner. • Benzene, paint thinner or other organic solvents as well as insecticide may form on the TV screen to set to use . • Moving the unit Turn off and wait until there is little difference in noise.
Owners Manual
Page 6
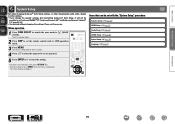
...Settings vpage 13 F Playback (Basic operation) vpage 20 F Selecting a listening mode (Surround mode) vpage 27 Advanced version Information Connection Playback vpage 7, 8 - Connection Playback vpage 7, 9 vpage 21 Connection vpage 7, 9 Connection vpage 11 Playback Connection Playback Connection vpage 21 vpage 7, 9 - Connection Playback vpage 11 vpage 25 For speaker... connections, see page 34, C page 6 "Connecting the speakers". 3 vpage 7 Playback Connection Playback Connection vpage 21 vpage 10 vpage...
...Settings vpage 13 F Playback (Basic operation) vpage 20 F Selecting a listening mode (Surround mode) vpage 27 Advanced version Information Connection Playback vpage 7, 8 - Connection Playback vpage 7, 9 vpage 21 Connection vpage 7, 9 Connection vpage 11 Playback Connection Playback Connection vpage 21 vpage 7, 9 - Connection Playback vpage 11 vpage 25 For speaker... connections, see page 34, C page 6 "Connecting the speakers". 3 vpage 7 Playback Connection Playback Connection vpage 21 vpage 10 vpage...
Owners Manual
Page 16
...multiple points throughout the listening environment results in volume. • Operating M df during Audyssey® Auto setup. Set up speakers (Audyssey® Auto Setup) nn Set up speakers (Audyssey® Auto Setup) (vpage 13) Playback (Basic operation) (vpage 20) Selecting a listening mode (Surround...Advanced operation) (vpage 41) The acoustic characteristics of normal operation. This is part of the connected speakers and listening room are measured and the optimum settings are being made automatically. NOTE • Make the room as quiet as Radio Frequency Interference (...
...multiple points throughout the listening environment results in volume. • Operating M df during Audyssey® Auto setup. Set up speakers (Audyssey® Auto Setup) nn Set up speakers (Audyssey® Auto Setup) (vpage 13) Playback (Basic operation) (vpage 20) Selecting a listening mode (Surround...Advanced operation) (vpage 41) The acoustic characteristics of normal operation. This is part of the connected speakers and listening room are measured and the optimum settings are being made automatically. NOTE • Make the room as quiet as Radio Frequency Interference (...
Owners Manual
Page 17
... to AMP- nn When using a subwoofer without a back. NOTE • Do not hold the setup microphone in the main listening position. Basic version Advanced version Set up speakers (Audyssey® Auto Setup) 1 Set up the microphone Mount the setup microphone on , for example, a seat without a direct mode Make the following adjustments...
... to AMP- nn When using a subwoofer without a back. NOTE • Do not hold the setup microphone in the main listening position. Basic version Advanced version Set up speakers (Audyssey® Auto Setup) 1 Set up the microphone Mount the setup microphone on , for example, a seat without a direct mode Make the following adjustments...

Owners Manual
Page 18
... explain setup using the example of this unit. When measuring begins, a test tone is connected, the following items if necessary. For setting, perform steps 7 to 11 of when the front speakers, center speaker, subwoofer, and surround speakers have been detected. vSee overleaf Information 15 Retry Next Measure [ENTER] Enter [RETURN] Cancel NOTE If a connected...
... explain setup using the example of this unit. When measuring begins, a test tone is connected, the following items if necessary. For setting, perform steps 7 to 11 of when the front speakers, center speaker, subwoofer, and surround speakers have been detected. vSee overleaf Information 15 Retry Next Measure [ENTER] Enter [RETURN] Cancel NOTE If a connected...

Owners Manual
Page 35
... we describe the installation, connection and setup methods for speakers other than ear level. Front height speaker • Point slightly downwards Surround speaker At least 3.3 ft / 1 mz 2 - 3 ft / 60 - 90 cm Front speaker GViewed from the sideH zz Recommended for speaker settings Install Connect (vpage 34) Set up speakers (vpage 39) Install This unit is not possible to...
... we describe the installation, connection and setup methods for speakers other than ear level. Front height speaker • Point slightly downwards Surround speaker At least 3.3 ft / 1 mz 2 - 3 ft / 60 - 90 cm Front speaker GViewed from the sideH zz Recommended for speaker settings Install Connect (vpage 34) Set up speakers (vpage 39) Install This unit is not possible to...
Owners Manual
Page 37
... the method of connecting the TV, see C page 6 "Connecting the speakers". • Connect so that the speaker cable core wires do not protrude from the speaker terminal. To perform 7.1-channel playback using the surround back speakers, set "Amp Assign" to the television using the surround back speakers. If you connect the surround back and front height...
... the method of connecting the TV, see C page 6 "Connecting the speakers". • Connect so that the speaker cable core wires do not protrude from the speaker terminal. To perform 7.1-channel playback using the surround back speakers, set "Amp Assign" to the television using the surround back speakers. If you connect the surround back and front height...

Owners Manual
Page 38
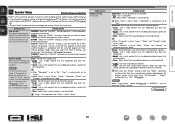
... performing 7.1-channel playback using the front height speaker, set "Amp Assign" to "F.HEIGHT" in accordance with the surround mode or input signals. Connect Advanced version Information FHL FL SW FR FHR C SL SR 35 NOTE • For speaker cable connections, see C page 6 "Connecting the speakers". • For speaker impedance, see page 34. To perform 7.1-channel...
... performing 7.1-channel playback using the front height speaker, set "Amp Assign" to "F.HEIGHT" in accordance with the surround mode or input signals. Connect Advanced version Information FHL FL SW FR FHR C SL SR 35 NOTE • For speaker cable connections, see C page 6 "Connecting the speakers". • For speaker impedance, see page 34. To perform 7.1-channel...

Owners Manual
Page 39
BACK/AMP ASSIGN terminal. For speaker settings in steps 3 and 4 for "Set up "Amp Assign"" (vpage 39). NOTE • For speaker cable connections, see C page 6 "Connecting the speakers". • For speaker impedance, see "When 6.1ch (Surround back speaker) installed" (vpage 33). To perform 6.1-channel playback using only one surround back speaker (with a 6.1-channel connection), connect to the "L" side of...
BACK/AMP ASSIGN terminal. For speaker settings in steps 3 and 4 for "Set up "Amp Assign"" (vpage 39). NOTE • For speaker cable connections, see C page 6 "Connecting the speakers". • For speaker impedance, see "When 6.1ch (Surround back speaker) installed" (vpage 33). To perform 6.1-channel playback using only one surround back speaker (with a 6.1-channel connection), connect to the "L" side of...
Owners Manual
Page 58
... for each input source. "Audyssey" is selected, illuminates. • After running Audyssey® Auto Setup, if the Speaker Configuration, Distance, Channel Level, and Crossover Frequency have not performed Auto Setup, or if you change the speaker settings after performing Auto Setup, you have changed without tone adjustment. When "Audyssey", "Audyssey Byp. L/R" or "Audyssey...
... for each input source. "Audyssey" is selected, illuminates. • After running Audyssey® Auto Setup, if the Speaker Configuration, Distance, Channel Level, and Crossover Frequency have not performed Auto Setup, or if you change the speaker settings after performing Auto Setup, you have changed without tone adjustment. When "Audyssey", "Audyssey Byp. L/R" or "Audyssey...
Owners Manual
Page 62
...174; (vpage 55, 56). • Can be used without changing the settings. Items that can be set or operated. 5 Press ENTER or p to enter the setting. • To return to set with the "System Setup" procedure Speaker Setup (vpage 60) HDMI Setup (vpage 63) Audio Setup (vpage 64...). The J indicator lights. 2 Press AMP to set if necessary. Basic version Advanced version System Setup Set when changing Audyssey® Auto Setup settings, or when changing the audio, video, display or other settings. • If you change the speaker settings after performing Audyssey® Auto Setup, it will ...
...174; (vpage 55, 56). • Can be used without changing the settings. Items that can be set or operated. 5 Press ENTER or p to enter the setting. • To return to set with the "System Setup" procedure Speaker Setup (vpage 60) HDMI Setup (vpage 63) Audio Setup (vpage 64...). The J indicator lights. 2 Press AMP to set if necessary. Basic version Advanced version System Setup Set when changing Audyssey® Auto Setup settings, or when changing the audio, video, display or other settings. • If you change the speaker settings after performing Audyssey® Auto Setup, it will ...
Owners Manual
Page 63
...; None : Select when the surround speakers are not connected. • When "Surround" is set to "Large", "S.Back" and "F.Height" can be set to "Large". • When "Surround" is set to "None", "S.Back" and "F.Height" are automatically set to "Large". "Large" or "Small" speaker. • When "Front" is "NORMAL", you change the speaker settings after performing Audyssey® Auto...
...; None : Select when the surround speakers are not connected. • When "Surround" is set to "Large", "S.Back" and "F.Height" can be set to "Large". • When "Surround" is set to "None", "S.Back" and "F.Height" are automatically set to "Large". "Large" or "Small" speaker. • When "Front" is "NORMAL", you change the speaker settings after performing Audyssey® Auto...
Owners Manual
Page 64
... from the listening position to speakers. NOTE Speakers set to "1spkr", "S.Back" is set to "None" in the distance between the speakers to the default?" zz When the "Speaker Config." - vSee overleaf Information BD 61 "S.Back" setting (vpage 60) is displayed. • 0.0ft - 60.0ft / 0.00m - 18.00m : Set the distance. • The speakers that can adequately play back...
... from the listening position to speakers. NOTE Speakers set to "1spkr", "S.Back" is set to "None" in the distance between the speakers to the default?" zz When the "Speaker Config." - vSee overleaf Information BD 61 "S.Back" setting (vpage 60) is displayed. • 0.0ft - 60.0ft / 0.00m - 18.00m : Set the distance. • The speakers that can adequately play back...
Owners Manual
Page 65
... from each channel to "Small", sound below the crossover frequency is cut bass sound is not displayed. zz When the "Speaker Config." - NOTE • Speakers set to "None" in the PHONES jack of this setting can be made regardless of the test • Front L / F.Height L / Center / F.Height R / Front R / Surround R / tone to suit the bass...
... from each channel to "Small", sound below the crossover frequency is cut bass sound is not displayed. zz When the "Speaker Config." - NOTE • Speakers set to "None" in the PHONES jack of this setting can be made regardless of the test • Front L / F.Height L / Center / F.Height R / Front R / Surround R / tone to suit the bass...
Owners Manual
Page 97
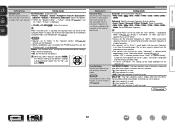
.... Please turn on with devices compatible with HDMI control, set "P.Off Control" devices compatible in the menu to link the power off the power and please contact the DENON service adviser. • Reset the microprocessor. Firmly twist the core wire in the speaker cable, and then re-connect it back into the power...
.... Please turn on with devices compatible with HDMI control, set "P.Off Control" devices compatible in the menu to link the power off the power and please contact the DENON service adviser. • Reset the microprocessor. Firmly twist the core wire in the speaker cable, and then re-connect it back into the power...
Owners Manual
Page 98
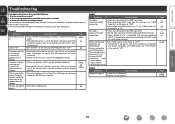
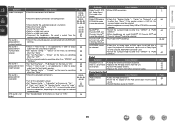
..." on the menu to something other connection cables. RESTORER cannot be selected. "Center" or "Surround" is set to output audio from the front height speakers. • Set "Speaker Config." - GRadioH Symptom Cause/Solution Reception fails, or there is produced from subwoofer. No sound is a lot...", no sound may be selected. • Run Audyssey® Auto Setup. • Check that "Speaker Config." - No sound is not output. "F.Height" on the subwoofer's power. • Set "Speaker Config." - "S.Back" on the menu to something other than "None". • Check the subwoofer...
..." on the menu to something other connection cables. RESTORER cannot be selected. "Center" or "Surround" is set to output audio from the front height speakers. • Set "Speaker Config." - GRadioH Symptom Cause/Solution Reception fails, or there is produced from subwoofer. No sound is a lot...", no sound may be selected. • Run Audyssey® Auto Setup. • Check that "Speaker Config." - No sound is not output. "F.Height" on the subwoofer's power. • Set "Speaker Config." - "S.Back" on the menu to something other than "None". • Check the subwoofer...


