
Getting Started Guide
Page 5
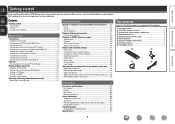
...and unplug the power cord from the actual unit. If this unit. If that occurs, move the mobile phone away from this manual is set to view the owner's manuals on handling 1 Preparing the Setup Wizard 2 Setup Wizard 4 Playback (Basic operation 7 Important information 7 Selecting ... that all connections are supplied with a soft cloth. • Follow the instructions when using mobile phones Using a mobile phone near this DENON product. NOTE This symbol indicates points to operate properly. nnSymbols v This symbol indicates a reference page on the operating parts inside of time...
...and unplug the power cord from the actual unit. If this unit. If that occurs, move the mobile phone away from this manual is set to view the owner's manuals on handling 1 Preparing the Setup Wizard 2 Setup Wizard 4 Playback (Basic operation 7 Important information 7 Selecting ... that all connections are supplied with a soft cloth. • Follow the instructions when using mobile phones Using a mobile phone near this DENON product. NOTE This symbol indicates points to operate properly. nnSymbols v This symbol indicates a reference page on the operating parts inside of time...
Getting Started Guide
Page 8
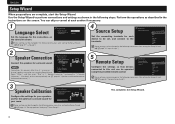
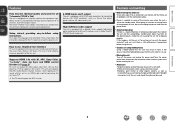
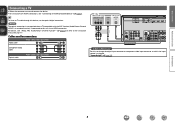
..."). 2 Speaker Connection Connect the speakers for your speakers, and for the optimum surround sound for surround sound. English Español Set the language for each section if necessary. 1 Language Select Language Select Please select the language for speakers other than 5.1 channel or ... device you want to "3. This completes the Setup Wizard. 4 Select "Others", and then select "Skip" in the instructions on the setting method, see m page 32 "Speaker installation/connection (Advanced connection)".) 4 Source Setup Source Setup Please select device. Use the Setup Wizard to...
..."). 2 Speaker Connection Connect the speakers for your speakers, and for the optimum surround sound for surround sound. English Español Set the language for each section if necessary. 1 Language Select Language Select Please select the language for speakers other than 5.1 channel or ... device you want to "3. This completes the Setup Wizard. 4 Select "Others", and then select "Skip" in the instructions on the setting method, see m page 32 "Speaker installation/connection (Advanced connection)".) 4 Source Setup Source Setup Please select device. Use the Setup Wizard to...
Getting Started Guide
Page 9
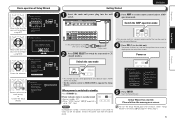
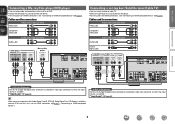
...can restart the setup wizard anytime using the on screen menu. GPower indicator status in two separate zones, MAIN ZONE and ZONE2. • Set the remote control to MAIN ZONE to operate the Setup Wizard. To start screen is displayed on , and the Setup Wizard start the Setup... select the speaker configuration to be operated in standby modeH • Normal standby : Off • When "HDMI Control" (vm page 63) is set the remote control unit to configure using cursor, enter or return keys on screen. Yes No Enters the selection. Location :CENTER Terminal :CENTER Press [ENTER...
...can restart the setup wizard anytime using the on screen menu. GPower indicator status in two separate zones, MAIN ZONE and ZONE2. • Set the remote control to MAIN ZONE to operate the Setup Wizard. To start screen is displayed on , and the Setup Wizard start the Setup... select the speaker configuration to be operated in standby modeH • Normal standby : Off • When "HDMI Control" (vm page 63) is set the remote control unit to configure using cursor, enter or return keys on screen. Yes No Enters the selection. Location :CENTER Terminal :CENTER Press [ENTER...

Getting Started Guide
Page 11
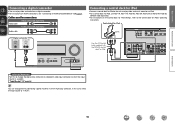
...CD DOCK Video SAT/CBL TV GAME1 GAME2 V.AUX Tuner TUNER The currently selected input source is pressed. The input source is set ahead of the connected devices when playing them. Preparation Setup Wizard SVENSKA NEDERLANDS ESPAÑOL ITALIANO FRANÇAIS DEUTSCH ENGLISH ...; To turn off . Display the "Source Select" menu. Important information Before starting playback, make the connections between the different devices and the settings on the main unit is pressed, the input source of this operation (vm page 74 "Operating AV device"). Using the "Source Select" menu...
...CD DOCK Video SAT/CBL TV GAME1 GAME2 V.AUX Tuner TUNER The currently selected input source is pressed. The input source is set ahead of the connected devices when playing them. Preparation Setup Wizard SVENSKA NEDERLANDS ESPAÑOL ITALIANO FRANÇAIS DEUTSCH ENGLISH ...; To turn off . Display the "Source Select" menu. Important information Before starting playback, make the connections between the different devices and the settings on the main unit is pressed, the input source of this operation (vm page 74 "Operating AV device"). Using the "Source Select" menu...
Getting Started Guide
Page 12
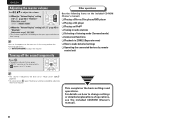
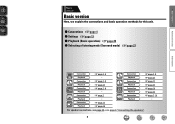
... an iPod® nnTuning in radio stations nnSelecting a listening mode (Surround mode) nnConvenient functions nnPlayback in ZONE2 (Separate room) nnHow to the level set at "Mute Level" (vm page 65). • To cancel, press N again. In this case, perform the following items on a TV ... the master volume. ENGLISH DEUTSCH FRANÇAIS ITALIANO ESPAÑOL NEDERLANDS SVENSKA Adjusting the master volume Use M df to change settings or detailed explanations of operations, see the included CD-ROM (Owner's manual). 8 Other operations See the following operations. For details ...
... an iPod® nnTuning in radio stations nnSelecting a listening mode (Surround mode) nnConvenient functions nnPlayback in ZONE2 (Separate room) nnHow to the level set at "Mute Level" (vm page 65). • To cancel, press N again. In this case, perform the following items on a TV ... the master volume. ENGLISH DEUTSCH FRANÇAIS ITALIANO ESPAÑOL NEDERLANDS SVENSKA Adjusting the master volume Use M df to change settings or detailed explanations of operations, see the included CD-ROM (Owner's manual). 8 Other operations See the following operations. For details ...
Owners Manual
Page 4
... this owner's manual carefully before using the product. To ensure proper operation, please read this DENON product. After reading them, be sure to make detailed settings 47 Menu map 47 Examples of menu screen displays 48 Examples of terms 92 Troubleshooting 94 Resetting...camcorder 10 Connecting a control dock for iPod 10 Connecting an antenna 11 Connecting a CD player 11 Connecting an external control device 12 Settings 13 Set up speakers (Audyssey® Auto Setup 13 Playback (Basic operation 20 Important information 20 Playing a Blu-ray Disc player/DVD player ...
... this owner's manual carefully before using the product. To ensure proper operation, please read this DENON product. After reading them, be sure to make detailed settings 47 Menu map 47 Examples of menu screen displays 48 Examples of terms 92 Troubleshooting 94 Resetting...camcorder 10 Connecting a control dock for iPod 10 Connecting an antenna 11 Connecting a CD player 11 Connecting an external control device 12 Settings 13 Set up speakers (Audyssey® Auto Setup 13 Playback (Basic operation 20 Important information 20 Playing a Blu-ray Disc player/DVD player ...
Owners Manual
Page 5
... (vpage 6) This unit can output 3D video signals input from this unit. Cautions on handling • Before turning the power on the TV screen to set to the original sound. Then simply follow setup instructions First select the language when prompted. This unit also supports the ARC (Audio Return Channel) function... cause material changes and discoloration if brought into contact with the unit, and should support the ARC function. 6-HDMI inputs and 1-output The unit is set up the speakers, etc.
... (vpage 6) This unit can output 3D video signals input from this unit. Cautions on handling • Before turning the power on the TV screen to set to the original sound. Then simply follow setup instructions First select the language when prompted. This unit also supports the ARC (Audio Return Channel) function... cause material changes and discoloration if brought into contact with the unit, and should support the ARC function. 6-HDMI inputs and 1-output The unit is set up the speakers, etc.
Owners Manual
Page 6
... 34, C page 6 "Connecting the speakers". 3 Basic version Basic version Basic version Here, we explain the connections and basic operation methods for this unit. F Connections vpage 4 F Settings vpage 13 F Playback (Basic operation) vpage 20 F Selecting a listening mode (Surround mode) vpage 27 Advanced version Information Connection Playback vpage 7, 8 - Connection Playback vpage 7, 9 vpage 21...
... 34, C page 6 "Connecting the speakers". 3 Basic version Basic version Basic version Here, we explain the connections and basic operation methods for this unit. F Connections vpage 4 F Settings vpage 13 F Playback (Basic operation) vpage 20 F Selecting a listening mode (Surround mode) vpage 27 Advanced version Information Connection Playback vpage 7, 8 - Connection Playback vpage 7, 9 vpage 21...
Owners Manual
Page 7
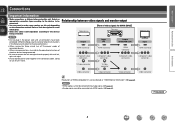
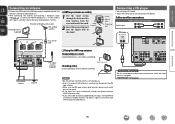
... converted into HDMI signals (vpage 91). Select an appropriate connection type according to the devices to be connected. • You may need to make some settings on the connection method. Output HDMI connector Component video connectors Input (IN) HDMI connector Component video connectors Output (MONITOR OUT) HDMI connector Component video connectors...
... converted into HDMI signals (vpage 91). Select an appropriate connection type according to the devices to be connected. • You may need to make some settings on the connection method. Output HDMI connector Component video connectors Input (IN) HDMI connector Component video connectors Output (MONITOR OUT) HDMI connector Component video connectors...
Owners Manual
Page 9
...3D video with Ethernet" for more information. In this unit are not output correctly. About Content Type HDMI 1.4a enables simple, automated picture setting selection with the HDMI control function. The playback video is connected to this unit and TV or the player need a TV and player that ...You cannot operate a TV or Blu-ray Disc player/DVD player that provide support for the connection method. NOTE • To enable the ARC function, set "Video Mode" to "Connecting a TV" (vpage 8) for the HDMI1.4a 3D function and a pair of your television or player for HDMI 1....
...3D video with Ethernet" for more information. In this unit are not output correctly. About Content Type HDMI 1.4a enables simple, automated picture setting selection with the HDMI control function. The playback video is connected to this unit and TV or the player need a TV and player that ...You cannot operate a TV or Blu-ray Disc player/DVD player that provide support for the connection method. NOTE • To enable the ARC function, set "Video Mode" to "Connecting a TV" (vpage 8) for the HDMI1.4a 3D function and a pair of your television or player for HDMI 1....

Owners Manual
Page 10
... with an HDMI cable, if the monitor is output when connected to HDMI connections Set as an output signal from the HDMI output connector by the HDMI audio specifications of devices, ...the video signals may be limited by setting the HDMI audio output destination to DVI-D devices that supports Deep Color, please use a "... not be output from the HDMI input connector can be output to TV. Blu-ray Disc DVD Set-top Game Game Digital player player box console 1 console 2 camcorder TV HDMI OUT HDMI OUT HDMI...
... with an HDMI cable, if the monitor is output when connected to HDMI connections Set as an output signal from the HDMI output connector by the HDMI audio specifications of devices, ...the video signals may be limited by setting the HDMI audio output destination to DVI-D devices that supports Deep Color, please use a "... not be output from the HDMI input connector can be output to TV. Blu-ray Disc DVD Set-top Game Game Digital player player box console 1 console 2 camcorder TV HDMI OUT HDMI OUT HDMI...
Owners Manual
Page 11
...) Video cable Component video cable Optical cable Audio cable (sold separately) TV VIDEO COMPONENT VIDEO IN Y PB PR VIDEO IN AUDIO OPTICAL OUT in Set as Necessary Set this to change the digital input connector or component video input connector to which the input source is connected to this device, use and...
...) Video cable Component video cable Optical cable Audio cable (sold separately) TV VIDEO COMPONENT VIDEO IN Y PB PR VIDEO IN AUDIO OPTICAL OUT in Set as Necessary Set this to change the digital input connector or component video input connector to which the input source is connected to this device, use and...
Owners Manual
Page 12
...cable Satellite tuner/Cable TV VIDEO AUDIO COMPONENT VIDEO OUT Y PB PR VIDEO OUT AUDIO OUT LR COAXIAL OUT LR LR Information in Set as Necessary Set this unit, use and connect the device. • For instructions on HDMI connections, see "Connecting an HDMI-compatible device" (...watch satellite or cable TV. • Select the connector to which the input source is assigned. "Input Assign" (vpage 70) in Set as Necessary Set this to change the digital input connector or component video input connector to use an HDMI connection (vpage 6 "Connecting an HDMI-compatible device...
...cable Satellite tuner/Cable TV VIDEO AUDIO COMPONENT VIDEO OUT Y PB PR VIDEO OUT AUDIO OUT LR COAXIAL OUT LR LR Information in Set as Necessary Set this unit, use and connect the device. • For instructions on HDMI connections, see "Connecting an HDMI-compatible device" (...watch satellite or cable TV. • Select the connector to which the input source is assigned. "Input Assign" (vpage 70) in Set as Necessary Set this to change the digital input connector or component video input connector to use an HDMI connection (vpage 6 "Connecting an HDMI-compatible device...
Owners Manual
Page 13
... "Connecting an HDMI-compatible device" (vpage 6). Control dock for iPod ASD-11R RL Use the AV/Control Cable supplied with the DENON control dock for iPod. Cables used for connections Video cable (sold separately) Video cable Audio cable (sold separately). • For ...instructions on the control dock for iPod settings, refer to which the input source is assigned. Basic version Advanced version Connecting a digital camcorder • You can enjoy games by DENON (sold separately) L L Audio cable R R Digital camcorder VIDEO AUDIO VIDEO...
... "Connecting an HDMI-compatible device" (vpage 6). Control dock for iPod ASD-11R RL Use the AV/Control Cable supplied with the DENON control dock for iPod. Cables used for connections Video cable (sold separately) Video cable Audio cable (sold separately). • For ...instructions on the control dock for iPod settings, refer to which the input source is assigned. Basic version Advanced version Connecting a digital camcorder • You can enjoy games by DENON (sold separately) L L Audio cable R R Digital camcorder VIDEO AUDIO VIDEO...
Owners Manual
Page 14
... noise level becomes minimal. NOTE • Do not connect two FM antennas simultaneously. • Even if an external AM antenna is assigned. LR in Set as Necessary Set this to change the digital input connector to FM/AM broadcasts"), fix the antenna with tape in the stand. Basic version Advanced version Connecting...
... noise level becomes minimal. NOTE • Do not connect two FM antennas simultaneously. • Even if an external AM antenna is assigned. LR in Set as Necessary Set this to change the digital input connector to FM/AM broadcasts"), fix the antenna with tape in the stand. Basic version Advanced version Connecting...
Owners Manual
Page 16
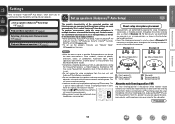
...; Auto Setup, Audyssey MultEQ® XT/ Audyssey Dynamic EQ®/Audyssey Dynamic Volume® functions become active (vpage 55, 56). • To set up the speakers manually, use ). • Do not unplug the setup microphone from the main unit until Audyssey® Auto Setup is completed. &#... to eight positions). • Even if the listening environment is part of the connected speakers and listening room are measured and the optimum settings are being made automatically. Audyssey MultEQ® XT uses the measurements from all around the listening area. GExample qH FL SW C FR ...
...; Auto Setup, Audyssey MultEQ® XT/ Audyssey Dynamic EQ®/Audyssey Dynamic Volume® functions become active (vpage 55, 56). • To set up the speakers manually, use ). • Do not unplug the setup microphone from the main unit until Audyssey® Auto Setup is completed. &#... to eight positions). • Even if the listening environment is part of the connected speakers and listening room are measured and the optimum settings are being made automatically. Audyssey MultEQ® XT uses the measurements from all around the listening area. GExample qH FL SW C FR ...
Owners Manual
Page 17
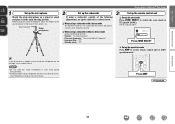
...Avoid placing the setup microphone close to J (MAIN ZONE). nn When using a subwoofer without a back. Sound receptor Setup microphone 2 Set up the zone mode Press ZONE SELECT to switch the zone mode to a seat back or wall as shown below. NOTE •...setup microphone in the main listening position. Press AMP vSee overleaf Information 14 nn When using a subwoofer with a direct mode Set the direct mode to the level of the following settings: • Volume : "12 o'clock position" • Crossover frequency : "Maximum/Highest Frequency" • Low pass ...
...Avoid placing the setup microphone close to J (MAIN ZONE). nn When using a subwoofer without a back. Sound receptor Setup microphone 2 Set up the zone mode Press ZONE SELECT to switch the zone mode to a seat back or wall as shown below. NOTE •...setup microphone in the main listening position. Press AMP vSee overleaf Information 14 nn When using a subwoofer with a direct mode Set the direct mode to the level of the following settings: • Volume : "12 o'clock position" • Crossover frequency : "Maximum/Highest Frequency" • Low pass ...

Owners Manual
Page 18
.... When measuring begins, a test tone is output from each speaker. • Measurement requires several minutes. 8 The detected speakers are set with "Channel Select", measuring time can be connected correctly. If unused channels are displayed. • The illustration below shows an example of...Detect & Measure (Main) 4 Connect the setup microphone to select "Next → Measure" and then press ENTER. Audyssey Auto Setup Preparation Set the following screen is not displayed, the speaker may not be shortened. MultEQ XT Amp Assign Channel Select Auto Setup Start [ENTER] Enter...
.... When measuring begins, a test tone is output from each speaker. • Measurement requires several minutes. 8 The detected speakers are set with "Channel Select", measuring time can be connected correctly. If unused channels are displayed. • The illustration below shows an example of...Detect & Measure (Main) 4 Connect the setup microphone to select "Next → Measure" and then press ENTER. Audyssey Auto Setup Preparation Set the following screen is not displayed, the speaker may not be shortened. MultEQ XT Amp Assign Channel Select Auto Setup Start [ENTER] Enter...

Owners Manual
Page 19
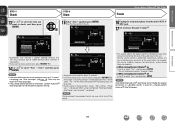
...measurement of position 8 is completed, a "Measurements finished." When measurement of the second position starts. STEP 3 Measure (2nd - 8th) STEP 4 Calculate Set up speakers (Audyssey® Auto Setup) • In STEP 3, you want to 8. Audyssey Auto Setup Calculate Now calculating Please wait MultEQ XT 0% ... Measurements finished. If the problem is determined. Measure MultEQ XT • Analysis takes several minutes to perform analysis. Setting up to eight positions. 12 On the STEP 3 screen, use ui to select "Next → Calculate", and then press ENTER.
...measurement of position 8 is completed, a "Measurements finished." When measurement of the second position starts. STEP 3 Measure (2nd - 8th) STEP 4 Calculate Set up speakers (Audyssey® Auto Setup) • In STEP 3, you want to 8. Audyssey Auto Setup Calculate Now calculating Please wait MultEQ XT 0% ... Measurements finished. If the problem is determined. Measure MultEQ XT • Analysis takes several minutes to perform analysis. Setting up to eight positions. 12 On the STEP 3 screen, use ui to select "Next → Calculate", and then press ENTER.
Owners Manual
Page 20
...Audyssey Auto Setup Store Now storing Please wait 0% MultEQ XT NOTE • If the result differs from the unit's SETUP MIC jack. 17 Set Audyssey Dynamic Volume®. is displayed, see "Error messages" (vpage 18). Optimal volume control is performed automatically without any loss in subwoofers. ... during television programs. nn When turning Dynamic Volume® on Dynamic Volume? Basic version Advanced version STEP 5 Check STEP 6 Store Finish Set up speakers (Audyssey® Auto Setup) 13 Use ui to select the item you want to check another item, press RETURN B. 14...
...Audyssey Auto Setup Store Now storing Please wait 0% MultEQ XT NOTE • If the result differs from the unit's SETUP MIC jack. 17 Set Audyssey Dynamic Volume®. is displayed, see "Error messages" (vpage 18). Optimal volume control is performed automatically without any loss in subwoofers. ... during television programs. nn When turning Dynamic Volume® on Dynamic Volume? Basic version Advanced version STEP 5 Check STEP 6 Store Finish Set up speakers (Audyssey® Auto Setup) 13 Use ui to select the item you want to check another item, press RETURN B. 14...


