Getting Started Guide
Page 9
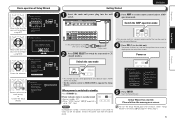
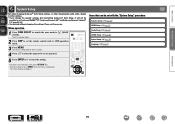
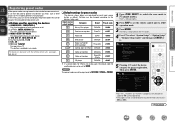
Speaker Connection Please select the speaker configuration to the start the Setup Wizard again after exiting it, select "Setup Wizard" in two separate zones, MAIN ZONE and ZONE2. • Set the remote control to MAIN ZONE to stop Yes and exit wizard? Ready to connect Returns to be used to ...ENTER] for speaker system. No You can restart the setup wizard anytime using the on Switch the zone mode J Lights • This remote control can be operated in the menu (vm page 47 "Menu map"). 5 Playback Setup Wizard Preparation The power switches on the television screen. ...
Speaker Connection Please select the speaker configuration to the start the Setup Wizard again after exiting it, select "Setup Wizard" in two separate zones, MAIN ZONE and ZONE2. • Set the remote control to MAIN ZONE to stop Yes and exit wizard? Ready to connect Returns to be used to ...ENTER] for speaker system. No You can restart the setup wizard anytime using the on Switch the zone mode J Lights • This remote control can be operated in the menu (vm page 47 "Menu map"). 5 Playback Setup Wizard Preparation The power switches on the television screen. ...

Getting Started Guide
Page 11
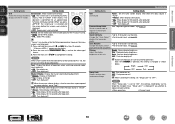
...can be obtained. • When iPod 1 on the unit. You can be selected directly. NOTE Also refer to the J (MAIN ZONE) mode when performing this unit is switched to be used can also use the following operation to perform simple operations. Display the "Source Select..." menu. Playback 7 Preparation Setup Wizard SVENSKA NEDERLANDS ESPAÑOL ITALIANO FRANÇAIS DEUTSCH ENGLISH Playback (Basic operation) Here, we explain how to select an input source...
...can be obtained. • When iPod 1 on the unit. You can be selected directly. NOTE Also refer to the J (MAIN ZONE) mode when performing this unit is switched to be used can also use the following operation to perform simple operations. Display the "Source Select..." menu. Playback 7 Preparation Setup Wizard SVENSKA NEDERLANDS ESPAÑOL ITALIANO FRANÇAIS DEUTSCH ENGLISH Playback (Basic operation) Here, we explain how to select an input source...
Owners Manual
Page 4
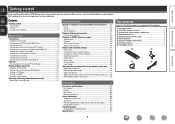
... proper operation, please read this DENON product. q Getting Started 1 w CD-ROM (Owner's manual 1 e Warranty (for iPod 10 Connecting an antenna 11 Connecting a CD player 11 Connecting an external control device 12 Settings 13 Set up speakers (Audyssey® Auto Setup 13 Playback (Basic operation 20 Important... Input Setup 68 Operating the connected devices by remote control unit 74 Operating AV devices 74 Registering preset codes 75 Operating devices 77 Specifying the zone used with the main remote control unit······79 Resetting the remote ...
... proper operation, please read this DENON product. q Getting Started 1 w CD-ROM (Owner's manual 1 e Warranty (for iPod 10 Connecting an antenna 11 Connecting a CD player 11 Connecting an external control device 12 Settings 13 Set up speakers (Audyssey® Auto Setup 13 Playback (Basic operation 20 Important... Input Setup 68 Operating the connected devices by remote control unit 74 Operating AV devices 74 Registering preset codes 75 Operating devices 77 Specifying the zone used with the main remote control unit······79 Resetting the remote ...
Owners Manual
Page 17
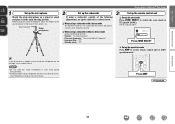
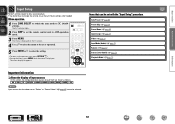
... nn When using a subwoofer without a back. NOTE • Do not hold the setup microphone in the main listening position. nn When using a subwoofer capable of the listener's ear. The J indicator lights. Press ZONE SELECT nn Set up the operation mode Press AMP to set up the microphone on ...a tripod or stand and place it in your hand during measurements. • Avoid placing the setup microphone close to a seat back or wall as shown...
... nn When using a subwoofer without a back. NOTE • Do not hold the setup microphone in the main listening position. nn When using a subwoofer capable of the listener's ear. The J indicator lights. Press ZONE SELECT nn Set up the operation mode Press AMP to set up the microphone on ...a tripod or stand and place it in your hand during measurements. • Avoid placing the setup microphone close to a seat back or wall as shown...

Owners Manual
Page 42
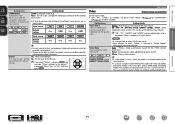
...the manual. Next [ENTER] Enter [RETURN] Cancel 4 Set up the zone mode Press ZONE SELECT to switch the zone mode to select "Amp Assign", and then press ENTER. MultEQ XT Amp Assign Channel Select Auto Setup Start [ENTER] Enter [RETURN] Cancel Amp Assign Amp Assign ZONE2 MultEQ... method of this unit. Basic version Advanced version Set up 5.1-channel speakers, see C page 4 "Setup wizard". Before Auto Setup measurement, the settings shown below can be reduced. Press ZONE SELECT nn Set up the operation mode Press AMP to set up "Amp Assign""). • Setting the...
...the manual. Next [ENTER] Enter [RETURN] Cancel 4 Set up the zone mode Press ZONE SELECT to switch the zone mode to select "Amp Assign", and then press ENTER. MultEQ XT Amp Assign Channel Select Auto Setup Start [ENTER] Enter [RETURN] Cancel Amp Assign Amp Assign ZONE2 MultEQ... method of this unit. Basic version Advanced version Set up 5.1-channel speakers, see C page 4 "Setup wizard". Before Auto Setup measurement, the settings shown below can be reduced. Press ZONE SELECT nn Set up the operation mode Press AMP to set up "Amp Assign""). • Setting the...
Owners Manual
Page 62
...174; and Audyssey Dynamic Volume® (vpage 55, 56). • Can be set with the "System Setup" procedure Speaker Setup (vpage 60) HDMI Setup (vpage 63) Audio Setup (vpage 64) ZONE2 Setup (vpage 65) Option Setup (vpage 65) Language (vpage 67) Information BD 59 The J indicator lights. 2 Press AMP to set ... to select the menu to be set the remote control unit to J (MAIN ZONE). Items that can be used without changing the settings. The menu is displayed. Menu operation 1 Press ZONE SELECT to switch the zone mode to AMP-operation mode. 3 Press MENU. Please set if necessary. The ...
...174; and Audyssey Dynamic Volume® (vpage 55, 56). • Can be set with the "System Setup" procedure Speaker Setup (vpage 60) HDMI Setup (vpage 63) Audio Setup (vpage 64) ZONE2 Setup (vpage 65) Option Setup (vpage 65) Language (vpage 67) Information BD 59 The J indicator lights. 2 Press AMP to set ... to select the menu to be set the remote control unit to J (MAIN ZONE). Items that can be used without changing the settings. The menu is displayed. Menu operation 1 Press ZONE SELECT to switch the zone mode to AMP-operation mode. 3 Press MENU. Please set if necessary. The ...

Owners Manual
Page 68
...vpage 65) is set to play back with "Amp Assign". Rch Level Adjust the right channel output level. vSee overleaf Information BD 65 "ZONE2 Setup" is displayed when "ZONE2" is not used in the range 0 (Min) to "Delete" cannot be deleted. • Input sources set ... setting for maximum volume. • OFF : Do not set level. Basic version Advanced version System Setup ZONE2 Setup Default settings are underlined. Power On Level Define the volume setting that is selected with multi-zone (ZONE2). Mute Level : Set the amount of attenuation when muting is on . • -80dB...
...vpage 65) is set to play back with "Amp Assign". Rch Level Adjust the right channel output level. vSee overleaf Information BD 65 "ZONE2 Setup" is displayed when "ZONE2" is not used in the range 0 (Min) to "Delete" cannot be deleted. • Input sources set ... setting for maximum volume. • OFF : Do not set level. Basic version Advanced version System Setup ZONE2 Setup Default settings are underlined. Power On Level Define the volume setting that is selected with multi-zone (ZONE2). Mute Level : Set the amount of attenuation when muting is on . • -80dB...
Owners Manual
Page 69
...display for 10 seconds after operation. • OFF : Turn display off . and set "Setup Lock" to 16 characters can be changed as shown below can no operation is hard to see page 50. each zone to one you prefer. Buttons on . • OFF : Turn display off . NOTE...the main unit's iPod 1 to register in the remote control unit. Quick Sel.Name Change the "Quick Select" display title to "Top". Remote Setup Guide Search a preset code to complete the setting. Press and hold the main unit's 2 and 9 for an approximately 5-minute continuous period. "V.Format...
...display for 10 seconds after operation. • OFF : Turn display off . and set "Setup Lock" to 16 characters can be changed as shown below can no operation is hard to see page 50. each zone to one you prefer. Buttons on . • OFF : Turn display off . NOTE...the main unit's iPod 1 to register in the remote control unit. Quick Sel.Name Change the "Quick Select" display title to "Top". Remote Setup Guide Search a preset code to complete the setting. Press and hold the main unit's 2 and 9 for an approximately 5-minute continuous period. "V.Format...
Owners Manual
Page 71
... unit to AMP-operation mode. 3 Press MENU. Menu operation 1 Press ZONE SELECT to switch the zone mode to J (MAIN ZONE). Make settings when needed. Information BD 68 Basic version Advanced version Input Setup Perform settings related to input source playback. • You do not have... been set with the "Input Setup" procedure Auto Preset (vpage 69) Preset Skip (...
... unit to AMP-operation mode. 3 Press MENU. Menu operation 1 Press ZONE SELECT to switch the zone mode to J (MAIN ZONE). Make settings when needed. Information BD 68 Basic version Advanced version Input Setup Perform settings related to input source playback. • You do not have... been set with the "Input Setup" procedure Auto Preset (vpage 69) Preset Skip (...
Owners Manual
Page 74
...when "HDMI" (vpage 70) or "COMPONENT" (vpage 71) has been assigned. Information BD 71 No : Do not reset to the defaults. Video Input Setup Default settings are returned to the default settings. • An input source to which "Delete" is displayed as shown below. BD z DVD TV z Movie...video. NOTE • It is connected, signals cannot be selected. is played in both MAIN ZONE (audio and video) and ZONE2 (audio only) modes in the same room, audio in MAIN ZONE and ZONE2 modes may improve audio synchronization. Video Mode Auto : Process video automatically based on ...
...when "HDMI" (vpage 70) or "COMPONENT" (vpage 71) has been assigned. Information BD 71 No : Do not reset to the defaults. Video Input Setup Default settings are returned to the default settings. • An input source to which "Delete" is displayed as shown below. BD z DVD TV z Movie...video. NOTE • It is connected, signals cannot be selected. is played in both MAIN ZONE (audio and video) and ZONE2 (audio only) modes in the same room, audio in MAIN ZONE and ZONE2 modes may improve audio synchronization. Video Mode Auto : Process video automatically based on ...
Owners Manual
Page 78
...source select button Category Brand Preset code Blu-ray Disc player DENON 32258 Satellite set top box DirecTV 01377 Television SONY 10810 DVD player DENON 32134 Digital camcorder (DVD recorder) Panasonic 21378 z Control dock for iPod DENON 72516 Cable set top box Motorola 01376 Cable set top box...by different manufacturers. NOTE The preset code cannot be registered to NET/USB, TUNER or PHONO. 1 Press ZONE SELECT to switch the zone mode to J (MAIN ZONE). e MENU, SETUP, TOP MENU For displaying the menu of each input source button as DVD players or TVs made by pressing...
...source select button Category Brand Preset code Blu-ray Disc player DENON 32258 Satellite set top box DirecTV 01377 Television SONY 10810 DVD player DENON 32134 Digital camcorder (DVD recorder) Panasonic 21378 z Control dock for iPod DENON 72516 Cable set top box Motorola 01376 Cable set top box...by different manufacturers. NOTE The preset code cannot be registered to NET/USB, TUNER or PHONO. 1 Press ZONE SELECT to switch the zone mode to J (MAIN ZONE). e MENU, SETUP, TOP MENU For displaying the menu of each input source button as DVD players or TVs made by pressing...

Owners Manual
Page 79
...check device. [QUICK1] OK [QUICK2] NG [QUICK3] Return NOTE If a wrong brand name is registered. RemoteSetupGuide Remote Setup Guide is retrieved. O K • The menu screen is finished. NOTE If the desired brand name is displayed: RemoteSetupGuide Press [AMP...] button. The zone mode indicator flashes twice. RemoteSetupGuide Device Brand Code DVD Denon 30490[1/3] 1.Press[INPUT SOURCE]. 2.Press and hold ZONE/DEVICE Z for 3 seconds. 3.Input Code with numbers and symbols, select "1". •...
...check device. [QUICK1] OK [QUICK2] NG [QUICK3] Return NOTE If a wrong brand name is registered. RemoteSetupGuide Remote Setup Guide is retrieved. O K • The menu screen is finished. NOTE If the desired brand name is displayed: RemoteSetupGuide Press [AMP...] button. The zone mode indicator flashes twice. RemoteSetupGuide Device Brand Code DVD Denon 30490[1/3] 1.Press[INPUT SOURCE]. 2.Press and hold ZONE/DEVICE Z for 3 seconds. 3.Input Code with numbers and symbols, select "1". •...

Owners Manual
Page 80
...9, +10 Track selection TV Z / X TV power on/standby (Default : SONY) TV INPUT Switch TV input (Default : SONY) ZONE/DEVICE Z Power onz ZONE/DEVICE X Power standbyz zzThis may not operate. Basic version Advanced version Registering preset codes 14 Either of the screens below is displayed. Repeat steps... cannot be used . MENU TOP MENU uio p ENTER SETUP RETURN B 6 7 1 8 9 3 2 0 - 9, +10 TV Z / X TV INPUT ZONE/DEVICE Z ZONE/DEVICE X Function Switch channels (up/down) (Popup) Menu Top menu Cursor operation Enter Setup Return Manual search (fast-reverse/fast-forward) Playback Auto ...
...9, +10 Track selection TV Z / X TV power on/standby (Default : SONY) TV INPUT Switch TV input (Default : SONY) ZONE/DEVICE Z Power onz ZONE/DEVICE X Power standbyz zzThis may not operate. Basic version Advanced version Registering preset codes 14 Either of the screens below is displayed. Repeat steps... cannot be used . MENU TOP MENU uio p ENTER SETUP RETURN B 6 7 1 8 9 3 2 0 - 9, +10 TV Z / X TV INPUT ZONE/DEVICE Z ZONE/DEVICE X Function Switch channels (up/down) (Popup) Menu Top menu Cursor operation Enter Setup Return Manual search (fast-reverse/fast-forward) Playback Auto ...

Owners Manual
Page 81
...for satellite (SAT) / Cable (CBL) / IP TV operation Operation buttons CH +, - MENU uio p ENTER SETUP RETURN B 6 7 1 8 9 3 2 0 - 9, +10 TV Z / X TV INPUT ZONE/DEVICE Z ZONE/DEVICE X Function Switch channels (up /down ) Menu Cursor operation Enter Guide Return Manual search (fast-reverse/fast-...standby. nnTV operation Operation buttons CH +, - MENU uio p ENTER SETUP RETURN B 6 7 1 8 9 3 2 0 - 9, +10 TV Z / X TV INPUT ZONE/DEVICE Z ZONE/DEVICE X Function Switch channels (up/down ) Menu Cursor operation Enter Setup Return Manual search (fast-reverse/fast-forward) Playback Auto search (...
...for satellite (SAT) / Cable (CBL) / IP TV operation Operation buttons CH +, - MENU uio p ENTER SETUP RETURN B 6 7 1 8 9 3 2 0 - 9, +10 TV Z / X TV INPUT ZONE/DEVICE Z ZONE/DEVICE X Function Switch channels (up /down ) Menu Cursor operation Enter Guide Return Manual search (fast-reverse/fast-...standby. nnTV operation Operation buttons CH +, - MENU uio p ENTER SETUP RETURN B 6 7 1 8 9 3 2 0 - 9, +10 TV Z / X TV INPUT ZONE/DEVICE Z ZONE/DEVICE X Function Switch channels (up/down ) Menu Cursor operation Enter Setup Return Manual search (fast-reverse/fast-forward) Playback Auto search (...
Owners Manual
Page 102
... 74 Operating devices 77 Registering Preset Codes 75 Remote mode 22 Remote Setup Guide 66 Rename 72 Repeat 73 Resetting the microprocessor 96 RESTORER 57...93 S.Back 54, 60 Screensaver 66 Selecting the input source 20 Setup Lock 66 Shuffle 73 Sleep timer 42, 46 Source Delete 65 Source...32 Set up 13, 39 Speaker Config 60 Speaker impedance 93 Speaker Setup 60 Standby Source 63 Subwoofer 54 Subwoofer setting 14 Surround back speaker ... Surround mode 27, 87 Surr.Parameter 53 sYCC601 color 93 System Setup 59 vvT Tone 55 Tone Control 55 Trademark 86 Treble 55 Troubleshooting...
... 74 Operating devices 77 Registering Preset Codes 75 Remote mode 22 Remote Setup Guide 66 Rename 72 Repeat 73 Resetting the microprocessor 96 RESTORER 57...93 S.Back 54, 60 Screensaver 66 Selecting the input source 20 Setup Lock 66 Shuffle 73 Sleep timer 42, 46 Source Delete 65 Source...32 Set up 13, 39 Speaker Config 60 Speaker impedance 93 Speaker Setup 60 Standby Source 63 Subwoofer 54 Subwoofer setting 14 Surround back speaker ... Surround mode 27, 87 Surr.Parameter 53 sYCC601 color 93 System Setup 59 vvT Tone 55 Tone Control 55 Trademark 86 Treble 55 Troubleshooting...
Specification Sheet
Page 1
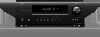
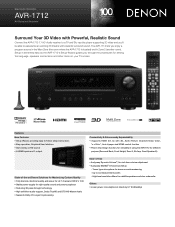
...Denon Solutions for Maximizing Content Quality • Fully discrete, identical quality and power for all 7 channels (125 W x 7ch) • Stable power supply for high-quality sound and picture playback • Featuring 3D pass-through the procedures for versatility in Zone 2 (another room). Setup is located) and in using the AVR-1712... for different purpose (Surround Back, Front Height, Zone 2, Bi-Amp, Front Speaker B) State-of -Use • ...
...Denon Solutions for Maximizing Content Quality • Fully discrete, identical quality and power for all 7 channels (125 W x 7ch) • Stable power supply for high-quality sound and picture playback • Featuring 3D pass-through the procedures for versatility in Zone 2 (another room). Setup is located) and in using the AVR-1712... for different purpose (Surround Back, Front Height, Zone 2, Bi-Amp, Front Speaker B) State-of -Use • ...
Specification Sheet
Page 2
... or ASD-51N.) • Supports HDMI (V.1.4a with Glow-Key • Remote Setup Guidance • Auto surround mode • Sleep timer function • Audio Delay function...power amp to Zone 2, you can enjoy multi-room audio playback, or to achieve higher-quality sound for 2-channel stereo playback, you can configure the AVR-1712 for their ...Denon Solutions for Maximizing Content Quality • Fully discrete, identical quality and power for all 7 channels (125 W x 7ch) To faithfully reproduce the original surround sound, each of the AVR-1712's 7 channels is equipped with the AVR-1712...
... or ASD-51N.) • Supports HDMI (V.1.4a with Glow-Key • Remote Setup Guidance • Auto surround mode • Sleep timer function • Audio Delay function...power amp to Zone 2, you can enjoy multi-room audio playback, or to achieve higher-quality sound for 2-channel stereo playback, you can configure the AVR-1712 for their ...Denon Solutions for Maximizing Content Quality • Fully discrete, identical quality and power for all 7 channels (125 W x 7ch) To faithfully reproduce the original surround sound, each of the AVR-1712's 7 channels is equipped with the AVR-1712...


