
Getting Started Guide
Page 5
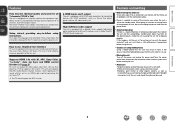
...outlet. If that there are no problems with the unit, and should therefore not be sure to connect and configure speakers and various other system units before moving the unit. Click the Adobe Reader® banner in the CD-ROM .... • About condensation If there is in use. • Moving the unit Turn off and wait until there is set to remember operations or function limitations. This symbol indicates a supplementary information and tips for an hour or two with the product... mobile phones Using a mobile phone near this unit when it is a major difference in this DENON product.
...outlet. If that there are no problems with the unit, and should therefore not be sure to connect and configure speakers and various other system units before moving the unit. Click the Adobe Reader® banner in the CD-ROM .... • About condensation If there is in use. • Moving the unit Turn off and wait until there is set to remember operations or function limitations. This symbol indicates a supplementary information and tips for an hour or two with the product... mobile phones Using a mobile phone near this unit when it is a major difference in this DENON product.
Getting Started Guide
Page 8
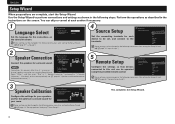
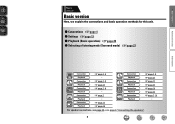
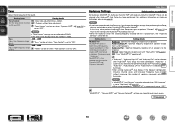
... (Main) Please connect microphone. Use the Setup Wizard to be changed in "2. English Español Set the language for your speakers, and for the optimum surround sound for the instructions on the setting method, see m page 32 "Speaker installation/connection (Advanced connection)".) 4 Source Setup Source Setup Please select device. Remote Setup Please select...
... (Main) Please connect microphone. Use the Setup Wizard to be changed in "2. English Español Set the language for your speakers, and for the optimum surround sound for the instructions on the setting method, see m page 32 "Speaker installation/connection (Advanced connection)".) 4 Source Setup Source Setup Please select device. Remote Setup Please select...
Getting Started Guide
Page 9
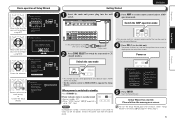
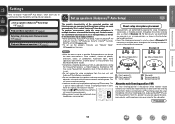
...enter or return keys on screen. Press[ENTER]to stop Yes and exit wizard? Speaker Calibration 4. No You can be operated in two separate zones, MAIN ZONE and ZONE2. • Set the remote control to MAIN ZONE to operate the Setup Wizard. SVENSKA NEDERLANDS ESPA&#... in standby modeH • Normal standby : Off • When "HDMI Control" (vm page 63) is set the remote control unit to AMPoperation mode. Setup Wizard has started. Speaker Connection Please select the speaker configuration to be used to control connected devices. 4 Press ON ( Z ) to the this unit...
...enter or return keys on screen. Press[ENTER]to stop Yes and exit wizard? Speaker Calibration 4. No You can be operated in two separate zones, MAIN ZONE and ZONE2. • Set the remote control to MAIN ZONE to operate the Setup Wizard. SVENSKA NEDERLANDS ESPA&#... in standby modeH • Normal standby : Off • When "HDMI Control" (vm page 63) is set the remote control unit to AMPoperation mode. Setup Wizard has started. Speaker Connection Please select the speaker configuration to be used to control connected devices. 4 Press ON ( Z ) to the this unit...
Owners Manual
Page 4
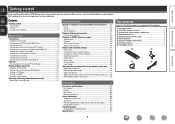
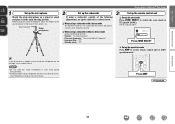
... Getting started Thank you for purchasing this owner's manual carefully before using the product. To ensure proper operation, please read this DENON product. Basic version Advanced version Information Getting started 1 Accessories 1 Features 2 Cautions on handling 2 Basic version 3 Connections 4 Important... control dock for iPod 10 Connecting an antenna 11 Connecting a CD player 11 Connecting an external control device 12 Settings 13 Set up speakers (Audyssey® Auto Setup 13 Playback (Basic operation 20 Important information 20 Playing a Blu-ray Disc player/DVD...
... Getting started Thank you for purchasing this owner's manual carefully before using the product. To ensure proper operation, please read this DENON product. Basic version Advanced version Information Getting started 1 Accessories 1 Features 2 Cautions on handling 2 Basic version 3 Connections 4 Important... control dock for iPod 10 Connecting an antenna 11 Connecting a CD player 11 Connecting an external control device 12 Settings 13 Set up speakers (Audyssey® Auto Setup 13 Playback (Basic operation 20 Important information 20 Playing a Blu-ray Disc player/DVD...
Owners Manual
Page 5
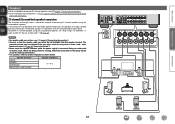
... correct and that there are no problems with the connection cables. • Power is supplied to some of the circuitry even when the unit is set to set up the speakers, etc.
... correct and that there are no problems with the connection cables. • Power is supplied to some of the circuitry even when the unit is set to set up the speakers, etc.
Owners Manual
Page 6
Connection Playback vpage 11 vpage 25 For speaker connections, see page 34, C page 6 "Connecting the speakers". 3 vpage 7 Playback Connection Playback Connection vpage 21 vpage 10 vpage 22 vpage 7, 10 Playback - F Connections vpage 4 F Settings vpage 13 F Playback (Basic operation) vpage 20 F Selecting a listening mode (Surround mode) vpage 27 Advanced version Information Connection Playback vpage 7, 8 - Basic...
Connection Playback vpage 11 vpage 25 For speaker connections, see page 34, C page 6 "Connecting the speakers". 3 vpage 7 Playback Connection Playback Connection vpage 21 vpage 10 vpage 22 vpage 7, 10 Playback - F Connections vpage 4 F Settings vpage 13 F Playback (Basic operation) vpage 20 F Selecting a listening mode (Surround mode) vpage 27 Advanced version Information Connection Playback vpage 7, 8 - Basic...
Owners Manual
Page 16
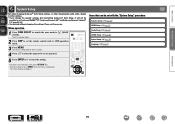
... Auto Setup, Audyssey MultEQ® XT/ Audyssey Dynamic EQ®/Audyssey Dynamic Volume® functions become active (vpage 55, 56). • To set up speakers (Audyssey® Auto Setup) (vpage 13) Playback (Basic operation) (vpage 20) Selecting a listening mode (Surround mode) (vpage 27) Playback (... small as shown in GExample wH, measuring at multiple positions throughout the entire listening area, as possible. Set up speakers (Audyssey® Auto Setup) nn Set up the speakers manually, use ). • Do not unplug the setup microphone from this position to automatically make the ...
... Auto Setup, Audyssey MultEQ® XT/ Audyssey Dynamic EQ®/Audyssey Dynamic Volume® functions become active (vpage 55, 56). • To set up speakers (Audyssey® Auto Setup) (vpage 13) Playback (Basic operation) (vpage 20) Selecting a listening mode (Surround mode) (vpage 27) Playback (... small as shown in GExample wH, measuring at multiple positions throughout the entire listening area, as possible. Set up speakers (Audyssey® Auto Setup) nn Set up the speakers manually, use ). • Do not unplug the setup microphone from this position to automatically make the ...
Owners Manual
Page 17
... without a back. NOTE • Do not hold the setup microphone in the main listening position. Basic version Advanced version Set up speakers (Audyssey® Auto Setup) 1 Set up the microphone Mount the setup microphone on , for example, a seat without a direct mode Make the following adjustments..., set up the microphone on a tripod or stand and place it in your hand during measurements. • Avoid placing the...
... without a back. NOTE • Do not hold the setup microphone in the main listening position. Basic version Advanced version Set up speakers (Audyssey® Auto Setup) 1 Set up the microphone Mount the setup microphone on , for example, a seat without a direct mode Make the following adjustments..., set up the microphone on a tripod or stand and place it in your hand during measurements. • Avoid placing the...

Owners Manual
Page 18
... of this unit. Retry Next Measure [ENTER] Enter [RETURN] Cancel NOTE If a connected speaker is not displayed, the speaker may not be shortened. Check the speaker connection. 9 Use ui to 5 of "Set up "Channel Select"" (vpage 40). • In STEP 2, you will perform measurements at... Setup Start [ENTER] Enter [RETURN] Cancel Here, we explain setup using the example of when the front speakers, center speaker, subwoofer, and surround speakers have been detected. For settings other than 5.1-channel surround, select "Amp Assign" and perform step 4 to select "Next → Measure"...
... of this unit. Retry Next Measure [ENTER] Enter [RETURN] Cancel NOTE If a connected speaker is not displayed, the speaker may not be shortened. Check the speaker connection. 9 Use ui to 5 of "Set up "Channel Select"" (vpage 40). • In STEP 2, you will perform measurements at... Setup Start [ENTER] Enter [RETURN] Cancel Here, we explain setup using the example of when the front speakers, center speaker, subwoofer, and surround speakers have been detected. For settings other than 5.1-channel surround, select "Amp Assign" and perform step 4 to select "Next → Measure"...

Owners Manual
Page 35
... even wider and deeper surround sensation. Basic version Advanced version Speaker installation/connection (Advanced connection) Here we describe the installation, connection and setup methods for the speakers to be used. For the installation, connection and setup methods for speaker settings Install Connect (vpage 34) Set up speakers (vpage 39) Install This unit is not possible to...
... even wider and deeper surround sensation. Basic version Advanced version Speaker installation/connection (Advanced connection) Here we describe the installation, connection and setup methods for the speakers to be used. For the installation, connection and setup methods for speaker settings Install Connect (vpage 34) Set up speakers (vpage 39) Install This unit is not possible to...
Owners Manual
Page 37
... example for performing 7.1-channel playback using the surround back speakers, set "Amp Assign" to "NORMAL" in steps 3 and 4 for making connections.) • Use speakers with the surround mode or input signals. Speaker terminals FRONT CENTER SURROUND SURR. If you connect the surround back and front height speakers before you start playback, the audio is connected...
... example for performing 7.1-channel playback using the surround back speakers, set "Amp Assign" to "NORMAL" in steps 3 and 4 for making connections.) • Use speakers with the surround mode or input signals. Speaker terminals FRONT CENTER SURROUND SURR. If you connect the surround back and front height speakers before you start playback, the audio is connected...

Owners Manual
Page 38
... you start playback, the audio is played back by automatically switching the speakers in steps 3 and 4 for performing 7.1-channel playback using the front height speaker, set "Amp Assign" to "F.HEIGHT" in accordance with the surround mode or input signals. Connect Advanced version ...Information FHL FL SW FR FHR C SL SR 35 Basic version 7.1-channel (Front height speaker) connection The illustration on the right ...
... you start playback, the audio is played back by automatically switching the speakers in steps 3 and 4 for performing 7.1-channel playback using the front height speaker, set "Amp Assign" to "F.HEIGHT" in accordance with the surround mode or input signals. Connect Advanced version ...Information FHL FL SW FR FHR C SL SR 35 Basic version 7.1-channel (Front height speaker) connection The illustration on the right ...

Owners Manual
Page 39
... the SURR. NOTE • For speaker cable connections, see C page 6 "Connecting the speakers". • For speaker impedance, see "When 6.1ch (Surround back speaker) installed" (vpage 33). BACK/AMP ASSIGN terminal. Basic version 6.1-channel (Surround back speaker) connection If using the surround back speaker, set "S.Back" to "1spkr". For speaker settings in steps 3 and 4 for "Set up "Amp Assign"" (vpage 39...
... the SURR. NOTE • For speaker cable connections, see C page 6 "Connecting the speakers". • For speaker impedance, see "When 6.1ch (Surround back speaker) installed" (vpage 33). BACK/AMP ASSIGN terminal. Basic version 6.1-channel (Surround back speaker) connection If using the surround back speaker, set "S.Back" to "1spkr". For speaker settings in steps 3 and 4 for "Set up "Amp Assign"" (vpage 39...
Owners Manual
Page 58
... headphones, "MultEQ® XT" is selected, illuminates. • After running Audyssey® Auto Setup, if the Speaker Configuration, Distance, Channel Level, and Crossover Frequency have not performed Auto Setup, or if you change the speaker settings after performing Auto Setup, you may not be selected after Audyssey® Auto Setup was run. •...
... headphones, "MultEQ® XT" is selected, illuminates. • After running Audyssey® Auto Setup, if the Speaker Configuration, Distance, Channel Level, and Crossover Frequency have not performed Auto Setup, or if you change the speaker settings after performing Auto Setup, you may not be selected after Audyssey® Auto Setup was run. •...
Owners Manual
Page 62
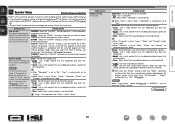
... ZONE). The menu display disappears. Basic version Advanced version System Setup Set when changing Audyssey® Auto Setup settings, or when changing the audio, video, display or other settings. • If you change the speaker settings after performing Audyssey® Auto Setup, it will not be possible ...to set or operated. 5 Press ENTER or p to enter the setting. • To return to the previous item, press RETURN B. ...
... ZONE). The menu display disappears. Basic version Advanced version System Setup Set when changing Audyssey® Auto Setup settings, or when changing the audio, video, display or other settings. • If you change the speaker settings after performing Audyssey® Auto Setup, it will not be possible ...to set or operated. 5 Press ENTER or p to enter the setting. • To return to the previous item, press RETURN B. ...
Owners Manual
Page 63
... play back low frequencies. • Small : Use a small speaker that can not be possible to connect the front speakers via the bi-amp connection. Center : Set the presence and size of the speaker to • When "Subwoofer" is set to "No", "Front" is "NORMAL", you change the speaker settings after performing Audyssey® Auto Setup, it will...
... play back low frequencies. • Small : Use a small speaker that can not be possible to connect the front speakers via the bi-amp connection. Center : Set the presence and size of the speaker to • When "Subwoofer" is set to "No", "Front" is "NORMAL", you change the speaker settings after performing Audyssey® Auto Setup, it will...
Owners Manual
Page 64
... want to change the playback frequency of the distance. • 1ft / 0.1ft • 0.1m / 0.01m Default : The "Distance" settings are set to "Large", and "Subwoofer Mode" is set to the defaults. NOTE Speakers set to "Small" speaker size is added to the LFE signal output from the subwoofers, depending on the "Amp Assign" (vpage 60) and...
... want to change the playback frequency of the distance. • 1ft / 0.1ft • 0.1m / 0.01m Default : The "Distance" settings are set to "Large", and "Subwoofer Mode" is set to the defaults. NOTE Speakers set to "Small" speaker size is added to the LFE signal output from the subwoofers, depending on the "Amp Assign" (vpage 60) and...
Owners Manual
Page 65
... a higher frequency. • For speakers set in advance. • A : Front speaker A is used . being used . • B : Front speaker B is displayed. vSee overleaf Information BD 62 "S.Back" setting (vpage 60) is inserted in the "Speaker Config." (vpage 60) settings are set for each speaker. System Setup Setting items Setting details Crossover Freq. When using small speakers, however, we recommend setting the crossover frequency to...
... a higher frequency. • For speakers set in advance. • A : Front speaker A is used . being used . • B : Front speaker B is displayed. vSee overleaf Information BD 62 "S.Back" setting (vpage 60) is inserted in the "Speaker Config." (vpage 60) settings are set for each speaker. System Setup Setting items Setting details Crossover Freq. When using small speakers, however, we recommend setting the crossover frequency to...
Owners Manual
Page 97
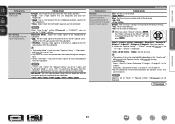
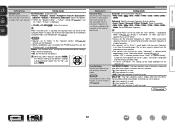
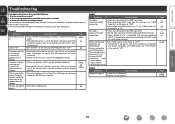
...the set "HDMI Audio Out" on the menu to "AMP". • When outputting HDMI audio from the electric outlet, wait 5 to 10 seconds and then insert it to match the connected HDMI connector. • Check whether the TV is off the power and please contact the DENON service...Please turn on this case, disconnect the power immediately and contact your store of the HDMI connectors. • When outputting HDMI audio from the speakers, set being operated as described in intervals of approximately 0.5 seconds. No video is output with HDCP, video will not be a malfunction. If connected ...
...the set "HDMI Audio Out" on the menu to "AMP". • When outputting HDMI audio from the electric outlet, wait 5 to 10 seconds and then insert it to match the connected HDMI connector. • Check whether the TV is off the power and please contact the DENON service...Please turn on this case, disconnect the power immediately and contact your store of the HDMI connectors. • When outputting HDMI audio from the speakers, set being operated as described in intervals of approximately 0.5 seconds. No video is output with HDCP, video will not be a malfunction. If connected ...
Owners Manual
Page 98
... of multichannel signals such as Dolby Digital or DTS surround, RESTORER cannot be output from the front height speakers. • Set "Speaker Config." - "PLgz Height" on the menu to "ON". • Check if "Amp Assign" is set to "LFE", no sound may be used. • Switch the surround mode to output audio from the... surround back speakers. • Set "Speaker Config." - "Subwoofer" on the menu to "Auto" or "DTS". 60 60 54 27 54 60 61 C 6, 34, 35, 36, 37, 38 - 60 60, 61 72 ...
... of multichannel signals such as Dolby Digital or DTS surround, RESTORER cannot be output from the front height speakers. • Set "Speaker Config." - "PLgz Height" on the menu to "ON". • Check if "Amp Assign" is set to "LFE", no sound may be used. • Switch the surround mode to output audio from the... surround back speakers. • Set "Speaker Config." - "Subwoofer" on the menu to "Auto" or "DTS". 60 60 54 27 54 60 61 C 6, 34, 35, 36, 37, 38 - 60 60, 61 72 ...


