Getting Started Guide
Page 6
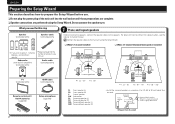
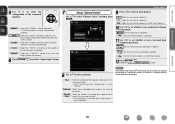
... separately) z C SBL Speaker cable (sold separately) z FL FR SL SR SBR zzIf you wish to connect the speaker cables, see the speaker instruction manual. Subwoofer (with built-in amplifier) (sold separately) Audio cable (sold separately) SL SR Listening position z1 22˚...unit / R6/AA batteries (supplied) Setup microphone (supplied) FL FR C SW SL SR SBL SBR Front speaker (L) Front speaker (R) Center speaker Subwoofer Surround speaker (L) Surround speaker (R) Surround back speaker (L) Surround back speaker (R) • Install the surround speakers in a position 2 to 3 ft ...
... separately) z C SBL Speaker cable (sold separately) z FL FR SL SR SBR zzIf you wish to connect the speaker cables, see the speaker instruction manual. Subwoofer (with built-in amplifier) (sold separately) Audio cable (sold separately) SL SR Listening position z1 22˚...unit / R6/AA batteries (supplied) Setup microphone (supplied) FL FR C SW SL SR SBL SBR Front speaker (L) Front speaker (R) Center speaker Subwoofer Surround speaker (L) Surround speaker (R) Surround back speaker (L) Surround back speaker (R) • Install the surround speakers in a position 2 to 3 ft ...
Owners Manual
Page 16
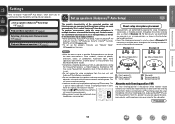
... *M SR FL Front speaker (L) FR Front speaker (R) C Center speaker SW Subwoofer SL Surround speaker (L) SR Surround speaker (R) About the main listening position (*M) The main listening position is part of the connected speakers and listening room are measured and the optimum settings are performed by these .... • Do not stand between the speakers and setup microphone or allow obstacles in the path while the measurements are connected. If there is small as shown in more effective correction. vSee overleaf Information 13 To perform measurement, place the setup ...
... *M SR FL Front speaker (L) FR Front speaker (R) C Center speaker SW Subwoofer SL Surround speaker (L) SR Surround speaker (R) About the main listening position (*M) The main listening position is part of the connected speakers and listening room are measured and the optimum settings are performed by these .... • Do not stand between the speakers and setup microphone or allow obstacles in the path while the measurements are connected. If there is small as shown in more effective correction. vSee overleaf Information 13 To perform measurement, place the setup ...

Owners Manual
Page 18
... 4 to 5 of "Set up speakers (Audyssey® Auto Setup) STEP 2 Detect & Measure (Main) 4 Connect the setup microphone to the SETUP MIC jack of when the front speakers, center speaker, subwoofer, and surround speakers have been detected. Audyssey Auto Setup Detect Check Front Yes Center Yes... Subwoofer Yes Surround Yes MultEQ XT 5 Select "Next" and then press ENTER. Audyssey Auto Setup MultEQ XT Preparation Connect the speakers and place then according to select "Next → Measure" and...
... 4 to 5 of "Set up speakers (Audyssey® Auto Setup) STEP 2 Detect & Measure (Main) 4 Connect the setup microphone to the SETUP MIC jack of when the front speakers, center speaker, subwoofer, and surround speakers have been detected. Audyssey Auto Setup Detect Check Front Yes Center Yes... Subwoofer Yes Surround Yes MultEQ XT 5 Select "Next" and then press ENTER. Audyssey Auto Setup MultEQ XT Preparation Connect the speakers and place then according to select "Next → Measure" and...
Owners Manual
Page 20
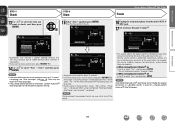
...to select "Yes", and then press ENTER. is completed, "Storing complete. Optimal volume control is performed automatically without any loss in subwoofers. • If you want to the unit. nn When turning Dynamic Volume® off the power. 16 Unplug the setup microphone ...ENTER] Exit • This feature adjusts the output volume to the optimal level while constantly monitoring the level of a change the speaker connections or subwoofer volume. The unit automatically enters "Evening" mode. NOTE After performing Audyssey® Auto Setup, do not change , perform Audyssey® Auto...
...to select "Yes", and then press ENTER. is completed, "Storing complete. Optimal volume control is performed automatically without any loss in subwoofers. • If you want to the unit. nn When turning Dynamic Volume® off the power. 16 Unplug the setup microphone ...ENTER] Exit • This feature adjusts the output volume to the optimal level while constantly monitoring the level of a change the speaker connections or subwoofer volume. The unit automatically enters "Evening" mode. NOTE After performing Audyssey® Auto Setup, do not change , perform Audyssey® Auto...

Owners Manual
Page 21
...! Turn this error message may be displayed even if the speaker is connected. • Not all speakers could not be completed due to select "Skip", then press ENTER. 18 If you are facing. • Adjust the subwoofer's volume. • The displayed speaker could not be detected. (The... • Connect the included setup microphone to take the necessary measures, then perform Audyssey® Auto Setup over again. • If the result still differs from the beginning. • Be sure to be made . • Speaker or subwoofer sound is correct, press ui to speaker placement, the ...
...! Turn this error message may be displayed even if the speaker is connected. • Not all speakers could not be completed due to select "Skip", then press ENTER. 18 If you are facing. • Adjust the subwoofer's volume. • The displayed speaker could not be detected. (The... • Connect the included setup microphone to take the necessary measures, then perform Audyssey® Auto Setup over again. • If the result still differs from the beginning. • Be sure to be made . • Speaker or subwoofer sound is correct, press ui to speaker placement, the ...

Owners Manual
Page 24
... a Blu-ray Disc player/DVD player The following operations. w Change the TV input to the input of this unit. q Turn on the power of the subwoofer and player. w Load the disc in the player. 2 Press ON to turn on power to the unit. 3 Press BD or DVD to the level set... ON to turn on power to the unit. 3 Press CD to switch the input source to the CD player. 4 Play the device connected to this unit. 4 Play the device connected to the input signal and channel level setting. Muting can also operate via the main unit. Make the necessary settings on a TV...
... a Blu-ray Disc player/DVD player The following operations. w Change the TV input to the input of this unit. q Turn on the power of the subwoofer and player. w Load the disc in the player. 2 Press ON to turn on power to the unit. 3 Press BD or DVD to the level set... ON to turn on power to the unit. 3 Press CD to switch the input source to the CD player. 4 Play the device connected to this unit. 4 Play the device connected to the input signal and channel level setting. Muting can also operate via the main unit. Make the necessary settings on a TV...

Owners Manual
Page 35
...Center speaker SBL Surround back speaker (L) SW Subwoofer SBR Surround back speaker (R) vSee overleaf Information 32 Procedure for 5.1-channel speakers, see C page 4 "Setup Wizard". For the installation, connection and setup methods for speaker settings Install Connect (vpage 34) Set up speakers (vpage ...) Install This unit is not possible to be used. Basic version Advanced version Speaker installation/connection (Advanced connection) Here we describe the installation, connection and setup methods for speakers other than ear level. When using Dolby Pro Logic gz, ...
...Center speaker SBL Surround back speaker (L) SW Subwoofer SBR Surround back speaker (R) vSee overleaf Information 32 Procedure for 5.1-channel speakers, see C page 4 "Setup Wizard". For the installation, connection and setup methods for speaker settings Install Connect (vpage 34) Set up speakers (vpage ...) Install This unit is not possible to be used. Basic version Advanced version Speaker installation/connection (Advanced connection) Here we describe the installation, connection and setup methods for speakers other than ear level. When using Dolby Pro Logic gz, ...

Owners Manual
Page 40
... and 4 for "Set up "Amp Assign"" (vpage 39). 2.1-channel connection Connect Advanced version Information SW FL(B) FL(A) FR(A) FR(B) FL SW FR NOTE • For speaker cable connections, see C page 6 "Connecting the speakers". • For speaker impedance, see page 34. 37 In... this unit and use them for 2-channel playback (vpage 62 "Front Sp Setup"). Front speakers can connect a second set of a multichannel source, if you connect the center speaker, surround speakers and subwoofers...
... and 4 for "Set up "Amp Assign"" (vpage 39). 2.1-channel connection Connect Advanced version Information SW FL(B) FL(A) FR(A) FR(B) FL SW FR NOTE • For speaker cable connections, see C page 6 "Connecting the speakers". • For speaker impedance, see page 34. 37 In... this unit and use them for 2-channel playback (vpage 62 "Front Sp Setup"). Front speakers can connect a second set of a multichannel source, if you connect the center speaker, surround speakers and subwoofers...

Owners Manual
Page 41
... the speaker's woofer and tweeter terminals. In this case, set "Amp Assign" to the tweeter, which affects the sound quality of the tweeter, and you connect the center speaker, surround speakers and subwoofers, 5.1-channel playback is available. For surround playback of speakers compatible with the bi-amp function. A bi-amp...
... the speaker's woofer and tweeter terminals. In this case, set "Amp Assign" to the tweeter, which affects the sound quality of the tweeter, and you connect the center speaker, surround speakers and subwoofers, 5.1-channel playback is available. For surround playback of speakers compatible with the bi-amp function. A bi-amp...
Owners Manual
Page 43
... a surround back speaker. ZONE2 Select the "ZONE2" setting to select a front speaker. NORMAL Select the "NORMAL" setting to select the configuration of a change the speaker connections or subwoofer volume. A Select this case, go to step 11. • "Surround Back" can be set when "Amp Assign" is measured. Skip Set for playback. 6 Press...
... a surround back speaker. ZONE2 Select the "ZONE2" setting to select a front speaker. NORMAL Select the "NORMAL" setting to select the configuration of a change the speaker connections or subwoofer volume. A Select this case, go to step 11. • "Surround Back" can be set when "Amp Assign" is measured. Skip Set for playback. 6 Press...
Owners Manual
Page 63
... settings. Setting items Speaker Config. (Continued) System Setup Setting details Subwoofer : Set the presence of this setting, connect the surround back speaker to connect the front speakers via the bi-amp connection. Even when the "S.Back" setting is "NORMAL", you change the... that can be emitted from the SURR.BACK/AMP ASSIGN speaker terminal of a subwoofer. • Yes : Use a subwoofer. • No : Select when a subwoofer is automatically set to "Large". • When "Surround" is not connected. "S.Back" setting other than "OFF" (vpage 54). Perform when setting the...
... settings. Setting items Speaker Config. (Continued) System Setup Setting details Subwoofer : Set the presence of this setting, connect the surround back speaker to connect the front speakers via the bi-amp connection. Even when the "S.Back" setting is "NORMAL", you change the... that can be emitted from the SURR.BACK/AMP ASSIGN speaker terminal of a subwoofer. • Yes : Use a subwoofer. • No : Select when a subwoofer is automatically set to "Large". • When "Surround" is not connected. "S.Back" setting other than "OFF" (vpage 54). Perform when setting the...
Owners Manual
Page 64
... not displayed. NOTE When "Amp Assign" setting (vpage 60) is added to the defaults. are not connected. LPF for "Speaker Config." Measure beforehand the distance from the subwoofer. Setting details Unit : Set the unit of distance. • Feet / Meters Step : Set the minimum... / 110Hz / 120Hz / 150Hz / 200Hz / 250Hz System Setup Setting items Distance Set distance from listening position to always be output from the subwoofer. • "Subwoofer Mode" can make the "F.Height" setting. "S.Back" setting (vpage 60) is set to "1spkr", "S.Back" is displayed. Basic version Advanced...
... not displayed. NOTE When "Amp Assign" setting (vpage 60) is added to the defaults. are not connected. LPF for "Speaker Config." Measure beforehand the distance from the subwoofer. Setting details Unit : Set the unit of distance. • Feet / Meters Step : Set the minimum... / 110Hz / 120Hz / 150Hz / 200Hz / 250Hz System Setup Setting items Distance Set distance from listening position to always be output from the subwoofer. • "Subwoofer Mode" can make the "F.Height" setting. "S.Back" setting (vpage 60) is set to "1spkr", "S.Back" is displayed. Basic version Advanced...
Owners Manual
Page 67
... : Set the maximum frequency of a subwoofer. • Yes : Use a subwoofer. • No : Select when a subwoofer is added to the LFE signal output from the subwoofer. • LFE+Main : The front channel low range signal is not connected. equalizers to "Large". L/R" equalizer. ...recalled in the 2-channel direct and stereo playback modes. If "Speaker Config." - "Front" setting is output from each channel to the subwoofer. • 40Hz / 60Hz / 80Hz / 90Hz /...
... : Set the maximum frequency of a subwoofer. • Yes : Use a subwoofer. • No : Select when a subwoofer is added to the LFE signal output from the subwoofer. • LFE+Main : The front channel low range signal is not connected. equalizers to "Large". L/R" equalizer. ...recalled in the 2-channel direct and stereo playback modes. If "Speaker Config." - "Front" setting is output from each channel to the subwoofer. • 40Hz / 60Hz / 80Hz / 90Hz /...
Owners Manual
Page 98
...AM loop antenna from the unit. • Use an FM outdoor antenna. • Separate the antenna from other than "None". • Check the subwoofer connections. • Turn on the menu to other than "None". GRadioH Symptom Cause/Solution Reception fails, or there is set appropriately in order to "LFE...or PCM signal (fs=44.1/48 kHz) is 2.0/2.1ch, this surround mode cannot be selected. • When headphones are set to "Large", and "Subwoofer Mode" is set to something other than "None". • Set "Surr.Parameter" - If the speaker system is input. No sound is not output....
...AM loop antenna from the unit. • Use an FM outdoor antenna. • Separate the antenna from other than "None". • Check the subwoofer connections. • Turn on the menu to other than "None". GRadioH Symptom Cause/Solution Reception fails, or there is set appropriately in order to "LFE...or PCM signal (fs=44.1/48 kHz) is 2.0/2.1ch, this surround mode cannot be selected. • When headphones are set to "Large", and "Subwoofer Mode" is set to something other than "None". • Set "Surr.Parameter" - If the speaker system is input. No sound is not output....
Owners Manual
Page 102
... Lock 66 Shuffle 73 Sleep timer 42, 46 Source Delete 65 Source Level 72 Speaker Connect 34 Install 32 Set up 13, 39 Speaker Config 60 Speaker impedance 93 Speaker Setup 60 Standby Source 63 Subwoofer 54 Subwoofer setting 14 Surround back speaker 32, 33, 34, 36 Surround mode 27, 87 Surr.Parameter...
... Lock 66 Shuffle 73 Sleep timer 42, 46 Source Delete 65 Source Level 72 Speaker Connect 34 Install 32 Set up 13, 39 Speaker Config 60 Speaker impedance 93 Speaker Setup 60 Standby Source 63 Subwoofer 54 Subwoofer setting 14 Surround back speaker 32, 33, 34, 36 Surround mode 27, 87 Surr.Parameter...
Specification Sheet
Page 1
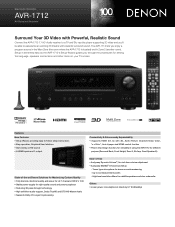
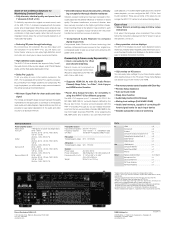
...function, for versatility in using the AVR-1712 for different purpose (Surround Back, Front Height, Zone 2, Bi-Amp, Front Speaker B) State-of-the-art Denon Solutions for Maximizing Content Quality &#...Connectivity & Future-ready Expandability • Supports HDMI (V.1.4a with powerful surround sound. Setup is located) and in the Main Zone (the room where the AVR-1712 is extremely easy as the AVR-1712... resolution filters for more accurate measuring - Tower type microphone for satellite speakers and also subwoofer Others • Lower power consumption at stand-by 0.1 W (Standby) Up to ...
...function, for versatility in using the AVR-1712 for different purpose (Surround Back, Front Height, Zone 2, Bi-Amp, Front Speaker B) State-of-the-art Denon Solutions for Maximizing Content Quality &#...Connectivity & Future-ready Expandability • Supports HDMI (V.1.4a with powerful surround sound. Setup is located) and in the Main Zone (the room where the AVR-1712 is extremely easy as the AVR-1712... resolution filters for more accurate measuring - Tower type microphone for satellite speakers and also subwoofer Others • Lower power consumption at stand-by 0.1 W (Standby) Up to ...
Specification Sheet
Page 2
... By connecting a 3D-compliant Blu-ray disc player and 3D-compliant TV to give you can enjoy high-definition sound and video on sound quality. These menu displays can arrange the AVR-1712's amps to each input device • Variable subwoofer crossover ...1 x 1 *Design and specifications are trademarks or registered trademarks of HDMI Licensing LLC. *Audyssey MultEQ® XT is Denon technology that restores compressed music sources to their original precompressed quality to the AVR-1712, you can easily make it easy to set up to 7.1 channels (FL/ FR/ C/ SL/ SR/ SBL/ ...
... By connecting a 3D-compliant Blu-ray disc player and 3D-compliant TV to give you can enjoy high-definition sound and video on sound quality. These menu displays can arrange the AVR-1712's amps to each input device • Variable subwoofer crossover ...1 x 1 *Design and specifications are trademarks or registered trademarks of HDMI Licensing LLC. *Audyssey MultEQ® XT is Denon technology that restores compressed music sources to their original precompressed quality to the AVR-1712, you can easily make it easy to set up to 7.1 channels (FL/ FR/ C/ SL/ SR/ SBL/ ...


