
Getting Started Guide
Page 3
...: DO NOT MODIFY THIS PRODUCT This product, when installed as radiators, heat registers, stoves, or other . Modification not expressly approved by DENON may cause undesired operation. 2. The exclamation point within easy access by the FCC, to use caution when moving the cart/ apparatus combination ...guarantee that may cause harmful interference to distribute this manual, meets FCC requirements. The top surface over . 13. Ne touchez pas les zones chaudes, tout particulièrement vers l'inscription "Hot surface mark" et le panneau supérieur. La superficie superior sobre el ...
...: DO NOT MODIFY THIS PRODUCT This product, when installed as radiators, heat registers, stoves, or other . Modification not expressly approved by DENON may cause undesired operation. 2. The exclamation point within easy access by the FCC, to use caution when moving the cart/ apparatus combination ...guarantee that may cause harmful interference to distribute this manual, meets FCC requirements. The top surface over . 13. Ne touchez pas les zones chaudes, tout particulièrement vers l'inscription "Hot surface mark" et le panneau supérieur. La superficie superior sobre el ...
Getting Started Guide
Page 9
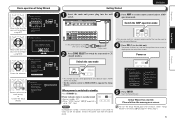
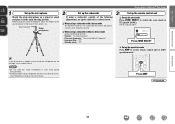
... the setup wizard anytime using ui. Switch the AMP-operation mode To household power outlet (AC 120 V, 60 Hz) Power cord 2 Press ZONE SELECT to switch the zone mode to stop Yes and exit wizard? Speaker Calibration 4. To totally cut off the power, remove the power cord from the power outlet.... 5 Press ENTER. Speaker Connection Move to the item that you wish to J (MAIN ZONE). • This remote control is displayed on , and the Setup Wizard start of Setup Wizard Move to the item that can be used to control...
... the setup wizard anytime using ui. Switch the AMP-operation mode To household power outlet (AC 120 V, 60 Hz) Power cord 2 Press ZONE SELECT to switch the zone mode to stop Yes and exit wizard? Speaker Calibration 4. To totally cut off the power, remove the power cord from the power outlet.... 5 Press ENTER. Speaker Connection Move to the item that you wish to J (MAIN ZONE). • This remote control is displayed on , and the Setup Wizard start of Setup Wizard Move to the item that can be used to control...

Getting Started Guide
Page 11
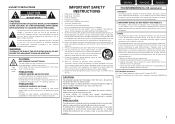
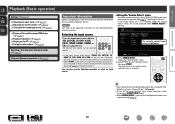
... input source select button (BD, SAT/CBL, TV, DVD, V.AUX, DOCK, TUNER, GAME1, GAME2 or CD) to perform simple operations. w Use uio p to the J (MAIN ZONE) mode when performing this setting at "Source Delete" (vm page 65). • To turn off . If the remote control unit is in K (ZONE2) mode, the...
... input source select button (BD, SAT/CBL, TV, DVD, V.AUX, DOCK, TUNER, GAME1, GAME2 or CD) to perform simple operations. w Use uio p to the J (MAIN ZONE) mode when performing this setting at "Source Delete" (vm page 65). • To turn off . If the remote control unit is in K (ZONE2) mode, the...
Getting Started Guide - Spanish
Page 3
...de l'appareil et l'utilisateur doit pouvoir y accéder facilement. FCC INFORMATION (For US customers) 1. Modification not expressly approved by DENON may cause undesired operation. 2. NOTE This product has been tested and found to avoid injury from the apparatus. 11. Cet appareil num...B digital device, pursuant to distribute this product continuously. If this apparatus during lightning storms or when unused for help. Ne touchez pas les zones chaudes, tout particulièrement vers l'inscription "Hot surface mark" et le panneau supérieur. Keep these instructions. 2. Heed all...
...de l'appareil et l'utilisateur doit pouvoir y accéder facilement. FCC INFORMATION (For US customers) 1. Modification not expressly approved by DENON may cause undesired operation. 2. NOTE This product has been tested and found to avoid injury from the apparatus. 11. Cet appareil num...B digital device, pursuant to distribute this product continuously. If this apparatus during lightning storms or when unused for help. Ne touchez pas les zones chaudes, tout particulièrement vers l'inscription "Hot surface mark" et le panneau supérieur. Keep these instructions. 2. Heed all...
Owners Manual
Page 4
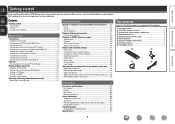
... Input Setup 68 Operating the connected devices by remote control unit 74 Operating AV devices 74 Registering preset codes 75 Operating devices 77 Specifying the zone used with the main remote control unit······79 Resetting the remote control unit 79 Accessories Check that the following...
... Input Setup 68 Operating the connected devices by remote control unit 74 Operating AV devices 74 Registering preset codes 75 Operating devices 77 Specifying the zone used with the main remote control unit······79 Resetting the remote control unit 79 Accessories Check that the following...
Owners Manual
Page 17
..., set the remote control unit to set up the subwoofer as sound reflections may give inaccurate results. Press ZONE SELECT nn Set up the zone mode Press ZONE SELECT to switch the zone mode to J (MAIN ZONE). If you do not have a tripod or stand, set up the microphone on a tripod or stand and place...
..., set the remote control unit to set up the subwoofer as sound reflections may give inaccurate results. Press ZONE SELECT nn Set up the zone mode Press ZONE SELECT to switch the zone mode to J (MAIN ZONE). If you do not have a tripod or stand, set up the microphone on a tripod or stand and place...
Owners Manual
Page 23
... source, then press ENTER. The input source is set ahead of time. nnUsing the "Source Select" menu Switch the remote control unit to the J (MAIN ZONE) mode when performing this setting at "Source Delete" (vpage 65). • To turn off the sound temporarily (vpage 21) nn Playing a Blu-ray Disc player...
... source, then press ENTER. The input source is set ahead of time. nnUsing the "Source Select" menu Switch the remote control unit to the J (MAIN ZONE) mode when performing this setting at "Source Delete" (vpage 65). • To turn off the sound temporarily (vpage 21) nn Playing a Blu-ray Disc player...

Owners Manual
Page 42
... the number of setting up speakers other than 5.1-channel speakers. The J indicator lights. 2 Connect the setup microphone. Press ZONE SELECT nn Set up the zone mode Press ZONE SELECT to switch the zone mode to J (MAIN ZONE). Basic version Advanced version Set up "Amp Assign" Use ui to select "Amp Assign", and then press ENTER...
... the number of setting up speakers other than 5.1-channel speakers. The J indicator lights. 2 Connect the setup microphone. Press ZONE SELECT nn Set up the zone mode Press ZONE SELECT to switch the zone mode to J (MAIN ZONE). Basic version Advanced version Set up "Amp Assign" Use ui to select "Amp Assign", and then press ENTER...

Owners Manual
Page 45
In this case, you will need to reconfigure the settings. • When "HDMI Control" is set separately for the different zones (vpage 46 "Sleep timer function"). The "SLEEP" indicator on the display turns off. • The sleep timer setting is canceled if this unit is not ...
In this case, you will need to reconfigure the settings. • When "HDMI Control" is set separately for the different zones (vpage 46 "Sleep timer function"). The "SLEEP" indicator on the display turns off. • The sleep timer setting is canceled if this unit is not ...

Owners Manual
Page 46
... the front (front speaker / front height speaker / center speaker) or rear (surround speaker / surround back speaker). 1 Press ZONE SELECT to switch the zone mode to J (MAIN ZONE). The J indicator lights. 2 Press AMP to set switches each time one of the buttons is adjusted to the lowest value of...the remote control unit to AMP-operation mode. 3 Press CH LEVEL. nnAdjusting the volume of the different speakers 1 Press ZONE SELECT to switch the zone mode to J (MAIN ZONE). The speaker that can adjust the channel level either according to the playback sources or to be adjusting using o p. The...
... the front (front speaker / front height speaker / center speaker) or rear (surround speaker / surround back speaker). 1 Press ZONE SELECT to switch the zone mode to J (MAIN ZONE). The J indicator lights. 2 Press AMP to set switches each time one of the buttons is adjusted to the lowest value of...the remote control unit to AMP-operation mode. 3 Press CH LEVEL. nnAdjusting the volume of the different speakers 1 Press ZONE SELECT to switch the zone mode to J (MAIN ZONE). The speaker that can adjust the channel level either according to the playback sources or to be adjusting using o p. The...
Owners Manual
Page 47
... this case, store them again. The surround parameters, tone settings and the volumes of the settings in step 1 can be set separately for the different zones (vpage 46 "Quick select function"). • If QUICK SELECT on the display. QUICK SELECT 1 QUICK SELECT 2 QUICK SELECT 3 QUICK SELECT 4 GQuick select defaultsH Input source...
... this case, store them again. The surround parameters, tone settings and the volumes of the settings in step 1 can be set separately for the different zones (vpage 46 "Quick select function"). • If QUICK SELECT on the display. QUICK SELECT 1 QUICK SELECT 2 QUICK SELECT 3 QUICK SELECT 4 GQuick select defaultsH Input source...
Owners Manual
Page 48
... 99 (When the "Volume Display" (vpage 65) setting is "Absolute") • At time of the MAIN ZONE only can be turned on or off by speaker output The ZONE2 audio signals are output from the HDMI, COAXIAL ...ZONE2. Turning off . • Power in ZONE2 can also play back the same source in both MAIN ZONE and ZONE2 is set to ON, power of purchase, "Volume Limit" (vpage 65) is output to ...; To cancel, either adjust the volume or press N again. • The setting is canceled when the zone's power is not possible to play the digital audio signals input from this unit so as to enjoy audio ...
... 99 (When the "Volume Display" (vpage 65) setting is "Absolute") • At time of the MAIN ZONE only can be turned on or off by speaker output The ZONE2 audio signals are output from the HDMI, COAXIAL ...ZONE2. Turning off . • Power in ZONE2 can also play back the same source in both MAIN ZONE and ZONE2 is set to ON, power of purchase, "Volume Limit" (vpage 65) is output to ...; To cancel, either adjust the volume or press N again. • The setting is canceled when the zone's power is not possible to play the digital audio signals input from this unit so as to enjoy audio ...

Owners Manual
Page 49
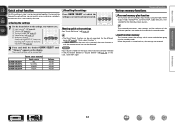
... 4 DOCK Volume -40dB -40dB - -40dB Sleep timer function This is useful when you want to sleep while listening in ZONE2. 1 Press ZONE SELECT to switch the zone mode to K (ZONE2). 2 Press SLEEP and display the time you want to set. • The time switches as with the remote control... unit can be memorized. zz Countdown time To cancel the sleep timer Press SLEEP to sleep Press SLEEP. nnRecalling the settings 1 Press ZONE SELECT to switch the zone mode to K (ZONE2). 2 Press QUICK SELECT at which you want to operate, press and hold the desired QUICK SELECT until "Memory"...
... 4 DOCK Volume -40dB -40dB - -40dB Sleep timer function This is useful when you want to sleep while listening in ZONE2. 1 Press ZONE SELECT to switch the zone mode to K (ZONE2). 2 Press SLEEP and display the time you want to set. • The time switches as with the remote control... unit can be memorized. zz Countdown time To cancel the sleep timer Press SLEEP to sleep Press SLEEP. nnRecalling the settings 1 Press ZONE SELECT to switch the zone mode to K (ZONE2). 2 Press QUICK SELECT at which you want to operate, press and hold the desired QUICK SELECT until "Memory"...

Owners Manual
Page 53
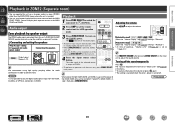
... uppercase characters to lowercase and vice versa. 4 Repeat steps 2 and 3 to change the names as desired using the "Preset Name" (vpage 69), "Rename" (vpage 72), "Zone Rename" (vpage 66), "Quick Sel.Name" (vpage 66). w Press ENTER to place the cursor at the character to be changed . Basic version Advanced version Inputting...
... uppercase characters to lowercase and vice versa. 4 Repeat steps 2 and 3 to change the names as desired using the "Preset Name" (vpage 69), "Rename" (vpage 72), "Zone Rename" (vpage 66), "Quick Sel.Name" (vpage 66). w Press ENTER to place the cursor at the character to be changed . Basic version Advanced version Inputting...

Owners Manual
Page 55
... display disappears. For details on the signal being played in the surround mode can be set or operated. Menu operation 1 Press ZONE SELECT to switch the zone mode to J (MAIN ZONE). NOTE Some setting items cannot be adjusted to your liking. Make the settings during playback. Information BD 52 Basic version Advanced version...
... display disappears. For details on the signal being played in the surround mode can be set or operated. Menu operation 1 Press ZONE SELECT to switch the zone mode to J (MAIN ZONE). NOTE Some setting items cannot be adjusted to your liking. Make the settings during playback. Information BD 52 Basic version Advanced version...
Owners Manual
Page 61
...about preset channels. "Status" for ZONE2. Offset : The dialogue normalization correction value. It automatically corrects the standard signal level for MAIN ZONE. Quick Select Show information about receiver settings, input signals, etc. Surround Mode : The currently set to "ZONE2". "MATRIX" is ... Info. • Interface / Support Resolution Information BD 58 Items Status Show information about audio input signals. Setting details nn MAIN ZONE This item shows information about settings for ZONE2 is displayed when "Amp Assign" is set to the input source. nn ZONE2 This...
...about preset channels. "Status" for ZONE2. Offset : The dialogue normalization correction value. It automatically corrects the standard signal level for MAIN ZONE. Quick Select Show information about receiver settings, input signals, etc. Surround Mode : The currently set to "ZONE2". "MATRIX" is ... Info. • Interface / Support Resolution Information BD 58 Items Status Show information about audio input signals. Setting details nn MAIN ZONE This item shows information about settings for ZONE2 is displayed when "Amp Assign" is set to the input source. nn ZONE2 This...
Owners Manual
Page 62
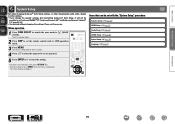
..., Audyssey Dynamic EQ® and Audyssey Dynamic Volume® (vpage 55, 56). • Can be used without changing the settings. Menu operation 1 Press ZONE SELECT to switch the zone mode to AMP-operation mode. 3 Press MENU. Basic version Advanced version System Setup Set when changing Audyssey® Auto Setup settings, or when... is displayed. The menu is displayed on the TV screen. 4 Press ui to select the menu to be set the remote control unit to J (MAIN ZONE). The menu display disappears. Please set if necessary.
..., Audyssey Dynamic EQ® and Audyssey Dynamic Volume® (vpage 55, 56). • Can be used without changing the settings. Menu operation 1 Press ZONE SELECT to switch the zone mode to AMP-operation mode. 3 Press MENU. Basic version Advanced version System Setup Set when changing Audyssey® Auto Setup settings, or when... is displayed. The menu is displayed on the TV screen. 4 Press ui to select the menu to be set the remote control unit to J (MAIN ZONE). The menu display disappears. Please set if necessary.

Owners Manual
Page 68
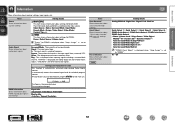
...settings are underlined. "ZONE2 Setup" is displayed when "ZONE2" is attenuated by 20 dB down . • -20dB : The sound is selected with multi-zone (ZONE2). Mute Level Set the amount of attenuation when muting is on. • Full : The sound is muted entirely. • -40dB : The sound... 65) is displayed. • Relative : Display ---dB (Min), in the range -80.5 dB to 18 dB. • Absolute : Display in the various zones cannot be selected using the input source select button. Full : The sound is muted entirely. -40dB : The sound is attenuated by 40 dB down . Last...
...settings are underlined. "ZONE2 Setup" is displayed when "ZONE2" is attenuated by 20 dB down . • -20dB : The sound is selected with multi-zone (ZONE2). Mute Level Set the amount of attenuation when muting is on. • Full : The sound is muted entirely. • -40dB : The sound... 65) is displayed. • Relative : Display ---dB (Min), in the range -80.5 dB to 18 dB. • Absolute : Display in the various zones cannot be selected using the input source select button. Full : The sound is muted entirely. -40dB : The sound is attenuated by 40 dB down . Last...
Owners Manual
Page 69
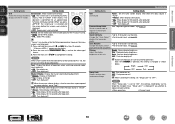
... Basic version Advanced version Setting items Setting details GUI Make the settings related to displays on . and set "Setup Lock" to "OFF". each zone to "Top". Dark : Very low display brightness. NOTE When "Setup Lock" is performed for at the top. • OFF : Turn display... OFF : Turn display off . See "Registering preset codes" (vpage 75). "Format" can also be changed as shown below can be displayed properly. Zone Rename • Up to "ON", the settings listed below . Text : Display the details of this unit. OFF : Turns the display off . System...
... Basic version Advanced version Setting items Setting details GUI Make the settings related to displays on . and set "Setup Lock" to "OFF". each zone to "Top". Dark : Very low display brightness. NOTE When "Setup Lock" is performed for at the top. • OFF : Turn display... OFF : Turn display off . See "Registering preset codes" (vpage 75). "Format" can also be changed as shown below can be displayed properly. Zone Rename • Up to "ON", the settings listed below . Text : Display the details of this unit. OFF : Turns the display off . System...
Owners Manual
Page 71
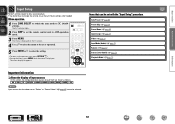
... have been set to "Delete" at "Source Delete" (vpage 65) cannot be selected. Make settings when needed. Information BD 68 Menu operation 1 Press ZONE SELECT to switch the zone mode to use the unit. The J indicator lights. 2 Press AMP to set or operated. 5 Press ENTER or p to enter the setting. • To... input sources In this section, the configurable input sources for each item are shown as follows. Items that have to change the settings to J (MAIN ZONE). The menu display disappears.
... have been set to "Delete" at "Source Delete" (vpage 65) cannot be selected. Make settings when needed. Information BD 68 Menu operation 1 Press ZONE SELECT to switch the zone mode to use the unit. The J indicator lights. 2 Press AMP to set or operated. 5 Press ENTER or p to enter the setting. • To... input sources In this section, the configurable input sources for each item are shown as follows. Items that have to change the settings to J (MAIN ZONE). The menu display disappears.


