Owner's Manual
Page 1
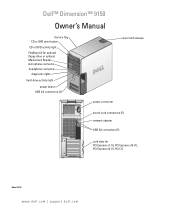
Dell™ Dimension™ 9150 Owner's Manual Service Tag CD or DVD eject button CD or DVD activity light FlexBays (2) for optional floppy drive or optional Media Card Reader microphone connector headphone connector diagnostic lights hard-drive activity light power button USB 2.0 connectors (2) cover latch release power connector sound-card connectors (5) network adapter USB 2.0 connectors (5) card slots for PCI Express x1 (1), PCI Express x16 (1), PCI Express x4 (1), PCI (3) Model DCTA www.dell.com | support.dell.com
Dell™ Dimension™ 9150 Owner's Manual Service Tag CD or DVD eject button CD or DVD activity light FlexBays (2) for optional floppy drive or optional Media Card Reader microphone connector headphone connector diagnostic lights hard-drive activity light power button USB 2.0 connectors (2) cover latch release power connector sound-card connectors (5) network adapter USB 2.0 connectors (5) card slots for PCI Express x1 (1), PCI Express x16 (1), PCI Express x4 (1), PCI (3) Model DCTA www.dell.com | support.dell.com
Owner's Manual
Page 5
...Problems 48 Sound and Speaker Problems 49 No sound from speakers 49 No sound from headphones 50 Video and Monitor Problems 50 If the screen is blank 50 If the screen is difficult to read 51 3 Troubleshooting Tools 53 Diagnostic Lights 53 Dell Diagnostics 56 Dell Diagnostics ... Identifying Drivers 58 Reinstalling Drivers 58 Resolving Software and Hardware Incompatibilities 59 Restoring Your Operating System 59 Using Microsoft Windows XP System Restore 60 Using Dell PC Restore by Symantec 61 4 Removing and Installing Parts 63 Before You Begin 63 Recommended Tools 63 Turn Off ...
...Problems 48 Sound and Speaker Problems 49 No sound from speakers 49 No sound from headphones 50 Video and Monitor Problems 50 If the screen is blank 50 If the screen is difficult to read 51 3 Troubleshooting Tools 53 Diagnostic Lights 53 Dell Diagnostics 56 Dell Diagnostics ... Identifying Drivers 58 Reinstalling Drivers 58 Resolving Software and Hardware Incompatibilities 59 Restoring Your Operating System 59 Using Microsoft Windows XP System Restore 60 Using Dell PC Restore by Symantec 61 4 Removing and Installing Parts 63 Before You Begin 63 Recommended Tools 63 Turn Off ...
Owner's Manual
Page 38
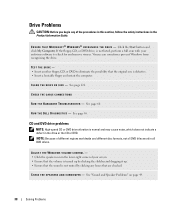
... CD or DVD drive vibration is defective. • Insert a bootable floppy and restart the computer. See "Sound and Speaker Problems" on page 49. 38 Solving Problems See page 122. Viruses can sometimes prevent Windows from ... H A T M I C R O S O F T ® W I N D O W S ® R E C O G N I Z E S T H E D R I S K - If the floppy, CD, or DVD drive, is not muted by clicking the slidebar and dragging it up. • Ensure that the sound is not listed, perform a full scan with your screen. • Ensure that the volume is turned up by clicking any of different regions worldwide and...
... CD or DVD drive vibration is defective. • Insert a bootable floppy and restart the computer. See "Sound and Speaker Problems" on page 49. 38 Solving Problems See page 122. Viruses can sometimes prevent Windows from ... H A T M I C R O S O F T ® W I N D O W S ® R E C O G N I Z E S T H E D R I S K - If the floppy, CD, or DVD drive, is not muted by clicking the slidebar and dragging it up. • Ensure that the sound is not listed, perform a full scan with your screen. • Ensure that the volume is turned up by clicking any of different regions worldwide and...

Owner's Manual
Page 49
... - • See the scanner documentation for instructions. If you did not turn the player volume down or off. R E I N S T A L L T H E S C A N N E R D R I S C O N N E C T H E A D P H O N E S F R O M T H E H E A D P H O N E C O N N E C T O R - Solving Problems 49 Sound and Speaker Problems CAUTION: Before you purchased a sound card, ensure that the speakers are securely connected to eliminate distortion. C H E C K T H E S P E A K E R C A B L E C O N N E C T I N D O W S V O L U M E C O N T R O L - Click or double-click the speaker icon in the lower-right...
... - • See the scanner documentation for instructions. If you did not turn the player volume down or off. R E I N S T A L L T H E S C A N N E R D R I S C O N N E C T H E A D P H O N E S F R O M T H E H E A D P H O N E C O N N E C T O R - Solving Problems 49 Sound and Speaker Problems CAUTION: Before you purchased a sound card, ensure that the speakers are securely connected to eliminate distortion. C H E C K T H E S P E A K E R C A B L E C O N N E C T I N D O W S V O L U M E C O N T R O L - Click or double-click the speaker icon in the lower-right...
Owner's Manual
Page 50
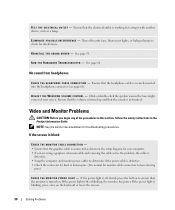
... screen is blank CHECK THE MONITOR CABLE CONNECTION - • Ensure that the graphics cable is normal for interference. See page 59. See page 60. No sound from headphones C H E C K T H E H E A D P H O N E C A B L E C O N N E C T I V E R - Video and Monitor Problems CAUTION:... O S S I B L E I N D O W S V O L U M E C O N T R O L - Ensure that the volume is turned up and that the headphone cable is not muted. Ensure that the sound is securely inserted into the headphone connector (see page 66). If the power light is turned on the keyboard or move the mouse. 50 Solving...
... screen is blank CHECK THE MONITOR CABLE CONNECTION - • Ensure that the graphics cable is normal for interference. See page 59. See page 60. No sound from headphones C H E C K T H E H E A D P H O N E C A B L E C O N N E C T I V E R - Video and Monitor Problems CAUTION:... O S S I B L E I N D O W S V O L U M E C O N T R O L - Ensure that the volume is turned up and that the headphone cable is not muted. Ensure that the sound is securely inserted into the headphone connector (see page 66). If the power light is turned on the keyboard or move the mouse. 50 Solving...

Owner's Manual
Page 66
...recommended that the system is operating. Used to identify your computer when you use the power button to ensure that you access the Dell Support website or call technical support. 66 Removing and Installing Parts NOTICE: Keep the vent area clean and dust-free to turn... lights (4) 11 headphone connector 12 microphone connector 13 Service Tag Use the optional IEEE 1394 connector for voice or musical input into a sound or telephony program. Use the front USB connectors for more information, see "System Setup Options" on page 116 for devices that typically remain...
...recommended that the system is operating. Used to identify your computer when you use the power button to ensure that you access the Dell Support website or call technical support. 66 Removing and Installing Parts NOTICE: Keep the vent area clean and dust-free to turn... lights (4) 11 headphone connector 12 microphone connector 13 Service Tag Use the optional IEEE 1394 connector for voice or musical input into a sound or telephony program. Use the front USB connectors for more information, see "System Setup Options" on page 116 for devices that typically remain...

Owner's Manual
Page 67
...8226; Microphone connector - Use the green line-out connector to attach a personal computer microphone for voice or musical input into a sound or telephony program. • Surround connector - Use the yellow subwoofer connector to attach multichannelcapable speakers. • Center/subwoofer (Center...the black surround connector to attach multiple speakers. Back View of the Computer 1 2 3 4 5 1 power connector Insert the power cable. 2 sound card connectors (5) • Line-in connector to attach a record/playback device such as a cassette player, CD player, or VCR. • Line...
...8226; Microphone connector - Use the green line-out connector to attach a personal computer microphone for voice or musical input into a sound or telephony program. • Surround connector - Use the yellow subwoofer connector to attach multichannelcapable speakers. • Center/subwoofer (Center...the black surround connector to attach multiple speakers. Back View of the Computer 1 2 3 4 5 1 power connector Insert the power cable. 2 sound card connectors (5) • Line-in connector to attach a record/playback device such as a cassette player, CD player, or VCR. • Line...
Owner's Manual
Page 80
...you removed the retention mechanism, you may reinstall the retention mechanism. 13 Before replacing the card retention mechanism, ensure that should be attached to the sound card connectors. b Connect the network cable to Off. Removing a PCI Card 1 Follow the procedures in "Before You Begin" on . 16 ...electrical outlets, and then turn them on page 63. 2 Remove the computer cover (see page 68). 3 If you need a filler bracket, contact Dell (see page 126). 80 Removing and Installing Parts b Connect external audio devices to the card. If you are removing the card permanently, install a ...
...you removed the retention mechanism, you may reinstall the retention mechanism. 13 Before replacing the card retention mechanism, ensure that should be attached to the sound card connectors. b Connect the network cable to Off. Removing a PCI Card 1 Follow the procedures in "Before You Begin" on . 16 ...electrical outlets, and then turn them on page 63. 2 Remove the computer cover (see page 68). 3 If you need a filler bracket, contact Dell (see page 126). 80 Removing and Installing Parts b Connect external audio devices to the card. If you are removing the card permanently, install a ...
Owner's Manual
Page 81
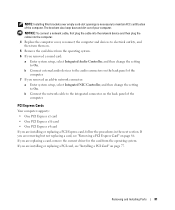
... • One PCI Express x4 card If you are replacing a card, remove the current driver for the card from the operating system. 6 If you removed a sound card: a Enter system setup, select Integrated Audio Controller, and then change the setting to On. If you are installing or replacing a PCI Express card, follow...
... • One PCI Express x4 card If you are replacing a card, remove the current driver for the card from the operating system. 6 If you removed a sound card: a Enter system setup, select Integrated Audio Controller, and then change the setting to On. If you are installing or replacing a PCI Express card, follow...
Owner's Manual
Page 85
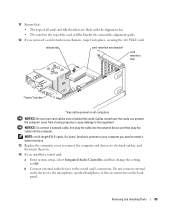
...routed over or behind the cards. NOTE: or full-length PCI-E cards, if a "piano" bracket is present on your computer you installed a sound card: a Enter system setup, select Integrated Audio Controller, and then change the setting to the microphone, speaker/headphone, or line-in the top ...If you removed a card retention mechanism, snap it down into place. 13 Replace the computer cover, reconnect the computer and devices to the sound card's connectors. release tab card retention mechanism* card retention door *"piano" bracket *may not be present on all cards and filler brackets are...
...routed over or behind the cards. NOTE: or full-length PCI-E cards, if a "piano" bracket is present on your computer you installed a sound card: a Enter system setup, select Integrated Audio Controller, and then change the setting to the microphone, speaker/headphone, or line-in the top ...If you removed a card retention mechanism, snap it down into place. 13 Replace the computer cover, reconnect the computer and devices to the sound card's connectors. release tab card retention mechanism* card retention door *"piano" bracket *may not be present on all cards and filler brackets are...
Owner's Manual
Page 88
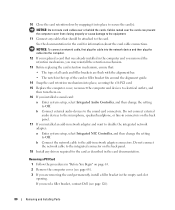
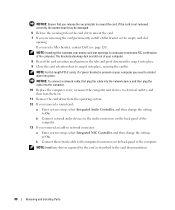
...mechanism in network connector: a Enter system setup, select Integrated NIC Controller, and then change the setting to unseat the card. 7 If you removed a sound card: a Enter system setup, select Integrated Audio Controller, and then change the setting to snap it down into place. 9 Close the card retention door...into place, securing the card(s). The brackets also keep dust and dirt out of the computer. 13 If you need a filler bracket, contact Dell (see page 126). b Connect external audio devices to the audio connectors on the back panel of your computer you removed an add-in ...
...mechanism in network connector: a Enter system setup, select Integrated NIC Controller, and then change the setting to unseat the card. 7 If you removed a sound card: a Enter system setup, select Integrated Audio Controller, and then change the setting to snap it down into place. 9 Close the card retention door...into place, securing the card(s). The brackets also keep dust and dirt out of the computer. 13 If you need a filler bracket, contact Dell (see page 126). b Connect external audio devices to the audio connectors on the back panel of your computer you removed an add-in ...
Owner's Manual
Page 145
...connectors center/LFE, 67 headphone, 66 IEEE 1394, 66 line-in, 67 line-out, 67 microphone, 66-67 network adapter, 68 power, 67 sound, 67 surround, 67 USB, 66, 68 copying CDs general information, 18 helpful tips, 20 how to, 18 copying DVDs general information, 18 ...helpful tips, 20 how to, 18 cover replacing, 107 D Dell Dell Diagnostics, 56 support policy, 123 support site, 11 Dell Premier Support website, 9, 11 diagnostic lights, 53 diagnostics Dell, 56 lights, 53, 66 documentation online, 11 Product Information Guide, 9 Setup Diagram, 9 drive panel...
...connectors center/LFE, 67 headphone, 66 IEEE 1394, 66 line-in, 67 line-out, 67 microphone, 66-67 network adapter, 68 power, 67 sound, 67 surround, 67 USB, 66, 68 copying CDs general information, 18 helpful tips, 20 how to, 18 copying DVDs general information, 18 ...helpful tips, 20 how to, 18 cover replacing, 107 D Dell Dell Diagnostics, 56 support policy, 123 support site, 11 Dell Premier Support website, 9, 11 diagnostic lights, 53 diagnostics Dell, 56 lights, 53, 66 documentation online, 11 Product Information Guide, 9 Setup Diagram, 9 drive panel...
Owner's Manual
Page 147
...Wizard, 24 problems, 46 setting up, 23 Network Setup Wizard, 24 O operating system reinstalling Windows XP, 60 P password clearing, 121 jumper, 121 PC Restore, 61 PCI cards removing, 80 PCI ...blue screen, 44 CD drive, 38 CD-RW drive, 39 computer crashes, 43-44 computer stops responding, 43 Dell Diagnostics, 56 diagnostic lights, 53 drives, 38 DVD drive, 38 e-mail, 39 error messages, 41 general, 43... 48 screen is blank, 50 screen is hard to read, 51 software, 43-44 sound and speakers, 49 technical support policy, 123 troubleshooting tips, 37 volume adjusting, 49 Program Compatibility Wizard, 44 ...
...Wizard, 24 problems, 46 setting up, 23 Network Setup Wizard, 24 O operating system reinstalling Windows XP, 60 P password clearing, 121 jumper, 121 PC Restore, 61 PCI cards removing, 80 PCI ...blue screen, 44 CD drive, 38 CD-RW drive, 39 computer crashes, 43-44 computer stops responding, 43 Dell Diagnostics, 56 diagnostic lights, 53 drives, 38 DVD drive, 38 e-mail, 39 error messages, 41 general, 43... 48 screen is blank, 50 screen is hard to read, 51 software, 43-44 sound and speakers, 49 technical support policy, 123 troubleshooting tips, 37 volume adjusting, 49 Program Compatibility Wizard, 44 ...
Owner's Manual
Page 148
software Hyper-Threading, 27 problems, 43-44 sound problems, 49 volume, 49 sound connectors, 67 speaker problems, 49 volume, 49 ...panel, 66 volume adjusting, 49 T technical support policy, 123 transferring information to a new computer, 27 troubleshooting Dell Diagnostics, 56 diagnostic lights, 53 Hardware Troubleshooter, 59 Help and Support Center, 12 restore to previous state,...to computer, 21, 23 U USB booting to devices, 119 connectors, 66, 68 W warranty, 9 Windows XP Device Driver Rollback, 58 Files and Settings Transfer Wizard, 27 Hardware Troubleshooter, 59 Help and Support Center, 12...
software Hyper-Threading, 27 problems, 43-44 sound problems, 49 volume, 49 sound connectors, 67 speaker problems, 49 volume, 49 ...panel, 66 volume adjusting, 49 T technical support policy, 123 transferring information to a new computer, 27 troubleshooting Dell Diagnostics, 56 diagnostic lights, 53 Hardware Troubleshooter, 59 Help and Support Center, 12 restore to previous state,...to computer, 21, 23 U USB booting to devices, 119 connectors, 66, 68 W warranty, 9 Windows XP Device Driver Rollback, 58 Files and Settings Transfer Wizard, 27 Hardware Troubleshooter, 59 Help and Support Center, 12...


