Owner's Manual
Page 1
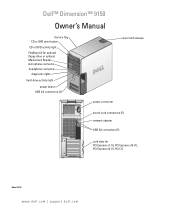
Dell™ Dimension™ 9150 Owner's Manual Service Tag CD or DVD eject button CD or DVD activity light FlexBays (2) for optional floppy drive or optional Media Card Reader microphone connector headphone connector diagnostic lights hard-drive activity light power button USB 2.0 connectors (2) cover latch release power connector sound-card connectors (5) network adapter USB 2.0 connectors (5) card slots for PCI Express x1 (1), PCI Express x16 (1), PCI Express x4 (1), PCI (3) Model DCTA www.dell.com | support.dell.com
Dell™ Dimension™ 9150 Owner's Manual Service Tag CD or DVD eject button CD or DVD activity light FlexBays (2) for optional floppy drive or optional Media Card Reader microphone connector headphone connector diagnostic lights hard-drive activity light power button USB 2.0 connectors (2) cover latch release power connector sound-card connectors (5) network adapter USB 2.0 connectors (5) card slots for PCI Express x1 (1), PCI Express x16 (1), PCI Express x4 (1), PCI (3) Model DCTA www.dell.com | support.dell.com
Owner's Manual
Page 6
... Cover 68 Inside View of Your Computer 70 System Board Components 71 Memory 72 Memory Overview 72 Installing Memory 74 Removing Memory 76 Cards 76 PCI Cards 77 PCI Express Cards 81 Drive Panels 89 Removing the Drive Panel 89 Removing the Drive-Panel Insert 90 Replacing the Drive-Panel Insert 90 Replacing the Drive Panel 91 Drives 92 General Installation Guidelines 92 Hard Drive 92 Removing a Hard Drive 93 Installing a Hard Drive 94 Adding a Second Hard Drive 95 Floppy Drive 96 Removing a Floppy Drive 96 Installing a Floppy Drive 98 Media Card Reader 99 Removing a Media...
... Cover 68 Inside View of Your Computer 70 System Board Components 71 Memory 72 Memory Overview 72 Installing Memory 74 Removing Memory 76 Cards 76 PCI Cards 77 PCI Express Cards 81 Drive Panels 89 Removing the Drive Panel 89 Removing the Drive-Panel Insert 90 Replacing the Drive-Panel Insert 90 Replacing the Drive Panel 91 Drives 92 General Installation Guidelines 92 Hard Drive 92 Removing a Hard Drive 93 Installing a Hard Drive 94 Adding a Second Hard Drive 95 Floppy Drive 96 Removing a Floppy Drive 96 Installing a Floppy Drive 98 Media Card Reader 99 Removing a Media...
Owner's Manual
Page 11
... configuration, product specifications, and white papers • Downloads - DSS is necessary for correct operation of your operating system and support for your Dell computer. Find it Here • Solutions - Service call and order status, warranty, and repair information • Service and support - DSS provides critical updates for Dell™ 3.5-inch USB floppy drives, Intel® Pentium® M processors, optical drives, and USB devices. Finding Information 11 Certified drivers, patches, and software updates • Desktop...
... configuration, product specifications, and white papers • Downloads - DSS is necessary for correct operation of your operating system and support for your Dell computer. Find it Here • Solutions - Service call and order status, warranty, and repair information • Service and support - DSS provides critical updates for Dell™ 3.5-inch USB floppy drives, Intel® Pentium® M processors, optical drives, and USB devices. Finding Information 11 Certified drivers, patches, and software updates • Desktop...
Owner's Manual
Page 14
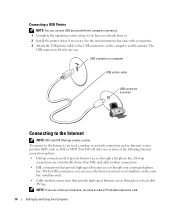
... need an add-in PCI modem expansion card. 14 Setting Up and Using Your Computer See the documentation that provide Internet access through your printer. 3 Attach the USB printer cable to the Internet, you can connect USB devices while the computer is turned on. 1 Complete the operating system setup, if you need a modem or network connection and an Internet service provider (ISP), such as AOL or MSN. USB connector on computer USB printer cable USB connector on printer Connecting...
... need an add-in PCI modem expansion card. 14 Setting Up and Using Your Computer See the documentation that provide Internet access through your printer. 3 Attach the USB printer cable to the Internet, you can connect USB devices while the computer is turned on. 1 Complete the operating system setup, if you need a modem or network connection and an Internet service provider (ISP), such as AOL or MSN. USB connector on computer USB printer cable USB connector on printer Connecting...
Owner's Manual
Page 18
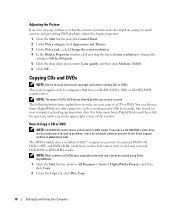
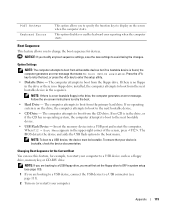
... display properties: 1 Click the Start button and click Control Panel. 2 Under Pick a category, click Appearance and Themes. 3 Under Pick a task..., click Change the screen resolution. 4 In the Display Properties window, click and drag the bar in Screen resolution to change the setting to 800 by Dell may not read DVD+/-R, DVD+/-RW and DVD+R DL (dual layer) media, but cannot write to make an exact copy of CD or DVD drives...
... display properties: 1 Click the Start button and click Control Panel. 2 Under Pick a category, click Appearance and Themes. 3 Under Pick a task..., click Change the screen resolution. 4 In the Display Properties window, click and drag the bar in Screen resolution to change the setting to 800 by Dell may not read DVD+/-R, DVD+/-RW and DVD+R DL (dual layer) media, but cannot write to make an exact copy of CD or DVD drives...
Owner's Manual
Page 21
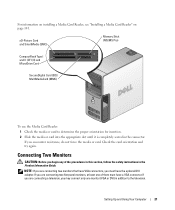
... safety instructions in addition to determine the proper orientation for insertion. 2 Slide the media or card into the appropriate slot until it is completely seated in the connector. NOTE: If you are connecting two monitors that have VGA connectors, you must have the optional DVI adapter. Setting Up and Using Your Computer 21 Connecting Two Monitors CAUTION: Before you are connecting two flat-panel monitors, at least one monitor (VGA...
... safety instructions in addition to determine the proper orientation for insertion. 2 Slide the media or card into the appropriate slot until it is completely seated in the connector. NOTE: If you are connecting two monitors that have VGA connectors, you must have the optional DVI adapter. Setting Up and Using Your Computer 21 Connecting Two Monitors CAUTION: Before you are connecting two flat-panel monitors, at least one monitor (VGA...
Owner's Manual
Page 23
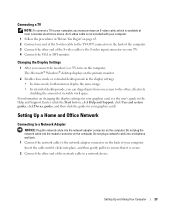
... not plug a network cable into the modem connector on the computer. Connecting a TV NOTE: To connect a TV to the S-video input connector on changing the display settings for your graphics card, see the user's guide in the Help and Support Center (click the Start button, click Help and Support, click User and system guides, click Device guides, and then click the guide for your graphics card). The Microsoft® Windows® desktop displays on the back of the network cable to the...
... not plug a network cable into the modem connector on the computer. Connecting a TV NOTE: To connect a TV to the S-video input connector on changing the display settings for your graphics card, see the user's guide in the Help and Support Center (click the Start button, click Help and Support, click User and system guides, click Device guides, and then click the guide for your graphics card). The Microsoft® Windows® desktop displays on the back of the network cable to the...
Owner's Manual
Page 47
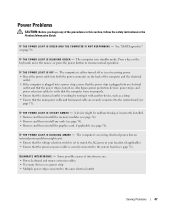
... incorrectly installed. • Remove and then reinstall the memory modules (see page 74). • Remove and then reinstall any of interference are securely connected to the system board (see page 71). I F T H E P O W E R L I G H T I S B L I N K I N T E R F E R E N C E - Press a key on . A device might exist. • Ensure that the voltage selection switch is set to match the AC power at your location (if applicable). • Ensure that the processor power cable is working by testing...
... incorrectly installed. • Remove and then reinstall the memory modules (see page 74). • Remove and then reinstall any of interference are securely connected to the system board (see page 71). I F T H E P O W E R L I G H T I S B L I N K I N T E R F E R E N C E - Press a key on . A device might exist. • Ensure that the voltage selection switch is set to match the AC power at your location (if applicable). • Ensure that the processor power cable is working by testing...
Owner's Manual
Page 54
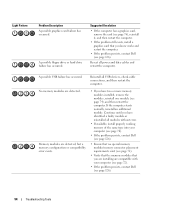
... special memory module/memory connector placement requirements exist (see page 72). • Verify that the memory modules that you have two or more memory modules installed, remove the modules, reinstall one module (see page 126). 54 Troubleshooting Tools Light Pattern Problem Description A possible graphics card failure has occurred. If the computer starts normally, reinstall an additional module. No memory modules are detected. Reseat all USB devices, check cable connections...
... special memory module/memory connector placement requirements exist (see page 72). • Verify that the memory modules that you have two or more memory modules installed, remove the modules, reinstall one module (see page 126). 54 Troubleshooting Tools Light Pattern Problem Description A possible graphics card failure has occurred. If the computer starts normally, reinstall an additional module. No memory modules are detected. Reseat all USB devices, check cable connections...
Owner's Manual
Page 58
... your computer after you install or update a driver, use System Restore to return your computer to replace the driver with the previously installed version. 1 Click the Start button and click Control Panel. 2 Under Pick a Category, click Performance and Maintenance. 3 Click System. 4 In the System Properties window, click the Hardware tab. 5 Click Device Manager. 6 Right-click the device for Dell™ computers. Windows XP 1 Click the Start button and click Control Panel. 2 Under Pick a Category, click...
... your computer after you install or update a driver, use System Restore to return your computer to replace the driver with the previously installed version. 1 Click the Start button and click Control Panel. 2 Under Pick a Category, click Performance and Maintenance. 3 Click System. 4 In the System Properties window, click the Hardware tab. 5 Click Device Manager. 6 Right-click the device for Dell™ computers. Windows XP 1 Click the Start button and click Control Panel. 2 Under Pick a Category, click...
Owner's Manual
Page 59
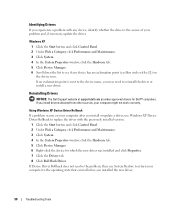
... click Device Manager. 4 Double-click the type of device for which you received the computer. Resolving Software and Hardware Incompatibilities If a device is either not detected during the operating system setup or is detected but incorrectly configured, you purchased the computer. Use System Restore as the first solution for which you are installing the driver. 6 Click the Driver tab and click Update Driver. 7 Click Install from a list or specific location (Advanced...
... click Device Manager. 4 Double-click the type of device for which you received the computer. Resolving Software and Hardware Incompatibilities If a device is either not detected during the operating system setup or is detected but incorrectly configured, you purchased the computer. Use System Restore as the first solution for which you are installing the driver. 6 Click the Driver tab and click Update Driver. 7 Click Install from a list or specific location (Advanced...
Owner's Manual
Page 60
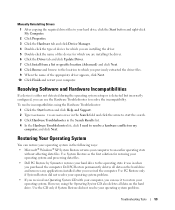
... Start button and click Help and Support. 2 Click the task for System Restore. 3 Follow the instructions on using a different restore point, or you install a device driver, use System Restore. Restoring the Computer to an Earlier Operating State If problems occur after System Restore finishes collecting data and then the computer restarts. 6 After the computer restarts, click OK. The Select a Restore Point screen provides a calendar that allows you set your Dell...
... Start button and click Help and Support. 2 Click the task for System Restore. 3 Follow the instructions on using a different restore point, or you install a device driver, use System Restore. Restoring the Computer to an Earlier Operating State If problems occur after System Restore finishes collecting data and then the computer restarts. 6 After the computer restarts, click OK. The Select a Restore Point screen provides a calendar that allows you set your Dell...
Owner's Manual
Page 80
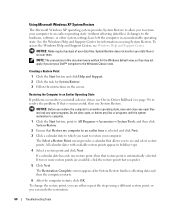
... integrated connector on page 63. 2 Remove the computer cover (see page 126). 80 Removing and Installing Parts Do not connect external audio devices to the microphone, speaker/headphone, or line-in the empty card-slot opening. Removing a PCI Card 1 Follow the procedures in network adapter and want to disable the integrated network adapter: a Enter system setup, select Integrated NIC Controller, and then change the setting to Off. b Connect the network cable to the sound card connectors. NOTICE: Do not route card cables over the cards can...
... integrated connector on page 63. 2 Remove the computer cover (see page 126). 80 Removing and Installing Parts Do not connect external audio devices to the microphone, speaker/headphone, or line-in the empty card-slot opening. Removing a PCI Card 1 Follow the procedures in network adapter and want to disable the integrated network adapter: a Enter system setup, select Integrated NIC Controller, and then change the setting to Off. b Connect the network cable to the sound card connectors. NOTICE: Do not route card cables over the cards can...
Owner's Manual
Page 81
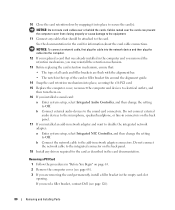
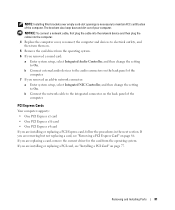
... of the computer. If you removed a sound card: a Enter system setup, select Integrated Audio Controller, and then change the setting to On. NOTICE: To connect a network cable, first plug the cable into the network device and then plug the cable into the computer. 4 Replace the computer cover, reconnect the computer and devices to electrical outlets, and then turn them on page 86. NOTE: Installing filler brackets over empty card-slot openings is necessary to maintain FCC...
... of the computer. If you removed a sound card: a Enter system setup, select Integrated Audio Controller, and then change the setting to On. NOTICE: To connect a network cable, first plug the cable into the network device and then plug the cable into the computer. 4 Replace the computer cover, reconnect the computer and devices to electrical outlets, and then turn them on page 86. NOTE: Installing filler brackets over empty card-slot openings is necessary to maintain FCC...
Owner's Manual
Page 88
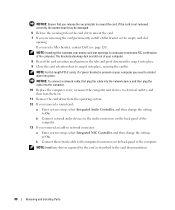
.... b Connect the network cable to unseat the card. 7 If you are removing the card permanently, install a filler bracket in the card documentation. 88 Removing and Installing Parts If the card is necessary to the audio connectors on . 11 Remove the card driver from the operating system. 12 If you removed a sound card: a Enter system setup, select Integrated Audio Controller, and then change the setting to unseat the card. NOTE: Installing filler brackets over empty card-slot openings is not removed correctly, the system board...
.... b Connect the network cable to unseat the card. 7 If you are removing the card permanently, install a filler bracket in the card documentation. 88 Removing and Installing Parts If the card is necessary to the audio connectors on . 11 Remove the card driver from the operating system. 12 If you removed a sound card: a Enter system setup, select Integrated Audio Controller, and then change the setting to unseat the card. NOTE: Installing filler brackets over empty card-slot openings is not removed correctly, the system board...
Owner's Manual
Page 116
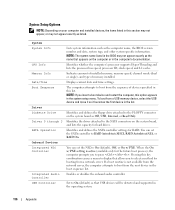
..., the BIOS version number and date, system tags, and other system-specific information. USB Controller Set to the FLOPPY connector on the system board, and lists the capacity for the future boot process), the computer prompts you to On (default), Off, or On w/ PXE. Memory Info Indicates amount of installed memory, memory speed, channel mode (dual or single), and type of devices specified in this key combination causes a menu to display that appears...
..., the BIOS version number and date, system tags, and other system-specific information. USB Controller Set to the FLOPPY connector on the system board, and lists the capacity for the future boot process), the computer prompts you to On (default), Off, or On w/ PXE. Memory Info Indicates amount of installed memory, memory speed, channel mode (dual or single), and type of devices specified in this key combination causes a menu to display that appears...
Owner's Manual
Page 119
... the screen, press . Changing Boot Sequence for the Current Boot You can use this feature, for devices. This option disables or enables keyboard error reporting when the computer starts. The BIOS detects the device and adds the USB flash option to enter the setup utility. • Diskette Drive - NOTE: If there is no operating system is bootable, check the device documentation. Insert the memory device into a USB port and restart the computer. To ensure that states No boot device available...
... the screen, press . Changing Boot Sequence for the Current Boot You can use this feature, for devices. This option disables or enables keyboard error reporting when the computer starts. The BIOS detects the device and adds the USB flash option to enter the setup utility. • Diskette Drive - NOTE: If there is no operating system is bootable, check the device documentation. Insert the memory device into a USB port and restart the computer. To ensure that states No boot device available...
Owner's Manual
Page 145
Index A audio. See sound B battery problems, 37 replacing, 106 BIOS, 113 boot sequence about, 119 changing, 119-120 option settings, 119 booting to a USB device, 119 C cards installing PCI Express, 82 PCI Express, 81 removing PCI, 80 removing PCI Express, 86 slots, 68 CD/DVD drive activity light, 65 eject button, 65 problems, 38 CD-RW drive problems, 39 CDs, 18 playing, 16 Check Disk, 39 CMOS settings clearing, 122 computer components inside, 70 crashes, 43-44 inside view, 70 restore to previous state, 59-60 stops...
Index A audio. See sound B battery problems, 37 replacing, 106 BIOS, 113 boot sequence about, 119 changing, 119-120 option settings, 119 booting to a USB device, 119 C cards installing PCI Express, 82 PCI Express, 81 removing PCI, 80 removing PCI Express, 86 slots, 68 CD/DVD drive activity light, 65 eject button, 65 problems, 38 CD-RW drive problems, 39 CDs, 18 playing, 16 Check Disk, 39 CMOS settings clearing, 122 computer components inside, 70 crashes, 43-44 inside view, 70 restore to previous state, 59-60 stops...
Owner's Manual
Page 146
... Bay drive Media Card Reader, 65 H hard drive activity light, 66 problems, 39 hardware Dell Diagnostics, 56 drives, RAID configuration, 28 Hardware Troubleshooter, 59 headphone connector, 66 Help and Support Center, 12 hibernate mode, 25, 27 Hyper-Threading, 27 I IEEE 1394 connector, 66 installing parts before you begin, 63 recommended tools, 63 turning off your computer, 63 Internet connection, about, 14 connection, options, 14 connection, setting up, 15 problems, 39 K keyboard problems, 42 L labels Microsoft Windows, 10 Service Tag, 10, 66 latch release cover, 65 lights diagnostic, 53...
... Bay drive Media Card Reader, 65 H hard drive activity light, 66 problems, 39 hardware Dell Diagnostics, 56 drives, RAID configuration, 28 Hardware Troubleshooter, 59 headphone connector, 66 Help and Support Center, 12 hibernate mode, 25, 27 Hyper-Threading, 27 I IEEE 1394 connector, 66 installing parts before you begin, 63 recommended tools, 63 turning off your computer, 63 Internet connection, about, 14 connection, options, 14 connection, setting up, 15 problems, 39 K keyboard problems, 42 L labels Microsoft Windows, 10 Service Tag, 10, 66 latch release cover, 65 lights diagnostic, 53...
Owner's Manual
Page 147
... cable, 13 connecting, 13 problems, 48 setting up, 13 USB, 14 problems battery, 37 blue screen, 44 CD drive, 38 CD-RW drive, 39 computer crashes, 43-44 computer stops responding, 43 Dell Diagnostics, 56 diagnostic lights, 53 drives, 38 DVD drive, 38 e-mail, 39 error messages, 41 general, 43 hard drive, 39 Internet, 39 keyboard, 42 Media Card Reader, 42 memory, 45 modem, 39 monitor is blank, 50 monitor is hard to read, 51 mouse, 45 network, 46 problems (continued) power, 47 power light...
... cable, 13 connecting, 13 problems, 48 setting up, 13 USB, 14 problems battery, 37 blue screen, 44 CD drive, 38 CD-RW drive, 39 computer crashes, 43-44 computer stops responding, 43 Dell Diagnostics, 56 diagnostic lights, 53 drives, 38 DVD drive, 38 e-mail, 39 error messages, 41 general, 43 hard drive, 39 Internet, 39 keyboard, 42 Media Card Reader, 42 memory, 45 modem, 39 monitor is blank, 50 monitor is hard to read, 51 mouse, 45 network, 46 problems (continued) power, 47 power light...


