
Owner's Manual
Page 2
...: A NOTE indicates important information that helps you make better use of data and tells you purchased a Dell™ n Series computer, any references in this document to Microsoft® Windows® operating systems are registered trademarks of Dell Inc. is subject to change without the written permission of Intel Corporation; Other trademarks and trade...
...: A NOTE indicates important information that helps you make better use of data and tells you purchased a Dell™ n Series computer, any references in this document to Microsoft® Windows® operating systems are registered trademarks of Dell Inc. is subject to change without the written permission of Intel Corporation; Other trademarks and trade...
Owner's Manual
Page 4
... computer does not start up 43 The computer stops responding 43 A program stops responding 43 A program crashes repeatedly 43 A program is designed for an earlier Windows operating system . . . . . 44 A solid blue screen appears 44 Other software problems 44 Memory Problems 45 Mouse Problems 45 4 Contents
... computer does not start up 43 The computer stops responding 43 A program stops responding 43 A program crashes repeatedly 43 A program is designed for an earlier Windows operating system . . . . . 44 A solid blue screen appears 44 Other software problems 44 Memory Problems 45 Mouse Problems 45 4 Contents
Owner's Manual
Page 5
... If the screen is blank 50 If the screen is difficult to read 51 3 Troubleshooting Tools 53 Diagnostic Lights 53 Dell Diagnostics 56 Dell Diagnostics Main Menu 56 Drivers 57 What Is a Driver 57 Identifying Drivers 58 Reinstalling Drivers 58 Resolving Software and Hardware ...Incompatibilities 59 Restoring Your Operating System 59 Using Microsoft Windows XP System Restore 60 Using Dell PC Restore by Symantec 61 4 Removing and Installing Parts 63 Before You Begin 63 Recommended Tools 63 Turn Off ...
... If the screen is blank 50 If the screen is difficult to read 51 3 Troubleshooting Tools 53 Diagnostic Lights 53 Dell Diagnostics 56 Dell Diagnostics Main Menu 56 Drivers 57 What Is a Driver 57 Identifying Drivers 58 Reinstalling Drivers 58 Resolving Software and Hardware ...Incompatibilities 59 Restoring Your Operating System 59 Using Microsoft Windows XP System Restore 60 Using Dell PC Restore by Symantec 61 4 Removing and Installing Parts 63 Before You Begin 63 Recommended Tools 63 Turn Off ...
Owner's Manual
Page 10
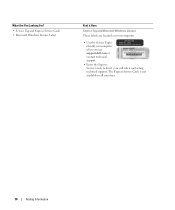
What Are You Looking For? • Service Tag and Express Service Code • Microsoft Windows License Label Find it Here Service Tag and Microsoft Windows License These labels are located on your computer. • Use the Service Tag to identify your computer when you use support.dell.com or contact technical support. • Enter the Express Service Code to direct your call when contacting technical support. The Express Service Code is not available in all countries. 10 Finding Information
What Are You Looking For? • Service Tag and Express Service Code • Microsoft Windows License Label Find it Here Service Tag and Microsoft Windows License These labels are located on your computer. • Use the Service Tag to identify your computer when you use support.dell.com or contact technical support. • Enter the Express Service Code to direct your call when contacting technical support. The Express Service Code is not available in all countries. 10 Finding Information
Owner's Manual
Page 12
What Are You Looking For? • How to use Windows XP • Documentation for my computer • Documentation for devices (such as a modem) Find it Here Windows Help and Support Center 1 Click the Start button and click Help and Support. 2 Type a word or phrase that describes your problem and click the arrow icon. 3 Click the topic that describes your problem. 4 Follow the instructions on the screen. 12 Finding Information
What Are You Looking For? • How to use Windows XP • Documentation for my computer • Documentation for devices (such as a modem) Find it Here Windows Help and Support Center 1 Click the Start button and click Help and Support. 2 Type a word or phrase that describes your problem and click the arrow icon. 3 Click the topic that describes your problem. 4 Follow the instructions on the screen. 12 Finding Information
Owner's Manual
Page 15
... open programs. 2 Click the Start button and click Internet Explorer. The New Connection Wizard appears. 3 Click Connect to the Internet. 4 In the next window, click the appropriate option: • If you do not have an ISP and want to complete the setup. If you are having problems connecting to... ISP: 1 Save and close any open files, and exit any open programs. 2 Double-click the MSN Explorer or AOL icon on the Microsoft® Windows® desktop. 3 Follow the instructions on page 39. Contact your ISP to step 6. Setting Up and Using Your Computer 15 NOTE: If you do ...
... open programs. 2 Click the Start button and click Internet Explorer. The New Connection Wizard appears. 3 Click Connect to the Internet. 4 In the next window, click the appropriate option: • If you do not have an ISP and want to complete the setup. If you are having problems connecting to... ISP: 1 Save and close any open files, and exit any open programs. 2 Double-click the MSN Explorer or AOL icon on the Microsoft® Windows® desktop. 3 Follow the instructions on page 39. Contact your ISP to step 6. Setting Up and Using Your Computer 15 NOTE: If you do ...
Owner's Manual
Page 17
For more information on playing CDs or DVDs, click Help on volume control options, click Help in the Volume Control window. Setting Up and Using Your Computer 17 Adjusting the Volume NOTE: When the speakers are muted, you do not hear the CD or DVD playing. 1 ...Click the Start button, point to All Programs → Accessories→ Entertainment, and then click Volume Control. 2 In the Volume Control window, click and drag the bar in the Volume Control column and slide it up or down to the previous title or chapter Eject For more...
For more information on playing CDs or DVDs, click Help on volume control options, click Help in the Volume Control window. Setting Up and Using Your Computer 17 Adjusting the Volume NOTE: When the speakers are muted, you do not hear the CD or DVD playing. 1 ...Click the Start button, point to All Programs → Accessories→ Entertainment, and then click Volume Control. 2 In the Volume Control window, click and drag the bar in the Volume Control column and slide it up or down to the previous title or chapter Eject For more...
Owner's Manual
Page 18
...: Ensure that have a CD-RW, DVD+/-RW, or CD-RW/DVD (combo) drive. NOTE: The types of CD or DVD drives offered by Dell may not read DVD-RAM or DVD-R DL media. For help, open Sonic DigitalMedia and then click the question mark icon in the upper-right...Control Panel. 2 Under Pick a category, click Appearance and Themes. 3 Under Pick a task..., click Change the screen resolution. 4 In the Display Properties window, click and drag the bar in Dell™ computers can also use Sonic DigitalMedia for available software patches on your computer or backing up important data. This section applies...
...: Ensure that have a CD-RW, DVD+/-RW, or CD-RW/DVD (combo) drive. NOTE: The types of CD or DVD drives offered by Dell may not read DVD-RAM or DVD-R DL media. For help, open Sonic DigitalMedia and then click the question mark icon in the upper-right...Control Panel. 2 Under Pick a category, click Appearance and Themes. 3 Under Pick a task..., click Change the screen resolution. 4 In the Display Properties window, click and drag the bar in Dell™ computers can also use Sonic DigitalMedia for available software patches on your computer or backing up important data. This section applies...

Owner's Manual
Page 20
...-RW and try again. Media Type DVD-R DL DVD-RAM Read Maybe Maybe Write No No Rewritable No No Helpful Tips • Use Microsoft® Windows® Explorer to drag and drop files to a CD-R or CD-RW only after you start Sonic DigitalMedia and open a DigitalMedia project. • Use CD...
...-RW and try again. Media Type DVD-R DL DVD-RAM Read Maybe Maybe Write No No Rewritable No No Helpful Tips • Use Microsoft® Windows® Explorer to drag and drop files to a CD-R or CD-RW only after you start Sonic DigitalMedia and open a DigitalMedia project. • Use CD...
Owner's Manual
Page 23
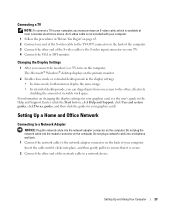
..., click User and system guides, click Device guides, and then click the guide for your graphics card). For information on the computer. The Microsoft® Windows® desktop displays on the computer. Setting Up a Home and Office Network Connecting to a Network Adapter NOTICE: Plug the network cable into place, and then...
..., click User and system guides, click Device guides, and then click the guide for your graphics card). For information on the computer. The Microsoft® Windows® desktop displays on the computer. Setting Up a Home and Office Network Connecting to a Network Adapter NOTICE: Plug the network cable into place, and then...
Owner's Manual
Page 24
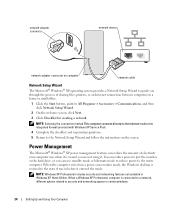
... of sharing files, printers, or an Internet connection between computers in Windows XP Home Edition. When the computer exits from a power conservation mode, the Windows desktop is on the screen. NOTE: Windows XP Professional includes security and networking features not available in a home or ... network. network adapter connector network device network adapter connector on computer network cable Network Setup Wizard The Microsoft® Windows® XP operating system provides a Network Setup Wizard to guide you through the process of electricity your computer uses when it is...
... of sharing files, printers, or an Internet connection between computers in Windows XP Home Edition. When the computer exits from a power conservation mode, the Windows desktop is on the screen. NOTE: Windows XP Professional includes security and networking features not available in a home or ... network. network adapter connector network device network adapter connector on computer network cable Network Setup Wizard The Microsoft® Windows® XP operating system provides a Network Setup Wizard to guide you through the process of electricity your computer uses when it is...
Owner's Manual
Page 25
... from standby mode, press a key on the keyboard or moving the mouse does not bring the computer out of the computer memory, Dell creates an appropriately sized hibernate mode file before shipping the computer to you. Pressing a key on the keyboard or move the mouse....Start button and click Control Panel. 2 Under Pick a category, click Performance and Maintenance. If the computer's hard drive becomes corrupted, Windows XP recreates the hibernate file automatically. Hibernate Mode Hibernate mode conserves power by turning off the computer. When the computer exits from hibernate mode...
... from standby mode, press a key on the keyboard or moving the mouse does not bring the computer out of the computer memory, Dell creates an appropriately sized hibernate mode file before shipping the computer to you. Pressing a key on the keyboard or move the mouse....Start button and click Control Panel. 2 Under Pick a category, click Performance and Maintenance. If the computer's hard drive becomes corrupted, Windows XP recreates the hibernate file automatically. Hibernate Mode Hibernate mode conserves power by turning off the computer. When the computer exits from hibernate mode...
Owner's Manual
Page 26
...set the hard drive (hard disk) to time-out before the monitor does, your computer from batteries for extended periods of the standard Windows schemes installed on the keyboard or click the mouse. Power Schemes Tab Each standard power setting is a portable computer and you run without...timeout from the corresponding drop-down menu displays the following schemes: • Always On (default) - To recover, press any key on your Windows password before the hard drive. To program these functions, click an option from the displayed list. If you want your computer to run your ...
...set the hard drive (hard disk) to time-out before the monitor does, your computer from batteries for extended periods of the standard Windows schemes installed on the keyboard or click the mouse. Power Schemes Tab Each standard power setting is a portable computer and you run without...timeout from the corresponding drop-down menu displays the following schemes: • Always On (default) - To recover, press any key on your Windows password before the hard drive. To program these functions, click an option from the displayed list. If you want your computer to run your ...
Owner's Manual
Page 27
....dell.com. For more information on Hyper-Threading, search the Knowledge Base on the Hibernate tab. If you want to function as digital video cameras. IEEE 1394 is ideal for use with the use the Microsoft® Windows® XP Service Pack 1 (SP1) or later operating system because Windows XP...Computer, and then click Properties. 2 Click Hardware and click Device Manager. 3 In the Device Manager window, click the plus (+) sign next to enable hibernate mode. To purchase a card, contact Dell. IEEE 1394 IEEE 1394 is an Intel® technology that can move large amounts of data between ...
....dell.com. For more information on Hyper-Threading, search the Knowledge Base on the Hibernate tab. If you want to function as digital video cameras. IEEE 1394 is ideal for use with the use the Microsoft® Windows® XP Service Pack 1 (SP1) or later operating system because Windows XP...Computer, and then click Properties. 2 Click Hardware and click Device Manager. 3 In the Device Manager window, click the plus (+) sign next to enable hibernate mode. To purchase a card, contact Dell. IEEE 1394 IEEE 1394 is an Intel® technology that can move large amounts of data between ...
Owner's Manual
Page 31
...Option ROM utility. 2 Use the up - and down-arrow keys to select Exit, and press . 13 Install the operating system (see "Using Microsoft Windows XP System Restore" on the main Intel RAID Option ROM utility screen. 11 Use the up - and down -arrow keys to enter the Intel RAID Option... mode (see page 30). 2 Press when you want to use to select Exit, and press . 12 Install the operating system (see "Using Microsoft Windows XP System Restore" on the RAID drives will become unbootable. 1 Press when you perform this operation, all data on page 60). and down -arrow keys ...
...Option ROM utility. 2 Use the up - and down-arrow keys to select Exit, and press . 13 Install the operating system (see "Using Microsoft Windows XP System Restore" on the main Intel RAID Option ROM utility screen. 11 Use the up - and down -arrow keys to enter the Intel RAID Option... mode (see page 30). 2 Press when you want to use to select Exit, and press . 12 Install the operating system (see "Using Microsoft Windows XP System Restore" on the RAID drives will become unbootable. 1 Press when you perform this operation, all data on page 60). and down -arrow keys ...
Owner's Manual
Page 32
... launch the Intel® Storage Utility. 32 Setting Up and Using Your Computer To add a third hard drive in the Selected window, and then click Next. 6 In the Specify Volume Size window, click the Volume Size desired, and then click Next. 7 Click Finish to create the volume, or click Back to exit...
... launch the Intel® Storage Utility. 32 Setting Up and Using Your Computer To add a third hard drive in the Selected window, and then click Next. 6 In the Specify Volume Size window, click the Volume Size desired, and then click Next. 7 Click Finish to create the volume, or click Back to exit...
Owner's Manual
Page 33
...Next to continue. 6 On the Select Volume Location screen, click the first hard drive you want to delete in the Selected window, and then click Next. 7 In the Specify Volume Size window, select the Volume Size desired and click Next. 8 Click Finish to create the volume, or click Back to make changes.... 9 Follow Microsoft Windows procedures for creating a partition on the Migration Wizard screen. 5 Enter a RAID volume name or accept the default. Click a second hard drive until two drives ...
...Next to continue. 6 On the Select Volume Location screen, click the first hard drive you want to delete in the Selected window, and then click Next. 7 In the Specify Volume Size window, select the Volume Size desired and click Next. 8 Click Finish to create the volume, or click Back to make changes.... 9 Follow Microsoft Windows procedures for creating a partition on the Migration Wizard screen. 5 Enter a RAID volume name or accept the default. Click a second hard drive until two drives ...
Owner's Manual
Page 35
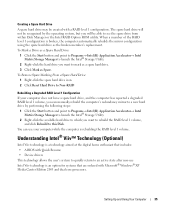
...; Technology (Optional) Intel Viiv technology is rebuilding the RAID level 1 volume. Creating a Spare Hard Drive A spare hard drive may be created with Microsoft® Windows® XP Media Center Edition 2005 and dual core processors. To Remove Spare Marking From a Spare Hard Drive: 1 Right-click the spare hard drive icon. 2 Click Reset...
...; Technology (Optional) Intel Viiv technology is rebuilding the RAID level 1 volume. Creating a Spare Hard Drive A spare hard drive may be created with Microsoft® Windows® XP Media Center Edition 2005 and dual core processors. To Remove Spare Marking From a Spare Hard Drive: 1 Right-click the spare hard drive icon. 2 Click Reset...
Owner's Manual
Page 36
... the power button on my computer drop-down menu, select Do Nothing. 8 From the When I press the sleep button on the optional Microsoft® Windows® XP Media Center Edition 2005 remote control. and right-arrow keys to highlight the On option and press to mute. Enabling the QRT feature in the...
... the power button on my computer drop-down menu, select Do Nothing. 8 From the When I press the sleep button on the optional Microsoft® Windows® XP Media Center Edition 2005 remote control. and right-arrow keys to highlight the On option and press to mute. Enabling the QRT feature in the...
Owner's Manual
Page 38
Click the Start button and click My Computer. Viruses can sometimes prevent Windows from recognizing the drive. C L E A N T H E D R I V E O R D I C S - NOTE: Because of different regions worldwide and different disc formats, not all DVD titles work in the ...DRIVE - • Insert another floppy, CD, or DVD to check for and remove viruses. See page 60. See page 122. R U N T H E D E L L D I A G N O S T I S K - ADJUST THE WINDOWS VOLUME CONTROL - • Click the speaker icon in the lower-right corner of the procedures in this section, follow the safety instructions in all DVD...
Click the Start button and click My Computer. Viruses can sometimes prevent Windows from recognizing the drive. C L E A N T H E D R I V E O R D I C S - NOTE: Because of different regions worldwide and different disc formats, not all DVD titles work in the ...DRIVE - • Insert another floppy, CD, or DVD to check for and remove viruses. See page 60. See page 122. R U N T H E D E L L D I A G N O S T I S K - ADJUST THE WINDOWS VOLUME CONTROL - • Click the speaker icon in the lower-right corner of the procedures in this section, follow the safety instructions in all DVD...


