Owner's Manual
Page 1
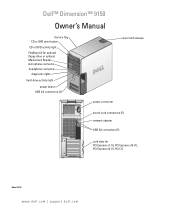
Dell™ Dimension™ 9150 Owner's Manual Service Tag CD or DVD eject button CD or DVD activity light FlexBays (2) for optional floppy drive or optional Media Card Reader microphone connector headphone connector diagnostic lights hard-drive activity light power button USB 2.0 connectors (2) cover latch release power connector sound-card connectors (5) network adapter USB 2.0 connectors (5) card slots for PCI Express x1 (1), PCI Express x16 (1), PCI Express x4 (1), PCI (3) Model DCTA www.dell.com | support.dell.com
Dell™ Dimension™ 9150 Owner's Manual Service Tag CD or DVD eject button CD or DVD activity light FlexBays (2) for optional floppy drive or optional Media Card Reader microphone connector headphone connector diagnostic lights hard-drive activity light power button USB 2.0 connectors (2) cover latch release power connector sound-card connectors (5) network adapter USB 2.0 connectors (5) card slots for PCI Express x1 (1), PCI Express x16 (1), PCI Express x4 (1), PCI (3) Model DCTA www.dell.com | support.dell.com
Owner's Manual
Page 3
... Connecting to the Internet 14 Setting Up Your Internet Connection 15 Playing CDs and DVDs 16 Adjusting the Volume 17 Adjusting the Picture 18 Copying CDs and DVDs 18 How to Copy a CD or DVD 18 Using Blank CDs and DVDs 19 Helpful Tips 20 Using a Media Card Reader (Optional 20 Connecting Two Monitors...
... Connecting to the Internet 14 Setting Up Your Internet Connection 15 Playing CDs and DVDs 16 Adjusting the Volume 17 Adjusting the Picture 18 Copying CDs and DVDs 18 How to Copy a CD or DVD 18 Using Blank CDs and DVDs 19 Helpful Tips 20 Using a Media Card Reader (Optional 20 Connecting Two Monitors...
Owner's Manual
Page 4
... Setup 36 Enabling the QRT feature in the Operating system 36 2 Solving Problems 37 Troubleshooting Tips 37 Battery Problems 37 Drive Problems 38 CD and DVD drive problems 38 Hard drive problems 39 E-Mail, Modem, and Internet Problems 39 Error Messages 41 Media Card Reader Problems 42 Keyboard Problems 42 Lockups...
... Setup 36 Enabling the QRT feature in the Operating system 36 2 Solving Problems 37 Troubleshooting Tips 37 Battery Problems 37 Drive Problems 38 CD and DVD drive problems 38 Hard drive problems 39 E-Mail, Modem, and Internet Problems 39 Error Messages 41 Media Card Reader Problems 42 Keyboard Problems 42 Lockups...
Owner's Manual
Page 6
... Drive 96 Removing a Floppy Drive 96 Installing a Floppy Drive 98 Media Card Reader 99 Removing a Media Card Reader 99 Installing a Media Card Reader 101 CD/DVD Drive 102 Removing a CD/DVD Drive 103 Installing a CD/DVD Drive 104 Battery 106 Replacing the Battery 106 Replacing the Computer Cover 107 6 Contents
... Drive 96 Removing a Floppy Drive 96 Installing a Floppy Drive 98 Media Card Reader 99 Removing a Media Card Reader 99 Installing a Media Card Reader 101 CD/DVD Drive 102 Removing a CD/DVD Drive 103 Installing a CD/DVD Drive 104 Battery 106 Replacing the Battery 106 Replacing the Computer Cover 107 6 Contents
Owner's Manual
Page 7
Only 124 Class A 125 Class B 125 FCC Identification Information 126 Contacting Dell 126 Index 145 Contents 7 Only 123 Definition of "Dell-Installed" Software and Peripherals 124 Definition of "Third-Party" Software and Peripherals 124 FCC Notices (U.S. 5 Appendix 109 Specifications 109 System Setup 113 Overview 113 Entering ... 119 Clearing Forgotten Passwords 121 Clearing CMOS Settings 122 Cleaning Your Computer 122 Computer, Keyboard, and Monitor 122 Mouse 123 Floppy Drive 123 CDs and DVDs 123 Dell Technical Support Policy (U.S.
Only 124 Class A 125 Class B 125 FCC Identification Information 126 Contacting Dell 126 Index 145 Contents 7 Only 123 Definition of "Dell-Installed" Software and Peripherals 124 Definition of "Third-Party" Software and Peripherals 124 FCC Notices (U.S. 5 Appendix 109 Specifications 109 System Setup 113 Overview 113 Entering ... 119 Clearing Forgotten Passwords 121 Clearing CMOS Settings 122 Cleaning Your Computer 122 Computer, Keyboard, and Monitor 122 Mouse 123 Floppy Drive 123 CDs and DVDs 123 Dell Technical Support Policy (U.S.
Owner's Manual
Page 16
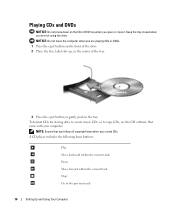
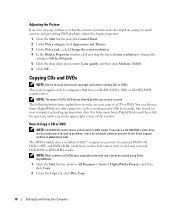
... Stop Go to copy CDs, see the CD software that you follow all copyright laws when you are playing CDs or DVDs. 1 Press the eject button on the CD or DVD tray when you are not using the drive. To format CDs for storing data, to create music CDs, or to the... previous track 16 Setting Up and Using Your Computer Playing CDs and DVDs NOTICE: Do not press down on the front of the drive. 2 Place the disc, label side up, in the center of the tray. 3 Press the...
... Stop Go to copy CDs, see the CD software that you follow all copyright laws when you are playing CDs or DVDs. 1 Press the eject button on the CD or DVD tray when you are not using the drive. To format CDs for storing data, to create music CDs, or to the... previous track 16 Setting Up and Using Your Computer Playing CDs and DVDs NOTICE: Do not press down on the front of the drive. 2 Place the disc, label side up, in the center of the tray. 3 Press the...
Owner's Manual
Page 17
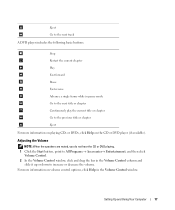
... and slide it up or down to increase or decrease the volume. Eject Go to the next track A DVD player includes the following basic buttons: Stop Restart the current chapter Play Fast forward Pause Fast reverse Advance a ...the previous title or chapter Eject For more information on the CD or DVD player (if available). Adjusting the Volume NOTE: When the speakers are muted, you do not hear the ...CD or DVD playing. 1 Click the Start button, point to All Programs → Accessories→ Entertainment, and then...
... and slide it up or down to increase or decrease the volume. Eject Go to the next track A DVD player includes the following basic buttons: Stop Restart the current chapter Play Fast forward Pause Fast reverse Advance a ...the previous title or chapter Eject For more information on the CD or DVD player (if available). Adjusting the Volume NOTE: When the speakers are muted, you do not hear the ...CD or DVD playing. 1 Click the Start button, point to All Programs → Accessories→ Entertainment, and then...
Owner's Manual
Page 18
NOTE: The types of CD or DVD drives offered by Dell may not read DVD-RAM or DVD-R DL media. How to Copy a CD or DVD NOTE: CD-RW/DVD combo drives cannot write to and may vary by 600 pixels. 5 Click the drop-down menu under Color quality, and then click Medium (16 bit). 6...window, click and drag the bar in Dell™ computers can also use Sonic DigitalMedia for available software patches on your computer or backing up important data. If you observe all copyright laws when creating CDs or DVDs. You can write to and read DVD+/-R, DVD+/-RW and DVD+R DL (dual layer) media, but cannot...
NOTE: The types of CD or DVD drives offered by Dell may not read DVD-RAM or DVD-R DL media. How to Copy a CD or DVD NOTE: CD-RW/DVD combo drives cannot write to and may vary by 600 pixels. 5 Click the drop-down menu under Color quality, and then click Medium (16 bit). 6...window, click and drag the bar in Dell™ computers can also use Sonic DigitalMedia for available software patches on your computer or backing up important data. If you observe all copyright laws when creating CDs or DVDs. You can write to and read DVD+/-R, DVD+/-RW and DVD+R DL (dual layer) media, but cannot...
Owner's Manual
Page 19
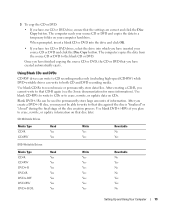
... computer hard drive. CD-Writable Drives Media Type CD-R CD-RW Read Yes Yes Write Yes Yes Rewritable No Yes DVD-Writable Drives Media Type CD-R CD-RW DVD+R DVD-R DVD+RW DVD-RW DVD+R DL Read Yes Yes Yes Yes Yes Yes Yes Write Yes Yes Yes Yes Yes Yes Yes Rewritable No Yes No... information on that CD-R again (see the Sonic documentation for more information). Once you have finished copying the source CD or DVD, the CD or DVD that you have one CD or DVD drive, ensure that disc again if the disc is "finalized" or "closed" during the final stage of information. 3 To copy...
... computer hard drive. CD-Writable Drives Media Type CD-R CD-RW Read Yes Yes Write Yes Yes Rewritable No Yes DVD-Writable Drives Media Type CD-R CD-RW DVD+R DVD-R DVD+RW DVD-RW DVD+R DL Read Yes Yes Yes Yes Yes Yes Yes Write Yes Yes Yes Yes Yes Yes Yes Rewritable No Yes No... information on that CD-R again (see the Sonic documentation for more information). Once you have finished copying the source CD or DVD, the CD or DVD that you have one CD or DVD drive, ensure that disc again if the disc is "finalized" or "closed" during the final stage of information. 3 To copy...

Owner's Manual
Page 20
...com for example, do not play in most home or car stereos. • You cannot create audio DVDs with Sonic DigitalMedia. • Music MP3 files can erase the data on computers that you want to ...play in home theater systems may not support all available DVD formats. You can also use blank CD-RWs to test music file projects before you can be...the CD-RW and try again. The CD-RW drive needs 1-2 MB of formats supported by your DVD player, see the documentation provided with CD recording techniques. Using a Media Card Reader (Optional) Use the...
...com for example, do not play in most home or car stereos. • You cannot create audio DVDs with Sonic DigitalMedia. • Music MP3 files can erase the data on computers that you want to ...play in home theater systems may not support all available DVD formats. You can also use blank CD-RWs to test music file projects before you can be...the CD-RW and try again. The CD-RW drive needs 1-2 MB of formats supported by your DVD player, see the documentation provided with CD recording techniques. Using a Media Card Reader (Optional) Use the...
Owner's Manual
Page 38
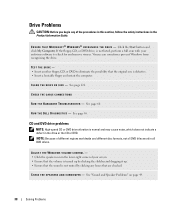
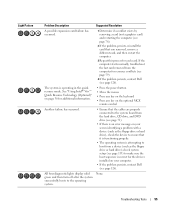
... that are checked. See page 122. R U N T H E D E L L D I A G N O S T I V E - CD and DVD drive problems NOTE: High-speed CD or DVD drive vibration is not listed, perform a full scan with your screen. • Ensure that the volume is turned up by clicking the...VOLUME CONTROL - • Click the speaker icon in the drive or the CD or DVD. E N S U R E T H A T M I C R O S O F T ® W I N D O W S ® R E C O G N I Z E S T H E D R I C S - TEST THE DRIVE - • Insert another floppy, CD, or DVD to check for and remove viruses. Drive Problems CAUTION: Before you begin any boxes ...
... that are checked. See page 122. R U N T H E D E L L D I A G N O S T I V E - CD and DVD drive problems NOTE: High-speed CD or DVD drive vibration is not listed, perform a full scan with your screen. • Ensure that the volume is turned up by clicking the...VOLUME CONTROL - • Click the speaker icon in the drive or the CD or DVD. E N S U R E T H A T M I C R O S O F T ® W I N D O W S ® R E C O G N I Z E S T H E D R I C S - TEST THE DRIVE - • Insert another floppy, CD, or DVD to check for and remove viruses. Drive Problems CAUTION: Before you begin any boxes ...
Owner's Manual
Page 39
... to remove the checkmark. The modem does not operate while it is interrupted, an error occurs. If you write to a CD/DVD-RW drive C L O S E O T H E R P R O G R A M S - Hard drive problems... D B Y M O D E I N W I N D O W S B E F O R E W R I T I S C - R W D I N G T O A C D / D V D - NOTE: Connect the modem to a digital telephone network. Problems writing to the CD/DVD-RW. Solving Problems 39 E-Mail, Modem, and Internet Problems CAUTION: Before you begin any of data when writing. C H E C K T H E M I C R O S O F T O U T L O O K ® E X P R E S S S E C U R I T Y S E T ...
... to remove the checkmark. The modem does not operate while it is interrupted, an error occurs. If you write to a CD/DVD-RW drive C L O S E O T H E R P R O G R A M S - Hard drive problems... D B Y M O D E I N W I N D O W S B E F O R E W R I T I S C - R W D I N G T O A C D / D V D - NOTE: Connect the modem to a digital telephone network. Problems writing to the CD/DVD-RW. Solving Problems 39 E-Mail, Modem, and Internet Problems CAUTION: Before you begin any of data when writing. C H E C K T H E M I C R O S O F T O U T L O O K ® E X P R E S S S E C U R I T Y S E T ...
Owner's Manual
Page 55
...• The operating system is attempting to boot from the hard drive, CD drive, and DVD drive (see page 71). • If there is an error message on your computer. • If the problem persists, contact Dell (see page 126). check system setup (see page 113) to make sure the boot sequence... is correct for resource conflicts (see page 59). 4 If the problem persists, contact Dell (see page 126). See "Using Intel® Viiv™ Quick Resume Technology (Optional)" on page 36 for each card. The system is operating in the...
...• The operating system is attempting to boot from the hard drive, CD drive, and DVD drive (see page 71). • If there is an error message on your computer. • If the problem persists, contact Dell (see page 126). check system setup (see page 113) to make sure the boot sequence... is correct for resource conflicts (see page 59). 4 If the problem persists, contact Dell (see page 126). See "Using Intel® Viiv™ Quick Resume Technology (Optional)" on page 36 for each card. The system is operating in the...
Owner's Manual
Page 65
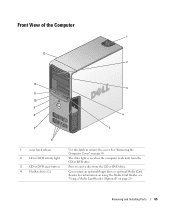
For information on using the Media Card Reader, see "Using a Media Card Reader (Optional)" on page 68. Can contain an optional floppy drive or optional Media Card Reader. Removing and Installing Parts 65 The drive light is on when the computer reads data from the CD or DVD drive. Press to remove the cover. See "Removing the Computer Cover" on page 20. Front View of the Computer 1 13 2 12 3 11 10 9 8 4 7 5 6 1 cover latch release 2 CD or DVD activity light 3 CD or DVD eject button 4 FlexBay drives (2) Use this latch to eject a disc from the CD or DVD drive.
For information on using the Media Card Reader, see "Using a Media Card Reader (Optional)" on page 68. Can contain an optional floppy drive or optional Media Card Reader. Removing and Installing Parts 65 The drive light is on when the computer reads data from the CD or DVD drive. Press to remove the cover. See "Removing the Computer Cover" on page 20. Front View of the Computer 1 13 2 12 3 11 10 9 8 4 7 5 6 1 cover latch release 2 CD or DVD activity light 3 CD or DVD eject button 4 FlexBay drives (2) Use this latch to eject a disc from the CD or DVD drive.

Owner's Manual
Page 70
power supply system board CD or DVD drive *floppy drive *may not be present on all computers hard drive 70 Removing and Installing Parts Inside View of Your Computer CAUTION: Before you begin any of the procedures in this section, follow the safety instructions in the Product Information Guide.
power supply system board CD or DVD drive *floppy drive *may not be present on all computers hard drive 70 Removing and Installing Parts Inside View of Your Computer CAUTION: Before you begin any of the procedures in this section, follow the safety instructions in the Product Information Guide.
Owner's Manual
Page 92
IDE CD/DVD drives should be connected to the connector labeled IDE. When disconnecting an IDE cable, grasp the colored pull tab and pull until the connector detaches. ... FlexBay drives (can contain an optional floppy drive or optional Media Card Reader) • Two CD or DVD drives General Installation Guidelines Connect hard drives to the connector labeled "SATA" and connect CD/DVD drives to the connector labeled SATA on the system board. When connecting an IDE cable, ensure you begin...
IDE CD/DVD drives should be connected to the connector labeled IDE. When disconnecting an IDE cable, grasp the colored pull tab and pull until the connector detaches. ... FlexBay drives (can contain an optional floppy drive or optional Media Card Reader) • Two CD or DVD drives General Installation Guidelines Connect hard drives to the connector labeled "SATA" and connect CD/DVD drives to the connector labeled SATA on the system board. When connecting an IDE cable, ensure you begin...

Owner's Manual
Page 102
USB cable *Media Card Reader *Not present on the system board (see page 107). CD/DVD Drive CAUTION: Before you begin any of the Media Card Reader and to the Media Card Reader connector on all computers. 8 Insert the Media Card ...
USB cable *Media Card Reader *Not present on the system board (see page 107). CD/DVD Drive CAUTION: Before you begin any of the Media Card Reader and to the Media Card Reader connector on all computers. 8 Insert the Media Card ...

Owner's Manual
Page 103
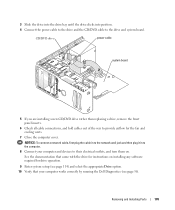
Removing a CD/DVD Drive 1 Follow the procedures in "Before You Begin" on page 63. 2 Remove the computer cover (see page 68). 3 Disconnect the power cable from the back of the drive and the CD/DVD drive cable from the back of the drive and the system board. CD/DVD drive cable power cable system board Removing and Installing Parts 103
Removing a CD/DVD Drive 1 Follow the procedures in "Before You Begin" on page 63. 2 Remove the computer cover (see page 68). 3 Disconnect the power cable from the back of the drive and the CD/DVD drive cable from the back of the drive and the system board. CD/DVD drive cable power cable system board Removing and Installing Parts 103

Owner's Manual
Page 104
... and prepare it from the inside of the drivepanel insert and attach the screws to verify that accompanied the drive to the new drive. CD/DVD drive 104 Removing and Installing Parts shoulder screws (3) If you are installing an IDE drive, configure the drive for the cable select setting. 2 If you...
... and prepare it from the inside of the drivepanel insert and attach the screws to verify that accompanied the drive to the new drive. CD/DVD drive 104 Removing and Installing Parts shoulder screws (3) If you are installing an IDE drive, configure the drive for the cable select setting. 2 If you...
Owner's Manual
Page 105
... power cable system board 5 If you are installing a new CD/DVD drive rather than replacing a drive, remove the front panel inserts. 6 Check all...network wall jack and then plug it in to the computer. 8 Connect your computer works correctly by running the Dell Diagnostics (see page 114) and select the appropriate Drive option. 10 Verify that came with the drive for ...drive bay until the drive clicks into position. 4 Connect the power cable to the drive and the CD/DVD cable to their electrical outlets, and turn them on installing any software required for the fan and cooling vents. 7...
... power cable system board 5 If you are installing a new CD/DVD drive rather than replacing a drive, remove the front panel inserts. 6 Check all...network wall jack and then plug it in to the computer. 8 Connect your computer works correctly by running the Dell Diagnostics (see page 114) and select the appropriate Drive option. 10 Verify that came with the drive for ...drive bay until the drive clicks into position. 4 Connect the power cable to the drive and the CD/DVD cable to their electrical outlets, and turn them on installing any software required for the fan and cooling vents. 7...


