Owner's Manual
Page 7
...Dell 126 Index 145 Contents 7 Only 123 Definition of "Dell-Installed" Software and Peripherals 124 Definition of "Third-Party" Software and Peripherals 124 FCC Notices (U.S. 5 Appendix 109 Specifications 109 System Setup 113 Overview 113 Entering System Setup 114 System Setup Options 116 Boot... Sequence 119 Clearing Forgotten Passwords 121 Clearing CMOS Settings 122 Cleaning Your Computer 122 Computer, Keyboard, and Monitor 122 Mouse 123 Floppy Drive 123 CDs and DVDs 123 Dell Technical Support Policy (U.S.
...Dell 126 Index 145 Contents 7 Only 123 Definition of "Dell-Installed" Software and Peripherals 124 Definition of "Third-Party" Software and Peripherals 124 FCC Notices (U.S. 5 Appendix 109 Specifications 109 System Setup 113 Overview 113 Entering System Setup 114 System Setup Options 116 Boot... Sequence 119 Clearing Forgotten Passwords 121 Clearing CMOS Settings 122 Cleaning Your Computer 122 Computer, Keyboard, and Monitor 122 Mouse 123 Floppy Drive 123 CDs and DVDs 123 Dell Technical Support Policy (U.S.
Owner's Manual
Page 30
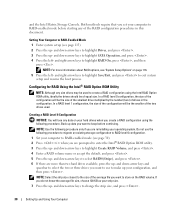
and right-arrow keys to exit system setup and resume the boot process. Creating a RAID Level 0 Configuration NOTICE: You will be of the configuration will lose any data on your configuration, and then press . Setting Your Computer ...
and right-arrow keys to exit system setup and resume the boot process. Creating a RAID Level 0 Configuration NOTICE: You will be of the configuration will lose any data on your configuration, and then press . Setting Your Computer ...
Owner's Manual
Page 31
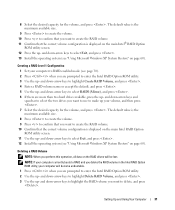
...8 Press to create the volume. 9 Press to confirm that the correct volume configuration is displayed on page 60). NOTE: If your computer currently boots to RAID and you delete the RAID volume in the Intel RAID Option ROM utility, your computer to RAID-enabled mode (see "Using Microsoft Windows...the RAID drives will become unbootable. 1 Press when you want to select Exit, and press . 13 Install the operating system (see "Using Microsoft Windows XP System Restore" on the main Intel RAID Option ROM utility screen. 11 Use the up your volume, and then press . 7 Select the desired capacity...
...8 Press to create the volume. 9 Press to confirm that the correct volume configuration is displayed on page 60). NOTE: If your computer currently boots to RAID and you delete the RAID volume in the Intel RAID Option ROM utility, your computer to RAID-enabled mode (see "Using Microsoft Windows...the RAID drives will become unbootable. 1 Press when you want to select Exit, and press . 13 Install the operating system (see "Using Microsoft Windows XP System Restore" on the main Intel RAID Option ROM utility screen. 11 Use the up your volume, and then press . 7 Select the desired capacity...

Owner's Manual
Page 37
... ensure that the part is correctly installed. • If a peripheral device does not work properly, contact Dell (see the program's documentation. • If you cannot boot into your operating system after turning on the screen, write down the exact message. Solving Problems 37 Solving ...Problems Troubleshooting Tips Follow these tips when you troubleshoot your previous SATA operation settings and retry booting into the operating system. CAUTION: Before you begin any of a new battery exploding if it is incorrectly installed. Replace the ...
... ensure that the part is correctly installed. • If a peripheral device does not work properly, contact Dell (see the program's documentation. • If you cannot boot into your operating system after turning on the screen, write down the exact message. Solving Problems 37 Solving ...Problems Troubleshooting Tips Follow these tips when you troubleshoot your previous SATA operation settings and retry booting into the operating system. CAUTION: Before you begin any of a new battery exploding if it is incorrectly installed. Replace the ...
Owner's Manual
Page 53
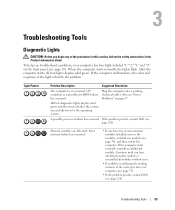
...processor failure has occurred. Continue until you troubleshoot a problem, your computer (see page 74). • If the problem persists, contact Dell (see page 126). Light Pattern Problem Description Suggested Resolution The computer is in the Product Information Guide. Problems" on the front panel ... color and sequence of the procedures in this section, follow the safety instructions in a normal "off after the system successfully boots to the operating system. Troubleshooting Tools 53 To help you have two or more memory modules installed, remove the modules, reinstall...
...processor failure has occurred. Continue until you troubleshoot a problem, your computer (see page 74). • If the problem persists, contact Dell (see page 126). Light Pattern Problem Description Suggested Resolution The computer is in the Product Information Guide. Problems" on the front panel ... color and sequence of the procedures in this section, follow the safety instructions in a normal "off after the system successfully boots to the operating system. Troubleshooting Tools 53 To help you have two or more memory modules installed, remove the modules, reinstall...
Owner's Manual
Page 55
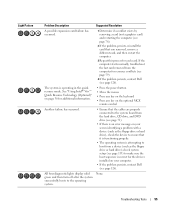
If the computer starts normally, troubleshoot the last card removed from the computer for resource conflicts (see page 59). 4 If the problem persists, contact Dell (see page 76). 2 If the problem persists, reinstall the card that you removed, remove a different card, and then restart the computer. 3 Repeat...; Press any key on the keyboard • Press any key on your computer. • If the problem persists, contact Dell (see page 113) to make sure the boot sequence is correct for each card. All four diagnostic lights display solid green and then turn off after the system successfully...
If the computer starts normally, troubleshoot the last card removed from the computer for resource conflicts (see page 59). 4 If the problem persists, contact Dell (see page 76). 2 If the problem persists, reinstall the card that you removed, remove a different card, and then restart the computer. 3 Repeat...; Press any key on the keyboard • Press any key on your computer. • If the problem persists, contact Dell (see page 113) to make sure the boot sequence is correct for each card. All four diagnostic lights display solid green and then turn off after the system successfully...
Owner's Manual
Page 56
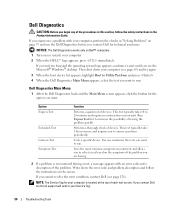
... Main Menu appears, select the test you cannot resolve the error condition, contact Dell (see page 63) and try again. 3 When the boot device list appears, highlight Boot to run the Dell Diagnostics before you to select a test based on the symptom of the problem you are having. 2 If a problem is located at the...
... Main Menu appears, select the test you cannot resolve the error condition, contact Dell (see page 63) and try again. 3 When the boot device list appears, highlight Boot to run the Dell Diagnostics before you to select a test based on the symptom of the problem you are having. 2 If a problem is located at the...
Owner's Manual
Page 61
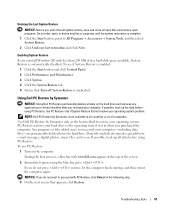
...data files-are permanently deleted from the hard drive. Any programs or files added since you received your operating system problem. During the boot process, a blue bar with www.dell.com appears at the top of free hard-disk space available, System Restore is complete. 1 Click the Start button, point to proceed... your computer. If possible, back up the data before using PC Restore. To see if System Restore is unchecked. NOTICE: If you reinstall Windows XP with PC Restore, click Reboot in time, let the computer finish starting, and then restart the computer again. Use...
...data files-are permanently deleted from the hard drive. Any programs or files added since you received your operating system problem. During the boot process, a blue bar with www.dell.com appears at the top of free hard-disk space available, System Restore is complete. 1 Click the Start button, point to proceed... your computer. If possible, back up the data before using PC Restore. To see if System Restore is unchecked. NOTICE: If you reinstall Windows XP with PC Restore, click Reboot in time, let the computer finish starting, and then restart the computer again. Use...

Owner's Manual
Page 66
...cameras, or for bootable USB devices (see "Diagnostic Lights" on page 53. Use the front USB connectors for devices that the system is on booting to a USB device). Use the microphone connector to attach headphones and most kinds of the vents. NOTICE: Keep the vent area clean and ... Setup Options" on page 116 for more information on when the computer reads data from or writes data to ensure that you access the Dell Support website or call technical support. 66 Removing and Installing Parts Use the headphone connector to attach a personal computer microphone for voice or ...
...cameras, or for bootable USB devices (see "Diagnostic Lights" on page 53. Use the front USB connectors for devices that the system is on booting to a USB device). Use the microphone connector to attach headphones and most kinds of the vents. NOTICE: Keep the vent area clean and ... Setup Options" on page 116 for more information on when the computer reads data from or writes data to ensure that you access the Dell Support website or call technical support. 66 Removing and Installing Parts Use the headphone connector to attach a personal computer microphone for voice or ...
Owner's Manual
Page 112
... lights on the front panel (see "Power Problems" on integrated network adapter) Diagnostic lights Standby power light push button green light - If the system cannot boot and there is a solid amber light, this indicates a problem with the power supply inside the computer. yellow light - solid green for important voltage setting information...
... lights on the front panel (see "Power Problems" on integrated network adapter) Diagnostic lights Standby power light push button green light - If the system cannot boot and there is a solid amber light, this indicates a problem with the power supply inside the computer. yellow light - solid green for important voltage setting information...
Owner's Manual
Page 116
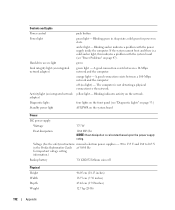
... as Off, USB, Internal, or Read Only. SATA Operation Identifies and defines the SATA controller settings for hard drives. USB Controller Set to boot from a USB memory device, select the USB device and move it so it becomes the first device in the system setup menu. Identifies the... drives attached to boot from a network server. Onboard Devices Integrated NIC Controller Integrated Audio Controller You can set the NIC to the FLOPPY connector on the system board...
... as Off, USB, Internal, or Read Only. SATA Operation Identifies and defines the SATA controller settings for hard drives. USB Controller Set to boot from a USB memory device, select the USB device and move it so it becomes the first device in the system setup menu. Identifies the... drives attached to boot from a network server. Onboard Devices Integrated NIC Controller Integrated Audio Controller You can set the NIC to the FLOPPY connector on the system board...

Owner's Manual
Page 117
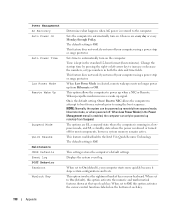
...and 8MB, this option appears in the same way that access to be assigned and verified. On = Internal USB for FlexBay is No Boot. NOTE: Switching to performance mode will cause the drive heads to move faster, causing the hard drive to the system can no longer ... FlexBay is installed. The hard drive operates at the level suggested by pressing when the computer starts. The factory default setting is disabled. No Boot = Internal USB for FlexBay. If your hard drive image. NOTE: This USB option appears only if a FlexBay device is enabled but not bootable...
...and 8MB, this option appears in the same way that access to be assigned and verified. On = Internal USB for FlexBay is No Boot. NOTE: Switching to performance mode will cause the drive heads to move faster, causing the hard drive to the system can no longer ... FlexBay is installed. The hard drive operates at the level suggested by pressing when the computer starts. The factory default setting is disabled. No Boot = Internal USB for FlexBay. If your hard drive image. NOTE: This USB option appears only if a FlexBay device is enabled but not bootable...
Owner's Manual
Page 118
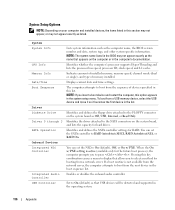
...to power up when a NIC or Remote Wakeup-capable modem receives a wake up remotely from Hibernate or Off. Sets time to boot from Suspend. On w/ Boot to NIC allows the computer to attempt to automatically turn off for most components, however, system memory remains active. The default setting...skips certain configurations and tests. When set to On (default), this option activates the cursor-control functions labeled on your computer using the boot sequence. Choices are S1, a suspend state where the computer is running in both the date and time fields. The options are ...
...to power up when a NIC or Remote Wakeup-capable modem receives a wake up remotely from Hibernate or Off. Sets time to boot from Suspend. On w/ Boot to NIC allows the computer to attempt to automatically turn off for most components, however, system memory remains active. The default setting...skips certain configurations and tests. When set to On (default), this option activates the cursor-control functions labeled on your computer using the boot sequence. Choices are S1, a suspend state where the computer is running in both the date and time fields. The options are ...
Owner's Manual
Page 119
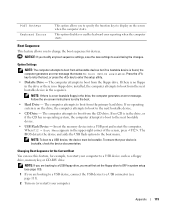
...the CD has no CD is on the screen when the computer starts. The BIOS detects the device and adds the USB flash option to boot from all bootable devices but if no bootable device is no floppy in the drive, the computer generates an error message. To ensure that states... your device is a non-bootable floppy in the drive or there is found, the computer generates an error message that your computer. NOTE: To boot to retry the boot. • Hard Drive - The computer attempts to avoid losing the changes. Insert the memory device into a USB port and restart the computer. NOTE...
...the CD has no CD is on the screen when the computer starts. The BIOS detects the device and adds the USB flash option to boot from all bootable devices but if no bootable device is no floppy in the drive, the computer generates an error message. To ensure that states... your device is a non-bootable floppy in the drive or there is found, the computer generates an error message that your computer. NOTE: To boot to retry the boot. • Hard Drive - The computer attempts to avoid losing the changes. Insert the memory device into a USB port and restart the computer. NOTE...
Owner's Manual
Page 120
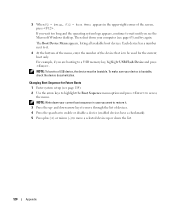
... the device documentation. NOTE: Write down the list. 120 Appendix Each device has a number next to it . 3 Press the up or down your current boot sequence in the upper-right corner of devices. 4 Press the spacebar to enable or disable a device (enabled devices have a checkmark). 5 Press plus (+) ...or minus (-) to be bootable. and down your device is to move through the list of the screen, press . The Boot Device Menu appears, listing all available boot devices. If you wait too long and the operating system logo appears, continue to wait until you want to a USB device,...
... the device documentation. NOTE: Write down the list. 120 Appendix Each device has a number next to it . 3 Press the up or down your current boot sequence in the upper-right corner of devices. 4 Press the spacebar to enable or disable a device (enabled devices have a checkmark). 5 Press plus (+) ...or minus (-) to be bootable. and down your device is to move through the list of the screen, press . The Boot Device Menu appears, listing all available boot devices. If you wait too long and the operating system logo appears, continue to wait until you want to a USB device,...
Owner's Manual
Page 145
Index A audio. See sound B battery problems, 37 replacing, 106 BIOS, 113 boot sequence about, 119 changing, 119-120 option settings, 119 booting to a USB device, 119 C cards installing PCI Express, 82 PCI Express, 81 removing PCI, 80 removing PCI Express, 86 slots...to, 18 copying DVDs general information, 18 helpful tips, 20 how to, 18 cover replacing, 107 D Dell Dell Diagnostics, 56 support policy, 123 support site, 11 Dell Premier Support website, 9, 11 diagnostic lights, 53 diagnostics Dell, 56 lights, 53, 66 documentation online, 11 Product Information Guide, 9 Setup Diagram, 9 drive panel...
Index A audio. See sound B battery problems, 37 replacing, 106 BIOS, 113 boot sequence about, 119 changing, 119-120 option settings, 119 booting to a USB device, 119 C cards installing PCI Express, 82 PCI Express, 81 removing PCI, 80 removing PCI Express, 86 slots...to, 18 copying DVDs general information, 18 helpful tips, 20 how to, 18 cover replacing, 107 D Dell Dell Diagnostics, 56 support policy, 123 support site, 11 Dell Premier Support website, 9, 11 diagnostic lights, 53 diagnostics Dell, 56 lights, 53, 66 documentation online, 11 Product Information Guide, 9 Setup Diagram, 9 drive panel...
Owner's Manual
Page 148
...screens, 114 V vents, 66 front panel, 66 volume adjusting, 49 T technical support policy, 123 transferring information to a new computer, 27 troubleshooting Dell Diagnostics, 56 diagnostic lights, 53 Hardware Troubleshooter, 59 Help and Support Center, 12 restore to previous state, 59-60 tips, 37 TV connect ...to computer, 21, 23 U USB booting to devices, 119 connectors, 66, 68 W warranty, 9 Windows XP Device Driver Rollback, 58 Files and Settings Transfer Wizard, 27 Hardware Troubleshooter, 59 Help and Support Center, 12 Hyper...
...screens, 114 V vents, 66 front panel, 66 volume adjusting, 49 T technical support policy, 123 transferring information to a new computer, 27 troubleshooting Dell Diagnostics, 56 diagnostic lights, 53 Hardware Troubleshooter, 59 Help and Support Center, 12 restore to previous state, 59-60 tips, 37 TV connect ...to computer, 21, 23 U USB booting to devices, 119 connectors, 66, 68 W warranty, 9 Windows XP Device Driver Rollback, 58 Files and Settings Transfer Wizard, 27 Hardware Troubleshooter, 59 Help and Support Center, 12 Hyper...


