Owner's Manual
Page 5
...50 If the screen is blank 50 If the screen is difficult to read 51 3 Troubleshooting Tools 53 Diagnostic Lights 53 Dell Diagnostics 56 Dell Diagnostics Main Menu 56 Drivers 57 What Is a Driver 57 Identifying Drivers 58 Reinstalling Drivers 58 Resolving Software and Hardware ...Incompatibilities 59 Restoring Your Operating System 59 Using Microsoft Windows XP System Restore 60 Using Dell PC Restore by Symantec 61 4 Removing and Installing Parts 63 Before You Begin 63 Recommended Tools 63 Turn Off Your Computer 63 Before Working Inside Your Computer 64 Front ...
...50 If the screen is blank 50 If the screen is difficult to read 51 3 Troubleshooting Tools 53 Diagnostic Lights 53 Dell Diagnostics 56 Dell Diagnostics Main Menu 56 Drivers 57 What Is a Driver 57 Identifying Drivers 58 Reinstalling Drivers 58 Resolving Software and Hardware ...Incompatibilities 59 Restoring Your Operating System 59 Using Microsoft Windows XP System Restore 60 Using Dell PC Restore by Symantec 61 4 Removing and Installing Parts 63 Before You Begin 63 Recommended Tools 63 Turn Off Your Computer 63 Before Working Inside Your Computer 64 Front ...
Owner's Manual
Page 14
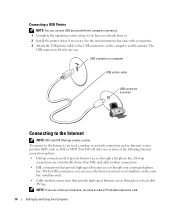
... USB connector on printer Connecting to the USB connectors on . 1 Complete the operating system setup, if you can connect USB devices while the computer is turned on the computer and the printer. With a DSL connection, you have not already done so. 2 Install the printer driver if necessary. To connect to the...
... USB connector on printer Connecting to the USB connectors on . 1 Complete the operating system setup, if you can connect USB devices while the computer is turned on the computer and the printer. With a DSL connection, you have not already done so. 2 Install the printer driver if necessary. To connect to the...
Owner's Manual
Page 23
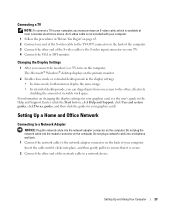
... Help and Support, click User and system guides, click Device guides, and then click the guide for your computer, you connect the monitor(s) or TV, turn on the computer.
... Help and Support, click User and system guides, click Device guides, and then click the guide for your computer, you connect the monitor(s) or TV, turn on the computer.
Owner's Manual
Page 25
...was in before shipping the computer to store the contents of the computer memory, Dell creates an appropriately sized hibernate mode file before it entered standby mode. Because hibernate mode ...automatically activate after a time-out. Pressing a key on the hard drive and then completely turning off the display and the hard drive after a defined period of hibernation, because the keyboard..., Advanced tab, and Hibernate tab. If the computer's hard drive becomes corrupted, Windows XP recreates the hibernate file automatically. Setting Up and Using Your Computer 25 When the computer ...
...was in before shipping the computer to store the contents of the computer memory, Dell creates an appropriately sized hibernate mode file before it entered standby mode. Because hibernate mode ...automatically activate after a time-out. Pressing a key on the hard drive and then completely turning off the display and the hard drive after a defined period of hibernation, because the keyboard..., Advanced tab, and Hibernate tab. If the computer's hard drive becomes corrupted, Windows XP recreates the hibernate file automatically. Setting Up and Using Your Computer 25 When the computer ...
Owner's Manual
Page 26
... computer as a home or office computer and you want your computer to change the default settings for each scheme appear in the Turn off monitor, Turn off the hard drive. If your Windows password before the computer exits from standby mode or hibernate mode. • Program the ...the computer to prompt you want your computer to activate standby mode, activate hibernate mode, or turn off the computer. If you for starting standby mode or hibernate mode, turning off the monitor, and turning off hard disks, System stand by, or System hibernates field, and then select a timeout ...
... computer as a home or office computer and you want your computer to change the default settings for each scheme appear in the Turn off monitor, Turn off the hard drive. If your Windows password before the computer exits from standby mode or hibernate mode. • Program the ...the computer to prompt you want your computer to activate standby mode, activate hibernate mode, or turn off the computer. If you for starting standby mode or hibernate mode, turning off the monitor, and turning off hard disks, System stand by, or System hibernates field, and then select a timeout ...

Owner's Manual
Page 37
... B A T T E R Y - If the battery still does not work , ensure that the part is correctly installed. • If a peripheral device does not work properly, contact Dell (see page 106). This message may help technical support personnel diagnose and fix the problem(s). • If an error message occurs in the Product Information...if it is incorrectly installed. Solving Problems 37 Discard used batteries according to repeatedly reset time and date information after turning on the screen, write down the exact message. If you have changed your SATA operation settings, restore your ...
... B A T T E R Y - If the battery still does not work , ensure that the part is correctly installed. • If a peripheral device does not work properly, contact Dell (see page 106). This message may help technical support personnel diagnose and fix the problem(s). • If an error message occurs in the Product Information...if it is incorrectly installed. Solving Problems 37 Discard used batteries according to repeatedly reset time and date information after turning on the screen, write down the exact message. If you have changed your SATA operation settings, restore your ...
Owner's Manual
Page 38
If the floppy, CD, or DVD drive, is not listed, perform a full scan with your screen. • Ensure that the volume is turned up by clicking the slidebar and dragging it up. • Ensure that the sound is normal and may cause noise, which does not indicate a defect ...
If the floppy, CD, or DVD drive, is not listed, perform a full scan with your screen. • Ensure that the volume is turned up by clicking the slidebar and dragging it up. • Ensure that the sound is normal and may cause noise, which does not indicate a defect ...
Owner's Manual
Page 43
... COMPUTER AND TO THE ELECTRICAL OUTLET The computer stops responding NOTICE: You might lose data if you are unable to 10 seconds until the computer turns off. If necessary, uninstall and then reinstall the program. Then restart your mouse, press and hold the power button for at least 8 to get a response...
... COMPUTER AND TO THE ELECTRICAL OUTLET The computer stops responding NOTICE: You might lose data if you are unable to 10 seconds until the computer turns off. If necessary, uninstall and then reinstall the program. Then restart your mouse, press and hold the power button for at least 8 to get a response...
Owner's Manual
Page 44
... installed on your keyboard or moving your mouse, press and hold the power button for at least 8 to 10 seconds until the computer turns off. BACK UP YOUR FILES IMMEDIATELY USE A VIRUS-SCANNING PROGRAM TO CHECK THE HARD DRIVE, FLOPPY DISKS, OR CDS SAVE AND CLOSE ...; If necessary, uninstall and then reinstall the program. The Program Compatibility Wizard configures a program so it runs in an environment similar to non-Windows XP operating system environments. 1 Click the Start button, point to All Programs→ Accessories, and then click Program Compatibility Wizard. 2 In the welcome screen...
... installed on your keyboard or moving your mouse, press and hold the power button for at least 8 to 10 seconds until the computer turns off. BACK UP YOUR FILES IMMEDIATELY USE A VIRUS-SCANNING PROGRAM TO CHECK THE HARD DRIVE, FLOPPY DISKS, OR CDS SAVE AND CLOSE ...; If necessary, uninstall and then reinstall the program. The Program Compatibility Wizard configures a program so it runs in an environment similar to non-Windows XP operating system environments. 1 Click the Start button, point to All Programs→ Accessories, and then click Program Compatibility Wizard. 2 In the welcome screen...
Owner's Manual
Page 46
.... RESTART THE COMPUTER - 1 Simultaneously press to display the Start menu. 2 Type u, press the keyboard arrow keys to highlight Shut down or Turn Off, and then press . 3 After the computer turns off , that indicates no network communication exists. CHECK THE MOUSE SETTINGS - 1 Click the Start button, click Control Panel, and then click Printers...
.... RESTART THE COMPUTER - 1 Simultaneously press to display the Start menu. 2 Type u, press the keyboard arrow keys to highlight Shut down or Turn Off, and then press . 3 After the computer turns off , that indicates no network communication exists. CHECK THE MOUSE SETTINGS - 1 Click the Start button, click Control Panel, and then click Printers...
Owner's Manual
Page 47
... on a power strip • Multiple power strips connected to resume normal operation. Some possible causes of interference are securely connected to verify that the computer turns on the keyboard, move the mouse, or press the power button to the same electrical outlet Solving Problems 47 I F T H E P O W E R L I G H T I N G - I F T H E P O W E R L I G H T I S B L I N K I N ...; If the computer is plugged into a power strip, ensure that the power strip is turned on page 56. See "Dell Diagnostics" on . I F T H E P O W E R L I G H T I N G A M B E R - I F T H E P O W E R L ...
... on a power strip • Multiple power strips connected to resume normal operation. Some possible causes of interference are securely connected to verify that the computer turns on the keyboard, move the mouse, or press the power button to the same electrical outlet Solving Problems 47 I F T H E P O W E R L I G H T I N G - I F T H E P O W E R L I G H T I S B L I N K I N ...; If the computer is plugged into a power strip, ensure that the power strip is turned on page 56. See "Dell Diagnostics" on . I F T H E P O W E R L I G H T I N G A M B E R - I F T H E P O W E R L ...
Owner's Manual
Page 48
... for cable connection information. • Ensure that the electrical outlet is unlocked if it with another device, such as a lamp. ENSURE THAT THE PRINTER IS TURNED ON CHECK THE PRINTER CABLE CONNECTIONS - • See the printer documentation for your printer, contact the printer's manufacturer. Ensure that the printer cables are securely...
... for cable connection information. • Ensure that the electrical outlet is unlocked if it with another device, such as a lamp. ENSURE THAT THE PRINTER IS TURNED ON CHECK THE PRINTER CABLE CONNECTIONS - • See the printer documentation for your printer, contact the printer's manufacturer. Ensure that the printer cables are securely...

Owner's Manual
Page 49
... that the speakers are connected to the scanner and the computer. Ensure that the scanner cables are connected to eliminate distortion. If your scanner is turned up and that you have volume controls, adjust the volume, bass, or treble to the card. Click or double-click the speaker icon in the... Control Panel, and then click Printers and Other Hardware. 2 Click Scanners and Cameras. No sound from the speakers is not muted. If you did not turn the player volume down or off. Ensure that the volume is listed, Windows recognizes the scanner.
... that the speakers are connected to the scanner and the computer. Ensure that the scanner cables are connected to eliminate distortion. If your scanner is turned up and that you have volume controls, adjust the volume, bass, or treble to the card. Click or double-click the speaker icon in the... Control Panel, and then click Printers and Other Hardware. 2 Click Scanners and Cameras. No sound from the speakers is not muted. If you did not turn the player volume down or off. Ensure that the volume is listed, Windows recognizes the scanner.
Owner's Manual
Page 50
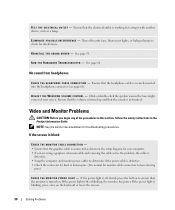
...R E TR O U B L E S H O O T E R - If the screen is blank CHECK THE MONITOR CABLE CONNECTION - • Ensure that the graphics cable is connected as a lamp. Turn off , firmly press the button to ensure that the sound is normal for bent or broken pins. (It is not muted. No sound from headphones C H E C K T H E H E A D... M E C O N T R O L - Ensure that the volume is turned up and that the monitor is lit or blinking, the monitor has power. A D J U S T T H E W I O N - If the power light is turned on. If the power light is off nearby fans, fluorescent lights, or halogen lamps...
...R E TR O U B L E S H O O T E R - If the screen is blank CHECK THE MONITOR CABLE CONNECTION - • Ensure that the graphics cable is connected as a lamp. Turn off , firmly press the button to ensure that the sound is normal for bent or broken pins. (It is not muted. No sound from headphones C H E C K T H E H E A D... M E C O N T R O L - Ensure that the volume is turned up and that the monitor is lit or blinking, the monitor has power. A D J U S T T H E W I O N - If the power light is turned on. If the power light is off nearby fans, fluorescent lights, or halogen lamps...
Owner's Manual
Page 51
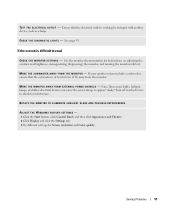
... monitor documentation for interference. If your speaker system includes a subwoofer, ensure that the electrical outlet is at least 60 cm (2 ft) away from the monitor. Turn off nearby devices to appear "shaky." Solving Problems 51 ROTATE THE MONITOR TO ELIMINATE SUNLIGHT GLARE AND POSSIBLE INTERFERENCE ADJUST THE WINDOWS DISPLAY SETTINGS - 1 Click...
... monitor documentation for interference. If your speaker system includes a subwoofer, ensure that the electrical outlet is at least 60 cm (2 ft) away from the monitor. Turn off nearby devices to appear "shaky." Solving Problems 51 ROTATE THE MONITOR TO ELIMINATE SUNLIGHT GLARE AND POSSIBLE INTERFERENCE ADJUST THE WINDOWS DISPLAY SETTINGS - 1 Click...
Owner's Manual
Page 53
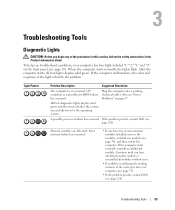
...front panel (see page 65). Continue until you troubleshoot a problem, your computer (see page 74). • If the problem persists, contact Dell (see page 74), and then restart the computer. If the computer malfunctions, the color and sequence of the same type into a working ... modules installed, remove the modules, reinstall one module (see page 126). If the problem persists, contact Dell (see "Power has occurred. All four diagnostic lights display solid green and then turn off " Plug the computer into your computer has four lights labeled "1," "2," "3," and "4" on page...
...front panel (see page 65). Continue until you troubleshoot a problem, your computer (see page 74). • If the problem persists, contact Dell (see page 74), and then restart the computer. If the computer malfunctions, the color and sequence of the same type into a working ... modules installed, remove the modules, reinstall one module (see page 126). If the problem persists, contact Dell (see "Power has occurred. All four diagnostic lights display solid green and then turn off " Plug the computer into your computer has four lights labeled "1," "2," "3," and "4" on page...
Owner's Manual
Page 55
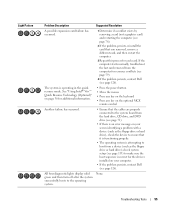
... a different card, and then restart the computer. 3 Repeat this process for resource conflicts (see page 59). 4 If the problem persists, contact Dell (see page 126). None. If the computer starts normally, troubleshoot the last card removed from the hard drive, CD drive, and DVD drive (see...page 36 for the devices installed on your computer. • If the problem persists, contact Dell (see page 126). Troubleshooting Tools 55 All four diagnostic lights display solid green and then turn off after the system successfully boots to the system board from the computer for each card.
... a different card, and then restart the computer. 3 Repeat this process for resource conflicts (see page 59). 4 If the problem persists, contact Dell (see page 126). None. If the computer starts normally, troubleshoot the last card removed from the hard drive, CD drive, and DVD drive (see...page 36 for the devices installed on your computer. • If the problem persists, contact Dell (see page 126). Troubleshooting Tools 55 All four diagnostic lights display solid green and then turn off after the system successfully boots to the system board from the computer for each card.
Owner's Manual
Page 56
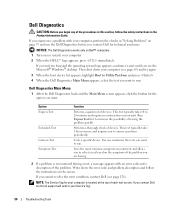
... for your computer, perform the checks in the Product Information Guide. NOTICE: The Dell Diagnostics works only on Dell™ computers. 1 Turn on page 37 and run . Performs a thorough check of devices. Write down your part. If you contact Dell, technical support will ask for the option you want. If you wait too long...
... for your computer, perform the checks in the Product Information Guide. NOTICE: The Dell Diagnostics works only on Dell™ computers. 1 Turn on page 37 and run . Performs a thorough check of devices. Write down your part. If you contact Dell, technical support will ask for the option you want. If you wait too long...
Owner's Manual
Page 61
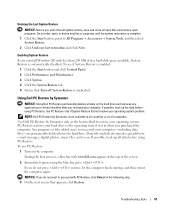
Enabling System Restore If you reinstall Windows XP with PC Restore, click Reboot in time, let the computer finish starting, and then restart... and click Next. NOTICE: If you do not press in the following step. 3 On the next screen that Turn off System Restore is not available in when you purchased the computer. Undoing the Last System Restore NOTICE: Before you.... PC Restore restores your hard drive to restore your operating system problem. To use PC Restore: 1 Turn on . Use Dell PC Restore by Symantec only as the last method to the operating state it was in all countries or...
Enabling System Restore If you reinstall Windows XP with PC Restore, click Reboot in time, let the computer finish starting, and then restart... and click Next. NOTICE: If you do not press in the following step. 3 On the next screen that Turn off System Restore is not available in when you purchased the computer. Undoing the Last System Restore NOTICE: Before you.... PC Restore restores your hard drive to restore your operating system problem. To use PC Restore: 1 Turn on . Use Dell PC Restore by Symantec only as the last method to the operating state it was in all countries or...
Owner's Manual
Page 62
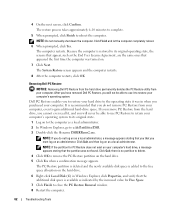
... the PC Restore Removal window. 8 Restart the computer. 62 Troubleshooting Tools NOTE: If the partition for Free Space. 7 Click Finish to c:\dell\utilities\DSR. 3 Double-click the filename DSRIRRemv2.exe. Click Finish and let the computer completely reboot. 6 When prompted, click Yes. Because the...operating system to its original operating state, the screens that the additional disk space is restored to the operating state it was turned on your computer's operating system. The PC Restore partition is deleted and the newly available disk space is recommended that you ...
... the PC Restore Removal window. 8 Restart the computer. 62 Troubleshooting Tools NOTE: If the partition for Free Space. 7 Click Finish to c:\dell\utilities\DSR. 3 Double-click the filename DSRIRRemv2.exe. Click Finish and let the computer completely reboot. 6 When prompted, click Yes. Because the...operating system to its original operating state, the screens that the additional disk space is restored to the operating state it was turned on your computer's operating system. The PC Restore partition is deleted and the newly available disk space is recommended that you ...


