Owner's Manual
Page 4
... (Optional 36 Enabling the QRT Feature in System Setup 36 Enabling the QRT feature in the Operating system 36 2 Solving Problems 37 Troubleshooting Tips 37 Battery Problems 37 Drive Problems 38 CD and DVD drive problems 38 Hard drive problems 39 E-Mail, Modem, and Internet Problems 39 Error Messages 41 Media...
... (Optional 36 Enabling the QRT Feature in System Setup 36 Enabling the QRT feature in the Operating system 36 2 Solving Problems 37 Troubleshooting Tips 37 Battery Problems 37 Drive Problems 38 CD and DVD drive problems 38 Hard drive problems 39 E-Mail, Modem, and Internet Problems 39 Error Messages 41 Media...
Owner's Manual
Page 6
... 99 Removing a Media Card Reader 99 Installing a Media Card Reader 101 CD/DVD Drive 102 Removing a CD/DVD Drive 103 Installing a CD/DVD Drive 104 Battery 106 Replacing the Battery 106 Replacing the Computer Cover 107 6 Contents
... 99 Removing a Media Card Reader 99 Installing a Media Card Reader 101 CD/DVD Drive 102 Removing a CD/DVD Drive 103 Installing a CD/DVD Drive 104 Battery 106 Replacing the Battery 106 Replacing the Computer Cover 107 6 Contents
Owner's Manual
Page 26
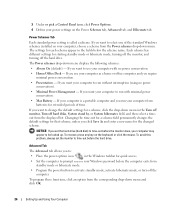
The Power schemes drop-down menu and click OK. 26 Setting Up and Using Your Computer If you want your computer from batteries for extended periods of the standard Windows schemes installed on your computer to run with no power conservation). • Minimal Power ... the corresponding drop-down menu displays the following schemes: • Always On (default) - If your computer with minimal power conservation. • Max Battery - To recover, press any key on the Power Schemes tab, Advanced tab, and Hibernate tab. If you want to time-out before the monitor ...
The Power schemes drop-down menu and click OK. 26 Setting Up and Using Your Computer If you want your computer from batteries for extended periods of the standard Windows schemes installed on your computer to run with no power conservation). • Minimal Power ... the corresponding drop-down menu displays the following schemes: • Always On (default) - If your computer with minimal power conservation. • Max Battery - To recover, press any key on the Power Schemes tab, Advanced tab, and Hibernate tab. If you want to time-out before the monitor ...

Owner's Manual
Page 37
...have changed your SATA operation settings, restore your previous SATA operation settings and retry booting into the operating system. Discard used batteries according to repeatedly reset time and date information after you have to the manufacturer's instructions. Solving Problems Troubleshooting Tips Follow ...that the part is correctly installed. • If a peripheral device does not work properly, contact Dell (see the program's documentation. • If you begin any of a new battery exploding if it is properly connected. • If an error message appears on the computer, or...
...have changed your SATA operation settings, restore your previous SATA operation settings and retry booting into the operating system. Discard used batteries according to repeatedly reset time and date information after you have to the manufacturer's instructions. Solving Problems Troubleshooting Tips Follow ...that the part is correctly installed. • If a peripheral device does not work properly, contact Dell (see the program's documentation. • If you begin any of a new battery exploding if it is properly connected. • If an error message appears on the computer, or...
Owner's Manual
Page 71
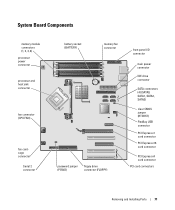
System Board Components memory module connectors (1, 2, 3, 4) processor power connector processor and heat sink connector fan connector (CPU FAN) fan cardcage connector Serial 2 connector battery socket (BATTERY) memory fan connector password jumper (PSWD) floppy drive connector (FLOPPY) front panel I/O connector main power connector IDE drive connector SATA connectors (4) (SATA0, SATA1, SATA2, SATA3) ...
System Board Components memory module connectors (1, 2, 3, 4) processor power connector processor and heat sink connector fan connector (CPU FAN) fan cardcage connector Serial 2 connector battery socket (BATTERY) memory fan connector password jumper (PSWD) floppy drive connector (FLOPPY) front panel I/O connector main power connector IDE drive connector SATA connectors (4) (SATA0, SATA1, SATA2, SATA3) ...

Owner's Manual
Page 106
...the socket or by breaking circuit traces on the system board. 5 Remove the battery by the manufacturer. Replace the battery only with the side labeled "+" facing up, and snap the battery into the socket with the same or equivalent type recommended by carefully prying it is... any of your computer's electronic components. A coin-cell battery maintains computer configuration, date, and time information. Ensure that you can last several years. Discard used batteries according to pry out the battery. NOTICE: If you pry the battery out of its socket with your fingers or with a...
...the socket or by breaking circuit traces on the system board. 5 Remove the battery by the manufacturer. Replace the battery only with the side labeled "+" facing up, and snap the battery into the socket with the same or equivalent type recommended by carefully prying it is... any of your computer's electronic components. A coin-cell battery maintains computer configuration, date, and time information. Ensure that you can last several years. Discard used batteries according to pry out the battery. NOTICE: If you pry the battery out of its socket with your fingers or with a...

Owner's Manual
Page 107
...: Before you so that they do not get caught underneath the drives. 2 Ensure that no tools or extra parts are left side of the old battery. d Ensure that all of the cover are connected, and fold cables out of the cover until it into the computer. 4 Connect your computer and devices... cover until it into the computer. 8 Connect your computer and devices to electrical outlets, and turn them on . Removing and Installing Parts 107 c Press down . battery socket tab battery 7 Replace the computer cover.
...: Before you so that they do not get caught underneath the drives. 2 Ensure that no tools or extra parts are left side of the old battery. d Ensure that all of the cover are connected, and fold cables out of the cover until it into the computer. 4 Connect your computer and devices... cover until it into the computer. 8 Connect your computer and devices to electrical outlets, and turn them on . Removing and Installing Parts 107 c Press down . battery socket tab battery 7 Replace the computer cover.
Owner's Manual
Page 112
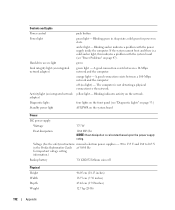
... lights Standby power light push button green light - yellow light - Blinking indicates activity on state. amber light - solid green for important voltage setting information.) Backup battery 3-V CR2032 lithium coin cell Physical Height Width Depth Weight 46.05 cm (18.13 inches) 18.75 cm (7.38 inches) 45.42 cm (17.88inches...
... lights Standby power light push button green light - yellow light - Blinking indicates activity on state. amber light - solid green for important voltage setting information.) Backup battery 3-V CR2032 lithium coin cell Physical Height Width Depth Weight 46.05 cm (18.13 inches) 18.75 cm (7.38 inches) 45.42 cm (17.88inches...
Owner's Manual
Page 145
Index A audio. See sound B battery problems, 37 replacing, 106 BIOS, 113 boot sequence about, 119 changing, 119-120 option settings, 119 booting to a USB device, 119 C cards installing PCI Express, ... how to, 18 copying DVDs general information, 18 helpful tips, 20 how to, 18 cover replacing, 107 D Dell Dell Diagnostics, 56 support policy, 123 support site, 11 Dell Premier Support website, 9, 11 diagnostic lights, 53 diagnostics Dell, 56 lights, 53, 66 documentation online, 11 Product Information Guide, 9 Setup Diagram, 9 drive panel, 66, 89 removing...
Index A audio. See sound B battery problems, 37 replacing, 106 BIOS, 113 boot sequence about, 119 changing, 119-120 option settings, 119 booting to a USB device, 119 C cards installing PCI Express, ... how to, 18 copying DVDs general information, 18 helpful tips, 20 how to, 18 cover replacing, 107 D Dell Dell Diagnostics, 56 support policy, 123 support site, 11 Dell Premier Support website, 9, 11 diagnostic lights, 53 diagnostics Dell, 56 lights, 53, 66 documentation online, 11 Product Information Guide, 9 Setup Diagram, 9 drive panel, 66, 89 removing...
Owner's Manual
Page 147
N network connector, 68 Network Setup Wizard, 24 problems, 46 setting up, 23 Network Setup Wizard, 24 O operating system reinstalling Windows XP, 60 P password clearing, 121 jumper, 121 PC Restore, 61 PCI cards removing, 80 PCI Express cards installing, 82 removing, 86 playing CDs and DVDs, ... Properties, 25 printer cable, 13 connecting, 13 problems, 48 setting up, 13 USB, 14 problems battery, 37 blue screen, 44 CD drive, 38 CD-RW drive, 39 computer crashes, 43-44 computer stops responding, 43 Dell Diagnostics, 56 diagnostic lights, 53 drives, 38 DVD drive, 38 e-mail, 39 error messages, 41...
N network connector, 68 Network Setup Wizard, 24 problems, 46 setting up, 23 Network Setup Wizard, 24 O operating system reinstalling Windows XP, 60 P password clearing, 121 jumper, 121 PC Restore, 61 PCI cards removing, 80 PCI Express cards installing, 82 removing, 86 playing CDs and DVDs, ... Properties, 25 printer cable, 13 connecting, 13 problems, 48 setting up, 13 USB, 14 problems battery, 37 blue screen, 44 CD drive, 38 CD-RW drive, 39 computer crashes, 43-44 computer stops responding, 43 Dell Diagnostics, 56 diagnostic lights, 53 drives, 38 DVD drive, 38 e-mail, 39 error messages, 41...


