Owner's Manual
Page 1
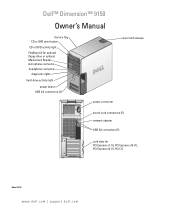
Dell™ Dimension™ 9150 Owner's Manual Service Tag CD or DVD eject button CD or DVD activity light FlexBays (2) for optional floppy drive or optional Media Card Reader microphone connector headphone connector diagnostic lights hard-drive activity light power button USB 2.0 connectors (2) cover latch release power connector sound-card connectors (5) network adapter USB 2.0 connectors (5) card slots for PCI Express x1 (1), PCI Express x16 (1), PCI Express x4 (1), PCI (3) Model DCTA www.dell.com | support.dell.com
Dell™ Dimension™ 9150 Owner's Manual Service Tag CD or DVD eject button CD or DVD activity light FlexBays (2) for optional floppy drive or optional Media Card Reader microphone connector headphone connector diagnostic lights hard-drive activity light power button USB 2.0 connectors (2) cover latch release power connector sound-card connectors (5) network adapter USB 2.0 connectors (5) card slots for PCI Express x1 (1), PCI Express x16 (1), PCI Express x4 (1), PCI (3) Model DCTA www.dell.com | support.dell.com
Owner's Manual
Page 4
... System Setup 36 Enabling the QRT feature in the Operating system 36 2 Solving Problems 37 Troubleshooting Tips 37 Battery Problems 37 Drive Problems 38 CD and DVD drive problems 38 Hard drive problems 39 E-Mail, Modem, and Internet Problems 39 Error Messages 41 Media Card Reader Problems 42 Keyboard Problems 42 Lockups and...
... System Setup 36 Enabling the QRT feature in the Operating system 36 2 Solving Problems 37 Troubleshooting Tips 37 Battery Problems 37 Drive Problems 38 CD and DVD drive problems 38 Hard drive problems 39 E-Mail, Modem, and Internet Problems 39 Error Messages 41 Media Card Reader Problems 42 Keyboard Problems 42 Lockups and...
Owner's Manual
Page 6
... Express Cards 81 Drive Panels 89 Removing the Drive Panel 89 Removing the Drive-Panel Insert 90 Replacing the Drive-Panel Insert 90 Replacing the Drive Panel 91 Drives 92 General Installation Guidelines 92 Hard Drive 92 Removing a Hard Drive 93 Installing a Hard Drive 94 Adding a Second Hard Drive 95 Floppy Drive 96 Removing a Floppy Drive 96 Installing a Floppy Drive 98 Media Card...
... Express Cards 81 Drive Panels 89 Removing the Drive Panel 89 Removing the Drive-Panel Insert 90 Replacing the Drive-Panel Insert 90 Replacing the Drive Panel 91 Drives 92 General Installation Guidelines 92 Hard Drive 92 Removing a Hard Drive 93 Installing a Hard Drive 94 Adding a Second Hard Drive 95 Floppy Drive 96 Removing a Floppy Drive 96 Installing a Floppy Drive 98 Media Card...
Owner's Manual
Page 7
... Boot Sequence 119 Clearing Forgotten Passwords 121 Clearing CMOS Settings 122 Cleaning Your Computer 122 Computer, Keyboard, and Monitor 122 Mouse 123 Floppy Drive 123 CDs and DVDs 123 Dell Technical Support Policy (U.S. Only 123 Definition of "Dell-Installed" Software and Peripherals 124 Definition of "Third-Party" Software and Peripherals 124 FCC Notices (U.S.
... Boot Sequence 119 Clearing Forgotten Passwords 121 Clearing CMOS Settings 122 Cleaning Your Computer 122 Computer, Keyboard, and Monitor 122 Mouse 123 Floppy Drive 123 CDs and DVDs 123 Dell Technical Support Policy (U.S. Only 123 Definition of "Dell-Installed" Software and Peripherals 124 Definition of "Third-Party" Software and Peripherals 124 FCC Notices (U.S.
Owner's Manual
Page 11
...System Software: 1 Go to System and Configuration Utilities, and click Dell Desktop System Software. Find it Here • Solutions - Upgrade information for Dell™ 3.5-inch USB floppy drives, Intel® Pentium® M processors, optical drives, and USB devices. Service call and order status, warranty, and...is necessary for correct operation of your operating system and support for components, such at premier.support.dell.com. The website may not be as memory, the hard drive, and the operating system available in all regions. • Customer Care - What Are You ...
...System Software: 1 Go to System and Configuration Utilities, and click Dell Desktop System Software. Find it Here • Solutions - Upgrade information for Dell™ 3.5-inch USB floppy drives, Intel® Pentium® M processors, optical drives, and USB devices. Service call and order status, warranty, and...is necessary for correct operation of your operating system and support for components, such at premier.support.dell.com. The website may not be as memory, the hard drive, and the operating system available in all regions. • Customer Care - What Are You ...
Owner's Manual
Page 16
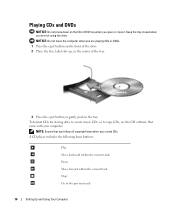
NOTICE: Do not move the computer when you are not using the drive. To format CDs for storing data, to create music CDs, or to the previous track 16 Setting Up and Using Your Computer A CD player includes ... the CD or DVD tray when you open or close it. Playing CDs and DVDs NOTICE: Do not press down on the front of the drive. 2 Place the disc, label side up, in the center of the tray. 3 Press the eject button or gently push in the tray. Keep the tray...
NOTICE: Do not move the computer when you are not using the drive. To format CDs for storing data, to create music CDs, or to the previous track 16 Setting Up and Using Your Computer A CD player includes ... the CD or DVD tray when you open or close it. Playing CDs and DVDs NOTICE: Do not press down on the front of the drive. 2 Place the disc, label side up, in the center of the tray. 3 Press the eject button or gently push in the tray. Keep the tray...
Owner's Manual
Page 18
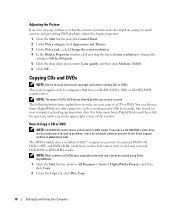
... OK. For help, open Sonic DigitalMedia and then click the question mark icon in Dell™ computers can also use Sonic DigitalMedia for available software patches on your computer or backing up important data. The DVD-writable drives installed in the upper-right corner of the window. Adjusting the Picture If an... write to make an exact copy of CD or DVD drives offered by country. NOTE: The types of a CD or DVD. You can write to and may vary by Dell may not read DVD+/-R, DVD+/-RW and DVD+R DL (dual layer) media, but cannot write to and read DVD-RAM or DVD...
... OK. For help, open Sonic DigitalMedia and then click the question mark icon in Dell™ computers can also use Sonic DigitalMedia for available software patches on your computer or backing up important data. The DVD-writable drives installed in the upper-right corner of the window. Adjusting the Picture If an... write to make an exact copy of CD or DVD drives offered by country. NOTE: The types of a CD or DVD. You can write to and may vary by Dell may not read DVD+/-R, DVD+/-RW and DVD+R DL (dual layer) media, but cannot write to and read DVD-RAM or DVD...
Owner's Manual
Page 19
... of information. Use blank CD-Rs to a temporary folder on CDs. 3 To copy the CD or DVD: • If you have one CD or DVD drive, ensure that you have created automatically ejects. The computer reads your source CD or DVD and click the Disc Copy button. When prompted, insert a blank... CD or DVD into the drive and click OK. • If you have two CD or DVD drives, select the drive into which you may not be used to the blank CD or DVD. After you create a DVD+/-R disc...
... of information. Use blank CD-Rs to a temporary folder on CDs. 3 To copy the CD or DVD: • If you have one CD or DVD drive, ensure that you have created automatically ejects. The computer reads your source CD or DVD and click the Disc Copy button. When prompted, insert a blank... CD or DVD into the drive and click OK. • If you have two CD or DVD drives, select the drive into which you may not be used to the blank CD or DVD. After you create a DVD+/-R disc...

Owner's Manual
Page 20
... that have MP3 software installed. • Commercially available DVD players used in home theater systems may not support all available DVD formats. The CD-RW drive needs 1-2 MB of formats supported by your DVD player or contact the manufacturer. • Do not burn a blank CD-R or CD-RW to its maximum...
... that have MP3 software installed. • Commercially available DVD players used in home theater systems may not support all available DVD formats. The CD-RW drive needs 1-2 MB of formats supported by your DVD player or contact the manufacturer. • Do not burn a blank CD-R or CD-RW to its maximum...
Owner's Manual
Page 24
...→ Communications, and then click Network Setup Wizard. 2 On the welcome screen, click Next. 3 Click Checklist for creating a network. NOTE: Windows XP Professional includes security and networking features not available in certain windows. 24 Setting Up and Using Your Computer You can reduce power to just the... monitor or the hard drive, or you are not using it is on and you can reduce the amount of sharing files, printers, or an Internet connection ...
...→ Communications, and then click Network Setup Wizard. 2 On the welcome screen, click Next. 3 Click Checklist for creating a network. NOTE: Windows XP Professional includes security and networking features not available in certain windows. 24 Setting Up and Using Your Computer You can reduce power to just the... monitor or the hard drive, or you are not using it is on and you can reduce the amount of sharing files, printers, or an Internet connection ...
Owner's Manual
Page 25
...it returns to a reserved area on the keyboard or moving the mouse does not bring the computer out of the computer memory, Dell creates an appropriately sized hibernate mode file before shipping the computer to the state it was in before it may take a short.... 4 Define your standby mode settings, hibernate mode settings, and other power settings in hibernate mode. If the computer's hard drive becomes corrupted, Windows XP recreates the hibernate file automatically. Standby Mode Standby mode conserves power by turning off the computer. The computer may lose data. When...
...it returns to a reserved area on the keyboard or moving the mouse does not bring the computer out of the computer memory, Dell creates an appropriately sized hibernate mode file before shipping the computer to the state it was in before it may take a short.... 4 Define your standby mode settings, hibernate mode settings, and other power settings in hibernate mode. If the computer's hard drive becomes corrupted, Windows XP recreates the hibernate file automatically. Standby Mode Standby mode conserves power by turning off the computer. The computer may lose data. When...
Owner's Manual
Page 26
... these functions, click an option from batteries for a scheme, click the drop-down menu in the Turn off monitor, Turn off the hard drive. If you want to run without interruption (using no power conservation. • Home/Office Desk - Changing the time-out for a scheme field...; Place the power options icon in the fields below the scheme name. To avoid this problem, always set the hard drive (hard disk) to time-out before the hard drive. Power Schemes Tab Each standard power setting is a portable computer and you require minimal power conservation. • Presentation -...
... these functions, click an option from batteries for a scheme, click the drop-down menu in the Turn off monitor, Turn off the hard drive. If you want to run without interruption (using no power conservation. • Home/Office Desk - Changing the time-out for a scheme field...; Place the power options icon in the fields below the scheme name. To avoid this problem, always set the hard drive (hard disk) to time-out before the hard drive. Power Schemes Tab Each standard power setting is a portable computer and you require minimal power conservation. • Presentation -...
Owner's Manual
Page 28
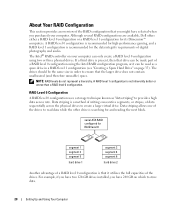
...several RAID configurations are available, Dell offers either a RAID level 0 configuration or a RAID level 1 configuration for the data integrity requirements of digital photography and audio. The drives should be the same size in a RAID level 1 configuration (see "Creating a Spare Hard Drive" on page 35). NOTE... the RAID configuration that you purchased your computer can be made part of a RAID level 0 configuration using two or three physical drives. A RAID level 0 configuration is recommended for and reading the next block. The Intel® RAID controller on your computer. ...
...several RAID configurations are available, Dell offers either a RAID level 0 configuration or a RAID level 1 configuration for the data integrity requirements of digital photography and audio. The drives should be the same size in a RAID level 1 configuration (see "Creating a Spare Hard Drive" on page 35). NOTE... the RAID configuration that you purchased your computer can be made part of a RAID level 0 configuration using two or three physical drives. A RAID level 0 configuration is recommended for and reading the next block. The Intel® RAID controller on your computer. ...

Owner's Manual
Page 29
... You must have installed the operating system Setting Up and Using Your Computer 29 You can then be rebuilt using two 120-GB hard drives collectively has a maximum of two methods to set up a RAID configuration. Therefore, ensure that you perform regular backups when you install ...the operating system onto the hard drive. Also, because data is performed after you purchased your computer. The second method uses the Intel Matrix Storage Manager, or Intel Matrix Storage ...
... You must have installed the operating system Setting Up and Using Your Computer 29 You can then be rebuilt using two 120-GB hard drives collectively has a maximum of two methods to set up a RAID configuration. Therefore, ensure that you perform regular backups when you install ...the operating system onto the hard drive. Also, because data is performed after you purchased your computer. The second method uses the Intel Matrix Storage Manager, or Intel Matrix Storage ...
Owner's Manual
Page 30
...In a RAID level 1 configuration, the size of the configuration will be of the RAID configuration procedures in the configuration. and down -arrow keys to highlight Drives, and press . 3 Press the up data you want to enter the Intel® RAID Option ROM utility. 3 Press the up - Configuring for RAID...Back up - and down -arrow keys to RAID-enabled mode before continuing. and down -arrow keys and spacebar to select the two or three drives you are prompted to store on page 116. 5 Press the left - Both methods require that you set your computer to select RAID0(Stripe), ...
...In a RAID level 1 configuration, the size of the configuration will be of the RAID configuration procedures in the configuration. and down -arrow keys to highlight Drives, and press . 3 Press the up data you want to enter the Intel® RAID Option ROM utility. 3 Press the up - Configuring for RAID...Back up - and down -arrow keys to RAID-enabled mode before continuing. and down -arrow keys and spacebar to select the two or three drives you are prompted to store on page 116. 5 Press the left - Both methods require that you set your computer to select RAID0(Stripe), ...
Owner's Manual
Page 31
...Using Your Computer 31 and down -arrow keys to select Exit, and press . 12 Install the operating system (see "Using Microsoft Windows XP System Restore" on the RAID drives will become unbootable. 1 Press when you want to make up - and down -arrow keys to highlight the RAID volume you are ...more than two hard drives available, press the up - and down -arrow keys to highlight Create RAID Volume, and press . 4 Enter a RAID volume name or accept the default, and press...
...Using Your Computer 31 and down -arrow keys to select Exit, and press . 12 Install the operating system (see "Using Microsoft Windows XP System Restore" on the RAID drives will become unbootable. 1 Press when you want to make up - and down -arrow keys to highlight the RAID volume you are ...more than two hard drives available, press the up - and down -arrow keys to highlight Create RAID Volume, and press . 4 Enter a RAID volume name or accept the default, and press...
Owner's Manual
Page 32
...; Storage Utility. 32 Setting Up and Using Your Computer Creating a RAID Level 0 Configuration NOTE: When you perform this operation, all data on the RAID drives will be lost . 1 Set your computer to RAID-enabled mode (see page 30). 3 On the Actions menu, select Create RAID Volume to launch the... RAID Level 1 Configuration" on the volume that you want to include in your RAID level 0 volume, click the right arrow and click on the RAID drives will be lost . 1 Set your computer to RAID-enabled mode (see page 30). 2 Click the Start button and point to Programs→ Intel(R) ...
...; Storage Utility. 32 Setting Up and Using Your Computer Creating a RAID Level 0 Configuration NOTE: When you perform this operation, all data on the RAID drives will be lost . 1 Set your computer to RAID-enabled mode (see page 30). 3 On the Actions menu, select Create RAID Volume to launch the... RAID Level 1 Configuration" on the volume that you want to include in your RAID level 0 volume, click the right arrow and click on the RAID drives will be lost . 1 Set your computer to RAID-enabled mode (see page 30). 2 Click the Start button and point to Programs→ Intel(R) ...
Owner's Manual
Page 33
... volume name, select RAID 1 as the RAID level, and then click Next to continue. 6 On the Select Volume Location screen, click the first hard drive you want to use to create your RAID level 0 volume, and then click the right arrow. Setting Up and Using Your Computer 33 Deleting a RAID..., you have not yet set your computer to RAID-enabled mode (see page 30). 3 On the Actions menu, select Create RAID Volume From Existing Hard Drive to launch the Migration Wizard. 4 Click Next on the volume. 1 Click the Start button and point to Programs→ Intel(R) Application Accelerator→ Intel ...
... volume name, select RAID 1 as the RAID level, and then click Next to continue. 6 On the Select Volume Location screen, click the first hard drive you want to use to create your RAID level 0 volume, and then click the right arrow. Setting Up and Using Your Computer 33 Deleting a RAID..., you have not yet set your computer to RAID-enabled mode (see page 30). 3 On the Actions menu, select Create RAID Volume From Existing Hard Drive to launch the Migration Wizard. 4 Click Next on the volume. 1 Click the Start button and point to Programs→ Intel(R) Application Accelerator→ Intel ...

Owner's Manual
Page 34
... Click the Start button and point to All Programs→ Intel(R) Application Accelerator→ Intel Matrix Storage Manager to make changes. NOTE: Select the hard drive that you want to the size of the average file you have not yet set your computer normally during the migration process. You can use...RAID-enabled mode (see an Actions menu option, you want , and click Next. NOTE: In the following step, you want to store on the member drive. 11 Click Finish to start migrating, or click Back to launch the Intel® Storage Utility. 6 From the drop-down box, select RAID 1 ...
... Click the Start button and point to All Programs→ Intel(R) Application Accelerator→ Intel Matrix Storage Manager to make changes. NOTE: Select the hard drive that you want to the size of the average file you have not yet set your computer normally during the migration process. You can use...RAID-enabled mode (see an Actions menu option, you want , and click Next. NOTE: In the following step, you want to store on the member drive. 11 Click Finish to start migrating, or click Back to launch the Intel® Storage Utility. 6 From the drop-down box, select RAID 1 ...
Owner's Manual
Page 35
...the mirror configuration using the spare hard drive as Spare. Setting Up and Using Your Computer 35 The spare hard drive will be able to this Disk. Creating a Spare Hard Drive A spare hard drive may be created with Microsoft® Windows® XP Media Center Edition 2005 and dual core... processors. To Mark a Drive as a Spare Hard Drive: 1 Click the Start button and ...
...the mirror configuration using the spare hard drive as Spare. Setting Up and Using Your Computer 35 The spare hard drive will be able to this Disk. Creating a Spare Hard Drive A spare hard drive may be created with Microsoft® Windows® XP Media Center Edition 2005 and dual core... processors. To Mark a Drive as a Spare Hard Drive: 1 Click the Start button and ...


