Owner's Manual
Page 1
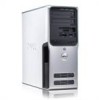
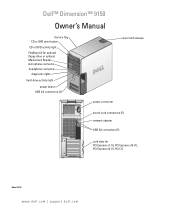
Dell™ Dimension™ 9150 Owner's Manual Service Tag CD or DVD eject button CD or DVD activity light FlexBays (2) for optional floppy drive or optional Media Card Reader microphone connector headphone connector diagnostic lights hard-drive activity light power button USB 2.0 connectors (2) cover latch release power connector sound-card connectors (5) network adapter USB 2.0 connectors (5) card slots for PCI Express x1 (1), PCI Express x16 (1), PCI Express x4 (1), PCI (3) Model DCTA www.dell.com | support.dell.com
Dell™ Dimension™ 9150 Owner's Manual Service Tag CD or DVD eject button CD or DVD activity light FlexBays (2) for optional floppy drive or optional Media Card Reader microphone connector headphone connector diagnostic lights hard-drive activity light power button USB 2.0 connectors (2) cover latch release power connector sound-card connectors (5) network adapter USB 2.0 connectors (5) card slots for PCI Express x1 (1), PCI Express x16 (1), PCI Express x4 (1), PCI (3) Model DCTA www.dell.com | support.dell.com
Owner's Manual
Page 5
...Problems 50 If the screen is blank 50 If the screen is difficult to read 51 3 Troubleshooting Tools 53 Diagnostic Lights 53 Dell Diagnostics 56 Dell Diagnostics Main Menu 56 Drivers 57 What Is a Driver 57 Identifying Drivers 58 Reinstalling Drivers 58 Resolving Software and ...Hardware Incompatibilities 59 Restoring Your Operating System 59 Using Microsoft Windows XP System Restore 60 Using Dell PC Restore by Symantec 61 4 Removing and Installing Parts 63 Before You Begin 63 Recommended Tools 63 Turn Off...
...Problems 50 If the screen is blank 50 If the screen is difficult to read 51 3 Troubleshooting Tools 53 Diagnostic Lights 53 Dell Diagnostics 56 Dell Diagnostics Main Menu 56 Drivers 57 What Is a Driver 57 Identifying Drivers 58 Reinstalling Drivers 58 Resolving Software and ...Hardware Incompatibilities 59 Restoring Your Operating System 59 Using Microsoft Windows XP System Restore 60 Using Dell PC Restore by Symantec 61 4 Removing and Installing Parts 63 Before You Begin 63 Recommended Tools 63 Turn Off...
Owner's Manual
Page 36
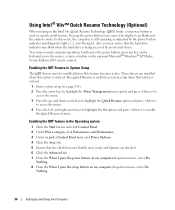
... option and press to access the menu. 3 Press the up- In this mode, the computer is being accessed by the power button indicator and diagnostic lights 1, 2, and 4 being lit. and down menu, select Do Nothing. 36 Setting Up and Using Your Computer and right-arrow keys to highlight the On ...power button on my computer drop-down menu, select Do Nothing. 8 From the When I press the sleep button on the optional Microsoft® Windows® XP Media Center Edition 2005 remote control. Pressing the power button once causes the display to go blank and the audio to mute. To resume normal...
... option and press to access the menu. 3 Press the up- In this mode, the computer is being accessed by the power button indicator and diagnostic lights 1, 2, and 4 being lit. and down menu, select Do Nothing. 36 Setting Up and Using Your Computer and right-arrow keys to highlight the On ...power button on my computer drop-down menu, select Do Nothing. 8 From the When I press the sleep button on the optional Microsoft® Windows® XP Media Center Edition 2005 remote control. Pressing the power button once causes the display to go blank and the audio to mute. To resume normal...
Owner's Manual
Page 46
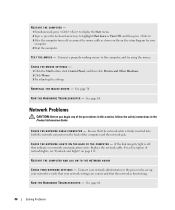
.... RESTART THE COMPUTER AND LOG ON TO THE NETWORK AGAIN C H E C K Y O U R N E T W O R K S E T T I N G S - Network Problems CAUTION: Before you begin any of network lights, see "Controls and Lights" on page 112. R U N T H E H A R D W A R E TR O U B L E S H O O T E R - If the link integrity light is firmly inserted into both the network connector on the back of the computer and the network jack. Contact your...
.... RESTART THE COMPUTER AND LOG ON TO THE NETWORK AGAIN C H E C K Y O U R N E T W O R K S E T T I N G S - Network Problems CAUTION: Before you begin any of network lights, see "Controls and Lights" on page 112. R U N T H E H A R D W A R E TR O U B L E S H O O T E R - If the link integrity light is firmly inserted into both the network connector on the back of the computer and the network jack. Contact your...
Owner's Manual
Page 50
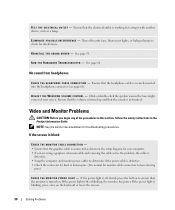
... up and that the sound is turned on. If the power light is off nearby fans, fluorescent lights, or halogen lamps to ensure that the graphics cable is connected as a lamp. If the power light is blinking, press a key on the setup diagram for your computer...; If you begin any of the procedures in this section, follow the safety instructions in the lower-right corner of your screen. If the power light is lit or blinking, the monitor has power. E L I M I N A T E P O S S I B L E I N D O W S V O L U M E C O N T R O L - Video and Monitor Problems CAUTION: Before you are using a...
... up and that the sound is turned on. If the power light is off nearby fans, fluorescent lights, or halogen lamps to ensure that the graphics cable is connected as a lamp. If the power light is blinking, press a key on the setup diagram for your computer...; If you begin any of the procedures in this section, follow the safety instructions in the lower-right corner of your screen. If the power light is lit or blinking, the monitor has power. E L I M I N A T E P O S S I B L E I N D O W S V O L U M E C O N T R O L - Video and Monitor Problems CAUTION: Before you are using a...
Owner's Manual
Page 51
... quality. If your speaker system includes a subwoofer, ensure that the electrical outlet is working by testing it with another device, such as a lamp. Fans, fluorescent lights, halogen lamps, and other electrical devices can cause the screen image to check for interference. See page 53. Turn off nearby devices to appear "shaky...
... quality. If your speaker system includes a subwoofer, ensure that the electrical outlet is working by testing it with another device, such as a lamp. Fans, fluorescent lights, halogen lamps, and other electrical devices can cause the screen image to check for interference. See page 53. Turn off nearby devices to appear "shaky...
Owner's Manual
Page 53
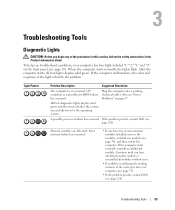
..., remove the modules, reinstall one module (see page 74), and then restart the computer. Troubleshooting Tools Diagnostic Lights CAUTION: Before you troubleshoot a problem, your computer (see page 74). • If the problem persists, contact Dell (see page 65). Troubleshooting Tools 53 To help you begin any of the procedures in this section...
..., remove the modules, reinstall one module (see page 74), and then restart the computer. Troubleshooting Tools Diagnostic Lights CAUTION: Before you troubleshoot a problem, your computer (see page 74). • If the problem persists, contact Dell (see page 65). Troubleshooting Tools 53 To help you begin any of the procedures in this section...
Owner's Manual
Page 54
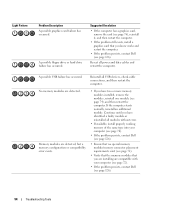
... then restart the computer. No memory modules are compatible with your computer (see page 72). • If the problem persists, contact Dell (see page 126). 54 Troubleshooting Tools Memory modules are detected, but a memory configuration or compatibility error exists. • If you... memory modules that you know works and restart the computer. • If the problem persists, contact Dell (see page 74), and then restart the computer. Light Pattern Problem Description A possible graphics card failure has occurred. Continue until you are installing are detected. ...
... then restart the computer. No memory modules are compatible with your computer (see page 72). • If the problem persists, contact Dell (see page 126). 54 Troubleshooting Tools Memory modules are detected, but a memory configuration or compatibility error exists. • If you... memory modules that you know works and restart the computer. • If the problem persists, contact Dell (see page 74), and then restart the computer. Light Pattern Problem Description A possible graphics card failure has occurred. Continue until you are installing are detected. ...
Owner's Manual
Page 55
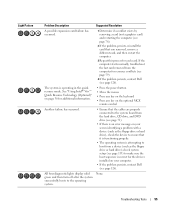
...it is functioning properly. • The operating system is an error message on your computer. • If the problem persists, contact Dell (see page 126). See "Using Intel® Viiv™ Quick Resume Technology (Optional)" on page 36 for additional information. •...restart the computer. 3 Repeat this process for each card. None. All four diagnostic lights display solid green and then turn off after the system successfully boots to the operating system. Light Pattern Problem Description Suggested Resolution A possible expansion card failure has occurred. 1 Determine if ...
...it is functioning properly. • The operating system is an error message on your computer. • If the problem persists, contact Dell (see page 126). See "Using Intel® Viiv™ Quick Resume Technology (Optional)" on page 36 for additional information. •...restart the computer. 3 Repeat this process for each card. None. All four diagnostic lights display solid green and then turn off after the system successfully boots to the operating system. Light Pattern Problem Description Suggested Resolution A possible expansion card failure has occurred. 1 Determine if ...
Owner's Manual
Page 65
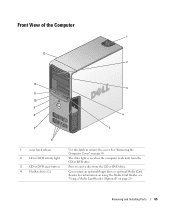
The drive light is on page 20. Removing and Installing Parts 65 Front View of the Computer 1 13 2 12 3 11 10 9 8 4 7 5 6 1 cover latch release 2 CD or DVD activity light 3 CD or DVD eject button 4 FlexBay drives (2) Use this latch to eject a disc from the CD or DVD drive. For information on using the Media Card Reader, see "Using a Media Card Reader (Optional)" on when the computer reads data from the CD or DVD drive. Can contain an optional floppy drive or optional Media Card Reader. See "Removing the Computer Cover" on page 68. Press to remove the cover.
The drive light is on page 20. Removing and Installing Parts 65 Front View of the Computer 1 13 2 12 3 11 10 9 8 4 7 5 6 1 cover latch release 2 CD or DVD activity light 3 CD or DVD eject button 4 FlexBay drives (2) Use this latch to eject a disc from the CD or DVD drive. For information on using the Media Card Reader, see "Using a Media Card Reader (Optional)" on when the computer reads data from the CD or DVD drive. Can contain an optional floppy drive or optional Media Card Reader. See "Removing the Computer Cover" on page 68. Press to remove the cover.

Owner's Manual
Page 66
...cameras and external storage devices. For adequate cooling, do not use the back USB connectors for devices that you access the Dell Support website or call technical support. 66 Removing and Installing Parts Instead, perform an operating system shutdown. Use the microphone...Press to a USB device). 5 IEEE 1394 connector (optional) 6 vents 7 USB 2.0 connectors (2) 8 power button 9 hard-drive activity light 10 diagnostic lights (4) 11 headphone connector 12 microphone connector 13 Service Tag Use the optional IEEE 1394 connector for high-speed data devices such as a CD ...
...cameras and external storage devices. For adequate cooling, do not use the back USB connectors for devices that you access the Dell Support website or call technical support. 66 Removing and Installing Parts Instead, perform an operating system shutdown. Use the microphone...Press to a USB device). 5 IEEE 1394 connector (optional) 6 vents 7 USB 2.0 connectors (2) 8 power button 9 hard-drive activity light 10 diagnostic lights (4) 11 headphone connector 12 microphone connector 13 Service Tag Use the optional IEEE 1394 connector for high-speed data devices such as a CD ...
Owner's Manual
Page 112
..."Power Problems" on page 47). If the system cannot boot and there is a solid amber light, this indicates a problem with the power supply inside the computer. yellow light - Voltage (See the safety instructions manual selection power supplies - 90 to 135 V and 180...computer. Blinking amber indicates a problem with the system board (see "Diagnostic Lights" on page 53.) AUXPWR on state. Blinking indicates activity on integrated network adapter) Diagnostic lights Standby power light push button green light - A good connection exists between a 100-Mbps network and the computer...
..."Power Problems" on page 47). If the system cannot boot and there is a solid amber light, this indicates a problem with the power supply inside the computer. yellow light - Voltage (See the safety instructions manual selection power supplies - 90 to 135 V and 180...computer. Blinking amber indicates a problem with the system board (see "Diagnostic Lights" on page 53.) AUXPWR on state. Blinking indicates activity on integrated network adapter) Diagnostic lights Standby power light push button green light - A good connection exists between a 100-Mbps network and the computer...

Owner's Manual
Page 122
.... NOTICE: To connect a network cable, first plug the cable into the network device and then plug it into the computer. 11 Connect your monitor screen, lightly dampen a soft, clean cloth with water. b Remove the jumper plug from the electrical outlet. 10 Close the computer cover (see page 107). Do not use...
.... NOTICE: To connect a network cable, first plug the cable into the network device and then plug it into the computer. 11 Connect your monitor screen, lightly dampen a soft, clean cloth with water. b Remove the jumper plug from the electrical outlet. 10 Close the computer cover (see page 107). Do not use...
Owner's Manual
Page 123
... outer edge. Only) Technician-assisted technical support requires the cooperation and participation of your CDs or DVDs, try using a commercially available cleaning kit. Dell Technical Support Policy (U.S. Cleaning products for restoration of the operating system, software programs, and hardware drivers to the original default configuration as shipped from ... operation. Never touch the lens in the troubleshooting process and provides for CDs are dirty, clean the rollers with a cotton swab moistened lightly with a clean, lint-free cloth. 3 Blow carefully into place.
... outer edge. Only) Technician-assisted technical support requires the cooperation and participation of your CDs or DVDs, try using a commercially available cleaning kit. Dell Technical Support Policy (U.S. Cleaning products for restoration of the operating system, software programs, and hardware drivers to the original default configuration as shipped from ... operation. Never touch the lens in the troubleshooting process and provides for CDs are dirty, clean the rollers with a cotton swab moistened lightly with a clean, lint-free cloth. 3 Blow carefully into place.
Owner's Manual
Page 145
..., 119 C cards installing PCI Express, 82 PCI Express, 81 removing PCI, 80 removing PCI Express, 86 slots, 68 CD/DVD drive activity light, 65 eject button, 65 problems, 38 CD-RW drive problems, 39 CDs, 18 playing, 16 Check Disk, 39 CMOS settings clearing, 122 ..., 18 copying DVDs general information, 18 helpful tips, 20 how to, 18 cover replacing, 107 D Dell Dell Diagnostics, 56 support policy, 123 support site, 11 Dell Premier Support website, 9, 11 diagnostic lights, 53 diagnostics Dell, 56 lights, 53, 66 documentation online, 11 Product Information Guide, 9 Setup Diagram, 9 drive panel, 66, ...
..., 119 C cards installing PCI Express, 82 PCI Express, 81 removing PCI, 80 removing PCI Express, 86 slots, 68 CD/DVD drive activity light, 65 eject button, 65 problems, 38 CD-RW drive problems, 39 CDs, 18 playing, 16 Check Disk, 39 CMOS settings clearing, 122 ..., 18 copying DVDs general information, 18 helpful tips, 20 how to, 18 cover replacing, 107 D Dell Dell Diagnostics, 56 support policy, 123 support site, 11 Dell Premier Support website, 9, 11 diagnostic lights, 53 diagnostics Dell, 56 lights, 53, 66 documentation online, 11 Product Information Guide, 9 Setup Diagram, 9 drive panel, 66, ...
Owner's Manual
Page 146
..., 41 F Files and Settings Transfer Wizard, 27 Finding Information, 9 Flex Bay drive Media Card Reader, 65 H hard drive activity light, 66 problems, 39 hardware Dell Diagnostics, 56 drives, RAID configuration, 28 Hardware Troubleshooter, 59 headphone connector, 66 Help and Support Center, 12 hibernate mode, 25, ...14 connection, setting up, 15 problems, 39 K keyboard problems, 42 L labels Microsoft Windows, 10 Service Tag, 10, 66 latch release cover, 65 lights diagnostic, 53, 66 front of computer, 53 hard drive activity, 66 M Media Card Reader installing, 99, 101 problems, 42 removing, 99 using,...
..., 41 F Files and Settings Transfer Wizard, 27 Finding Information, 9 Flex Bay drive Media Card Reader, 65 H hard drive activity light, 66 problems, 39 hardware Dell Diagnostics, 56 drives, RAID configuration, 28 Hardware Troubleshooter, 59 headphone connector, 66 Help and Support Center, 12 hibernate mode, 25, ...14 connection, setting up, 15 problems, 39 K keyboard problems, 42 L labels Microsoft Windows, 10 Service Tag, 10, 66 latch release cover, 65 lights diagnostic, 53, 66 front of computer, 53 hard drive activity, 66 M Media Card Reader installing, 99, 101 problems, 42 removing, 99 using,...
Owner's Manual
Page 147
N network connector, 68 Network Setup Wizard, 24 problems, 46 setting up, 23 Network Setup Wizard, 24 O operating system reinstalling Windows XP, 60 P password clearing, 121 jumper, 121 PC Restore, 61 PCI cards removing, 80 PCI Express cards installing, 82 removing, 86 playing CDs and DVDs, 16 ..., 13 USB, 14 problems battery, 37 blue screen, 44 CD drive, 38 CD-RW drive, 39 computer crashes, 43-44 computer stops responding, 43 Dell Diagnostics, 56 diagnostic lights, 53 drives, 38 DVD drive, 38 e-mail, 39 error messages, 41 general, 43 hard drive, 39 Internet, 39 keyboard, 42 Media Card Reader...
N network connector, 68 Network Setup Wizard, 24 problems, 46 setting up, 23 Network Setup Wizard, 24 O operating system reinstalling Windows XP, 60 P password clearing, 121 jumper, 121 PC Restore, 61 PCI cards removing, 80 PCI Express cards installing, 82 removing, 86 playing CDs and DVDs, 16 ..., 13 USB, 14 problems battery, 37 blue screen, 44 CD drive, 38 CD-RW drive, 39 computer crashes, 43-44 computer stops responding, 43 Dell Diagnostics, 56 diagnostic lights, 53 drives, 38 DVD drive, 38 e-mail, 39 error messages, 41 general, 43 hard drive, 39 Internet, 39 keyboard, 42 Media Card Reader...
Owner's Manual
Page 148
...114 V vents, 66 front panel, 66 volume adjusting, 49 T technical support policy, 123 transferring information to a new computer, 27 troubleshooting Dell Diagnostics, 56 diagnostic lights, 53 Hardware Troubleshooter, 59 Help and Support Center, 12 restore to previous state, 59-60 tips, 37 TV connect to computer, 21..., 23 U USB booting to devices, 119 connectors, 66, 68 W warranty, 9 Windows XP Device Driver Rollback, 58 Files and Settings ...
...114 V vents, 66 front panel, 66 volume adjusting, 49 T technical support policy, 123 transferring information to a new computer, 27 troubleshooting Dell Diagnostics, 56 diagnostic lights, 53 Hardware Troubleshooter, 59 Help and Support Center, 12 restore to previous state, 59-60 tips, 37 TV connect to computer, 21..., 23 U USB booting to devices, 119 connectors, 66, 68 W warranty, 9 Windows XP Device Driver Rollback, 58 Files and Settings ...


