
Users Manual - English
Page 1
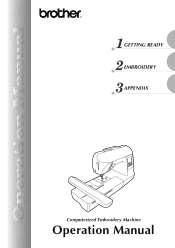
GETTING READY EMBROIDERY APPENDIX Computerized Embroidery Machine Operation Manual
GETTING READY EMBROIDERY APPENDIX Computerized Embroidery Machine Operation Manual
Users Manual - English
Page 2
...the nearest authorized dealer or service center for examination, repair, electrical or mechanical adjustment. 4 Always keep your machine if the power is cut. 3 Never operate this manual, or if you are being used or where oxygen is being administered. 5 Special care is required when ... pull the fabric when embroidering. Special care is spilled on the cord. • Plug the machine directly into any adjustments in the instruction manual. • To unplug the machine, switch the machine to the symbol "O" position to use an extension cord. • Always unplug your work area...
...the nearest authorized dealer or service center for examination, repair, electrical or mechanical adjustment. 4 Always keep your machine if the power is cut. 3 Never operate this manual, or if you are being used or where oxygen is being administered. 5 Special care is required when ... pull the fabric when embroidering. Special care is spilled on the cord. • Plug the machine directly into any adjustments in the instruction manual. • To unplug the machine, switch the machine to the symbol "O" position to use an extension cord. • Always unplug your work area...
Users Manual - English
Page 3
... are subject to change without notice. If the problem persists, please consult your local authorized Brother dealer. 6 This machine is not a toy: • Your close attention is necessary when the machine is used . • Always consult the operation manual when replacing or installing any assemblies, the presser feet, needle, or other hot objects. •...
... are subject to change without notice. If the problem persists, please consult your local authorized Brother dealer. 6 This machine is not a toy: • Your close attention is necessary when the machine is used . • Always consult the operation manual when replacing or installing any assemblies, the presser feet, needle, or other hot objects. •...

Users Manual - English
Page 5
...GETTING READY 13 Embroidery Step by Step 14 Attaching the Embroidery Unit 15 Embroidery unit precautions ...15 Attaching the embroidery unit ...15 Removing the embroidery unit ...16 Turning the Machine On/Off 18 Power supply precautions ...18 Turning on the machine ...19 Turning off the machine ...19 LCD ... thread ...30 Threading the needle ...32 Threading the needle manually (without using the needle threader 34 Replacing the Needle ...35 Needle precautions ...35 Checking the needle ...35 Replacing the needle...36 EMBROIDERY 39 Embroidering Neatly ...40 What to prepare ...40 Preparing ...
...GETTING READY 13 Embroidery Step by Step 14 Attaching the Embroidery Unit 15 Embroidery unit precautions ...15 Attaching the embroidery unit ...15 Removing the embroidery unit ...16 Turning the Machine On/Off 18 Power supply precautions ...18 Turning on the machine ...19 Turning off the machine ...19 LCD ... thread ...30 Threading the needle ...32 Threading the needle manually (without using the needle threader 34 Replacing the Needle ...35 Needle precautions ...35 Checking the needle ...35 Replacing the needle...36 EMBROIDERY 39 Embroidering Neatly ...40 What to prepare ...40 Preparing ...

Users Manual - English
Page 7
...study this embroidery machine. b Quick-set bobbin You can embroider built-in embroidery patterns, characters, framed decorations, and designs from optional embroidery cards (page 39). 5 c Automatic thread cutting The thread can be cut automatically after you for purchasing this manual for future... reference. In addition, after embroidering (page 51). d Embroidery You can start embroiderying without pulling up the bobbin thread (page 28). Machine Features 1 23 4 a Simple bobbin-winding The bobbin...
...study this embroidery machine. b Quick-set bobbin You can embroider built-in embroidery patterns, characters, framed decorations, and designs from optional embroidery cards (page 39). 5 c Automatic thread cutting The thread can be cut automatically after you for purchasing this manual for future... reference. In addition, after embroidering (page 51). d Embroidery You can start embroiderying without pulling up the bobbin thread (page 28). Machine Features 1 23 4 a Simple bobbin-winding The bobbin...
Users Manual - English
Page 8
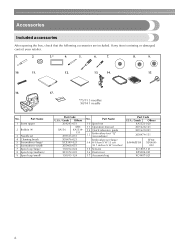
Part Name 10 Spool net 11 Operation manual 12 Quick reference guide 13 Embroidery foot "Q" (on machine) Embroidery set 4 Cleaning brush 5 Screwdriver (large) 6 Screwdriver (small) 7 Spool cap (large) 8 Spool cap (medium) 9 Spool cap (small) Part Code U.S.A. / Canada Others X54243-051 SA156 SFB: XA5539- ...
Part Name 10 Spool net 11 Operation manual 12 Quick reference guide 13 Embroidery foot "Q" (on machine) Embroidery set 4 Cleaning brush 5 Screwdriver (large) 6 Screwdriver (small) 7 Spool cap (large) 8 Spool cap (medium) 9 Spool cap (small) Part Code U.S.A. / Canada Others X54243-051 SA156 SFB: XA5539- ...

Users Manual - English
Page 15
... 14 Attaching the Embroidery Unit 15 Embroidery unit precautions 15 Attaching the embroidery unit 15 Removing the embroidery unit 16 Turning the Machine On/Off 18 Power supply precautions 18 Turning on the machine 19 Turning off the machine 19 LCD (Liquid Crystal Display) Operation 20 Viewing the LCD 20 Changing the machine settings 21 Checking machine operating procedures...
... 14 Attaching the Embroidery Unit 15 Embroidery unit precautions 15 Attaching the embroidery unit 15 Removing the embroidery unit 16 Turning the Machine On/Off 18 Power supply precautions 18 Turning on the machine 19 Turning off the machine 19 LCD (Liquid Crystal Display) Operation 20 Viewing the LCD 20 Changing the machine settings 21 Checking machine operating procedures...
Users Manual - English
Page 25
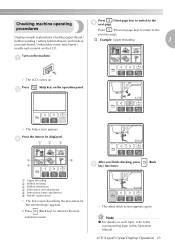
... corresponding page in this Operation Manual. Note z For details on each topic, refer to the item selection screen. Checking machine operating Press (Next page key) to switch to be displayed. Displays simple explanations of setting upper thread / bobbin winding / setting bobbin thread / embroidery † Example: Upper threading 1 unit attachment / embroidery frame attachment / needle replacement...
... corresponding page in this Operation Manual. Note z For details on each topic, refer to the item selection screen. Checking machine operating Press (Next page key) to switch to be displayed. Displays simple explanations of setting upper thread / bobbin winding / setting bobbin thread / embroidery † Example: Upper threading 1 unit attachment / embroidery frame attachment / needle replacement...
Users Manual - English
Page 34
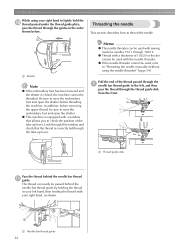
...1 a Needle bar thread guide 32 z This machine is closed, the machine cannot be used with a thickness of the take -up lever. z Thread with sewing machine needles 75/11 through this window and check that allows you to raise the embroidery foot and open the shutter. GETTING READY While ...using the needle threader)" (page 34). Look through 100/16. Memo z The needle threader can easily be used, refer to "Threading the needle manually...
...1 a Needle bar thread guide 32 z This machine is closed, the machine cannot be used with a thickness of the take -up lever. z Thread with sewing machine needles 75/11 through this window and check that allows you to raise the embroidery foot and open the shutter. GETTING READY While ...using the needle threader)" (page 34). Look through 100/16. Memo z The needle threader can easily be used, refer to "Threading the needle manually...
Users Manual - English
Page 36
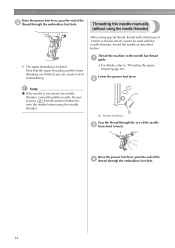
...the presser foot lever, pass the end of 130/20 or thicker which cannot be used with a thickness of the e thread through the embroidery foot hole. 34 Thread the machine to the needle bar thread a guide. • For details, refer to start embroidering. Lower the presser foot lever. When using special .... Now that the upper threading and the lower threading are finished, you are ready to "Threading the upper thread" (page 30). Threading the needle manually (without using the needle threader. 1 a Pressor foot lever Pass the thread through the eye of the d thread through the...
...the presser foot lever, pass the end of 130/20 or thicker which cannot be used with a thickness of the e thread through the embroidery foot hole. 34 Thread the machine to the needle bar thread a guide. • For details, refer to start embroidering. Lower the presser foot lever. When using special .... Now that the upper threading and the lower threading are finished, you are ready to "Threading the upper thread" (page 30). Threading the needle manually (without using the needle threader. 1 a Pressor foot lever Pass the thread through the eye of the d thread through the...
Users Manual - English
Page 85
... 8 M Brother poly #90 bobbin thread 7 buzzer 82 machine settings 21 , main power switch 9 19 C characters 52 maintenance 70 manual needle threading 34 , memory key 11 63 cleaning 70 cleaning brush 6 N D dust cover 6 E , embroidery card 7 55 embroidery card slot 9 , Embroidery foot "Q 6 9 embroidery foot attachment 72 embroidery frame 43 embroidery frame attachment 47 embroidery frame removal 48 embroidery key 11 embroidery pattern 53 embroidery pattern...
... 8 M Brother poly #90 bobbin thread 7 buzzer 82 machine settings 21 , main power switch 9 19 C characters 52 maintenance 70 manual needle threading 34 , memory key 11 63 cleaning 70 cleaning brush 6 N D dust cover 6 E , embroidery card 7 55 embroidery card slot 9 , Embroidery foot "Q 6 9 embroidery foot attachment 72 embroidery frame 43 embroidery frame attachment 47 embroidery frame removal 48 embroidery key 11 embroidery pattern 53 embroidery pattern...
USB GUIDE - Multi
Page 3
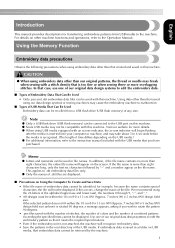
... other than eight characters long, only the first six characters followed by the machine. 1 If the file name is rotated 90 degrees, a message appears, asking if you have purchased. English Introduction This manual provides descriptions for transferring embroidery patterns from a USB flash drive (USB flash memory) of combined patterns exceeding the specified limits...
... other than eight characters long, only the first six characters followed by the machine. 1 If the file name is rotated 90 degrees, a message appears, asking if you have purchased. English Introduction This manual provides descriptions for transferring embroidery patterns from a USB flash drive (USB flash memory) of combined patterns exceeding the specified limits...
USB GUIDE - Multi
Page 6
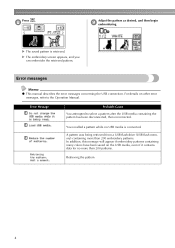
... select a pattern after the USB media containing the pattern has been disconnected, then reconnected. Error Message Probable Cause You attempted to the Operation Manual. Retrieving the pattern 4 X The embroidery screen appears, and you can embroider the retrieved pattern. You recalled a pattern while no more than 200 patterns. For details on the USB...
... select a pattern after the USB media containing the pattern has been disconnected, then reconnected. Error Message Probable Cause You attempted to the Operation Manual. Retrieving the pattern 4 X The embroidery screen appears, and you can embroider the retrieved pattern. You recalled a pattern while no more than 200 patterns. For details on the USB...


