Brother International PE-DESIGN2.0 Support and Manuals
Get Help and Manuals for this Brother International item

View All Support Options Below
Free Brother International PE-DESIGN2.0 manuals!
Problems with Brother International PE-DESIGN2.0?
Ask a Question
Free Brother International PE-DESIGN2.0 manuals!
Problems with Brother International PE-DESIGN2.0?
Ask a Question
Popular Brother International PE-DESIGN2.0 Manual Pages
Owner's Manual - English - Page 4
... a longer service life
• When storing the unit, avoid direct sunlight and high humidity locations. Do not store the unit close to the Windows manuals.
"SAVE THESE INSTRUCTIONS"
"This product is required, please consult your warranty.
For repairs or adjustments
• In the event malfunction occurs or adjustment is intended for the setting of International Business...
Owner's Manual - English - Page 8
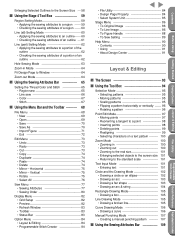
...8226; Grid Setup 82 &#...manual punching pattern --- 107
s Using the Sewing Attributes Bar ---- 109
Quick Reference Alphabetic Index
Programmable Stich Creator
File Utility
Getting Started Design Center Layout & Editing
Before Using
Contents Horizontal 75 • Mirror - Enlarging Selected Outlines to the Screen Size - 58
s Using the Stage 4 Tool Box ------ 59
Region Setting...part) Setting...
Owner's Manual - English - Page 9
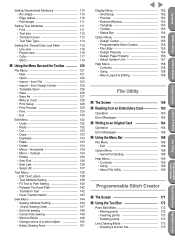
... 134 • Mirror - from Design Center ------- 125 • Template Open 126 • Save 126 • Save As 127 • Write to an Original Card ------ 164
Operation 164 Error Messages 166
s Using the Menu Bar --------- 168
File Menu 168 • Exit 168
Option Menu 168 • Serial Port Setting 168
Help Menu 169 •...
Owner's Manual - English - Page 13
.... Contents
Before Using
Getting Started Design Center Layout & Editing
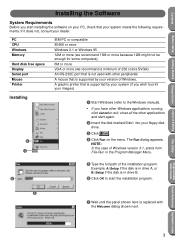
Installing the Software
System Requirements
Before you have other Windows applications running,
click Cancel to exit, close all the other peripherals A mouse that is supported by your system (if you wish to print your images)
Installing
4 3
1 Start Windows (refer to the Windows manual).
• If you start...
Owner's Manual - English - Page 15
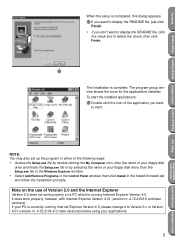
The program group window shows the icons for the applications installed.
To start the installed applications:
D Double-click the icon of the application you don't want
to start.
NOTE: You may also set up the program in either of the following ways:
• Access the Setup.exe file by double-clicking the My Computer...
Owner's Manual - English - Page 16
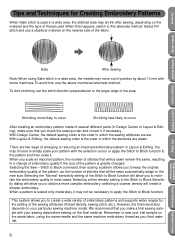
... stitch direction perpendicular to the new size.
To limit shrinking, set . With Design Center, the default sewing order is the order in which the elements are drawn. We recommend that you to occur
After creating an embroidery pattern made of several different parts (in a change of embroidery quality if the size of the...
Owner's Manual - English - Page 17
...but you can save your dealer (installed using pens and erasers of editable ...Design Center Layout & Editing
Getting Started
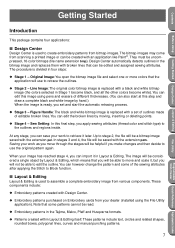
Introduction
This package contains four applications:
s Design Center
Design.... Design Center...replaces them with an application like Paint®. Figure Handle: The black and white bitmap image is replaced with a set...with Design Center... that you set of outlines made...
Owner's Manual - English - Page 92
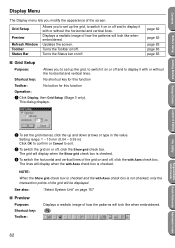
... image of how the patterns will display when the Show grid check box is checked. Updates the screen. Turns the Status bar on page 157
s Preview
Purpose: Shortcut key: ...Setup
Purpose:
Allows you to set up the grid, to switch it on /off .
Setting range: 1 ~ 10 mm (0.04 ~ 0.39 in the value. Getting Started Design Center Layout & Editing
File Utility
Programmable Stich Creator
2 To set...
Owner's Manual - English - Page 95
...;rm.
x Select the size by clicking the color.
Contents
Before Using
Getting Started Design Center Layout & Editing
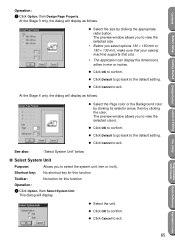
Operation:
1 Click Option, then Design Page Property. At the Stage 3 only, the dialog will display. The preview window allows you to the default setting.
x Click Default to go back to view the selected colors.
x Click Default...
Owner's Manual - English - Page 99

...:
"To Original Image" and "To Line Image" on page 86, "To Sew Setting" below, "Grid Setup" on page 82 and "Design Page Property" on page 84
s To Sew Setting
Purpose:
Moves from Stage 3 to zoom your pattern.
ON: the black lines are replaced with a center line). OFF
2 When you click OK, the Figure Handle Image...
Owner's Manual - English - Page 117
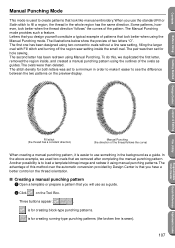
... setting inside , and created a manual punching pattern using the Manual Punching mode.
s Creating a manual punching pattern 1 Open a template or prepare a pattern that you design ...Manual Punching (the direction of the pattern.
The Manual Punching mode provides such a feature. To do this method over the automatic conversion provided by Design Center is that you use as a guide...
Owner's Manual - English - Page 138

... the card module is already stored on page 127
Allows you want to exit. x Correct the problem, then click Retry. x If the card is not brand new, make sure that is not ....
x Click Cancel to exit.
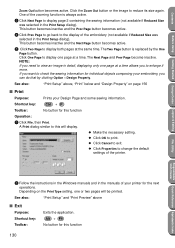
2 If you click OK, your Design Page to change the printing settings for this message displays. See also:
s Print Setup
Purpose: Shortcut key: Toolbar:
"Save" on page 126, "Save As...
Owner's Manual - English - Page 140
... Reference Alphabetic Index
2 Follow the instructions in the Windows manuals and in the Print Setup dialog).
One of the embroidery (not available if Reduced Size was selected in detail, displaying only one or two pages will display. The Next Page and Prev Page become inactive.
x Make the necessary setting.
Alt + F4
No button for...
Owner's Manual - English - Page 197

... Design Center 24
Inserting points 56, 98, 173 Install Embroidery Card 159, 160
Interface cable 2 Interface cable connector 1
K
Kerning 139
L
Layout & Editing 7 Line (all) setting mode 60 Line (part) setting ...Creating a manual punching pattern 107 Curve Drawing mode 106
Cut 73, 133
D
Delete 74, 134 Deleting points 56, 99, 173 Design Center 7, 9, 155
Design Center window 10 Design Page Setup 84
...
Owner's Manual - English - Page 198
...Original image 7 Oval 29
P
Page display 64 Part tab 81
Paste 74, 133
Path shape 111
...indicator LED 1
Preview 20, 41, 82, 153
Print 130 Print Preview 129 Print Setup 128 Printer 3
...Open 126 Text 31 Text Attribute Setting 138
Text attributes 109, 111
...Stich Creator
File Utility
Getting Started Design Center Layout & Editing
Before Using
Contents M
Manual Punching mode 107 Maximize button 10 ...
Brother International PE-DESIGN2.0 Reviews
We have not received any reviews for Brother International yet.