
Owner's Manual - English
Page 4
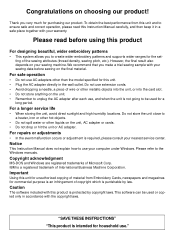
... the model specified for this unit. • Plug the AC adapter directly in the wall outlet. Caution The software included with your sewing data before using this product For designing beautiful, wider embroidery patterns • This system allows you make a trial sewing sample with this Instruction Manual carefully, and then keep it in accordance with your warranty. For repairs or adjustments •...
... the model specified for this unit. • Plug the AC adapter directly in the wall outlet. Caution The software included with your sewing data before using this product For designing beautiful, wider embroidery patterns • This system allows you make a trial sewing sample with this Instruction Manual carefully, and then keep it in accordance with your warranty. For repairs or adjustments •...
Owner's Manual - English
Page 8
... 106 • Drawing a curve 106 Manual Punching Mode ---------- 107 • Creating a manual punching pattern --- 107 s Using the Sewing Attributes Bar ---- 109 Quick Reference Alphabetic Index Programmable Stich Creator File Utility Getting Started Design Center Layout & Editing Before Using Contents Enlarging Selected Outlines to the Screen Size - 58 s Using the Stage 4 Tool Box ------ 59 Region Setting Mode 59 • Applying the sewing attributes to a region -- 59...
... 106 • Drawing a curve 106 Manual Punching Mode ---------- 107 • Creating a manual punching pattern --- 107 s Using the Sewing Attributes Bar ---- 109 Quick Reference Alphabetic Index Programmable Stich Creator File Utility Getting Started Design Center Layout & Editing Before Using Contents Enlarging Selected Outlines to the Screen Size - 58 s Using the Stage 4 Tool Box ------ 59 Region Setting Mode 59 • Applying the sewing attributes to a region -- 59...
Owner's Manual - English
Page 9
... • Path shape 111 Setting Text Attributes 111 • Font 111 • Text size 112 • Transform level 113 • Text Sew Type 114 Setting the Thread Color and Stitch ----- 115 • Line sew 115 • Region sew 116 • Color 117 • Stitch 119 s Using the Menu Bar and the Toolbar --- 120 File Menu 121 • New 121 • Open 122 • Import -
... • Path shape 111 Setting Text Attributes 111 • Font 111 • Text size 112 • Transform level 113 • Text Sew Type 114 Setting the Thread Color and Stitch ----- 115 • Line sew 115 • Region sew 116 • Color 117 • Stitch 119 s Using the Menu Bar and the Toolbar --- 120 File Menu 121 • New 121 • Open 122 • Import -
Owner's Manual - English
Page 16
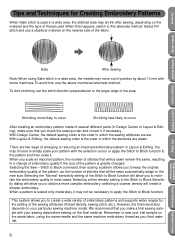
... parts (in a change of embroidery quality if the size of thread used in most cases. Remember to sew your trial sample on the reverse side of the sewing attributes (thread density, sewing pitch, etc.). To avoid this alternate method: Select Fill stitch and use the above mentioned alternate method. There are set the stitch direction perpendicular to create a wide variety of embroidery patterns and supports wider ranges for Creating Embroidery Patterns When Satin stitch...
... parts (in a change of embroidery quality if the size of thread used in most cases. Remember to sew your trial sample on the reverse side of the sewing attributes (thread density, sewing pitch, etc.). To avoid this alternate method: Select Fill stitch and use the above mentioned alternate method. There are set the stitch direction perpendicular to create a wide variety of embroidery patterns and supports wider ranges for Creating Embroidery Patterns When Satin stitch...
Owner's Manual - English
Page 17
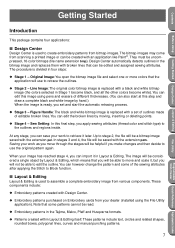
... manual punching patterns. 7 File Utility Programmable Stich Creator Quick Reference Alphabetic Index They must be read. x Stage 2 - The image will be able to assemble a complete embroidery image from bitmap images. x Patterns created within Layout & Editing itself. s Layout & Editing Layout & Editing is used to retrace the outlines. The bitmap images may come from your work to Block function. Saving your dealer (installed using...
... manual punching patterns. 7 File Utility Programmable Stich Creator Quick Reference Alphabetic Index They must be read. x Stage 2 - The image will be able to assemble a complete embroidery image from bitmap images. x Patterns created within Layout & Editing itself. s Layout & Editing Layout & Editing is used to retrace the outlines. The bitmap images may come from your work to Block function. Saving your dealer (installed using...
Owner's Manual - English
Page 27
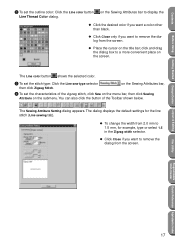
... change the width from 2.0 mm to remove the dialog from the screen. x Place the cursor on the submenu. You can also click the button of the zigzag stitch, click Sew on the menu bar, then click Sewing Attribute on the title bar; File Utility Programmable Stich Creator Quick Reference Alphabetic Index 17 Contents Before Using Getting Started Design Center Layout & Editing 2 To set the stitch type: Click...
... change the width from 2.0 mm to remove the dialog from the screen. x Place the cursor on the submenu. You can also click the button of the zigzag stitch, click Sew on the menu bar, then click Sewing Attribute on the title bar; File Utility Programmable Stich Creator Quick Reference Alphabetic Index 17 Contents Before Using Getting Started Design Center Layout & Editing 2 To set the stitch type: Click...
Owner's Manual - English
Page 39
... of the button will display. Getting Started Design Center Layout & Editing File Utility Programmable Stich Creator Line sew Line color Line sew type Region sew Region color Region sew type If you must set it so that you to Attributes bar now looks like this oval will be used only as arcs. We will add later, we will adjust them later. 29 Quick Reference Alphabetic...
... of the button will display. Getting Started Design Center Layout & Editing File Utility Programmable Stich Creator Line sew Line color Line sew type Region sew Region color Region sew type If you must set it so that you to Attributes bar now looks like this oval will be used only as arcs. We will add later, we will adjust them later. 29 Quick Reference Alphabetic...
Owner's Manual - English
Page 47
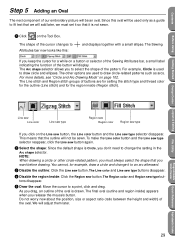
... 50 % by typing the value directly in the edit box window. Select a region color using the Region color button. 8 Select a line color and stitch using the Line color button and the Line sew type selector . (You can only choose to every new region that you draw. 7 Finish setting the remaining sewing attributes for a given pattern. The stitch and its settings are changed again, those sewing settings, just like...
... 50 % by typing the value directly in the edit box window. Select a region color using the Region color button. 8 Select a line color and stitch using the Line color button and the Line sew type selector . (You can only choose to every new region that you draw. 7 Finish setting the remaining sewing attributes for a given pattern. The stitch and its settings are changed again, those sewing settings, just like...
Owner's Manual - English
Page 59
...file name extension will be converted into the Layout & Editing Design Page and combined with a set the stitch, thread color, etc. x STAGE 3: Figure handle image When you move and delete points or insert new points). If you have the proper conversion software. The resulting embroidery pattern can then be in... and white image using a scanner and the appropriate software. for the outlines and regions to complete the embroidery data If you save the file and retrieve it later to resume working. 49 File Utility Programmable Stich Creator Quick Reference Alphabetic Index ...
...file name extension will be converted into the Layout & Editing Design Page and combined with a set the stitch, thread color, etc. x STAGE 3: Figure handle image When you move and delete points or insert new points). If you have the proper conversion software. The resulting embroidery pattern can then be in... and white image using a scanner and the appropriate software. for the outlines and regions to complete the embroidery data If you save the file and retrieve it later to resume working. 49 File Utility Programmable Stich Creator Quick Reference Alphabetic Index ...
Owner's Manual - English
Page 72
... and stitch for a portion of an outline 1 Click on page 67. The Sewing Attributes bar now looks like this: You can apply the current sewing attributes to a portion of the outline. The color cannot be black. 1 You can change the sewing attributes applied to a portion of the outline. If you want to check using the mouse's right button. Quick...
... and stitch for a portion of an outline 1 Click on page 67. The Sewing Attributes bar now looks like this: You can apply the current sewing attributes to a portion of the outline. The color cannot be black. 1 You can change the sewing attributes applied to a portion of the outline. If you want to check using the mouse's right button. Quick...
Owner's Manual - English
Page 77
... available options display. Getting Started Design Center Layout & Editing File Utility Programmable Stich Creator When you click the desired color, the new color is in Region setting mode or Line setting mode. Operation: 1 Click the sew type selector. See "Special colors" on page 66 67 Quick Reference Alphabetic Index The new setting displays on page 117 s Stitch Purpose: Sets the stitch for outline or region...
... available options display. Getting Started Design Center Layout & Editing File Utility Programmable Stich Creator When you click the desired color, the new color is in Region setting mode or Line setting mode. Operation: 1 Click the sew type selector. See "Special colors" on page 66 67 Quick Reference Alphabetic Index The new setting displays on page 117 s Stitch Purpose: Sets the stitch for outline or region...
Owner's Manual - English
Page 88
...; 179˚ 0˚ File Utility Programmable Stich Creator Quick Reference Alphabetic Index 78 Try to exit. Here you can change and reflect your setting changes each setting either by typing the value directly in the Region sew type selector of an individual setting, click its Default button. x To restore the default value of the Sewing Attributes bar. x Click the region(s) you click...
...; 179˚ 0˚ File Utility Programmable Stich Creator Quick Reference Alphabetic Index 78 Try to exit. Here you can change and reflect your setting changes each setting either by typing the value directly in the Region sew type selector of an individual setting, click its Default button. x To restore the default value of the Sewing Attributes bar. x Click the region(s) you click...
Owner's Manual - English
Page 89
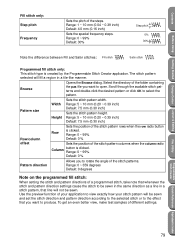
.... Pattern size Width Height Sets the stitch pattern width. Range: 5 ~ 10 mm (0.20 ~ 0.39 inch) Default: 7.5 mm (0.30 inch) Row/column offset Row Sets the position of different settings. To get an even better view, make test samples of the stitch pattern rows when the row radio button is clicked. File Utility Programmable Stich Creator Quick Reference Alphabetic Index 79 Range: 0 ~ 99% Default: 0 % Pattern direction Allows...
.... Pattern size Width Height Sets the stitch pattern width. Range: 5 ~ 10 mm (0.20 ~ 0.39 inch) Default: 7.5 mm (0.30 inch) Row/column offset Row Sets the position of different settings. To get an even better view, make test samples of the stitch pattern rows when the row radio button is clicked. File Utility Programmable Stich Creator Quick Reference Alphabetic Index 79 Range: 0 ~ 99% Default: 0 % Pattern direction Allows...
Owner's Manual - English
Page 117
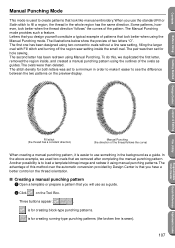
... Satin stitch to use as a guide. 2 Click on the thread orientation. When you have a better control on the Tool Box. Some patterns, however, look better when using manual punching patterns. The illustrations below show the preview of this , we removed after completing the manual punching pattern. Getting Started Design Center Layout & Editing File Utility Programmable Stich Creator Quick Reference Alphabetic Index Fill stitch (the thread has a constant direction) Manual Punching (the direction...
... Satin stitch to use as a guide. 2 Click on the thread orientation. When you have a better control on the Tool Box. Some patterns, however, look better when using manual punching patterns. The illustrations below show the preview of this , we removed after completing the manual punching pattern. Getting Started Design Center Layout & Editing File Utility Programmable Stich Creator Quick Reference Alphabetic Index Fill stitch (the thread has a constant direction) Manual Punching (the direction...
Owner's Manual - English
Page 122
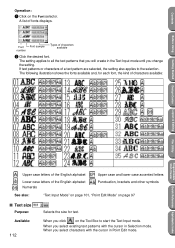
...: Getting Started Design Center Layout & Editing File Utility Programmable Stich Creator Quick Reference Alphabetic Index Upper case letters of the English alphabet Lower case letters of a text pattern are selected, the setting also applies to all the text patterns that you will create in the Text Input mode until you select existing text patterns with the cursor in Selection mode. Contents Before Using Operation: 1 Click...
...: Getting Started Design Center Layout & Editing File Utility Programmable Stich Creator Quick Reference Alphabetic Index Upper case letters of the English alphabet Lower case letters of a text pattern are selected, the setting also applies to all the text patterns that you will create in the Text Input mode until you select existing text patterns with the cursor in Selection mode. Contents Before Using Operation: 1 Click...
Owner's Manual - English
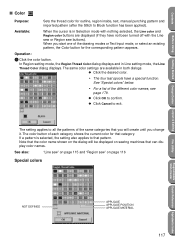
Page 127
... NOT DEFINED APPLIQUE APPLIQUE POSITION APPLIQUE MATERIAL 117 Operation: 1 Click the color button. x Click Cancel to confirm. x Click the desired color. • The four last spools have not been turned off with nothing selected, the Line color and Region color buttons are available in Line setting mode, the Line Thread Color dialog displays. Contents Before Using Getting Started Design Center Layout...
... NOT DEFINED APPLIQUE APPLIQUE POSITION APPLIQUE MATERIAL 117 Operation: 1 Click the color button. x Click Cancel to confirm. x Click the desired color. • The four last spools have not been turned off with nothing selected, the Line color and Region color buttons are available in Line setting mode, the Line Thread Color dialog displays. Contents Before Using Getting Started Design Center Layout...
Owner's Manual - English
Page 129
... machine and start sewing. Contents Before Using Getting Started Design Center Layout & Editing When sewing, proceed as there is selected, the setting also applies to that pattern. When you change it. For regions, Text and manual punching patterns, Satin, Fill and Programmed Fill stitches are available. At this step, only the APPLIQUE MATERIAL outline will create until you are in the selection mode, the Line sew type...
... machine and start sewing. Contents Before Using Getting Started Design Center Layout & Editing When sewing, proceed as there is selected, the setting also applies to that pattern. When you change it. For regions, Text and manual punching patterns, Satin, Fill and Programmed Fill stitches are available. At this step, only the APPLIQUE MATERIAL outline will create until you are in the selection mode, the Line sew type...
Owner's Manual - English
Page 139
...;rm the settings. The buttons that you reach the limit of the Design Page and check the sewing color order, the dimensions and the needle count before printing. Scroll the page as needed to display the sewing information on one or two pages. Contents Before Using Getting Started Design Center Layout & Editing Operation: 1 Click File, then Print Setup. The Actual Size will display...
...;rm the settings. The buttons that you reach the limit of the Design Page and check the sewing color order, the dimensions and the needle count before printing. Scroll the page as needed to display the sewing information on one or two pages. Contents Before Using Getting Started Design Center Layout & Editing Operation: 1 Click File, then Print Setup. The Actual Size will display...

Owner's Manual - English
Page 155
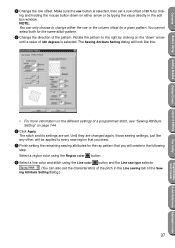
... the Region sew type selector, the Sewing Attribute Setting displays like this setting. Contents Before Using Getting Started Design Center Layout & Editing Line sewing attributes Zigzag stitch ZigZag width Sets the width of the zigzag stitch (when Zigzag Stitch is selected for the outline). Range: 1 ~ 10 mm (0.04 ~ 0.39 inch) Default: 2 mm (0.08 inch) Run times Sets the number of times the border will change the settings of an individual setting, click its Default button.
... the Region sew type selector, the Sewing Attribute Setting displays like this setting. Contents Before Using Getting Started Design Center Layout & Editing Line sewing attributes Zigzag stitch ZigZag width Sets the width of the zigzag stitch (when Zigzag Stitch is selected for the outline). Range: 1 ~ 10 mm (0.04 ~ 0.39 inch) Default: 2 mm (0.08 inch) Run times Sets the number of times the border will change the settings of an individual setting, click its Default button.

Owner's Manual - English
Page 197
..., 110 Grid 152 Grid menu 177 Grid Setup 82 H Hard disk free space 3 Help menu 90, 158, 169, 178 Hole sewing 40 Hole sewing mode 63 I Import - from Design Center 24 Inserting points 56, 98, 173 Install Embroidery Card 159, 160 Interface cable 2 Interface cable connector 1 K Kerning 139 L Layout & Editing 7 Line (all) setting mode 60 Line (part) setting mode 62 Line color 17 Line Drawing...
..., 110 Grid 152 Grid menu 177 Grid Setup 82 H Hard disk free space 3 Help menu 90, 158, 169, 178 Hole sewing 40 Hole sewing mode 63 I Import - from Design Center 24 Inserting points 56, 98, 173 Install Embroidery Card 159, 160 Interface cable 2 Interface cable connector 1 K Kerning 139 L Layout & Editing 7 Line (all) setting mode 60 Line (part) setting mode 62 Line color 17 Line Drawing...


