
Owner's Manual - English
Page 18
... complete, you will then learn how to add a few components to the embroidery image and to organize the layout. You will be pes) and write it (the file name extension will learn how to use the layout functions to modify their relative position, orientation and... applications. The Original card can then be imported into your sewing machine and the embroidery process continued. Contents Before Using Getting Started Design Center Layout & Editing After gathering the different components of your embroidery picture, you can apply to the enclosed regions of patterns, ...
... complete, you will then learn how to add a few components to the embroidery image and to organize the layout. You will be pes) and write it (the file name extension will learn how to use the layout functions to modify their relative position, orientation and... applications. The Original card can then be imported into your sewing machine and the embroidery process continued. Contents Before Using Getting Started Design Center Layout & Editing After gathering the different components of your embroidery picture, you can apply to the enclosed regions of patterns, ...
Owner's Manual - English
Page 57
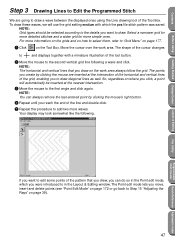
... the end of the grid, enabling you to draw diagonal lines as well. NOTE: You can do so in the Point edit mode, which the pes file stitch pattern was saved. The shape of the tool button. 2 Move the mouse to the second vertical grid line following . To draw ... in the Layout & Editing window. For more simple ones. Move the cursor over the work area always follow the grid. Contents Before Using Getting Started Design Center Layout & Editing Step 3 Drawing Lines to Edit the Programmed Stitch We are inserted at the nearest intersection. 3 Move the mouse to the first...
... the end of the grid, enabling you to draw diagonal lines as well. NOTE: You can do so in the Point edit mode, which the pes file stitch pattern was saved. The shape of the tool button. 2 Move the mouse to the second vertical grid line following . To draw ... in the Layout & Editing window. For more simple ones. Move the cursor over the work area always follow the grid. Contents Before Using Getting Started Design Center Layout & Editing Step 3 Drawing Lines to Edit the Programmed Stitch We are inserted at the nearest intersection. 3 Move the mouse to the first...
Owner's Manual - English
Page 131
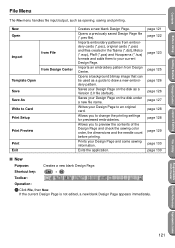
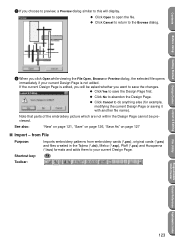
... from embroidery cards (*.pec), original cards (*.pes) and files created in the Tajima (*.dst), Melco (*.exp), Pfaff (*.pcs) and Husqvarna (*.hus) formats and adds them to your Design Page to preview the contents of the Design Page and check the sewing color order, ... Click File, then New. Contents Before Using Getting Started Design Center Layout & Editing File Menu The File menu handles file input/output, such as opening, saving and printing. Opens a previously saved Design Page file (*.pes file). Prints your Design Page on the disk under a new file name...
... from embroidery cards (*.pec), original cards (*.pes) and files created in the Tajima (*.dst), Melco (*.exp), Pfaff (*.pcs) and Husqvarna (*.hus) formats and adds them to your Design Page to preview the contents of the Design Page and check the sewing color order, ... Click File, then New. Contents Before Using Getting Started Design Center Layout & Editing File Menu The File menu handles file input/output, such as opening, saving and printing. Opens a previously saved Design Page file (*.pes file). Prints your Design Page on the disk under a new file name...
Owner's Manual - English
Page 132
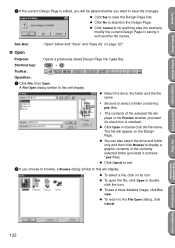
...x Select the drive, the folder and the file name. • Be sure to do anything else (for example, modify the current Design Page or saving it contains *.pes files). File Utility Programmable Stich Creator Quick Reference Alphabetic Index 122 Shortcut key: Ctrl + O Toolbar: Operation: 1 Click File, then ... contents of the selected file dis- x To return to this will appear on page 127 s Open Purpose: Opens a previously saved Design Page file (*.pes file). plays in the Preview window, provided its icon. The file will display.
...x Select the drive, the folder and the file name. • Be sure to do anything else (for example, modify the current Design Page or saving it contains *.pes files). File Utility Programmable Stich Creator Quick Reference Alphabetic Index 122 Shortcut key: Ctrl + O Toolbar: Operation: 1 Click File, then ... contents of the selected file dis- x To return to this will appear on page 127 s Open Purpose: Opens a previously saved Design Page file (*.pes file). plays in the Preview window, provided its icon. The file will display.
Owner's Manual - English
Page 133
.... x Click Cancel to return to save the changes. If the current Design Page is not edited. x Click No to open the file. from File Purpose: Imports embroidery patterns from embroidery cards (*.pec), original cards (*.pes) and files created in the Tajima (*.dst), Melco (*.exp), Pfaff... (*.pcs) and Husqvarna (*.hus) formats and adds them to save the Design Page first. x Click Open to abandon the Design Page. Note that parts of the embroidery ...
.... x Click Cancel to return to save the changes. If the current Design Page is not edited. x Click No to open the file. from File Purpose: Imports embroidery patterns from embroidery cards (*.pec), original cards (*.pes) and files created in the Tajima (*.dst), Melco (*.exp), Pfaff... (*.pcs) and Husqvarna (*.hus) formats and adds them to save the Design Page first. x Click Open to abandon the Design Page. Note that parts of the embroidery ...
Owner's Manual - English
Page 136
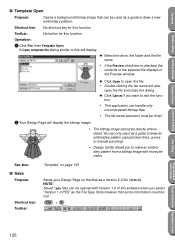
... be used as the File Type. Ctrl + S File Utility Programmable Stich Creator Quick Reference Alphabetic Index 126 Contents Before Using Getting Started Design Center Layout & Editing s Template Open Purpose: Opens a background bitmap image that some information could be directly embroi- x Click Open to... on the disk as a guide to draw an embroidery pattern (using broken lines, curves or manual punching). • Design Center allows you select "Version 1.0 PES" as a guide to exit the function. • This application can only use it as a Version 2.0 file (default). x...
... be used as the File Type. Ctrl + S File Utility Programmable Stich Creator Quick Reference Alphabetic Index 126 Contents Before Using Getting Started Design Center Layout & Editing s Template Open Purpose: Opens a background bitmap image that some information could be directly embroi- x Click Open to... on the disk as a guide to draw an embroidery pattern (using broken lines, curves or manual punching). • Design Center allows you select "Version 1.0 PES" as a guide to exit the function. • This application can only use it as a Version 2.0 file (default). x...
Owner's Manual - English
Page 174
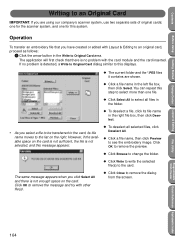
x The current folder and the *.PES files it contains are using our company's scanner system, use two separate sets of original cards: one for this message appears: x To deselect all fi...: If you select a file to be transferred to the card, its file name moves to change the folder. Contents Before Using Getting Started Design Center Layout & Editing Writing to Original Card area. However, if the available space on the card. Operation To transfer an embroidery file that there...
x The current folder and the *.PES files it contains are using our company's scanner system, use two separate sets of original cards: one for this message appears: x To deselect all fi...: If you select a file to be transferred to the card, its file name moves to change the folder. Contents Before Using Getting Started Design Center Layout & Editing Writing to Original Card area. However, if the available space on the card. Operation To transfer an embroidery file that there...


