

Users Manual - English
Page 7
... bobbin You can quickly and easily be cut automatically after you for purchasing this manual for future reference. Before using the machine, carefully read the "IMPORTANT SAFETY INSTRUCTIONS", and then study this embroidery machine. Machine Features 1 23 4 a Simple bobbin-winding The bobbin can start embroiderying without pulling up the bobbin thread (page 28). Introduction Thank you have...
... bobbin You can quickly and easily be cut automatically after you for purchasing this manual for future reference. Before using the machine, carefully read the "IMPORTANT SAFETY INSTRUCTIONS", and then study this embroidery machine. Machine Features 1 23 4 a Simple bobbin-winding The bobbin can start embroiderying without pulling up the bobbin thread (page 28). Introduction Thank you have...

Users Manual - English
Page 10
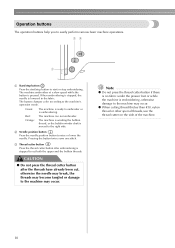
... the thread guide plate, pass the thread around this thread guide when winding the bobbin thread. e Top cover Open the top cover to cut them. i Presser foot lever Raise and lower the presser foot lever to raise and lower the presser foot j Operation buttons Use these descriptions to the machine, and then attach the embroidery frame. n Thread take...
... the thread guide plate, pass the thread around this thread guide when winding the bobbin thread. e Top cover Open the top cover to cut them. i Presser foot lever Raise and lower the presser foot lever to raise and lower the presser foot j Operation buttons Use these descriptions to the machine, and then attach the embroidery frame. n Thread take...
Users Manual - English
Page 12
... needle position button to the right side. c Thread cutter button Press the thread cutter button after the threads have already been cut both the upper and the bobbin threads. z When cutting thread thicker than #30, nylon thread or other special threads, use the thread cutter on the side of the machine. 10 Green: The machine is embroidering, otherwise damage to easily perform...
... needle position button to the right side. c Thread cutter button Press the thread cutter button after the threads have already been cut both the upper and the bobbin threads. z When cutting thread thicker than #30, nylon thread or other special threads, use the thread cutter on the side of the machine. 10 Green: The machine is embroidering, otherwise damage to easily perform...
Users Manual - English
Page 29
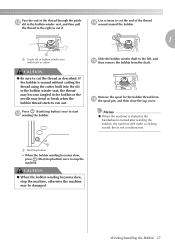
... the Bobbin 27 Use scissors to cut the end of the thread through the guide l slit in the bobbin winder seat, and then pull the thread to the right to cut the thread as described. Memo z When the machine is started or the handwheel is wound without cutting the thread using the cutter built into the... slit in the bobbin winder seat, the thread may become tangled in the bobbin or the ...
... the Bobbin 27 Use scissors to cut the end of the thread through the guide l slit in the bobbin winder seat, and then pull the thread to the right to cut the thread as described. Memo z When the machine is started or the handwheel is wound without cutting the thread using the cutter built into the... slit in the bobbin winder seat, the thread may become tangled in the bobbin or the ...
Users Manual - English
Page 31
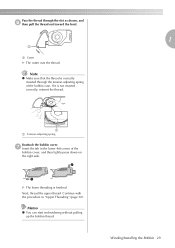
... of the bobbin cover, and then lightly press down on the right side. 2 1 X The lower threading is finished. Memo z You can start embroidering without pulling up the bobbin thread. Continue with the procedure in the lower-left corner of the bobbin case. If it is correctly inserted ...through the slot as shown, and f then pull the thread out toward the front. 1 1 a Cutter X The cutter cuts the thread. g Insert the tab in "Upper...
... of the bobbin cover, and then lightly press down on the right side. 2 1 X The lower threading is finished. Memo z You can start embroidering without pulling up the bobbin thread. Continue with the procedure in the lower-left corner of the bobbin case. If it is correctly inserted ...through the slot as shown, and f then pull the thread out toward the front. 1 1 a Cutter X The cutter cuts the thread. g Insert the tab in "Upper...
Users Manual - English
Page 35
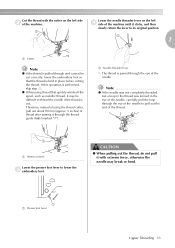
... foot lever to lower the c embroidery foot. If this operation is cut correctly, lower the embroidery foot so that quickly winds off the spool, such as metallic thread, it may break or bend. 1 a Presser foot lever Upper Threading 33 Lower the needle threader lever ...on the left d side of the needle. a Needle threader lever X The thread is passed through the eye of the machine...
... foot lever to lower the c embroidery foot. If this operation is cut correctly, lower the embroidery foot so that quickly winds off the spool, such as metallic thread, it may break or bend. 1 a Presser foot lever Upper Threading 33 Lower the needle threader lever ...on the left d side of the needle. a Needle threader lever X The thread is passed through the eye of the machine...
Users Manual - English
Page 53
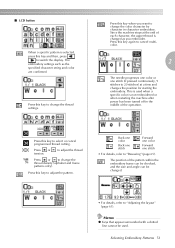
...cannot be changed as the specified character string and color are confirmed. This is used . Press this key to select or cancel programmed thread cutting. Press or tension. Back one color Back one stitch Forward one color Forward one stitch (if pressed continuously, 9 stitches to 20...stitches) at the end of each character, the upper thread is changed . • For details, refer to "Adjusting the layout" (page 61). Since the machine stops at a time and changes the position for starting the embroidery. The embroidery settings such as you want to change the color character...
...cannot be changed as the specified character string and color are confirmed. This is used . Press this key to select or cancel programmed thread cutting. Press or tension. Back one color Back one stitch Forward one color Forward one stitch (if pressed continuously, 9 stitches to 20...stitches) at the end of each character, the upper thread is changed . • For details, refer to "Adjusting the layout" (page 61). Since the machine stops at a time and changes the position for starting the embroidery. The embroidery settings such as you want to change the color character...
Users Manual - English
Page 60
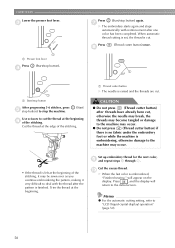
... 5-6 stitches, press e stop button) to stop the machine. (Start/ Use scissors to cut , otherwise the needle may break, the threads may become tangled or damage to the machine may occur. ● Do not press (Thread cutter button) if there is no fabric under the embroidery foot or while the machine is embroidering, otherwise damage to the initial...
... 5-6 stitches, press e stop button) to stop the machine. (Start/ Use scissors to cut , otherwise the needle may break, the threads may become tangled or damage to the machine may occur. ● Do not press (Thread cutter button) if there is no fabric under the embroidery foot or while the machine is embroidering, otherwise damage to the initial...
Users Manual - English
Page 61
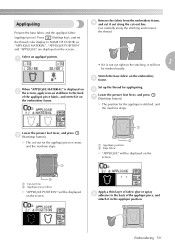
...a 2 • If it on the embroidery e frame. Press (Settings key), and set the thread color display to the back of the appliqué piece fabric, and stretch it is stitched, and the machine stops. Remove the fabric from the embroidery frame, d and cut right on the screen. X The position for... appliquéing. Set up the thread for the appliqué is not cut it in the appliqué position. Appliquéing...
...a 2 • If it on the embroidery e frame. Press (Settings key), and set the thread color display to the back of the appliqué piece fabric, and stretch it is stitched, and the machine stops. Remove the fabric from the embroidery frame, d and cut right on the screen. X The position for... appliquéing. Set up the thread for the appliqué is not cut it in the appliqué position. Appliquéing...


