

Users Manual - English
Page 16
...embroidery unit Attach the embroidery unit. (If the embroidery unit is not attached, the machine does not operate.) For details, refer to "Attaching the embroidery unit" (page 15). ↓ 2 Checking the needle Use a needle matched to the pattern. For details on replacing the needle, refer to "Attaching the Embroidery..."Upper Threading" (page 30). 14 thread For details, refer to "Selecting Embroidery Patterns" (page 49). ↓ 7 Checking the layout Check and adjust the size and position of the embroidery pattern. For details, refer to "Winding/Installing the Bobbin" (page 24)....
...embroidery unit Attach the embroidery unit. (If the embroidery unit is not attached, the machine does not operate.) For details, refer to "Attaching the embroidery unit" (page 15). ↓ 2 Checking the needle Use a needle matched to the pattern. For details on replacing the needle, refer to "Attaching the Embroidery..."Upper Threading" (page 30). 14 thread For details, refer to "Selecting Embroidery Patterns" (page 49). ↓ 7 Checking the layout Check and adjust the size and position of the embroidery pattern. For details, refer to "Winding/Installing the Bobbin" (page 24)....
Users Manual - English
Page 27
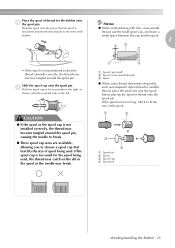
... cap is not installed correctly, the thread may break. ● a a Spool cap (small) b Spool (cross-wound thread) c Space z When using thread that best fits the size of spool being used . Slide the spool onto the pin so that the thread unwinds correctly, the thread may become tangled around the spool pin... it to the right, as shown, with the rounded side on the slit in the spool or the needle may become tangled around the spool pin, causing the needle to break. ● Three spool cap sizes are available, allowing you to the front at the bottom. Place the spool of thread for the...
... cap is not installed correctly, the thread may break. ● a a Spool cap (small) b Spool (cross-wound thread) c Space z When using thread that best fits the size of spool being used . Slide the spool onto the pin so that the thread unwinds correctly, the thread may become tangled around the spool pin... it to the right, as shown, with the rounded side on the slit in the spool or the needle may become tangled around the spool pin, causing the needle to break. ● Three spool cap sizes are available, allowing you to the front at the bottom. Place the spool of thread for the...
Users Manual - English
Page 30
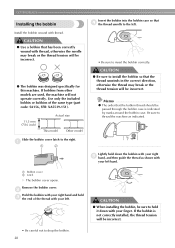
... d the thread unrolls to hold c the end of the same type (part code: SA156, SFB: XA5539-151). 11.5 mm (7/16 inch) Actual size This model Other model • Be sure to install the bobbin so that has been correctly wound with thread. b Hold the bobbin with your finger...as indicated. CAUTION ● When installing the bobbin, be incorrect. ● The bobbin was designed specifically for this machine. Install the bobbin wound with thread, otherwise the needle may break or the thread tension will be sure to the left. Use only the included bobbin or bobbins of the...
... d the thread unrolls to hold c the end of the same type (part code: SA156, SFB: XA5539-151). 11.5 mm (7/16 inch) Actual size This model Other model • Be sure to install the bobbin so that has been correctly wound with thread. b Hold the bobbin with your finger...as indicated. CAUTION ● When installing the bobbin, be incorrect. ● The bobbin was designed specifically for this machine. Install the bobbin wound with thread, otherwise the needle may break or the thread tension will be sure to the left. Use only the included bobbin or bobbins of the...
Users Manual - English
Page 32
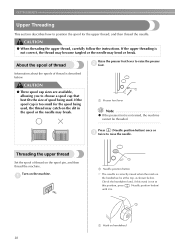
...Threading the upper thread Set the spool of thread is too small for the upper thread, and then thread the needle. Information about the spools of thread on the machine. Press (Needle position button) once or c twice to position the spool for the spool being used , the thread may catch ...on handwheel 30 CAUTION ● Three spool cap sizes are available, allowing you to choose a spool cap that best fits the size of thread Raise the...
...Threading the upper thread Set the spool of thread is too small for the upper thread, and then thread the needle. Information about the spools of thread on the machine. Press (Needle position button) once or c twice to position the spool for the spool being used , the thread may catch ...on handwheel 30 CAUTION ● Three spool cap sizes are available, allowing you to choose a spool cap that best fits the size of thread Raise the...

Users Manual - English
Page 42
...embroidery bobbin thread. The needle may become tangled. 40 Note z Always use stabilizer for embroidery machines. For details, refer to break. Note z For good quality embroidery designs be sure to use (Needle position button) to the embroidery unit, and use embroidery thread designed for embroidery..., attach the embroidery frame to raise the needle. We recommend stabilizer material for embroidering. What to "Optional accessories" (page 7). CAUTION ● Do not embroider fabrics that matches the size of fabric a little larger than the embroidery frame that are...
...embroidery bobbin thread. The needle may become tangled. 40 Note z Always use stabilizer for embroidery machines. For details, refer to break. Note z For good quality embroidery designs be sure to use (Needle position button) to the embroidery unit, and use embroidery thread designed for embroidery..., attach the embroidery frame to raise the needle. We recommend stabilizer material for embroidering. What to "Optional accessories" (page 7). CAUTION ● Do not embroider fabrics that matches the size of fabric a little larger than the embroidery frame that are...
Users Manual - English
Page 44
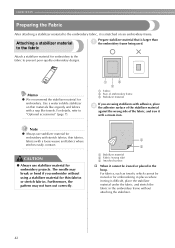
... hoop. Furthermore, the pattern may break or bend if you are using a stabilizer material for embroidery to the fabric to "Optional accessories" (page 7). 1 3 2 a Fabric b Size of the fabric, and iron it cannot be ironed or for embroidery. The needle may not turn out correctly. 1 2 3 a Stabilizer material b Fabric (wrong side) c Attached surface † When it...
... hoop. Furthermore, the pattern may break or bend if you are using a stabilizer material for embroidery to the fabric to "Optional accessories" (page 7). 1 3 2 a Fabric b Size of the fabric, and iron it cannot be ironed or for embroidery. The needle may not turn out correctly. 1 2 3 a Stabilizer material b Fabric (wrong side) c Attached surface † When it...
Users Manual - English
Page 45
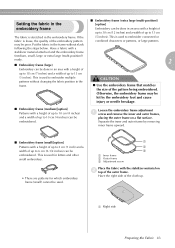
... the outer frame. Have the right side of the pattern being embroidered. Separate the inner and outer frame by the embroidery foot and cause injury or needle breakage. ■ Embroidery frame (medium)[option] Patterns with a height of up to 30 cm (12 inches) and a width of up ..., small, large or extra large (multi-position)) ready. 2 ■ Embroidery frame (large) Embroidery can be done in an area with the stabilizer material on a flat surface. CAUTION ● Use the embroidery frame that matches the size of the cloth up. 1 a Right side Preparing the Fabric 43 If ...
... the outer frame. Have the right side of the pattern being embroidered. Separate the inner and outer frame by the embroidery foot and cause injury or needle breakage. ■ Embroidery frame (medium)[option] Patterns with a height of up to 30 cm (12 inches) and a width of up ..., small, large or extra large (multi-position)) ready. 2 ■ Embroidery frame (large) Embroidery can be done in an area with the stabilizer material on a flat surface. CAUTION ● Use the embroidery frame that matches the size of the cloth up. 1 a Right side Preparing the Fabric 43 If ...
Users Manual - English
Page 53
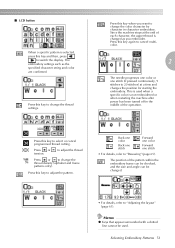
Press this key again to cancel multicolor. 2 The needle progresses one color or one stitch • For details, refer to 20...(if pressed continuously, 9 stitches to "Resewing" (page 65). Selecting Embroidery Patterns 51 Since the machine stops at a time and changes the position for starting the embroidery. This is used when a specific color is not embroidered or when ...character in the middle of the pattern within the embroidery frame can be checked, and the size and angle can be used. The position of the operation. The embroidery settings such as you want to change the thread...
Press this key again to cancel multicolor. 2 The needle progresses one color or one stitch • For details, refer to 20...(if pressed continuously, 9 stitches to "Resewing" (page 65). Selecting Embroidery Patterns 51 Since the machine stops at a time and changes the position for starting the embroidery. This is used when a specific color is not embroidered or when ...character in the middle of the pattern within the embroidery frame can be checked, and the size and angle can be used. The position of the operation. The embroidery settings such as you want to change the thread...
Users Manual - English
Page 64
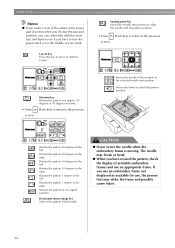
...1 degree to the right Returns the pattern to rotation screen. • Press screen. CAUTION ● Never lower the needle when the embroidery frame is moving. If you use an embroidery frame not displayed as available for use an appropriate frame. Layout key Press this key to move to its original position... position to check the pattern position. Moves the frame to align the needle with the same size and layout even if you have to turn the power back on in the middle of available embroidery frames and use , the presser foot may strike the frame and possibly cause injury. 62 ...
...1 degree to the right Returns the pattern to rotation screen. • Press screen. CAUTION ● Never lower the needle when the embroidery frame is moving. If you use an embroidery frame not displayed as available for use an appropriate frame. Layout key Press this key to move to its original position... position to check the pattern position. Moves the frame to align the needle with the same size and layout even if you have to turn the power back on in the middle of available embroidery frames and use , the presser foot may strike the frame and possibly cause injury. 62 ...

Users Manual - English
Page 68
... turned off, the embroidery size and layout return to stop the a machine. Turn on the screen b and make a note of it is displayed. Memo z When the machine is displayed. X The confirmation message is complete, check the current needle count before it . EMBROIDERY Stopping while embroidering Press c (Embroidery key). Press . Turn off the machine. If the embroidery is stopped before...
... turned off, the embroidery size and layout return to stop the a machine. Turn on the screen b and make a note of it is displayed. Memo z When the machine is displayed. X The confirmation message is complete, check the current needle count before it . EMBROIDERY Stopping while embroidering Press c (Embroidery key). Press . Turn off the machine. If the embroidery is stopped before...
USB GUIDE - Multi
Page 3
...size unless it meets the required specifications. • Even if the embroidery unit is not attached, the machine will begin flashing after the media is inserted into your computer or machine, and may take about 5 to 6 seconds before the media is more than our original patterns, the thread or needle may cause the embroidery machine... to malfunction. ■ Types of USB Media That Can Be Used Embroidery data can be connected to the USB port on this machine. Memo z Letters and numerals can be ...
...size unless it meets the required specifications. • Even if the embroidery unit is not attached, the machine will begin flashing after the media is inserted into your computer or machine, and may take about 5 to 6 seconds before the media is more than our original patterns, the thread or needle may cause the embroidery machine... to malfunction. ■ Types of USB Media That Can Be Used Embroidery data can be connected to the USB port on this machine. Memo z Letters and numerals can be ...


