
Users Manual - English
Page 12
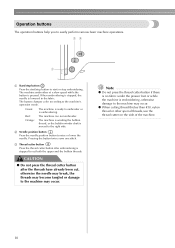
...machine is embroidering, otherwise damage to start /stop embroidering. Note z Do not press the thread cutter button if there is no fabric under the presser foot or while the machine... to the machine may occur. Red: The machine can not ...according to the machine may become tangled or damage to the machine's operation mode. ...machine. 10 c Thread cutter button Press the thread cutter button after the threads have already been cut both the upper and the bobbin threads. The machine... embroiders at a slow speed while the button is lowered in the fabric. Orange: The machine...
...machine is embroidering, otherwise damage to start /stop embroidering. Note z Do not press the thread cutter button if there is no fabric under the presser foot or while the machine... to the machine may occur. Red: The machine can not ...according to the machine may become tangled or damage to the machine's operation mode. ...machine. 10 c Thread cutter button Press the thread cutter button after the threads have already been cut both the upper and the bobbin threads. The machine... embroiders at a slow speed while the button is lowered in the fabric. Orange: The machine...
Users Manual - English
Page 13
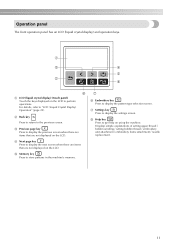
...Liquid Crystal Display) Operation" (page 20). g Settings key Press to get help on the LCD. h Help key Press to display the settings screen. Displays simple explanations of setting upper thread / bobbin winding / setting bobbin thread / embroidery unit attachment / embroidery frame attachment / needle replacement. 11 a c d e b h f a... to store patterns in the machine's memory. Operation panel The front operation panel has an LCD (liquid crystal display) and operation keys. d Next page key Press to display the pattern type selection screen. g f Embroidery key Press to display the ...
...Liquid Crystal Display) Operation" (page 20). g Settings key Press to get help on the LCD. h Help key Press to display the settings screen. Displays simple explanations of setting upper thread / bobbin winding / setting bobbin thread / embroidery unit attachment / embroidery frame attachment / needle replacement. 11 a c d e b h f a... to store patterns in the machine's memory. Operation panel The front operation panel has an LCD (liquid crystal display) and operation keys. d Next page key Press to display the pattern type selection screen. g f Embroidery key Press to display the ...
Users Manual - English
Page 25
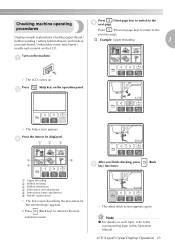
...help screen appears. Press b (Help key) on . Press the item to the previous page. X The initial stitch screen appears again. procedures Press (Previous page key) to return to be displayed. a Upper threading b Bobbin winding c Bobbin installation d Embroidery unit attachment e Embroidery... simple explanations of setting upper thread / bobbin winding / setting bobbin thread / embroidery † Example: Upper threading 1 unit attachment / embroidery frame attachment / needle replacement on the machine. Turn on the LCD. LCD (Liquid Crystal Display) Operation 23
...help screen appears. Press b (Help key) on . Press the item to the previous page. X The initial stitch screen appears again. procedures Press (Previous page key) to return to be displayed. a Upper threading b Bobbin winding c Bobbin installation d Embroidery unit attachment e Embroidery... simple explanations of setting upper thread / bobbin winding / setting bobbin thread / embroidery † Example: Upper threading 1 unit attachment / embroidery frame attachment / needle replacement on the machine. Turn on the LCD. LCD (Liquid Crystal Display) Operation 23
Users Manual - English
Page 46
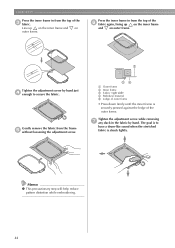
... outer frame • Press down firmly until the inner frame is struck lightly. The goal is to secure the fabric. Memo z This precautionary step will help reduce pattern distortion while embroidering. 44 Tighten the adjustment screw by hand. Press the inner frame in from the top of the c fabric. Line up... on the inner frame and on outer frame. EMBROIDERY Press the inner frame in from the top of the f fabric again, lining up on the inner frame and on outer frame.
... outer frame • Press down firmly until the inner frame is struck lightly. The goal is to secure the fabric. Memo z This precautionary step will help reduce pattern distortion while embroidering. 44 Tighten the adjustment screw by hand. Press the inner frame in from the top of the c fabric. Line up... on the inner frame and on outer frame. EMBROIDERY Press the inner frame in from the top of the f fabric again, lining up on the inner frame and on outer frame.
Users Manual - English
Page 85
... 8 M Brother poly #90 bobbin thread 7 buzzer 82 machine settings 21 , main power switch 9 19 C characters 52 maintenance 70 manual needle threading 34 , memory key 11 63 cleaning 70 cleaning brush 6 N D dust cover 6 E , embroidery card 7 55 embroidery card slot 9 , Embroidery foot "Q 6 9 embroidery foot attachment 72 embroidery frame 43 embroidery frame attachment 47 embroidery frame removal 48 embroidery key 11 embroidery pattern 53 embroidery...
... 8 M Brother poly #90 bobbin thread 7 buzzer 82 machine settings 21 , main power switch 9 19 C characters 52 maintenance 70 manual needle threading 34 , memory key 11 63 cleaning 70 cleaning brush 6 N D dust cover 6 E , embroidery card 7 55 embroidery card slot 9 , Embroidery foot "Q 6 9 embroidery foot attachment 72 embroidery frame 43 embroidery frame attachment 47 embroidery frame removal 48 embroidery key 11 embroidery pattern 53 embroidery...


