
Users Manual - English
Page 3
... to assure correct installation. 8 For repair or adjustment: • If the Light unit is damaged, it must be used by authorized dealer. • In the event a malfunction occurs or adjustment is used . • Always consult the operation manual when replacing or installing any assemblies, the presser feet, needle, or other hot objects. • Use only neutral soaps or detergents to clean the case. Use this manual. 6 This machine is not a toy...
... to assure correct installation. 8 For repair or adjustment: • If the Light unit is damaged, it must be used by authorized dealer. • In the event a malfunction occurs or adjustment is used . • Always consult the operation manual when replacing or installing any assemblies, the presser feet, needle, or other hot objects. • Use only neutral soaps or detergents to clean the case. Use this manual. 6 This machine is not a toy...

Users Manual - English
Page 5
... ...19 LCD (Liquid Crystal Display) Operation 20 Viewing the LCD...20 Changing the machine settings ...21 Checking machine operating procedures ...23 Winding/Installing the Bobbin 24 Bobbin precautions ...24 Winding the bobbin ...24 Installing the bobbin ...28 Upper Threading ...30 About the spool of thread ...30 Threading the upper thread ...30 Threading the needle ...32 Threading the needle manually (without using the needle threader 34 Replacing the Needle ...35 Needle precautions ...35 Checking the needle ...35 Replacing the needle...36 EMBROIDERY 39 Embroidering Neatly ...40 What to...
... ...19 LCD (Liquid Crystal Display) Operation 20 Viewing the LCD...20 Changing the machine settings ...21 Checking machine operating procedures ...23 Winding/Installing the Bobbin 24 Bobbin precautions ...24 Winding the bobbin ...24 Installing the bobbin ...28 Upper Threading ...30 About the spool of thread ...30 Threading the upper thread ...30 Threading the needle ...32 Threading the needle manually (without using the needle threader 34 Replacing the Needle ...35 Needle precautions ...35 Checking the needle ...35 Replacing the needle...36 EMBROIDERY 39 Embroidering Neatly ...40 What to...
Users Manual - English
Page 8
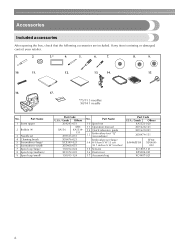
... the following accessories are included. Part Name 1 Seam ripper 2 Bobbin (4) 3 Needle set (large) 14 H 18cm X W 13 cm (H 7 inches X W 5 inches) 15 Scissors 16 Dust cover 17 Accessory bag Part Code U.S.A. / Canada Others XA5523-020 XD1628-121 XD1629-021 XD0474-151 SA444/EF84 EF84: XD0600- 002 XC1807-121 XZ5004-021 XC4487-021 6 Part Name 10 Spool net 11 Operation manual 12 Quick reference guide 13 Embroidery foot "Q" (on machine) Embroidery set 4 Cleaning brush 5 Screwdriver...
... the following accessories are included. Part Name 1 Seam ripper 2 Bobbin (4) 3 Needle set (large) 14 H 18cm X W 13 cm (H 7 inches X W 5 inches) 15 Scissors 16 Dust cover 17 Accessory bag Part Code U.S.A. / Canada Others XA5523-020 XD1628-121 XD1629-021 XD0474-151 SA444/EF84 EF84: XD0600- 002 XC1807-121 XZ5004-021 XC4487-021 6 Part Name 10 Spool net 11 Operation manual 12 Quick reference guide 13 Embroidery foot "Q" (on machine) Embroidery set 4 Cleaning brush 5 Screwdriver...

Users Manual - English
Page 11
.... e Bobbin cover/bobbin case Remove the bobbin cover, and then insert the bobbin into the power supply jack. c Embroidery card slot Insert the embroidery card. b Handwheel Turn the handwheel toward you are learning to raise and lower the needle. Needle and embroidery foot section Right-side/rear view a Thread guide disk Pass the thread through the thread guide disk when using the needle threader to clean the bobbin case and race. d Needle plate cover Remove the needle plate cover to thread the needle. c Needle plate When the needle is lowered, it enters the hole in...
.... e Bobbin cover/bobbin case Remove the bobbin cover, and then insert the bobbin into the power supply jack. c Embroidery card slot Insert the embroidery card. b Handwheel Turn the handwheel toward you are learning to raise and lower the needle. Needle and embroidery foot section Right-side/rear view a Thread guide disk Pass the thread through the thread guide disk when using the needle threader to clean the bobbin case and race. d Needle plate cover Remove the needle plate cover to thread the needle. c Needle plate When the needle is lowered, it enters the hole in...
Users Manual - English
Page 12
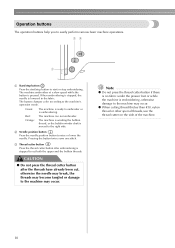
... the presser foot or while the machine is stopped to cut , otherwise the needle may break, the threads may become tangled or damage to the right side. The machine embroiders at a slow speed while the button is moved to the machine may occur. The button changes color according to easily perform various basic machine operations. Pressing the button twice sews one stitch. Orange: The machine is winding the bobbin thread, or the bobbin winder...
... the presser foot or while the machine is stopped to cut , otherwise the needle may break, the threads may become tangled or damage to the right side. The machine embroiders at a slow speed while the button is moved to the machine may occur. The button changes color according to easily perform various basic machine operations. Pressing the button twice sews one stitch. Orange: The machine is winding the bobbin thread, or the bobbin winder...
Users Manual - English
Page 13
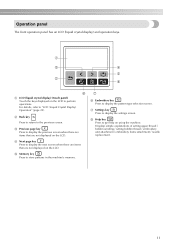
... displayed on the LCD. For details, refer to display the previous screen when there are items that are not displayed on the LCD to get help on the LCD. c Previous page key Press to "LCD (Liquid Crystal Display) Operation" (page 20). Displays simple explanations of setting upper thread / bobbin winding / setting bobbin thread / embroidery unit attachment / embroidery frame attachment / needle replacement. 11
... displayed on the LCD. For details, refer to display the previous screen when there are items that are not displayed on the LCD to get help on the LCD. c Previous page key Press to "LCD (Liquid Crystal Display) Operation" (page 20). Displays simple explanations of setting upper thread / bobbin winding / setting bobbin thread / embroidery unit attachment / embroidery frame attachment / needle replacement. 11

Users Manual - English
Page 16
..., refer to "Upper Threading" (page 30). 14 thread For details, refer to "Selecting Embroidery Patterns" (page 49). ↓ 7 Checking the layout Check and adjust the size and position of the embroidery pattern. For details, refer to "Winding/Installing the Bobbin" (page 24). ↓ 4 Preparing the fabric Attach a stabilizer material to "Adjusting the layout" (page 61). ↓ 8 Setting up the embroidery Set up the bobbin thread For the bobbin thread, wind embroidery bobbin thread and set it in place...
..., refer to "Upper Threading" (page 30). 14 thread For details, refer to "Selecting Embroidery Patterns" (page 49). ↓ 7 Checking the layout Check and adjust the size and position of the embroidery pattern. For details, refer to "Winding/Installing the Bobbin" (page 24). ↓ 4 Preparing the fabric Attach a stabilizer material to "Adjusting the layout" (page 61). ↓ 8 Setting up the embroidery Set up the bobbin thread For the bobbin thread, wind embroidery bobbin thread and set it in place...
Users Manual - English
Page 25
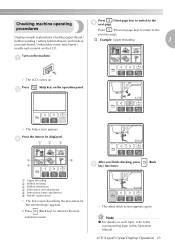
... the corresponding page in this Operation Manual. Displays simple explanations of setting upper thread / bobbin winding / setting bobbin thread / embroidery † Example: Upper threading 1 unit attachment / embroidery frame attachment / needle replacement on the operation panel. LCD (Liquid Crystal Display) Operation 23 Note z For details on each topic, refer to the previous page. Press b (Help key) on the LCD. c 1 2 3 4 6 After you finish checking, press (Back 5 e key) two times. Checking machine operating Press (Next page key...
... the corresponding page in this Operation Manual. Displays simple explanations of setting upper thread / bobbin winding / setting bobbin thread / embroidery † Example: Upper threading 1 unit attachment / embroidery frame attachment / needle replacement on the operation panel. LCD (Liquid Crystal Display) Operation 23 Note z For details on each topic, refer to the previous page. Press b (Help key) on the LCD. c 1 2 3 4 6 After you finish checking, press (Back 5 e key) two times. Checking machine operating Press (Next page key...
Users Manual - English
Page 26
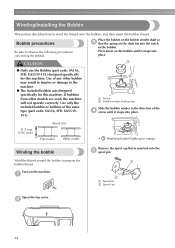
... same type (part code: SA156, SFB: XA5539151). 2 a Notch b Bobbin winder shaft spring Slide the bobbin winder in the direction of any other models are used, the machine will not operate correctly. Winding the bobbin Wind the thread around the bobbin to the machine. ● The included bobbin was designed specifically for this machine. Turn on the shaft fits into place. 11.5 mm (7/16 inch) Actual size This model Other model • (Start/stop button) lights up in the bobbin. Use of...
... same type (part code: SA156, SFB: XA5539151). 2 a Notch b Bobbin winder shaft spring Slide the bobbin winder in the direction of any other models are used, the machine will not operate correctly. Winding the bobbin Wind the thread around the bobbin to the machine. ● The included bobbin was designed specifically for this machine. Turn on the shaft fits into place. 11.5 mm (7/16 inch) Actual size This model Other model • (Start/stop button) lights up in the bobbin. Use of...
Users Manual - English
Page 27
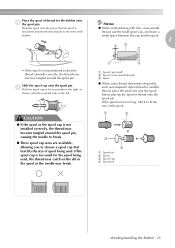
... size of the spool. 1 2 3 4 a Spool net b Spool c Spool cap d Spool pin Winding/Installing the Bobbin 25 Memo z When embroidering with the rounded side on the slit in the spool or the needle may become tangled around the spool pin. CAUTION ● If the spool or the spool cap is not installed correctly, the thread may break. ● a a Spool cap (small) b Spool (cross-wound thread) c Space z When using thread that the spool is too small for the bobbin...
... size of the spool. 1 2 3 4 a Spool net b Spool c Spool cap d Spool pin Winding/Installing the Bobbin 25 Memo z When embroidering with the rounded side on the slit in the spool or the needle may become tangled around the spool pin. CAUTION ● If the spool or the spool cap is not installed correctly, the thread may break. ● a a Spool cap (small) b Spool (cross-wound thread) c Space z When using thread that the spool is too small for the bobbin...
Users Manual - English
Page 30
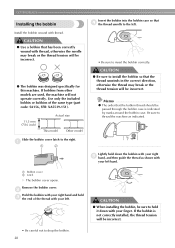
... the thread tension will be incorrect. ● The bobbin was designed specifically for this machine. Slide the bobbin cover latch to insert the bobbin correctly. CAUTION ● When installing the bobbin, be incorrect. • Be careful not to drop the bobbin. 28 Install the bobbin wound with your finger. Use only the included bobbin or bobbins of the thread with thread. Remove the bobbin cover. Be sure to hold c the end of the same type (part code...
... the thread tension will be incorrect. ● The bobbin was designed specifically for this machine. Slide the bobbin cover latch to insert the bobbin correctly. CAUTION ● When installing the bobbin, be incorrect. • Be careful not to drop the bobbin. 28 Install the bobbin wound with your finger. Use only the included bobbin or bobbins of the thread with thread. Remove the bobbin cover. Be sure to hold c the end of the same type (part code...
Users Manual - English
Page 38
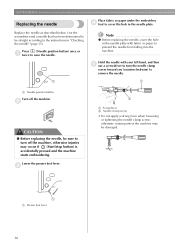
... machine starts embroidering. Use the screwdriver and a needle that has been determined to be damaged. 1 a Presser foot lever 36 b CAUTION ● Before replacing the needle, be sure to turn the needle clamp screw toward you (counterclockwise) to remove the needle. 1 a Needle position button Turn off the machine, otherwise injuries may be straight according to the instructions in the needle plate. GETTING READY Replacing the needle Place fabric or paper under the embroidery d foot to cover the hole in "Checking the needle...
... machine starts embroidering. Use the screwdriver and a needle that has been determined to be damaged. 1 a Presser foot lever 36 b CAUTION ● Before replacing the needle, be sure to turn the needle clamp screw toward you (counterclockwise) to remove the needle. 1 a Needle position button Turn off the machine, otherwise injuries may be straight according to the instructions in the needle plate. GETTING READY Replacing the needle Place fabric or paper under the embroidery d foot to cover the hole in "Checking the needle...

Users Manual - English
Page 58
... finish to "Optional accessories" (page 7). Thread Upper thread Bobbin thread Use embroidery thread, or country embroidery thread intended for embroidering and appliquéing. EMBROIDERY Embroidering After the preparations are many factors that there is the appropriateness of the needle and thread being used. This section describes the steps for use with this machine. Another important point is enough thread in the range of motion of threads below. Otherwise, the embroidery unit cannot move...
... finish to "Optional accessories" (page 7). Thread Upper thread Bobbin thread Use embroidery thread, or country embroidery thread intended for embroidering and appliquéing. EMBROIDERY Embroidering After the preparations are many factors that there is the appropriateness of the needle and thread being used. This section describes the steps for use with this machine. Another important point is enough thread in the range of motion of threads below. Otherwise, the embroidery unit cannot move...
Users Manual - English
Page 67
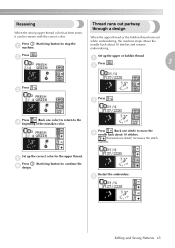
Press . Set up the upper or bobbin thread. e Editing and Saving Patterns 65 Press (Start/stop button) to stop button) to continue the f design. Move the needle back about 10 stitches. (Forward one stitch) increases the stitch number. b Set up the correct color for the upper thread. a Press . 2 b Press . Thread runs out partway through a design When the upper thread or the bobbin thread runs out while embroidering, the machine stops. Press (Back one color) to return...
Press . Set up the upper or bobbin thread. e Editing and Saving Patterns 65 Press (Start/stop button) to stop button) to continue the f design. Move the needle back about 10 stitches. (Forward one stitch) increases the stitch number. b Set up the correct color for the upper thread. a Press . 2 b Press . Thread runs out partway through a design When the upper thread or the bobbin thread runs out while embroidering, the machine stops. Press (Back one color) to return...
Users Manual - English
Page 70
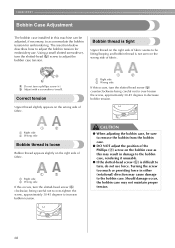
... the screw, approximately 30-45 degrees to turn, do not use . a Right side b Wrong side If this occurs, turn the slotted-head screw (b) counterclockwise being careful not to over -loosen the screw, approximately 30-45 degrees to adjust the bobbin tension for embroidering. EMBROIDERY Bobbin Case Adjustment The bobbin case installed in this machine can be adjusted, if necessary, to the bobbin case. The insertion below describes how to decrease bobbin tension.
... the screw, approximately 30-45 degrees to turn, do not use . a Right side b Wrong side If this occurs, turn the slotted-head screw (b) counterclockwise being careful not to over -loosen the screw, approximately 30-45 degrees to adjust the bobbin tension for embroidering. EMBROIDERY Bobbin Case Adjustment The bobbin case installed in this machine can be adjusted, if necessary, to the bobbin case. The insertion below describes how to decrease bobbin tension.
Users Manual - English
Page 76
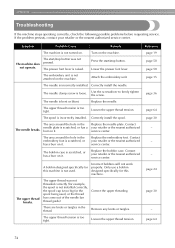
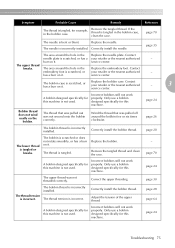
... on . Lower the presser foot lever. Replace the needle. The area around the hole in the embroidery foot is not used , or the thread has come out of the needle bar thread guide). The bobbin case is not attached on the machine. Only use a bobbin designed specifically for the spool being used . There are knots or tangles in the Replace the needle plate. The embroidery unit is scratched, or has a burr on it . Correctly install the needle. Loosen the upper thread tension. The spool is too...
... on . Lower the presser foot lever. Replace the needle. The area around the hole in the embroidery foot is not used , or the thread has come out of the needle bar thread guide). The bobbin case is not attached on the machine. Only use a bobbin designed specifically for the spool being used . There are knots or tangles in the Replace the needle plate. The embroidery unit is scratched, or has a burr on it . Correctly install the needle. Loosen the upper thread tension. The spool is too...
Users Manual - English
Page 77
... machine is not used . Correct the upper threading. Correctly install the bobbin thread. Only use a bobbin designed specifically for this machine. Contact needle plate is tangled in the Replace the embroidery foot. The thread that was pulled off around the hole in the bobbin case, clean the race. Incorrect bobbins will not work properly. Wind the thread that was pulled out was not threaded correctly. The upper thread breaks. Replace the bobbin. Remove the tangled thread and clean the race. - The bobbin thread is incorrect. page 24 Troubleshooting...
... machine is not used . Correct the upper threading. Correctly install the bobbin thread. Only use a bobbin designed specifically for this machine. Contact needle plate is tangled in the Replace the embroidery foot. The thread that was pulled off around the hole in the bobbin case, clean the race. Incorrect bobbins will not work properly. Wind the thread that was pulled out was not threaded correctly. The upper thread breaks. Replace the bobbin. Remove the tangled thread and clean the race. - The bobbin thread is incorrect. page 24 Troubleshooting...
Users Manual - English
Page 78
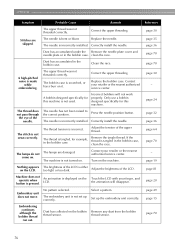
Correctly install the needle. Dust has accumulated under the Remove the needle plate cover and needle plate or in the bobbin case. clean the race. The upper thread was not threaded correctly. Replace the bobbin case. Press the needle position button. Correctly install the needle. If the thread is not turned on. The machine is tangled in the bobbin case. The brightness of the upper thread. Machine does not operate when button is either too light or too dark. Set up correctly. Dust has...
Correctly install the needle. Dust has accumulated under the Remove the needle plate cover and needle plate or in the bobbin case. clean the race. The upper thread was not threaded correctly. Replace the bobbin case. Press the needle position button. Correctly install the needle. If the thread is not turned on. The machine is tangled in the bobbin case. The brightness of the upper thread. Machine does not operate when button is either too light or too dark. Set up correctly. Dust has...
Users Manual - English
Page 79
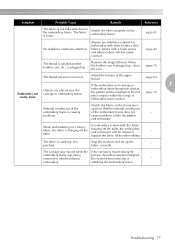
... the range of the upper thread. page 16 Stretch the fabric on the embroidery frame. Support the fabric while embroidering. - Troubleshooting 77 page 42 The thread is tangled and the bobbin case, etc., is plugged up, clean the race. Stop the machine and set up . attaching the embroidery frame. embroidery frame bumps into objects, the pattern will be misaligned. Stretch the fabric properly on the frame once Material coming out of the...
... the range of the upper thread. page 16 Stretch the fabric on the embroidery frame. Support the fabric while embroidering. - Troubleshooting 77 page 42 The thread is tangled and the bobbin case, etc., is plugged up, clean the race. Stop the machine and set up . attaching the embroidery frame. embroidery frame bumps into objects, the pattern will be misaligned. Stretch the fabric properly on the frame once Material coming out of the...
Users Manual - English
Page 85
...6 air vent 9 appliqu 59 H handle 9 handwheel 9 , help key 11 23 B I back key 11 , beep 81 82 included accessories 6 bobbin 6 L bobbin case 9 bobbin case removal 70 layout adjustment 61 bobbin cover 9 LCD 11 bobbin installation 28 bobbin winder 8 LCD button 51 , LCD operation 20 50 3 bobbin winding 24 bobbin winding thread guide 8 M Brother poly #90 bobbin thread 7 buzzer 82 machine settings 21 , main power switch 9 19 C characters 52 maintenance 70 manual needle threading 34 , memory key 11 63 cleaning 70 cleaning brush 6 N D dust cover...
...6 air vent 9 appliqu 59 H handle 9 handwheel 9 , help key 11 23 B I back key 11 , beep 81 82 included accessories 6 bobbin 6 L bobbin case 9 bobbin case removal 70 layout adjustment 61 bobbin cover 9 LCD 11 bobbin installation 28 bobbin winder 8 LCD button 51 , LCD operation 20 50 3 bobbin winding 24 bobbin winding thread guide 8 M Brother poly #90 bobbin thread 7 buzzer 82 machine settings 21 , main power switch 9 19 C characters 52 maintenance 70 manual needle threading 34 , memory key 11 63 cleaning 70 cleaning brush 6 N D dust cover...


