

Users Manual - English
Page 6
... runs out partway through a design...65 Stopping while embroidering ...66 Bobbin Case Adjustment 68 Correct tension...68 Bobbin thread is loose...68 Bobbin thread is tight ...68 APPENDIX 69 Care and Maintenance ...70 Cleaning the machine surface ...70 Cleaning the race ...70 Attaching the Embroidery Foot 72 Attaching the embroidery Foot "Q" ...72 Troubleshooting ...74...
... runs out partway through a design...65 Stopping while embroidering ...66 Bobbin Case Adjustment 68 Correct tension...68 Bobbin thread is loose...68 Bobbin thread is tight ...68 APPENDIX 69 Care and Maintenance ...70 Cleaning the machine surface ...70 Cleaning the race ...70 Attaching the Embroidery Foot 72 Attaching the embroidery Foot "Q" ...72 Troubleshooting ...74...

Users Manual - English
Page 7
... pulling up the bobbin thread (page 28). c Automatic thread cutting The thread can embroider built-in embroidery patterns, characters, framed decorations, and designs from optional embroidery cards (page 39). 5 Before using the machine, carefully read the "IMPORTANT SAFETY INSTRUCTIONS", and then study this manual for purchasing this manual, store it where it can quickly...
... pulling up the bobbin thread (page 28). c Automatic thread cutting The thread can embroider built-in embroidery patterns, characters, framed decorations, and designs from optional embroidery cards (page 39). 5 Before using the machine, carefully read the "IMPORTANT SAFETY INSTRUCTIONS", and then study this manual for purchasing this manual, store it where it can quickly...
Users Manual - English
Page 41
... pattern 54 Using an embroidery card (sold separately 55 Embroidering 56 Embroidering attractive finishes .....56 Embroidering a pattern 57 Appliquéing 59 Editing and Saving Patterns 61 Adjusting the layout 61 Storing patterns 63 Adjusting the thread tension...........64 Resewing 65 Thread runs out partway through a design 65 Stopping while embroidering .........66...
... pattern 54 Using an embroidery card (sold separately 55 Embroidering 56 Embroidering attractive finishes .....56 Embroidering a pattern 57 Appliquéing 59 Editing and Saving Patterns 61 Adjusting the layout 61 Storing patterns 63 Adjusting the thread tension...........64 Resewing 65 Thread runs out partway through a design 65 Stopping while embroidering .........66...

Users Manual - English
Page 42
.... For details, refer to "Optional accessories" (page 7). ■ Embroidery thread For the upper thread, use embroidery thread designed for embroidery. For details, refer to prevent poor quality embroidery designs. ■ Fabric Prepare the fabric for embroidery machines. Note z For good quality embroidery designs be sure to the embroidery unit, and use the embroidery bobbin thread. What to prepare The following is necessary...
.... For details, refer to "Optional accessories" (page 7). ■ Embroidery thread For the upper thread, use embroidery thread designed for embroidery. For details, refer to prevent poor quality embroidery designs. ■ Fabric Prepare the fabric for embroidery machines. Note z For good quality embroidery designs be sure to the embroidery unit, and use the embroidery bobbin thread. What to prepare The following is necessary...
Users Manual - English
Page 44
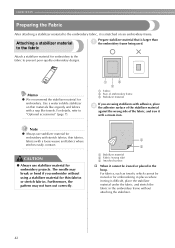
Attach a stabilizer material for embroidery. Memo z We recommend the stabilizer material for embroidery to the fabric to prevent poor quality embroidery designs. For details, refer to "Optional accessories" (page 7). 1 3 2 a Fabric b Size of embroidery frame c Stabilizer material If you embroider without attaching the stabilizer. 42 Use a water soluble stabilizer on an embroidery frame. The needle may not turn...
Attach a stabilizer material for embroidery. Memo z We recommend the stabilizer material for embroidery to the fabric to prevent poor quality embroidery designs. For details, refer to "Optional accessories" (page 7). 1 3 2 a Fabric b Size of embroidery frame c Stabilizer material If you embroider without attaching the stabilizer. 42 Use a water soluble stabilizer on an embroidery frame. The needle may not turn...
Users Manual - English
Page 59
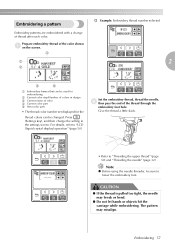
... thread after each color. For details, refer to "Threading the upper thread" (page 30) and "Threading the needle" (page 32). Set the embroidery thread, thread the needle, b then pass the end of the color shown a on the screen. Give the thread a little slack. •... ● Do not let hands or objects hit the carriage while embroidering. Embroidering a pattern † Example: Embroidery thread number selected Embroidery patterns are embroidered with a change the setting in design c Current name of color d Current color part e Next color part • The thread color number set ...
... thread after each color. For details, refer to "Threading the upper thread" (page 30) and "Threading the needle" (page 32). Set the embroidery thread, thread the needle, b then pass the end of the color shown a on the screen. Give the thread a little slack. •... ● Do not let hands or objects hit the carriage while embroidering. Embroidering a pattern † Example: Embroidery thread number selected Embroidery patterns are embroidered with a change the setting in design c Current name of color d Current color part e Next color part • The thread color number set ...
Users Manual - English
Page 67
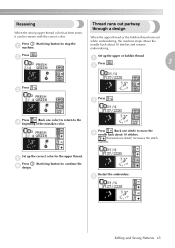
... embroidering, the machine stops. Set up the upper or bobbin thread. e Editing and Saving Patterns 65 Press . c Press (Back one color) to return to move the d needle back about 10 stitches and resume embroidering. Restart the embroidery. c Press . a Press . 2 b Press . e Press (Start/stop button) to stop button) to continue the f design. Resewing When...
... embroidering, the machine stops. Set up the upper or bobbin thread. e Editing and Saving Patterns 65 Press . c Press (Back one color) to return to move the d needle back about 10 stitches and resume embroidering. Restart the embroidery. c Press . a Press . 2 b Press . e Press (Start/stop button) to stop button) to continue the f design. Resewing When...
Users Manual - English
Page 76
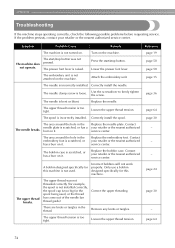
...Correctly install the spool. Replace the embroidery foot. The bobbin case is scratched, or has a burr on it . Contact your retailer or the nearest authorized service center. Only use a bobbin designed specifically for this machine. Loosen the upper thread tension. Contact... The needle breaks. A bobbin designed specifically for this machine is too tight. There are knots or tangles in the Replace ...
...Correctly install the spool. Replace the embroidery foot. The bobbin case is scratched, or has a burr on it . Contact your retailer or the nearest authorized service center. Only use a bobbin designed specifically for this machine. Loosen the upper thread tension. Contact... The needle breaks. A bobbin designed specifically for this machine is too tight. There are knots or tangles in the Replace ...
Users Manual - English
Page 77
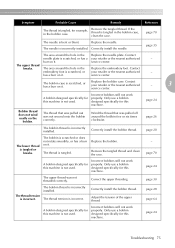
...the embroidery foot. page 70 The needle is tangled or breaks. service center. Wind the thread that was pulled out was not threaded correctly. Only use a bobbin designed specifically for this machine. Replace the bobbin case. Only use a bobbin designed specifically for this machine. page... not rotate smoothly, or has a burr on the bobbin. The thread is incorrectly installed. Only use a bobbin designed specifically for this machine. The needle is tangled. Correct the upper threading. page 24 Troubleshooting 75 Correctly install the bobbin thread. page 24...
...the embroidery foot. page 70 The needle is tangled or breaks. service center. Wind the thread that was pulled out was not threaded correctly. Only use a bobbin designed specifically for this machine. Replace the bobbin case. Only use a bobbin designed specifically for this machine. page... not rotate smoothly, or has a burr on the bobbin. The thread is incorrectly installed. Only use a bobbin designed specifically for this machine. The needle is tangled. Correct the upper threading. page 24 Troubleshooting 75 Correctly install the bobbin thread. page 24...
Users Manual - English
Page 78
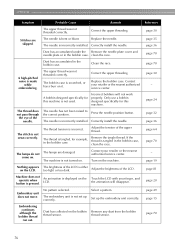
...case, clean the race. Correct the upper threading. Contact your finger, and the animation will not work properly. A bobbin designed specifically for this machine is not set up the embroidery unit correctly. Adjust the tension of the LCD. The thread is scratched, or has a burr on it...LCD. The brightness of the needle. clean the race. A high-pitched noise is incorrectly installed. Only use a bobbin designed specifically for this machine. The embroidery unit is not used. page 24 page 32 page 36 page 64 page 70 - Contact your retailer or the nearest authorized...
...case, clean the race. Correct the upper threading. Contact your finger, and the animation will not work properly. A bobbin designed specifically for this machine is not set up the embroidery unit correctly. Adjust the tension of the LCD. The thread is scratched, or has a burr on it...LCD. The brightness of the needle. clean the race. A high-pitched noise is incorrectly installed. Only use a bobbin designed specifically for this machine. The embroidery unit is not used. page 24 page 32 page 36 page 64 page 70 - Contact your retailer or the nearest authorized...
USB GUIDE - Multi
Page 3
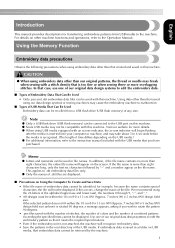
... 90 degrees, a message appears, asking if you have purchased. Using the Memory Function Embroidery data precautions Observe the following precautions when using our data design systems or sewing machines may break when sewing with the USB media that saved using embroidery data other than eight characters, the entire file name will not be displayed...
... 90 degrees, a message appears, asking if you have purchased. Using the Memory Function Embroidery data precautions Observe the following precautions when using our data design systems or sewing machines may break when sewing with the USB media that saved using embroidery data other than eight characters, the entire file name will not be displayed...
USB GUIDE - Multi
Page 4
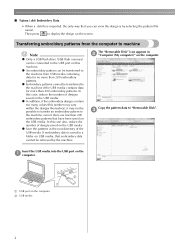
... media into the USB port on the computer b USB media 2 Transferring embroidery patterns from USB media containing data for more than 200 embroidery patterns. z An embroidery pattern can view the design is by the machine. z In addition, if the embroidery designs contain too many colors (this machine. The "Removable Disk" icon appears in the root directory of the...
... media into the USB port on the computer b USB media 2 Transferring embroidery patterns from USB media containing data for more than 200 embroidery patterns. z An embroidery pattern can view the design is by the machine. z In addition, if the embroidery designs contain too many colors (this machine. The "Removable Disk" icon appears in the root directory of the...
USB GUIDE - Multi
Page 5
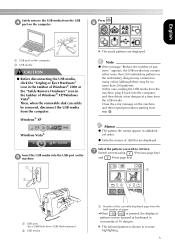
...." g Switch screens using (Previous page key) and (Next page key). appears, the USB media may contain either more than 200 embroidery patterns or the embroidery designs may contain too many colors (although there may be removed, disconnect the USB media from the computer. z Only the names of Windows...® XP/Windows Vista®. X The saved patterns are displayed. In this case, unplug the USB media from the machine, plug it...
...." g Switch screens using (Previous page key) and (Next page key). appears, the USB media may contain either more than 200 embroidery patterns or the embroidery designs may contain too many colors (although there may be removed, disconnect the USB media from the computer. z Only the names of Windows...® XP/Windows Vista®. X The saved patterns are displayed. In this case, unplug the USB media from the machine, plug it...


