

Users Manual - English
Page 6
Using an embroidery card (sold separately) ...55 Embroidering ...56 Embroidering attractive finishes...56 Embroidering a pattern ...57 Appliquéing ...59 Editing and Saving Patterns 61 Adjusting the layout ...... embroidering ...66 Bobbin Case Adjustment 68 Correct tension...68 Bobbin thread is loose...68 Bobbin thread is tight ...68 APPENDIX 69 Care and Maintenance ...70 Cleaning the machine surface ...70 Cleaning the race ...70 Attaching the Embroidery Foot 72 Attaching the embroidery Foot "Q" ...72 Troubleshooting ...74 Error messages ...78 Adjusting the LCD ...81 Operation...
Using an embroidery card (sold separately) ...55 Embroidering ...56 Embroidering attractive finishes...56 Embroidering a pattern ...57 Appliquéing ...59 Editing and Saving Patterns 61 Adjusting the layout ...... embroidering ...66 Bobbin Case Adjustment 68 Correct tension...68 Bobbin thread is loose...68 Bobbin thread is tight ...68 APPENDIX 69 Care and Maintenance ...70 Cleaning the machine surface ...70 Cleaning the race ...70 Attaching the Embroidery Foot 72 Attaching the embroidery Foot "Q" ...72 Troubleshooting ...74 Error messages ...78 Adjusting the LCD ...81 Operation...
Users Manual - English
Page 41
...embroidery frame 43 Attaching the Embroidery Frame.........47 Attaching the embroidery frame .... 47 Removing the embroidery frame .... 48 Selecting Embroidery Patterns 49 Copyright information 49 Embroidery pattern types 49 LCD (liquid crystal display) operation 50 Selecting characters 52 Selecting an embroidery pattern .... 53 Selecting a frame pattern 54 Using an embroidery... 65 Stopping while embroidering .........66 Bobbin Case Adjustment 68 Correct tension 68 Bobbin thread is loose 68 Bobbin thread is tight 68 Embroidering Neatly 40 What to prepare 40 Preparing the Fabric...
...embroidery frame 43 Attaching the Embroidery Frame.........47 Attaching the embroidery frame .... 47 Removing the embroidery frame .... 48 Selecting Embroidery Patterns 49 Copyright information 49 Embroidery pattern types 49 LCD (liquid crystal display) operation 50 Selecting characters 52 Selecting an embroidery pattern .... 53 Selecting a frame pattern 54 Using an embroidery... 65 Stopping while embroidering .........66 Bobbin Case Adjustment 68 Correct tension 68 Bobbin thread is loose 68 Bobbin thread is tight 68 Embroidering Neatly 40 What to prepare 40 Preparing the Fabric...
Users Manual - English
Page 44
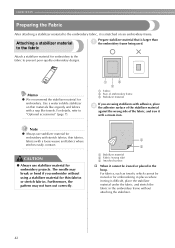
... like towels. Attach a stabilizer material for embroidery projects. Note z Always use stabilizer material for embroidery to the fabric to the fabric Prepare stabilizer material that is stretched on thin materials like organdy and fabrics with a loose weave and fabrics where stitches easily contract. ...The needle may not turn out correctly. 1 2 3 a Stabilizer material b Fabric (wrong side) c Attached surface † When it cannot be ironed or for embroidery. CAUTION ● Always use ...
... like towels. Attach a stabilizer material for embroidery projects. Note z Always use stabilizer material for embroidery to the fabric to the fabric Prepare stabilizer material that is stretched on thin materials like organdy and fabrics with a loose weave and fabrics where stitches easily contract. ...The needle may not turn out correctly. 1 2 3 a Stabilizer material b Fabric (wrong side) c Attached surface † When it cannot be ironed or for embroidery. CAUTION ● Always use ...
Users Manual - English
Page 45
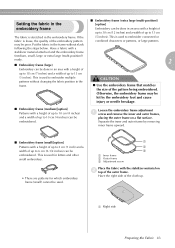
... to 6 cm (2-1/2 inches) can be poor. Setting the fabric in the ■ Embroidery frame (extra large (multi-position)) [option] embroidery frame Embroidery can be embroidered. This is loose, the quality of the embroidery pattern may be hit by removing inner frame upward. ■ Embroidery frame (small)[option] Patterns with the stabilizer material on a flat surface. Separate...
... to 6 cm (2-1/2 inches) can be poor. Setting the fabric in the ■ Embroidery frame (extra large (multi-position)) [option] embroidery frame Embroidery can be embroidered. This is loose, the quality of the embroidery pattern may be hit by removing inner frame upward. ■ Embroidery frame (small)[option] Patterns with the stabilizer material on a flat surface. Separate...
Users Manual - English
Page 66
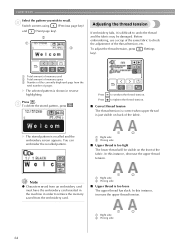
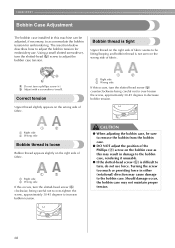
...The selected pattern is too tight The lower thread will be damaged. Press . Note z Characters saved from an embroidery card must have the embroidery card inserted in the machine in reverse highlighting. Before embroidering, use a scrap of the same fabric to retrieve the memory saved from the ...■ Correct thread tension The thread tension is correct when upper thread is too loose The upper thread has slack. b Switch screens using (Previous page key) and (Next page key). EMBROIDERY Select the pattern you wish to weaken the thread tension. To adjust the thread ...
...The selected pattern is too tight The lower thread will be damaged. Press . Note z Characters saved from an embroidery card must have the embroidery card inserted in the machine in reverse highlighting. Before embroidering, use a scrap of the same fabric to retrieve the memory saved from the ...■ Correct thread tension The thread tension is correct when upper thread is too loose The upper thread has slack. b Switch screens using (Previous page key) and (Next page key). EMBROIDERY Select the pattern you wish to weaken the thread tension. To adjust the thread ...
Users Manual - English
Page 70
... the right side of fabric. Using a small slotted screwdriver, turn the slotted-head (b) screw to be lifting/looping and bobbin thread is loose Bobbin thread appears slightly on the wrong side of fabric. Turning the screw too much or providing force in either (rotational) direction may cause...-head screw (b) clockwise, being careful not to over -tighten the screw, approximately 30-45 degrees to accommodate the bobbin tension for embroidery use force. The insertion below describes how to decrease bobbin tension. a Right side b Wrong side If this occurs, turn a phillips screw...
... the right side of fabric. Using a small slotted screwdriver, turn the slotted-head (b) screw to be lifting/looping and bobbin thread is loose Bobbin thread appears slightly on the wrong side of fabric. Turning the screw too much or providing force in either (rotational) direction may cause...-head screw (b) clockwise, being careful not to over -tighten the screw, approximately 30-45 degrees to accommodate the bobbin tension for embroidery use force. The insertion below describes how to decrease bobbin tension. a Right side b Wrong side If this occurs, turn a phillips screw...
Users Manual - English
Page 75
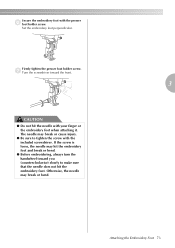
... holder screw. g Turn the screwdriver toward you (counterclockwise) slowly to tighten the screw with the included screwdriver. Otherwise, the needle may hit the embroidery foot and break or bend. ● Before embroidering, always turn the handwheel toward the front. 3 CAUTION ● Do not hit the needle... with the presser f foot holder screw. Attaching the Embroidery Foot 73 Secure the embroidery foot with your finger or the embroidery foot when attaching it. The needle may break or cause injury. ● Be sure to make sure that ...
... holder screw. g Turn the screwdriver toward you (counterclockwise) slowly to tighten the screw with the included screwdriver. Otherwise, the needle may hit the embroidery foot and break or bend. ● Before embroidering, always turn the handwheel toward the front. 3 CAUTION ● Do not hit the needle... with the presser f foot holder screw. Attaching the Embroidery Foot 73 Secure the embroidery foot with your finger or the embroidery foot when attaching it. The needle may break or cause injury. ● Be sure to make sure that ...
Users Manual - English
Page 76
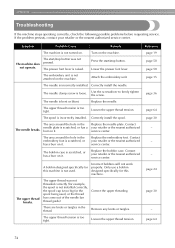
... the needle bar thread guide). The machine does not operate. The presser foot lever is loose. Correctly install the needle. The needle clamp screw is raised. Only use a bobbin designed specifically for this machine. The upper thread tension is incorrectly installed... A bobbin designed specifically for this machine is not turned on it. Remove any knots or tangles. APPENDIX Troubleshooting If the machine stops operating correctly, check the following possible problems before requesting service. Attach the embroidery unit. Loosen the upper thread tension....
... the needle bar thread guide). The machine does not operate. The presser foot lever is loose. Correctly install the needle. The needle clamp screw is raised. Only use a bobbin designed specifically for this machine. The upper thread tension is incorrectly installed... A bobbin designed specifically for this machine is not turned on it. Remove any knots or tangles. APPENDIX Troubleshooting If the machine stops operating correctly, check the following possible problems before requesting service. Attach the embroidery unit. Loosen the upper thread tension....
Users Manual - English
Page 79
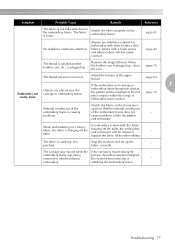
...thread is tangled and the bobbin case, etc., is attached. Adjust the tension of embroidery frame motion. Do not place objects within the range of the upper thread. Stop the machine and set up , clean the race. Be careful when removing or - Troubleshooting 77 ...stabilizer material is plugged up. page 64 If the embroidery unit carriage or 3 Embroidery not neatly done. page 16 Stretch the fabric on a heavy fabric, the fabric is done with a loose weave and fabrics where stitches easily contract. embroidery. Support the fabric while embroidering. - The fabric...
...thread is tangled and the bobbin case, etc., is attached. Adjust the tension of embroidery frame motion. Do not place objects within the range of the upper thread. Stop the machine and set up , clean the race. Be careful when removing or - Troubleshooting 77 ...stabilizer material is plugged up. page 64 If the embroidery unit carriage or 3 Embroidery not neatly done. page 16 Stretch the fabric on a heavy fabric, the fabric is done with a loose weave and fabrics where stitches easily contract. embroidery. Support the fabric while embroidering. - The fabric...


