
Users Manual - English
Page 2
...; Keep fingers away from the electrical outlet when removing covers, lubricating, or when making any adjustments in the needle area. • Do not use the machine. Special care is cut. 3 Never operate this manual, or if you are being used or where oxygen is ... nearest authorized dealer or service center for examination, repair, electrical or mechanical adjustment. 4 Always keep your machine if the power is required around the machine needle. • Switch the machine to the symbol "O" position to turn it off when making any adjustments mentioned in the instruction manual....
...; Keep fingers away from the electrical outlet when removing covers, lubricating, or when making any adjustments in the needle area. • Do not use the machine. Special care is cut. 3 Never operate this manual, or if you are being used or where oxygen is ... nearest authorized dealer or service center for examination, repair, electrical or mechanical adjustment. 4 Always keep your machine if the power is required around the machine needle. • Switch the machine to the symbol "O" position to turn it off when making any adjustments mentioned in the instruction manual....
Users Manual - English
Page 3
...this manual and specifications of the operation manual to inspect and adjust the machine yourself. For additional product information and updates, visit our web site at www.brother.com SAVE THESE INSTRUCTIONS This machine is intended for its intended use as contained in the back of this...• Always consult the operation manual when replacing or installing any assemblies, the presser feet, needle, or other hot objects. • Use only neutral soaps or detergents to clean the case. Use this machine only for household use outdoors. 7 For a longer service life: • When storing this...
...this manual and specifications of the operation manual to inspect and adjust the machine yourself. For additional product information and updates, visit our web site at www.brother.com SAVE THESE INSTRUCTIONS This machine is intended for its intended use as contained in the back of this...• Always consult the operation manual when replacing or installing any assemblies, the presser feet, needle, or other hot objects. • Use only neutral soaps or detergents to clean the case. Use this machine only for household use outdoors. 7 For a longer service life: • When storing this...

Users Manual - English
Page 5
... accessories ...7 Names of Machine Parts and Their Functions 8 Front view ...8 Needle and embroidery foot section ...9 Right-side/rear view ...9 Operation buttons ...10 Operation panel ...11 GETTING READY 13 Embroidery Step by Step 14 Attaching the Embroidery Unit 15 Embroidery unit precautions ...15 Attaching the embroidery unit ...15 Removing the embroidery unit ...16 Turning the Machine On/Off 18 Power...
... accessories ...7 Names of Machine Parts and Their Functions 8 Front view ...8 Needle and embroidery foot section ...9 Right-side/rear view ...9 Operation buttons ...10 Operation panel ...11 GETTING READY 13 Embroidery Step by Step 14 Attaching the Embroidery Unit 15 Embroidery unit precautions ...15 Attaching the embroidery unit ...15 Removing the embroidery unit ...16 Turning the Machine On/Off 18 Power...
Users Manual - English
Page 8
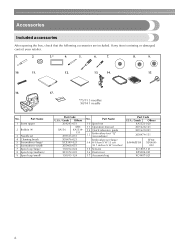
...4. 5. 6. 7. 8. 9. 10. 11. 12. 13. 14. 15. 16. 17. *75/11 3 needles 90/14 1 needle No. Part Name 10 Spool net 11 Operation manual 12 Quick reference guide 13 Embroidery foot "Q" (on machine) Embroidery set 4 Cleaning brush 5 Screwdriver (large) 6 Screwdriver (small) 7 Spool cap (large) 8 Spool cap (medium... No. Accessories Included accessories After opening the box, check that the following accessories are included. Part Name 1 Seam ripper 2 Bobbin (4) 3 Needle set (large) 14 H 18cm X W 13 cm (H 7 inches X W 5 inches) 15 Scissors 16 Dust cover 17 Accessory bag ...
...4. 5. 6. 7. 8. 9. 10. 11. 12. 13. 14. 15. 16. 17. *75/11 3 needles 90/14 1 needle No. Part Name 10 Spool net 11 Operation manual 12 Quick reference guide 13 Embroidery foot "Q" (on machine) Embroidery set 4 Cleaning brush 5 Screwdriver (large) 6 Screwdriver (small) 7 Spool cap (large) 8 Spool cap (medium... No. Accessories Included accessories After opening the box, check that the following accessories are included. Part Name 1 Seam ripper 2 Bobbin (4) 3 Needle set (large) 14 H 18cm X W 13 cm (H 7 inches X W 5 inches) 15 Scissors 16 Dust cover 17 Accessory bag ...

Users Manual - English
Page 10
...Embroidery unit Attach the embroidery unit to thread the needle. m Needle threader lever Use the needle threader lever to the machine, and then attach the embroidery frame. Front view a Thread guide plate Pass the thread around the thread guide cover when threading the upper thread. e Top cover Open the top cover to operate the machine... the operation panel, patterns can be selected and edited, and operations for the embroidery unit. n Thread take -up lever. c Spool pin Place a spool of the machine and their functions are described below. f Bobbin winder Use the bobbin winder when...
...Embroidery unit Attach the embroidery unit to thread the needle. m Needle threader lever Use the needle threader lever to the machine, and then attach the embroidery frame. Front view a Thread guide plate Pass the thread around the thread guide cover when threading the upper thread. e Top cover Open the top cover to operate the machine... the operation panel, patterns can be selected and edited, and operations for the embroidery unit. n Thread take -up lever. c Spool pin Place a spool of the machine and their functions are described below. f Bobbin winder Use the bobbin winder when...

Users Manual - English
Page 11
... slot Insert the embroidery card. Memo z Refer to turn the machine on the power supply cord into the bobbin case. e Bobbin cover/bobbin case Remove the bobbin cover, and then insert the bobbin into the power supply jack. d Needle plate cover Remove the needle plate cover to thread the needle. Needle and embroidery foot section Right-side...
... slot Insert the embroidery card. Memo z Refer to turn the machine on the power supply cord into the bobbin case. e Bobbin cover/bobbin case Remove the bobbin cover, and then insert the bobbin into the power supply jack. d Needle plate cover Remove the needle plate cover to thread the needle. Needle and embroidery foot section Right-side...
Users Manual - English
Page 12
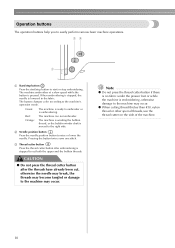
...occur. Note z Do not press the thread cutter button if there is no fabric under the presser foot or while the machine is stopped to cut , otherwise the needle may break, the threads may become tangled or damage to embroider or is lowered in the fabric. z When cutting thread thicker... than #30, nylon thread or other special threads, use the thread cutter on the side of the machine. 10 When embroidering is stopped, the needle is embroidering. c Thread cutter button Press the thread cutter button after the threads have already been cut both the upper and ...
...occur. Note z Do not press the thread cutter button if there is no fabric under the presser foot or while the machine is stopped to cut , otherwise the needle may break, the threads may become tangled or damage to embroider or is lowered in the fabric. z When cutting thread thicker... than #30, nylon thread or other special threads, use the thread cutter on the side of the machine. 10 When embroidering is stopped, the needle is embroidering. c Thread cutter button Press the thread cutter button after the threads have already been cut both the upper and ...
Users Manual - English
Page 13
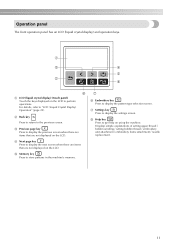
.... Displays simple explanations of setting upper thread / bobbin winding / setting bobbin thread / embroidery unit attachment / embroidery frame attachment / needle replacement. 11 a c d e b h f a LCD (liquid crystal display) (touch panel) Touch the keys displayed on the LCD. g f Embroidery key Press to store patterns in the machine's memory. b Back key Press to return to display the settings screen. d Next...
.... Displays simple explanations of setting upper thread / bobbin winding / setting bobbin thread / embroidery unit attachment / embroidery frame attachment / needle replacement. 11 a c d e b h f a LCD (liquid crystal display) (touch panel) Touch the keys displayed on the LCD. g f Embroidery key Press to store patterns in the machine's memory. b Back key Press to return to display the settings screen. d Next...

Users Manual - English
Page 15
...Embroidery Unit 15 Embroidery unit precautions 15 Attaching the embroidery unit 15 Removing the embroidery unit 16 Turning the Machine On/Off 18 Power supply precautions 18 Turning on the machine 19 Turning off the machine 19 LCD (Liquid Crystal Display) Operation 20 Viewing the LCD 20 Changing the machine settings 21 Checking machine... the upper thread 30 Threading the needle 32 Threading the needle manually (without using the needle threader 34 Replacing the Needle 35 Needle precautions 35 Checking the needle 35 Replacing the needle 36 1 GETTING READY The various preparations...
...Embroidery Unit 15 Embroidery unit precautions 15 Attaching the embroidery unit 15 Removing the embroidery unit 16 Turning the Machine On/Off 18 Power supply precautions 18 Turning on the machine 19 Turning off the machine 19 LCD (Liquid Crystal Display) Operation 20 Viewing the LCD 20 Changing the machine settings 21 Checking machine... the upper thread 30 Threading the needle 32 Threading the needle manually (without using the needle threader 34 Replacing the Needle 35 Needle precautions 35 Checking the needle 35 Replacing the needle 36 1 GETTING READY The various preparations...

Users Manual - English
Page 16
...embroidery are as follows. 1 Attaching the embroidery unit Attach the embroidery unit. (If the embroidery unit is not attached, the machine does not operate.) For details, refer to "Attaching the embroidery unit" (page 15). ↓ 2 Checking the needle Use a needle matched to the fabric, and hoop it in an embroidery...layout" (page 61). ↓ 8 Setting up the embroidery Set up the embroidery thread according to "Replacing the needle" (page 36). ↓ 3 Setting up the bobbin thread For the bobbin thread, wind embroidery bobbin thread and set it in place. frame For ...
...embroidery are as follows. 1 Attaching the embroidery unit Attach the embroidery unit. (If the embroidery unit is not attached, the machine does not operate.) For details, refer to "Attaching the embroidery unit" (page 15). ↓ 2 Checking the needle Use a needle matched to the fabric, and hoop it in an embroidery...layout" (page 61). ↓ 8 Setting up the embroidery Set up the embroidery thread according to "Replacing the needle" (page 36). ↓ 3 Setting up the bobbin thread For the bobbin thread, wind embroidery bobbin thread and set it in place. frame For ...
Users Manual - English
Page 23
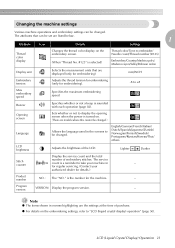
...page 82). The service count is a reminder to +8 Max embroidery speed Specifies the maximum embroidering speed. is selected) Thread color/Time to embroider/ Needle count/Thread number (#123) Embroidery/Country/Madeira poly/ Madeira rayon/Sulky/Robison anton Display unit Selects...Norwegian/Finnish/Swedish/ Portuguese/Russian/Korean/Thai/ others LCD brightness Adjusts the brightness of purchase. Changing the machine settings Various machine operations and embroidery settings can be set are listed below. 1 Attribute Icon Details Settings Thread color display Changes the thread ...
...page 82). The service count is a reminder to +8 Max embroidery speed Specifies the maximum embroidering speed. is selected) Thread color/Time to embroider/ Needle count/Thread number (#123) Embroidery/Country/Madeira poly/ Madeira rayon/Sulky/Robison anton Display unit Selects...Norwegian/Finnish/Swedish/ Portuguese/Russian/Korean/Thai/ others LCD brightness Adjusts the brightness of purchase. Changing the machine settings Various machine operations and embroidery settings can be set are listed below. 1 Attribute Icon Details Settings Thread color display Changes the thread ...
Users Manual - English
Page 25
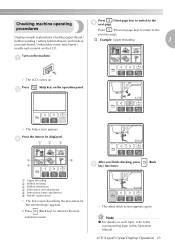
... the previous page. X The help screen appears. Note z For details on the machine. procedures Press (Previous page key) to return to be displayed. X The initial stitch screen appears again. a Upper threading b Bobbin winding c Bobbin installation d Embroidery unit attachment e Embroidery frame attachment f Needle replacement X The first screen describing the procedure for the selected topic appears...
... the previous page. X The help screen appears. Note z For details on the machine. procedures Press (Previous page key) to return to be displayed. X The initial stitch screen appears again. a Upper threading b Bobbin winding c Bobbin installation d Embroidery unit attachment e Embroidery frame attachment f Needle replacement X The first screen describing the procedure for the selected topic appears...
Users Manual - English
Page 27
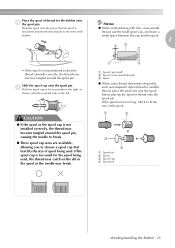
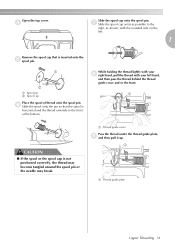
... best fits the size of thread onto the spool pin. Memo z When embroidering with the rounded side on the slit in the spool or the needle may become tangled around the spool pin. Slide the spool cap onto the spool pin. g Slide the spool cap as far as transparent nylon thread... to the front at the bottom. If the spool net is not installed correctly, the thread may become tangled around the spool pin, causing the needle to break. ● Three spool cap sizes are available, allowing you to fit the size of thread for the bobbin onto f the spool pin...
... best fits the size of thread onto the spool pin. Memo z When embroidering with the rounded side on the slit in the spool or the needle may become tangled around the spool pin. Slide the spool cap onto the spool pin. g Slide the spool cap as far as transparent nylon thread... to the front at the bottom. If the spool net is not installed correctly, the thread may become tangled around the spool pin, causing the needle to break. ● Three spool cap sizes are available, allowing you to fit the size of thread for the bobbin onto f the spool pin...
Users Manual - English
Page 29
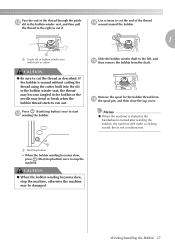
... Start/stop button • When the bobbin winding becomes slow, press (Start/stop button) once to stop the machine. Slide the bobbin winder shaft to the left, and o then remove the bobbin from p the spool pin,... and then close the top cover. this is turned after winding the bobbin, the machine will make a clicking sound; CAUTION ● When the bobbin winding becomes slow, stop button) once to ... to cut the end of the thread through the guide l slit in the bobbin or the needle may be damaged. Remove the spool for the bobbin thread from the shaft. If the bobbin ...
... Start/stop button • When the bobbin winding becomes slow, press (Start/stop button) once to stop the machine. Slide the bobbin winder shaft to the left, and o then remove the bobbin from p the spool pin,... and then close the top cover. this is turned after winding the bobbin, the machine will make a clicking sound; CAUTION ● When the bobbin winding becomes slow, stop button) once to ... to cut the end of the thread through the guide l slit in the bobbin or the needle may be damaged. Remove the spool for the bobbin thread from the shaft. If the bobbin ...
Users Manual - English
Page 30
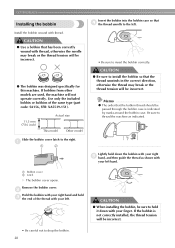
... should be passed through the bobbin case is not correctly installed, the thread tension will be incorrect. ● The bobbin was designed specifically for this machine. b Hold the bobbin with your right hand and hold it down the bobbin with your right e hand, and then guide the thread as indicated. ... the bobbin Insert the bobbin into the bobbin case so that d the thread unrolls to the right. Install the bobbin wound with thread, otherwise the needle may break or the thread tension will be sure to hold c the end of the same type (part code: SA156, SFB: XA5539-151). 11.5 ...
... should be passed through the bobbin case is not correctly installed, the thread tension will be incorrect. ● The bobbin was designed specifically for this machine. b Hold the bobbin with your right hand and hold it down the bobbin with your right e hand, and then guide the thread as indicated. ... the bobbin Insert the bobbin into the bobbin case so that d the thread unrolls to the right. Install the bobbin wound with thread, otherwise the needle may break or the thread tension will be sure to hold c the end of the same type (part code: SA156, SFB: XA5539-151). 11.5 ...
Users Manual - English
Page 32
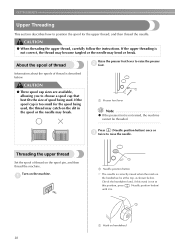
...30 If the upper threading is . (Needle position button) 1 a Mark on the slit in the spool or the needle may bend or break. GETTING READY Upper Threading This section describes how to raise the needle. About the spool of thread on the machine. Check the handwheel and, if this... position, press until it is not correct, the thread may become tangled or the needle may break. CAUTION ● When threading the upper thread...
...30 If the upper threading is . (Needle position button) 1 a Mark on the slit in the spool or the needle may bend or break. GETTING READY Upper Threading This section describes how to raise the needle. About the spool of thread on the machine. Check the handwheel and, if this... position, press until it is not correct, the thread may become tangled or the needle may break. CAUTION ● When threading the upper thread...
Users Manual - English
Page 33
... on the left. 1 Remove the spool cap that the spool is not positioned correctly, the thread may become tangled around the spool pin or the needle may break.
... on the left. 1 Remove the spool cap that the spool is not positioned correctly, the thread may become tangled around the spool pin or the needle may break.
Users Manual - English
Page 34
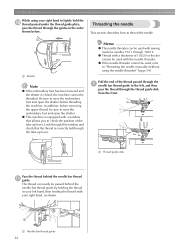
...holding the thread in the order shown below. 1 a Shutter Note z If the embroidery foot has been lowered and the shutter is closed, the machine cannot be used, refer to "Threading the needle manually (without using the needle threader)" (page 34). z Thread with a thickness of 130/20 or thicker ... the left hand, then feeding the thread with sewing machine needles 75/11 through 100/16. Be sure to raise the embroidery foot and open the shutter. Threading the needle This section describes how to thread the needle. z If the needle threader cannot be threaded. Pull the end of the take...
...holding the thread in the order shown below. 1 a Shutter Note z If the embroidery foot has been lowered and the shutter is closed, the machine cannot be used, refer to "Threading the needle manually (without using the needle threader)" (page 34). z Thread with a thickness of 130/20 or thicker ... the left hand, then feeding the thread with sewing machine needles 75/11 through 100/16. Be sure to raise the embroidery foot and open the shutter. Threading the needle This section describes how to thread the needle. z If the needle threader cannot be threaded. Pull the end of the take...
Users Manual - English
Page 35
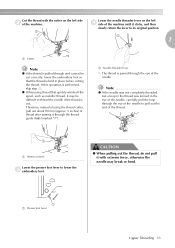
... it with the cutter on the left side b of the machine. Lower the needle threader lever on the left d side of the machine until it clicks, and then slowly return the lever to lower the c embroidery foot. Note z If the needle was not completely threaded, but a loop in the thread was... formed in place before cutting the thread. a Needle threader lever X The thread is performed, skip ...
... it with the cutter on the left side b of the machine. Lower the needle threader lever on the left d side of the machine until it clicks, and then slowly return the lever to lower the c embroidery foot. Note z If the needle was not completely threaded, but a loop in the thread was... formed in place before cutting the thread. a Needle threader lever X The thread is performed, skip ...
Users Manual - English
Page 36
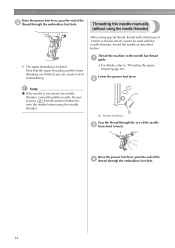
... embroidery foot hole. 34 When using special thread, thread with the needle threader, thread the needle as described below. Raise the presser foot lever, pass the end of the needle c from front to raise the needle before using the needle threader) X The upper threading is not raised, the needle threader cannot thread the needle. Thread the machine to the needle...
... embroidery foot hole. 34 When using special thread, thread with the needle threader, thread the needle as described below. Raise the presser foot lever, pass the end of the needle c from front to raise the needle before using the needle threader) X The upper threading is not raised, the needle threader cannot thread the needle. Thread the machine to the needle...


