

Users Manual - English
Page 6
... runs out partway through a design...65 Stopping while embroidering ...66 Bobbin Case Adjustment 68 Correct tension...68 Bobbin thread is loose...68 Bobbin thread is tight ...68 APPENDIX 69 Care and Maintenance ...70 Cleaning the machine surface ...70 Cleaning the race ...70 Attaching the Embroidery Foot 72 Attaching the embroidery Foot "Q" ...72 Troubleshooting ...74...
... runs out partway through a design...65 Stopping while embroidering ...66 Bobbin Case Adjustment 68 Correct tension...68 Bobbin thread is loose...68 Bobbin thread is tight ...68 APPENDIX 69 Care and Maintenance ...70 Cleaning the machine surface ...70 Cleaning the race ...70 Attaching the Embroidery Foot 72 Attaching the embroidery Foot "Q" ...72 Troubleshooting ...74...

Users Manual - English
Page 7
...embroidery patterns, characters, framed decorations, and designs from optional embroidery cards (page 39). 5 d Embroidery You can start embroiderying without pulling up the bobbin thread (page 28). Introduction Thank you have finished reading this manual, store it where it can quickly be accessed for future reference. Machine... bobbin can be wound with thread (page 24). Before using the machine, carefully read the "IMPORTANT SAFETY INSTRUCTIONS", and then study this manual for purchasing this embroidery machine. c Automatic thread cutting The thread can quickly and easily be cut...
...embroidery patterns, characters, framed decorations, and designs from optional embroidery cards (page 39). 5 d Embroidery You can start embroiderying without pulling up the bobbin thread (page 28). Introduction Thank you have finished reading this manual, store it where it can quickly be accessed for future reference. Machine... bobbin can be wound with thread (page 24). Before using the machine, carefully read the "IMPORTANT SAFETY INSTRUCTIONS", and then study this manual for purchasing this embroidery machine. c Automatic thread cutting The thread can quickly and easily be cut...
Users Manual - English
Page 26
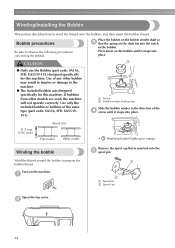
... it snaps into place. 1 ● Only use the Bobbin (part code: SA156, SFB: XA5539-151) designed specifically for this machine. a Remove the spool cap that the spring on the machine. If bobbins from other bobbin may result in injuries or damage to observe the following precautions concerning the bobbin... SA156, SFB: XA5539151). 2 a Notch b Bobbin winder shaft spring Slide the bobbin winder in the direction of any other models are used, the machine will not operate correctly. Bobbin precautions Be sure to the machine. ● The included bobbin was designed specifically for this...
... it snaps into place. 1 ● Only use the Bobbin (part code: SA156, SFB: XA5539-151) designed specifically for this machine. a Remove the spool cap that the spring on the machine. If bobbins from other bobbin may result in injuries or damage to observe the following precautions concerning the bobbin... SA156, SFB: XA5539151). 2 a Notch b Bobbin winder shaft spring Slide the bobbin winder in the direction of any other models are used, the machine will not operate correctly. Bobbin precautions Be sure to the machine. ● The included bobbin was designed specifically for this...
Users Manual - English
Page 30
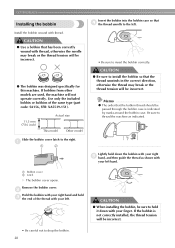
... right e hand, and then guide the thread as indicated. If bobbins from other models are used, the machine will be incorrect. Use only the included bobbin or bobbins of the thread with your left. CAUTION ●...is not correctly installed, the thread tension will be incorrect. • Be careful not to thread the machine as shown with your right hand and hold down with thread, otherwise the needle may break or the ... the thread tension will be incorrect. ● The bobbin was designed specifically for this machine. Remove the bobbin cover. b Hold the bobbin with thread.
... right e hand, and then guide the thread as indicated. If bobbins from other models are used, the machine will be incorrect. Use only the included bobbin or bobbins of the thread with your left. CAUTION ●...is not correctly installed, the thread tension will be incorrect. • Be careful not to thread the machine as shown with your right hand and hold down with thread, otherwise the needle may break or the ... the thread tension will be incorrect. ● The bobbin was designed specifically for this machine. Remove the bobbin cover. b Hold the bobbin with thread.
Users Manual - English
Page 41
... pattern 54 Using an embroidery card (sold separately 55 Embroidering 56 Embroidering attractive finishes .....56 Embroidering a pattern 57 Appliquéing 59 Editing and Saving Patterns 61 Adjusting the layout 61 Storing patterns 63 Adjusting the thread tension...........64 Resewing 65 Thread runs out partway through a design 65 Stopping while embroidering .........66...
... pattern 54 Using an embroidery card (sold separately 55 Embroidering 56 Embroidering attractive finishes .....56 Embroidering a pattern 57 Appliquéing 59 Editing and Saving Patterns 61 Adjusting the layout 61 Storing patterns 63 Adjusting the thread tension...........64 Resewing 65 Thread runs out partway through a design 65 Stopping while embroidering .........66...

Users Manual - English
Page 42
... with a nap like towels. For details, refer to raise the needle. Note z Always use stabilizer for embroidery machines. Note z For good quality embroidery designs be embroidered. z Before starting to embroider, be sure there is space between the embroidery foot and the fabric, the fabric can be sure to "Optional accessories" (page 7). The needle may result...
... with a nap like towels. For details, refer to raise the needle. Note z Always use stabilizer for embroidery machines. Note z For good quality embroidery designs be embroidered. z Before starting to embroider, be sure there is space between the embroidery foot and the fabric, the fabric can be sure to "Optional accessories" (page 7). The needle may result...
Users Manual - English
Page 44
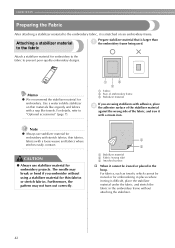
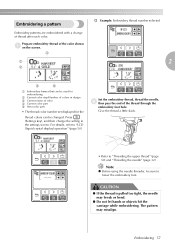
... material for embroidery to the fabric to prevent poor quality embroidery designs. Memo z We recommend the stabilizer material for embroidery with stretch fabrics, thin fabrics, fabrics with a loose weave and fabrics where stitches easily contract. CAUTION ● Always use stabilizer material for embroidery. Furthermore, ...the wrong side of the fabric, and iron it with a nap like towels. Use a water soluble stabilizer on an embroidery frame. Attaching a stabilizer material to the fabric Prepare stabilizer material that is stretched on thin materials like organdy and fabrics ...
... material for embroidery to the fabric to prevent poor quality embroidery designs. Memo z We recommend the stabilizer material for embroidery with stretch fabrics, thin fabrics, fabrics with a loose weave and fabrics where stitches easily contract. CAUTION ● Always use stabilizer material for embroidery. Furthermore, ...the wrong side of the fabric, and iron it with a nap like towels. Use a water soluble stabilizer on an embroidery frame. Attaching a stabilizer material to the fabric Prepare stabilizer material that is stretched on thin materials like organdy and fabrics ...
Users Manual - English
Page 59
... is pulled too tight, the needle may misalign. Embroidering 57 Embroidering a pattern † Example: Embroidery thread number selected Embroidery patterns are embroidered with a change the setting in design c Current name of the color shown a on the screen. Prepare embroidery thread of color d Current color part e Next color part • The thread color number set...
... is pulled too tight, the needle may misalign. Embroidering 57 Embroidering a pattern † Example: Embroidery thread number selected Embroidery patterns are embroidered with a change the setting in design c Current name of the color shown a on the screen. Prepare embroidery thread of color d Current color part e Next color part • The thread color number set...
Users Manual - English
Page 67
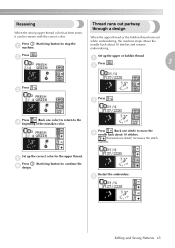
...thread color has been sewn, it can be resewn with the correct color. Thread runs out partway through a design When the upper thread or the bobbin thread runs out while embroidering, the machine stops. a Press . 2 b Press . Set up the upper or bobbin thread. e Editing and ...Saving Patterns 65 b Set up the correct color for the upper thread. e Press (Start/stop the a machine. Restart the embroidery. Press . Press (Back one stitch) to move the d needle back about 10 stitches and resume embroidering. c Press . c Press (Back ...
...thread color has been sewn, it can be resewn with the correct color. Thread runs out partway through a design When the upper thread or the bobbin thread runs out while embroidering, the machine stops. a Press . 2 b Press . Set up the upper or bobbin thread. e Editing and ...Saving Patterns 65 b Set up the correct color for the upper thread. e Press (Start/stop the a machine. Restart the embroidery. Press . Press (Back one stitch) to move the d needle back about 10 stitches and resume embroidering. c Press . c Press (Back ...
Users Manual - English
Page 76
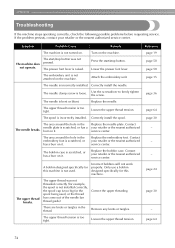
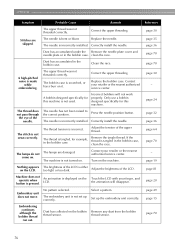
...lever is bent or blunt. Loosen the upper thread tension. A bobbin designed specifically for the spool being used . The start /stop button was not threaded correctly (for this machine is not attached on it . The embroidery unit is not used , or the thread has come out of the ... The area around the hole in the embroidery foot is incorrectly installed. The area around the hole in the thread. Turn on it . The spool is scratched, or has a burr on the machine. Replace the bobbin case. Only use a bobbin designed specifically for example, the spool is not...
...lever is bent or blunt. Loosen the upper thread tension. A bobbin designed specifically for the spool being used . The start /stop button was not threaded correctly (for this machine is not attached on it . The embroidery unit is not used , or the thread has come out of the ... The area around the hole in the embroidery foot is incorrectly installed. The area around the hole in the thread. Turn on it . The spool is scratched, or has a burr on the machine. Replace the bobbin case. Only use a bobbin designed specifically for example, the spool is not...
Users Manual - English
Page 77
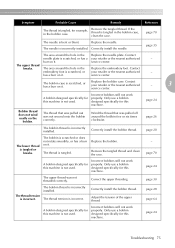
...page 24 The upper thread was pulled off around the hole in the Replace the embroidery foot. The bobbin thread is incorrect. Only use a bobbin designed specifically for this machine. Contact needle plate is scratched, or your retailer or the nearest authorized - The ...burr on it . Incorrect bobbins will not work properly. Only use a bobbin designed specifically for this machine. page 30 The thread tension is incorrectly installed. Correctly install the bobbin thread. Contact embroidery foot is scratched, or has a your retailer or the nearest authorized - ...
...page 24 The upper thread was pulled off around the hole in the Replace the embroidery foot. The bobbin thread is incorrect. Only use a bobbin designed specifically for this machine. Contact needle plate is scratched, or your retailer or the nearest authorized - The ...burr on it . Incorrect bobbins will not work properly. Only use a bobbin designed specifically for this machine. page 30 The thread tension is incorrectly installed. Correctly install the bobbin thread. Contact embroidery foot is scratched, or has a your retailer or the nearest authorized - ...
Users Manual - English
Page 78
...or has a burr on . Correct the upper threading. Only use a bobbin designed specifically for this machine is not turned on it. The stitch is incorrectly installed. Remove the tangle thread. The machine is not used. No pattern selected. page 24 page 32 page 36 page 64... with your finger, and the animation will not work properly. Embroidery unit does not move. Replace the needle. A bobbin designed specifically for example, in the bobbin case, clean the race. Turn on the machine. Embroidering continues although the bobbin thread ran out. Reference page 30...
...or has a burr on . Correct the upper threading. Only use a bobbin designed specifically for this machine is not turned on it. The stitch is incorrectly installed. Remove the tangle thread. The machine is not used. No pattern selected. page 24 page 32 page 36 page 64... with your finger, and the animation will not work properly. Embroidery unit does not move. Replace the needle. A bobbin designed specifically for example, in the bobbin case, clean the race. Turn on the machine. Embroidering continues although the bobbin thread ran out. Reference page 30...
USB GUIDE - Multi
Page 3
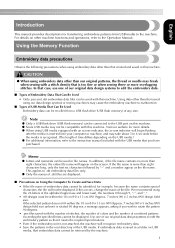
... the embroidery machine to the instruction manual included with the number of stitches, the number of colors and the number of combined patterns exceeding the specified limits cannot be compatible with a stitch density that case, use one of our original data design systems to .dst embroidery data files... only. z When using USB media equipped with this machine. If embroidery data is too fine or when sewing three or more than eight characters long, only...
... the embroidery machine to the instruction manual included with the number of stitches, the number of colors and the number of combined patterns exceeding the specified limits cannot be compatible with a stitch density that case, use one of our original data design systems to .dst embroidery data files... only. z When using USB media equipped with this machine. If embroidery data is too fine or when sewing three or more than eight characters long, only...
USB GUIDE - Multi
Page 4
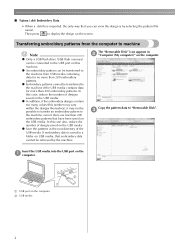
... on USB media, that have been saved on this number may vary within the designs themselves), it may not be possible to transfer an embroidery pattern to the machine, even if there are less than 200 embroidery patterns. ■ Tajima (.dst) Embroidery Data • When a .dst file is imported, the only way that you can...
... on USB media, that have been saved on this number may vary within the designs themselves), it may not be possible to transfer an embroidery pattern to the machine, even if there are less than 200 embroidery patterns. ■ Tajima (.dst) Embroidery Data • When a .dst file is imported, the only way that you can...
USB GUIDE - Multi
Page 5
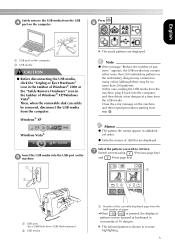
...Select the pattern you wish to retrieve. X The saved patterns are displayed. appears, the USB media may contain either more than 200 embroidery patterns or the embroidery designs may contain too many colors (although there may be removed, disconnect the USB media from step e. Memo z The pattern file names appear...moves forward or backward in the taskbar of the currently displayed page from the USB media. In this case, unplug the USB media from the machine, plug it back into the USB port on the computer. Note z If the message "Reduce the number of pages •When / ...
...Select the pattern you wish to retrieve. X The saved patterns are displayed. appears, the USB media may contain either more than 200 embroidery patterns or the embroidery designs may contain too many colors (although there may be removed, disconnect the USB media from step e. Memo z The pattern file names appear...moves forward or backward in the taskbar of the currently displayed page from the USB media. In this case, unplug the USB media from the machine, plug it back into the USB port on the computer. Note z If the message "Reduce the number of pages •When / ...


