
Users Manual - English
Page 2
... INSTRUCTIONS Please read these safety instructions before attempting to turn it off , then grasp the plug and pull it could cause the needle to persons. 2 Always unplug the machine from the build up of lint, dust, and loose cloth. • Do not use an extension cord. • Always ..., if it has been dropped or damaged, or water is required when embroidering: • Always pay close attention to the needle. To reduce the risk of the machine free from the electrical outlet when removing covers, lubricating, or when making any adjustments mentioned in the instruction manual. • ...
... INSTRUCTIONS Please read these safety instructions before attempting to turn it off , then grasp the plug and pull it could cause the needle to persons. 2 Always unplug the machine from the build up of lint, dust, and loose cloth. • Do not use an extension cord. • Always ..., if it has been dropped or damaged, or water is required when embroidering: • Always pay close attention to the needle. To reduce the risk of the machine free from the electrical outlet when removing covers, lubricating, or when making any adjustments mentioned in the instruction manual. • ...
Users Manual - English
Page 3
For additional product information and updates, visit our web site at www.brother.com SAVE THESE INSTRUCTIONS This machine is intended for its intended use or store the machine near a space heater, iron, halogen lamp, or other parts to assure correct installation. 8 For repair or ...local authorized Brother dealer. Use this product are subject to change without notice. 6 This machine is not a toy: • Your close attention is necessary when the machine is used . • Always consult the operation manual when replacing or installing any assemblies, the presser feet, needle, or...
For additional product information and updates, visit our web site at www.brother.com SAVE THESE INSTRUCTIONS This machine is intended for its intended use or store the machine near a space heater, iron, halogen lamp, or other parts to assure correct installation. 8 For repair or ...local authorized Brother dealer. Use this product are subject to change without notice. 6 This machine is not a toy: • Your close attention is necessary when the machine is used . • Always consult the operation manual when replacing or installing any assemblies, the presser feet, needle, or...

Users Manual - English
Page 5
... accessories ...7 Names of Machine Parts and Their Functions 8 Front view ...8 Needle and embroidery foot section ...9 Right-side/rear view ...9 Operation buttons ...10 Operation panel ...11 GETTING READY 13 Embroidery Step by Step 14 Attaching the Embroidery Unit 15 Embroidery unit precautions ...15 Attaching the embroidery unit ...15 Removing the embroidery unit ...16 Turning the Machine On/Off 18 Power...
... accessories ...7 Names of Machine Parts and Their Functions 8 Front view ...8 Needle and embroidery foot section ...9 Right-side/rear view ...9 Operation buttons ...10 Operation panel ...11 GETTING READY 13 Embroidery Step by Step 14 Attaching the Embroidery Unit 15 Embroidery unit precautions ...15 Attaching the embroidery unit ...15 Removing the embroidery unit ...16 Turning the Machine On/Off 18 Power...
Users Manual - English
Page 8
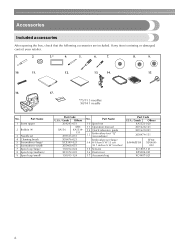
Part Name 10 Spool net 11 Operation manual 12 Quick reference guide 13 Embroidery foot "Q" (on machine) Embroidery set 4 Cleaning brush 5 Screwdriver (large) 6 Screwdriver (small) 7 Spool cap (large) 8 Spool cap (medium) 9 Spool cap (small) Part Code U.S.A. ... damaged, contact your retailer. 1. 2. 3.* 4. 5. 6. 7. 8. 9. 10. 11. 12. 13. 14. 15. 16. 17. *75/11 3 needles 90/14 1 needle No. Part Name 1 Seam ripper 2 Bobbin (4) 3 Needle set (large) 14 H 18cm X W 13 cm (H 7 inches X W 5 inches) 15 Scissors 16 Dust cover 17 Accessory bag Part Code U.S.A. / Canada...
Part Name 10 Spool net 11 Operation manual 12 Quick reference guide 13 Embroidery foot "Q" (on machine) Embroidery set 4 Cleaning brush 5 Screwdriver (large) 6 Screwdriver (small) 7 Spool cap (large) 8 Spool cap (medium) 9 Spool cap (small) Part Code U.S.A. ... damaged, contact your retailer. 1. 2. 3.* 4. 5. 6. 7. 8. 9. 10. 11. 12. 13. 14. 15. 16. 17. *75/11 3 needles 90/14 1 needle No. Part Name 1 Seam ripper 2 Bobbin (4) 3 Needle set (large) 14 H 18cm X W 13 cm (H 7 inches X W 5 inches) 15 Scissors 16 Dust cover 17 Accessory bag Part Code U.S.A. / Canada...

Users Manual - English
Page 10
... Attach the embroidery unit to thread the needle. d Bobbin winding thread guide Pass the thread around the thread guide cover when threading the upper thread. f Bobbin winder Use the bobbin winder when winding the bobbin. Names of Machine Parts and Their Functions The names of the ... panel From the operation panel, patterns can be selected and edited, and operations for the embroidery unit. m Needle threader lever Use the needle threader lever to the machine, and then attach the embroidery frame. c Spool pin Place a spool of thread on the spool pin. i Presser foot lever Raise and...
... Attach the embroidery unit to thread the needle. d Bobbin winding thread guide Pass the thread around the thread guide cover when threading the upper thread. f Bobbin winder Use the bobbin winder when winding the bobbin. Names of Machine Parts and Their Functions The names of the ... panel From the operation panel, patterns can be selected and edited, and operations for the embroidery unit. m Needle threader lever Use the needle threader lever to the machine, and then attach the embroidery frame. c Spool pin Place a spool of thread on the spool pin. i Presser foot lever Raise and...

Users Manual - English
Page 11
... bobbin case. e Power supply jack Insert the plug on and off. c Needle plate When the needle is used . Memo z Refer to pages 8 through the needle bar thread guide. c Embroidery card slot Insert the embroidery card. Do not cover the air vent while the machine is being used for embroidering. b Handwheel Turn the handwheel toward you are...
... bobbin case. e Power supply jack Insert the plug on and off. c Needle plate When the needle is used . Memo z Refer to pages 8 through the needle bar thread guide. c Embroidery card slot Insert the embroidery card. Do not cover the air vent while the machine is being used for embroidering. b Handwheel Turn the handwheel toward you are...
Users Manual - English
Page 12
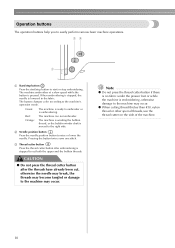
... bobbin threads. Operation buttons The operation buttons help you to start /stop button to easily perform various basic machine operations. b Needle position button Press the needle position button to the machine's operation mode. Note z Do not press the thread cutter button if there is no fabric under the... thread thicker than #30, nylon thread or other special threads, use the thread cutter on the side of the machine. 10 When embroidering is stopped, the needle is pressed. Orange: The machine is winding the bobbin thread, or the bobbin winder shaft is stopped to cut , otherwise the...
... bobbin threads. Operation buttons The operation buttons help you to start /stop button to easily perform various basic machine operations. b Needle position button Press the needle position button to the machine's operation mode. Note z Do not press the thread cutter button if there is no fabric under the... thread thicker than #30, nylon thread or other special threads, use the thread cutter on the side of the machine. 10 When embroidering is stopped, the needle is pressed. Orange: The machine is winding the bobbin thread, or the bobbin winder shaft is stopped to cut , otherwise the...
Users Manual - English
Page 13
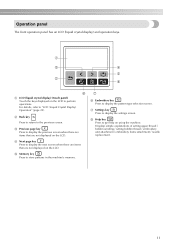
... type selection screen. d Next page key Press to display the next screen when there are items that are not displayed on using the machine. g f Embroidery key Press to display the settings screen. For details, refer to perform operations. a c d e b h f a LCD (liquid... LCD. c Previous page key Press to store patterns in the machine's memory. Displays simple explanations of setting upper thread / bobbin winding / setting bobbin thread / embroidery unit attachment / embroidery frame attachment / needle replacement. 11 Operation panel The front operation panel has an LCD...
... type selection screen. d Next page key Press to display the next screen when there are items that are not displayed on using the machine. g f Embroidery key Press to display the settings screen. For details, refer to perform operations. a c d e b h f a LCD (liquid... LCD. c Previous page key Press to store patterns in the machine's memory. Displays simple explanations of setting upper thread / bobbin winding / setting bobbin thread / embroidery unit attachment / embroidery frame attachment / needle replacement. 11 Operation panel The front operation panel has an LCD...

Users Manual - English
Page 15
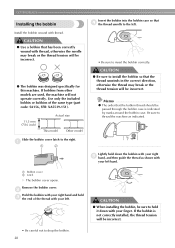
...Embroidery Unit 15 Embroidery unit precautions 15 Attaching the embroidery unit 15 Removing the embroidery unit 16 Turning the Machine On/Off 18 Power supply precautions 18 Turning on the machine 19 Turning off the machine 19 LCD (Liquid Crystal Display) Operation 20 Viewing the LCD 20 Changing the machine settings 21 Checking machine... the upper thread 30 Threading the needle 32 Threading the needle manually (without using the needle threader 34 Replacing the Needle 35 Needle precautions 35 Checking the needle 35 Replacing the needle 36 1 GETTING READY The various preparations...
...Embroidery Unit 15 Embroidery unit precautions 15 Attaching the embroidery unit 15 Removing the embroidery unit 16 Turning the Machine On/Off 18 Power supply precautions 18 Turning on the machine 19 Turning off the machine 19 LCD (Liquid Crystal Display) Operation 20 Viewing the LCD 20 Changing the machine settings 21 Checking machine... the upper thread 30 Threading the needle 32 Threading the needle manually (without using the needle threader 34 Replacing the Needle 35 Needle precautions 35 Checking the needle 35 Replacing the needle 36 1 GETTING READY The various preparations...

Users Manual - English
Page 16
... by Step The basic steps for embroidery are as follows. 1 Attaching the embroidery unit Attach the embroidery unit. (If the embroidery unit is not attached, the machine does not operate.) For details, refer to "Attaching the embroidery unit" (page 15). ↓ 2 Checking the needle Use a needle matched to "Attaching the Embroidery Frame" (page 47). ↓ 6 Selecting a pattern Select an...
... by Step The basic steps for embroidery are as follows. 1 Attaching the embroidery unit Attach the embroidery unit. (If the embroidery unit is not attached, the machine does not operate.) For details, refer to "Attaching the embroidery unit" (page 15). ↓ 2 Checking the needle Use a needle matched to "Attaching the Embroidery Frame" (page 47). ↓ 6 Selecting a pattern Select an...
Users Manual - English
Page 23
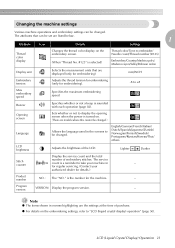
...are the settings at the time of purchase. z For details on the embroidery screen. (When "Thread No. #123" is a reminder to embroider/ Needle count/Thread number (#123) Embroidery/Country/Madeira poly/ Madeira rayon/Sulky/Robison anton Display unit Selects the .../Swedish/ Portuguese/Russian/Korean/Thai/ others LCD brightness Adjusts the brightness of embroidery stitches. Changing the machine settings Various machine operations and embroidery settings can be changed . mm/INCH Embroidery tension Adjusts the thread tension for embroidering (only for embroidering). is sounded...
...are the settings at the time of purchase. z For details on the embroidery screen. (When "Thread No. #123" is a reminder to embroider/ Needle count/Thread number (#123) Embroidery/Country/Madeira poly/ Madeira rayon/Sulky/Robison anton Display unit Selects the .../Swedish/ Portuguese/Russian/Korean/Thai/ others LCD brightness Adjusts the brightness of embroidery stitches. Changing the machine settings Various machine operations and embroidery settings can be changed . mm/INCH Embroidery tension Adjusts the thread tension for embroidering (only for embroidering). is sounded...
Users Manual - English
Page 25
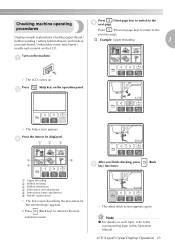
... to the previous page. Displays simple explanations of setting upper thread / bobbin winding / setting bobbin thread / embroidery † Example: Upper threading 1 unit attachment / embroidery frame attachment / needle replacement on . X The initial stitch screen appears again. Checking machine operating Press (Next page key) to switch to the item selection screen. a X The LCD comes on the...
... to the previous page. Displays simple explanations of setting upper thread / bobbin winding / setting bobbin thread / embroidery † Example: Upper threading 1 unit attachment / embroidery frame attachment / needle replacement on . X The initial stitch screen appears again. Checking machine operating Press (Next page key) to switch to the item selection screen. a X The LCD comes on the...
Users Manual - English
Page 27
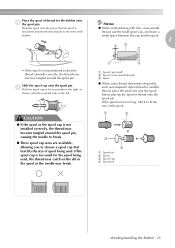
... thread may catch on the left. Memo z When embroidering with the rounded side on the slit in the spool or the needle may become tangled around the spool pin, causing the needle to break. ● Three spool cap sizes are available, allowing you to fit the size of spool being used . Slide...
... thread may catch on the left. Memo z When embroidering with the rounded side on the slit in the spool or the needle may become tangled around the spool pin, causing the needle to break. ● Three spool cap sizes are available, allowing you to fit the size of spool being used . Slide...
Users Manual - English
Page 29
... built into the slit in the bobbin winder seat, the thread may become tangled in the bobbin or the needle may be damaged. If the bobbin is turned after winding the bobbin, the machine will make a clicking sound; Slide the bobbin winder shaft to stop button) once to the left, and ... Bobbin 27 CAUTION ● When the bobbin winding becomes slow, stop button) once to start m winding the bobbin. Press (Start/stop the machine, otherwise the machine may bend or break when the bobbin thread starts to run out. Remove the spool for the bobbin thread from the shaft. Use scissors...
... built into the slit in the bobbin winder seat, the thread may become tangled in the bobbin or the needle may be damaged. If the bobbin is turned after winding the bobbin, the machine will make a clicking sound; Slide the bobbin winder shaft to stop button) once to the left, and ... Bobbin 27 CAUTION ● When the bobbin winding becomes slow, stop button) once to start m winding the bobbin. Press (Start/stop the machine, otherwise the machine may bend or break when the bobbin thread starts to run out. Remove the spool for the bobbin thread from the shaft. Use scissors...
Users Manual - English
Page 30
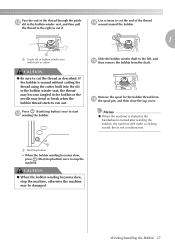
...installing the bobbin, be sure to install the bobbin so that the bobbin thread should be incorrect. ● The bobbin was designed specifically for this machine. CAUTION ● Use a bobbin that has been correctly wound with your right e hand, and then guide the thread as indicated. a 1... hold it down the bobbin with your finger. If bobbins from other models are used, the machine will be incorrect. CAUTION ● Be sure to hold down with thread, otherwise the needle may break or the thread tension will be passed through the bobbin case is not correctly installed,...
...installing the bobbin, be sure to install the bobbin so that the bobbin thread should be incorrect. ● The bobbin was designed specifically for this machine. CAUTION ● Use a bobbin that has been correctly wound with your right e hand, and then guide the thread as indicated. a 1... hold it down the bobbin with your finger. If bobbins from other models are used, the machine will be incorrect. CAUTION ● Be sure to hold down with thread, otherwise the needle may break or the thread tension will be passed through the bobbin case is not correctly installed,...
Users Manual - English
Page 32
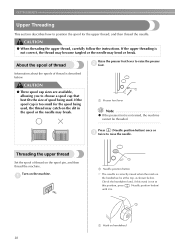
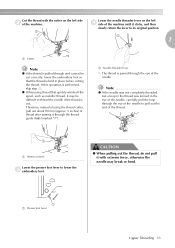
...the thread may catch on the slit in the spool or the needle may bend or break. GETTING READY Upper Threading This section describes how to raise the needle. Turn on the spool pin, and then thread the machine. About the spool of thread Raise the presser foot lever to choose... lever Note z If the presser foot is not correct, the thread may become tangled or the needle may break. CAUTION ● When threading the upper thread, carefully follow the instructions. If the upper threading is not raised, the machine cannot be threaded. Information about the spools of thread on the...
...the thread may catch on the slit in the spool or the needle may bend or break. GETTING READY Upper Threading This section describes how to raise the needle. Turn on the spool pin, and then thread the machine. About the spool of thread Raise the presser foot lever to choose... lever Note z If the presser foot is not correct, the thread may become tangled or the needle may break. CAUTION ● When threading the upper thread, carefully follow the instructions. If the upper threading is not raised, the machine cannot be threaded. Information about the spools of thread on the...
Users Manual - English
Page 33
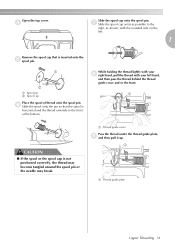
... on the left. 1 Remove the spool cap that the spool is not positioned correctly, the thread may become tangled around the spool pin or the needle may break. g Slide the spool cap as far as possible to the front at the bottom. d Slide the spool cap onto the spool pin. a Thread...
... on the left. 1 Remove the spool cap that the spool is not positioned correctly, the thread may become tangled around the spool pin or the needle may break. g Slide the spool cap as far as possible to the front at the bottom. d Slide the spool cap onto the spool pin. a Thread...
Users Manual - English
Page 34
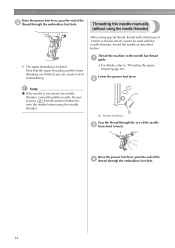
... your left hand, then feeding the thread with sewing machine needles 75/11 through this window and check that allows you to check the position of 130/20 or thicker cannot be threaded. Be sure to raise the embroidery foot and open the shutter before removing the upper thread..., be used with your right hand to thread the needle. z This machine is equipped with the needle threader. Look through 100/16. Memo z The needle threader can easily be used with a window ...
... your left hand, then feeding the thread with sewing machine needles 75/11 through this window and check that allows you to check the position of 130/20 or thicker cannot be threaded. Be sure to raise the embroidery foot and open the shutter before removing the upper thread..., be used with your right hand to thread the needle. z This machine is equipped with the needle threader. Look through 100/16. Memo z The needle threader can easily be used with a window ...
Users Manual - English
Page 35
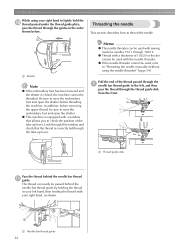
... thread. Cut the thread with extreme force, otherwise the needle may be difficult to thread the needle if the thread is cut correctly, lower the embroidery foot so that the thread is pulled through the eye of the needle to lower the c embroidery foot. z When using the thread cutter, pull out ...about 80 mm (approx. 3 inches) of thread after passing it with the cutter on the left side b of the needle. Lower the needle threader lever on the left d side of the machine until it may ...
... thread. Cut the thread with extreme force, otherwise the needle may be difficult to thread the needle if the thread is cut correctly, lower the embroidery foot so that the thread is pulled through the eye of the needle to lower the c embroidery foot. z When using the thread cutter, pull out ...about 80 mm (approx. 3 inches) of thread after passing it with the cutter on the left side b of the needle. Lower the needle threader lever on the left d side of the machine until it may ...
Users Manual - English
Page 36
...the upper thread" (page 30). Thread the machine to the needle bar thread a guide. • For details, refer to start embroidering. When using the needle threader. 1 a Pressor foot lever Pass the thread through the embroidery foot hole. 34 Be sure to press (Needle position button) to back. Raise the presser ...foot lever, pass the end of the d thread through the eye of the needle c from front to raise the needle before using special thread, thread with a thickness of the e thread through the embroidery foot hole. GETTING READY Raise the presser foot lever, pass the end of 130...
...the upper thread" (page 30). Thread the machine to the needle bar thread a guide. • For details, refer to start embroidering. When using the needle threader. 1 a Pressor foot lever Pass the thread through the embroidery foot hole. 34 Be sure to press (Needle position button) to back. Raise the presser ...foot lever, pass the end of the d thread through the eye of the needle c from front to raise the needle before using special thread, thread with a thickness of the e thread through the embroidery foot hole. GETTING READY Raise the presser foot lever, pass the end of 130...


