
Users Manual - English
Page 2
...incorrect needle plate, as it could cause the needle to break. • Do not push or pull the fabric when embroidering. Plug the machine directly into the electrical outlet. • Never drop or insert any object into the electrical outlet. IMPORTANT SAFETY INSTRUCTIONS Please read these safety ... attempting to use bent or damaged needles. • Keep fingers away from all moving parts. Do not use an extension cord. • Always unplug your work area clear: • Never operate the machine with any adjustments in the needle area. • Do not use extension cords. Return...
...incorrect needle plate, as it could cause the needle to break. • Do not push or pull the fabric when embroidering. Plug the machine directly into the electrical outlet. • Never drop or insert any object into the electrical outlet. IMPORTANT SAFETY INSTRUCTIONS Please read these safety ... attempting to use bent or damaged needles. • Keep fingers away from all moving parts. Do not use an extension cord. • Always unplug your work area clear: • Never operate the machine with any adjustments in the needle area. • Do not use extension cords. Return...
Users Manual - English
Page 3
...Brother dealer. Use accessories recommended by the manufacturer as described in the manual. Benzene, thinner, and scouring powders can damage the case and machine, and should never be replaced by or near children. • Do not use or store the machine near a space heater, iron, halogen lamp, or other parts... information and updates, visit our web site at www.brother.com SAVE THESE INSTRUCTIONS This machine is intended for its intended use . 1 6 This machine is not a toy: • Your close attention is necessary when the machine is used . • Always consult the operation manual...
...Brother dealer. Use accessories recommended by the manufacturer as described in the manual. Benzene, thinner, and scouring powders can damage the case and machine, and should never be replaced by or near children. • Do not use or store the machine near a space heater, iron, halogen lamp, or other parts... information and updates, visit our web site at www.brother.com SAVE THESE INSTRUCTIONS This machine is intended for its intended use . 1 6 This machine is not a toy: • Your close attention is necessary when the machine is used . • Always consult the operation manual...

Users Manual - English
Page 5
... accessories ...7 Names of Machine Parts and Their Functions 8 Front view ...8 Needle and embroidery foot section ...9 Right-side/rear view ...9 Operation buttons ...10 Operation panel ...11 GETTING READY 13 Embroidery Step by Step 14 Attaching the Embroidery Unit 15 Embroidery unit precautions ...15 Attaching the embroidery unit ...15 Removing the embroidery unit ...16 Turning the Machine On/Off 18 Power...
... accessories ...7 Names of Machine Parts and Their Functions 8 Front view ...8 Needle and embroidery foot section ...9 Right-side/rear view ...9 Operation buttons ...10 Operation panel ...11 GETTING READY 13 Embroidery Step by Step 14 Attaching the Embroidery Unit 15 Embroidery unit precautions ...15 Attaching the embroidery unit ...15 Removing the embroidery unit ...16 Turning the Machine On/Off 18 Power...
Users Manual - English
Page 8
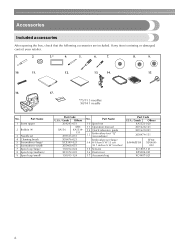
...No. Accessories Included accessories After opening the box, check that the following accessories are included. Part Name 10 Spool net 11 Operation manual 12 Quick reference guide 13 Embroidery foot "Q" (on machine) Embroidery set 4 Cleaning brush 5 Screwdriver (large) 6 Screwdriver (small) 7 Spool cap (...large) 8 Spool cap (medium) 9 Spool cap (small) Part Code U.S.A. / Canada Others X54243-051 SA156 ...
...No. Accessories Included accessories After opening the box, check that the following accessories are included. Part Name 10 Spool net 11 Operation manual 12 Quick reference guide 13 Embroidery foot "Q" (on machine) Embroidery set 4 Cleaning brush 5 Screwdriver (large) 6 Screwdriver (small) 7 Spool cap (...large) 8 Spool cap (medium) 9 Spool cap (small) Part Code U.S.A. / Canada Others X54243-051 SA156 ...
Users Manual - English
Page 9
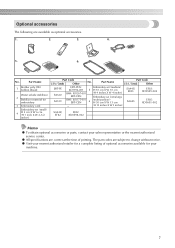
... X W 10 cm BM4: X81267-001 (H 4 inches X W 4 inches) EBT-CEN Embroidery set (small) 4 H 2 cm X W 6 cm (H 1 inch X W 2-1/2 inches) Part Code U.S.A. / Canada Other No. Part Name 1 Brother poly #90 bobbin thread Water solude stabilizer 2 Stabilizer material for a complete listing of printing. z Visit your nearest authorized retailer for embroidery 3 Embroidery card Embroidery set (extra large BM3: X81175-001 EBT-CEN 6 (multi...
... X W 10 cm BM4: X81267-001 (H 4 inches X W 4 inches) EBT-CEN Embroidery set (small) 4 H 2 cm X W 6 cm (H 1 inch X W 2-1/2 inches) Part Code U.S.A. / Canada Other No. Part Name 1 Brother poly #90 bobbin thread Water solude stabilizer 2 Stabilizer material for a complete listing of printing. z Visit your nearest authorized retailer for embroidery 3 Embroidery card Embroidery set (extra large BM3: X81175-001 EBT-CEN 6 (multi...

Users Manual - English
Page 10
... and lower the presser foot j Operation buttons Use these descriptions to the machine, and then attach the embroidery frame. m Needle threader lever Use the needle threader lever to place the spool of the machine parts. Names of Machine Parts and Their Functions The names of the various parts of thread on the spool pin. Before using the...
... and lower the presser foot j Operation buttons Use these descriptions to the machine, and then attach the embroidery frame. m Needle threader lever Use the needle threader lever to place the spool of the machine parts. Names of Machine Parts and Their Functions The names of the various parts of thread on the spool pin. Before using the...
Users Manual - English
Page 26
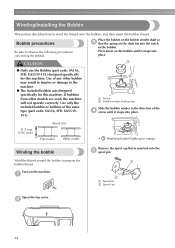
... not operate correctly. Turn on the shaft fits into place. 1 ● Only use the Bobbin (part code: SA156, SFB: XA5539-151) designed specifically for this machine. Bobbin precautions Be sure to prepare the bobbin thread. CAUTION Place the bobbin on the bobbin until it snaps into place. 11.5 mm (7/16 inch) ...
... not operate correctly. Turn on the shaft fits into place. 1 ● Only use the Bobbin (part code: SA156, SFB: XA5539-151) designed specifically for this machine. Bobbin precautions Be sure to prepare the bobbin thread. CAUTION Place the bobbin on the bobbin until it snaps into place. 11.5 mm (7/16 inch) ...
Users Manual - English
Page 30
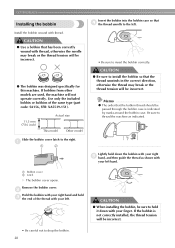
... the bobbin with your right hand and hold c the end of the same type (part code: SA156, SFB: XA5539-151). 11.5 mm (7/16 inch) Actual size This model Other model • Be sure to thread the machine as shown with your finger. CAUTION ● When installing the bobbin, be sure to... of the thread with thread, otherwise the needle may break or the thread tension will be incorrect. ● The bobbin was designed specifically for this machine. a Bobbin cover b Latch X The bobbin cover opens. Memo z The order that d the thread unrolls to the right. Slide the bobbin cover latch to ...
... the bobbin with your right hand and hold c the end of the same type (part code: SA156, SFB: XA5539-151). 11.5 mm (7/16 inch) Actual size This model Other model • Be sure to thread the machine as shown with your finger. CAUTION ● When installing the bobbin, be sure to... of the thread with thread, otherwise the needle may break or the thread tension will be incorrect. ● The bobbin was designed specifically for this machine. a Bobbin cover b Latch X The bobbin cover opens. Memo z The order that d the thread unrolls to the right. Slide the bobbin cover latch to ...
Users Manual - English
Page 38
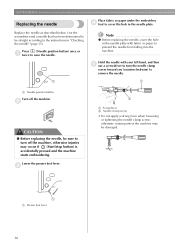
... presser foot lever. Hold the needle with fabric or paper to prevent the needle from falling into the machine. GETTING READY Replacing the needle Place fabric or paper under the embroidery d foot to cover the hole in the needle plate with your left hand, and then e use ...screw • Do not apply a strong force when loosening or tightening the needle clamp screw, otherwise certain parts of the machine may occur if (Start/stop button) is accidentally pressed and the machine starts embroidering. Press (Needle position button) once or a twice to be damaged. 1 a Presser foot lever...
... presser foot lever. Hold the needle with fabric or paper to prevent the needle from falling into the machine. GETTING READY Replacing the needle Place fabric or paper under the embroidery d foot to cover the hole in the needle plate with your left hand, and then e use ...screw • Do not apply a strong force when loosening or tightening the needle clamp screw, otherwise certain parts of the machine may occur if (Start/stop button) is accidentally pressed and the machine starts embroidering. Press (Needle position button) once or a twice to be damaged. 1 a Presser foot lever...
Users Manual - English
Page 59
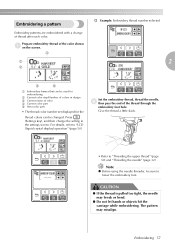
... of thread after each color. Embroidering a pattern † Example: Embroidery thread number selected Embroidery patterns are embroidered with a change the setting in design c Current name of color d Current color part e Next color part • The thread color number set displayed for the thread colors can... be sure to lower the embroidery foot. Give the thread a little slack. • Refer to "LCD (...
... of thread after each color. Embroidering a pattern † Example: Embroidery thread number selected Embroidery patterns are embroidered with a change the setting in design c Current name of color d Current color part e Next color part • The thread color number set displayed for the thread colors can... be sure to lower the embroidery foot. Give the thread a little slack. • Refer to "LCD (...
Users Manual - English
Page 64
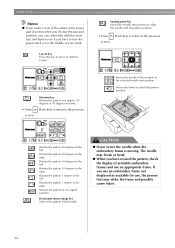
...position. • Press (Back key) to return to the previous screen. CAUTION ● Never lower the needle when the embroidery frame is moving. Rotation key Rotates the pattern one degree, 10 degrees or 90 degrees at a time. (Back key)... the needle with the same size and layout even if you have revised the pattern, check the display of available embroidery frames and use , the presser foot may break or bend. ● When you have to rotation screen. &#...this key to move to turn the power back on in the lower part of your work. Starting point key Moves the needle start position.
...position. • Press (Back key) to return to the previous screen. CAUTION ● Never lower the needle when the embroidery frame is moving. Rotation key Rotates the pattern one degree, 10 degrees or 90 degrees at a time. (Back key)... the needle with the same size and layout even if you have revised the pattern, check the display of available embroidery frames and use , the presser foot may break or bend. ● When you have to rotation screen. &#...this key to move to turn the power back on in the lower part of your work. Starting point key Moves the needle start position.
Users Manual - English
Page 73
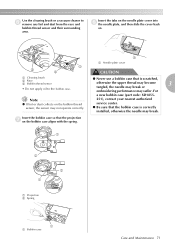
Insert the tabs on the needle plate cover into h the needle plate, and then slide the cover back on. For a new bobbin case (part code: XD1855- a b 2 1 a Projection b Spring 1 a Bobbin case Care and Maintenance 71 a c b a Needle plate cover a CAUTION a Cleaning brush b Race c Bobbin thread sensor • Do not apply oil ...
Insert the tabs on the needle plate cover into h the needle plate, and then slide the cover back on. For a new bobbin case (part code: XD1855- a b 2 1 a Projection b Spring 1 a Bobbin case Care and Maintenance 71 a c b a Needle plate cover a CAUTION a Cleaning brush b Race c Bobbin thread sensor • Do not apply oil ...


