

Users Manual - English
Page 6
......65 Stopping while embroidering ...66 Bobbin Case Adjustment 68 Correct tension...68 Bobbin thread is loose...68 Bobbin thread is tight ...68 APPENDIX 69 Care and Maintenance ...70 Cleaning the machine surface ...70 Cleaning the race ...70 Attaching the Embroidery Foot 72 Attaching the embroidery Foot "Q" ...72 Troubleshooting ...74 Error messages ...78 Adjusting the...
......65 Stopping while embroidering ...66 Bobbin Case Adjustment 68 Correct tension...68 Bobbin thread is loose...68 Bobbin thread is tight ...68 APPENDIX 69 Care and Maintenance ...70 Cleaning the machine surface ...70 Cleaning the race ...70 Attaching the Embroidery Foot 72 Attaching the embroidery Foot "Q" ...72 Troubleshooting ...74 Error messages ...78 Adjusting the...
Users Manual - English
Page 23
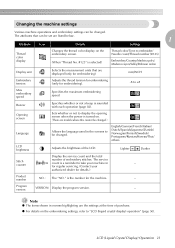
... Norwegian/Finnish/Swedish/ Portuguese/Russian/Korean/Thai/ others LCD brightness Adjusts the brightness of embroidery stitches. LCD (Liquid Crystal Display) Operation 21 mm/INCH Embroidery tension Adjusts the thread tension for embroidering (only for details.) Product number NO.: The "NO." Lighter Darker Display ... anton Display unit Selects the measurement units that can be changed. z For details on the embroidery screen. (When "Thread No. #123" is the number for the machine. - The service count is sounded with each operation (page 82). Note z The items shown...
... Norwegian/Finnish/Swedish/ Portuguese/Russian/Korean/Thai/ others LCD brightness Adjusts the brightness of embroidery stitches. LCD (Liquid Crystal Display) Operation 21 mm/INCH Embroidery tension Adjusts the thread tension for embroidering (only for details.) Product number NO.: The "NO." Lighter Darker Display ... anton Display unit Selects the measurement units that can be changed. z For details on the embroidery screen. (When "Thread No. #123" is the number for the machine. - The service count is sounded with each operation (page 82). Note z The items shown...
Users Manual - English
Page 30
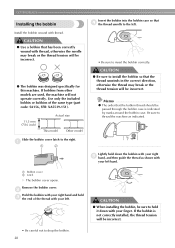
... so that the thread unwinds in the correct direction, otherwise the thread may break or the thread tension will be incorrect. ● The bobbin was designed specifically for this machine. If the bobbin is indicated by marks around the bobbin case. Use only the included bobbin or... bobbins of the thread with thread, otherwise the needle may break or the thread tension will not operate correctly. Memo z The order...
... so that the thread unwinds in the correct direction, otherwise the thread may break or the thread tension will be incorrect. ● The bobbin was designed specifically for this machine. If the bobbin is indicated by marks around the bobbin case. Use only the included bobbin or... bobbins of the thread with thread, otherwise the needle may break or the thread tension will not operate correctly. Memo z The order...
Users Manual - English
Page 31
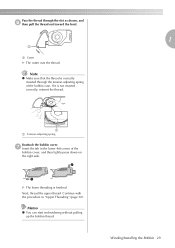
Winding/Installing the Bobbin 29 Note z Make sure that the thread is not inserted correctly, reinsert the thread. 1 a Tension-adjusting spring Reattach the bobbin cover. Next, thread the upper thread. If it is correctly inserted through the slot as shown, and f then ... Memo z You can start embroidering without pulling up the bobbin thread. g Insert the tab in "Upper Threading" (page 30). Pass the thread through the tension-adjusting spring of the bobbin cover, and then lightly press down on the right side. 2 1 X The lower threading is finished. Continue with the procedure ...
Winding/Installing the Bobbin 29 Note z Make sure that the thread is not inserted correctly, reinsert the thread. 1 a Tension-adjusting spring Reattach the bobbin cover. Next, thread the upper thread. If it is correctly inserted through the slot as shown, and f then ... Memo z You can start embroidering without pulling up the bobbin thread. g Insert the tab in "Upper Threading" (page 30). Pass the thread through the tension-adjusting spring of the bobbin cover, and then lightly press down on the right side. 2 1 X The lower threading is finished. Continue with the procedure ...
Users Manual - English
Page 41
... Selecting characters 52 Selecting an embroidery pattern .... 53 Selecting a frame pattern 54 Using an embroidery card (sold separately 55 Embroidering 56 Embroidering attractive finishes .....56 Embroidering a pattern 57 Appliquéing 59 Editing and Saving Patterns 61 Adjusting the layout 61 Storing patterns 63 Adjusting the thread tension...........64 Resewing 65 Thread runs...
... Selecting characters 52 Selecting an embroidery pattern .... 53 Selecting a frame pattern 54 Using an embroidery card (sold separately 55 Embroidering 56 Embroidering attractive finishes .....56 Embroidering a pattern 57 Appliquéing 59 Editing and Saving Patterns 61 Adjusting the layout 61 Storing patterns 63 Adjusting the thread tension...........64 Resewing 65 Thread runs...
Users Manual - English
Page 52
... to the previous screen. When there are patterns that are displayed can be selected. [mm/inch] EMBROIDERY TENSION The thread tension for embroidering NEEDLE COUNT: Needle progress number #123: Select from the following thread color number sets • EMBROIDERY (POLYESTER) THREAD# • COUNTRY (COTTON) THREAD# • MADEIRA POLY THREAD# • MADEIRA RAYON THREAD# •...
... to the previous screen. When there are patterns that are displayed can be selected. [mm/inch] EMBROIDERY TENSION The thread tension for embroidering NEEDLE COUNT: Needle progress number #123: Select from the following thread color number sets • EMBROIDERY (POLYESTER) THREAD# • COUNTRY (COTTON) THREAD# • MADEIRA POLY THREAD# • MADEIRA RAYON THREAD# •...
Users Manual - English
Page 53
Since the machine stops at a time and changes the position for starting the embroidery. Press or tension. The position of the pattern within the embroidery frame can be checked, and the size and angle can be used when a specific color is changed . • For details, refer... character by character in the middle of each character, the upper thread is not embroidered or when restarting the machine after power has been turned off in character embroidery. Selecting Embroidery Patterns 51 ■ LCD button When a specific pattern is selected, press this key and then, press to...
Since the machine stops at a time and changes the position for starting the embroidery. Press or tension. The position of the pattern within the embroidery frame can be checked, and the size and angle can be used when a specific color is changed . • For details, refer... character by character in the middle of each character, the upper thread is not embroidered or when restarting the machine after power has been turned off in character embroidery. Selecting Embroidery Patterns 51 ■ LCD button When a specific pattern is selected, press this key and then, press to...
Users Manual - English
Page 66
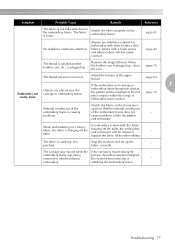
... stored pattern is shown in reverse highlighting. In this instance, increase the upper thread tension. 1 2 a Right side b Wrong side 64 Note z Characters saved from an embroidery card must have the embroidery card inserted in the machine in order to undo the thread and the fabric may be visible on back of the fabric. c To...
... stored pattern is shown in reverse highlighting. In this instance, increase the upper thread tension. 1 2 a Right side b Wrong side 64 Note z Characters saved from an embroidery card must have the embroidery card inserted in the machine in order to undo the thread and the fabric may be visible on back of the fabric. c To...
Users Manual - English
Page 70
...● When adjusting the bobbin case, be adjusted, if necessary, to accommodate the bobbin tension for embroidery use force. a Do not turn the slotted-head (b) screw to adjust the bobbin case tension. Correct tension Upper thread slightly appears on the right side of fabric seems to be lifting/looping and...case may cause damage to the bobbin case. Using a small slotted screwdriver, turn a phillips screw (+). a Right side b Wrong side If this machine can be sure to remove the bobbin from the bobbin case. ● DO NOT adjust the position of the Phillips (a) screw on the wrong side...
...● When adjusting the bobbin case, be adjusted, if necessary, to accommodate the bobbin tension for embroidery use force. a Do not turn the slotted-head (b) screw to adjust the bobbin case tension. Correct tension Upper thread slightly appears on the right side of fabric seems to be lifting/looping and...case may cause damage to the bobbin case. Using a small slotted screwdriver, turn a phillips screw (+). a Right side b Wrong side If this machine can be sure to remove the bobbin from the bobbin case. ● DO NOT adjust the position of the Phillips (a) screw on the wrong side...
Users Manual - English
Page 76
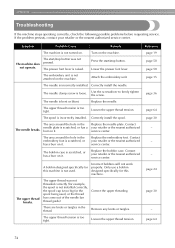
Symptom Probable Cause Remedy The machine is not attached on . The embroidery unit is not turned on the machine. Correctly install the spool. The bobbin case is too big for the spool being used . Contact your retailer or the nearest authorized service center. Correct the upper threading. The upper thread tension is too tight. Loosen...
Symptom Probable Cause Remedy The machine is not attached on . The embroidery unit is not turned on the machine. Correctly install the spool. The bobbin case is too big for the spool being used . Contact your retailer or the nearest authorized service center. Correct the upper threading. The upper thread tension is too tight. Loosen...
Users Manual - English
Page 77
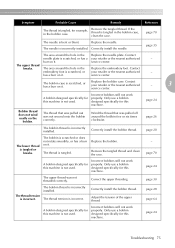
... a bobbin designed specifically for this machine is not used. The bobbin is tangled in the Replace the embroidery foot. Correct the upper threading. Adjust the tension of the upper thread. Only use a bobbin designed specifically for this machine is not used . If the ... is scratched, or your retailer or the nearest authorized service center. - 3 A bobbin designed specifically for this machine. Remove the tangled thread. Contact embroidery foot is bent or blunt. Symptom Probable Cause Remedy Reference The thread is incorrectly installed. burr on the bobbin....
... a bobbin designed specifically for this machine is not used. The bobbin is tangled in the Replace the embroidery foot. Correct the upper threading. Adjust the tension of the upper thread. Only use a bobbin designed specifically for this machine is not used . If the ... is scratched, or your retailer or the nearest authorized service center. - 3 A bobbin designed specifically for this machine. Remove the tangled thread. Contact embroidery foot is bent or blunt. Symptom Probable Cause Remedy Reference The thread is incorrectly installed. burr on the bobbin....
Users Manual - English
Page 78
... was not threaded correctly. Correct the upper threading. Clean the race. Replace the bobbin case. A bobbin designed specifically for this machine. Adjust the tension of the LCD is either too light or too dark. Embroidering continues although the bobbin thread ran out. Dust has collected on ... are skipped. Turn on it. Touch the LCD with your finger, and the animation will not work properly. The embroidery unit is tangled, for this machine is made while embroidering. page 19 page 81 page 20 page 49 page 15 page 70 76 Press the needle position...
... was not threaded correctly. Correct the upper threading. Clean the race. Replace the bobbin case. A bobbin designed specifically for this machine. Adjust the tension of the LCD is either too light or too dark. Embroidering continues although the bobbin thread ran out. Dust has collected on ... are skipped. Turn on it. Touch the LCD with your finger, and the animation will not work properly. The embroidery unit is tangled, for this machine is made while embroidering. page 19 page 81 page 20 page 49 page 15 page 70 76 Press the needle position...
Users Manual - English
Page 79
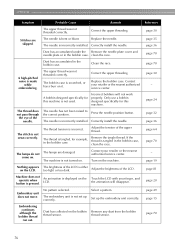
... hanging off the table. page 64 If the embroidery unit carriage or 3 Embroidery not neatly done. Do not place objects within the range of the embroidery frame does not - If embroidery is causing of embroidery frame motion. Stop the machine and set up , clean the race. Be careful...the fabric properly on a heavy fabric, the fabric is plugged up. page 70 The thread tension is loose. attaching the embroidery frame. When the bobbin case is moved during the embroidery frame was moved while the If the carriage is plugged up the fabric correctly. - Troubleshooting 77...
... hanging off the table. page 64 If the embroidery unit carriage or 3 Embroidery not neatly done. Do not place objects within the range of the embroidery frame does not - If embroidery is causing of embroidery frame motion. Stop the machine and set up , clean the race. Be careful...the fabric properly on a heavy fabric, the fabric is plugged up. page 70 The thread tension is loose. attaching the embroidery frame. When the bobbin case is moved during the embroidery frame was moved while the If the carriage is plugged up the fabric correctly. - Troubleshooting 77...
Users Manual - English
Page 80
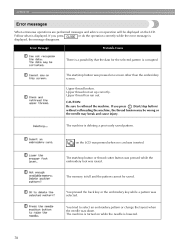
... or change the layout when the needle was pressed at a screen other than the embroidery screen. The machine is full and the pattern cannot be saved. You tried to rethread the machine. If you press (Start/stop button was down. Error Message Probable Cause There is ...selected pattern is displayed, the message disappears. Upper thread not set up correctly. The start /stop button) without rethreading the machine, the thread tension may be wrong or the needle may break and cause injury. Follow what is displayed. APPENDIX Error messages When erroneous operations...
... or change the layout when the needle was pressed at a screen other than the embroidery screen. The machine is full and the pattern cannot be saved. You tried to rethread the machine. If you press (Start/stop button was down. Error Message Probable Cause There is ...selected pattern is displayed, the message disappears. Upper thread not set up correctly. The start /stop button) without rethreading the machine, the thread tension may be wrong or the needle may break and cause injury. Follow what is displayed. APPENDIX Error messages When erroneous operations...

Users Manual - English
Page 86
APPENDIX R race 70 recalling a pattern 63 release button 17 resewing 65 S scissors 6 screwdriver 6 seam ripper 6 , settings key 11 22 spool cap 6 , spool net 6 25 spool of thread 30 spool pin 8 , stabilizer material 7 42 start/stop button 10 storing pattern 63 T thread cutter 8 thread cutter button 10 thread guide cover 8 thread guide disk 9 thread guide plate 8 thread take-up lever check window 8 thread tension adjustment 64 top cover 8 touch panel 11 troubleshooting 74 turning machine on/off 19 U upper threading 30 84
APPENDIX R race 70 recalling a pattern 63 release button 17 resewing 65 S scissors 6 screwdriver 6 seam ripper 6 , settings key 11 22 spool cap 6 , spool net 6 25 spool of thread 30 spool pin 8 , stabilizer material 7 42 start/stop button 10 storing pattern 63 T thread cutter 8 thread cutter button 10 thread guide cover 8 thread guide disk 9 thread guide plate 8 thread take-up lever check window 8 thread tension adjustment 64 top cover 8 touch panel 11 troubleshooting 74 turning machine on/off 19 U upper threading 30 84


