
Users Manual - English
Page 3
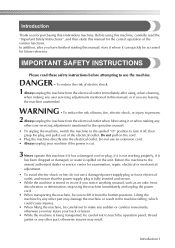
...read the "Important Safety Instructions", and then study this manual, or if you are leaving the machine unattended. Introduction Thank you for future reference. Before using this machine, carefully read these safety instructions before attempting to the nearest authorized dealer or service center for ...symbol "O" position to touch the operation panel, thread guides or any sudden or careless movements, otherwise you have finished reading this embroidery machine. WARNING - Do not use if you notice anything unusual, such as an odor, heat, discoloration or deformation, stop using ...
...read the "Important Safety Instructions", and then study this manual, or if you are leaving the machine unattended. Introduction Thank you for future reference. Before using this machine, carefully read these safety instructions before attempting to the nearest authorized dealer or service center for ...symbol "O" position to touch the operation panel, thread guides or any sudden or careless movements, otherwise you have finished reading this embroidery machine. WARNING - Do not use if you notice anything unusual, such as an odor, heat, discoloration or deformation, stop using ...
Users Manual - English
Page 7
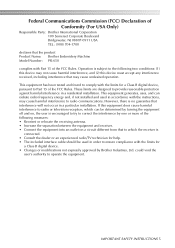
... a particular installation. Federal Communications Commission (FCC) Declaration of Conformity (For USA Only) Responsible Party: Brother International Corporation 100 Somerset Corporate Boulevard Bridgewater, NJ 08807-0911 USA TEL : (908) 704-1700 declares that the product Product Name: Brother Embroidery Machine Model Number: PR-650 complies with the limits for a Class B digital device. • Changes or modifications not expressly...
... a particular installation. Federal Communications Commission (FCC) Declaration of Conformity (For USA Only) Responsible Party: Brother International Corporation 100 Somerset Corporate Boulevard Bridgewater, NJ 08807-0911 USA TEL : (908) 704-1700 declares that the product Product Name: Brother Embroidery Machine Model Number: PR-650 complies with the limits for a Class B digital device. • Changes or modifications not expressly...

Users Manual - English
Page 8
... and Marketing Dept. 6 The CONTENT are proprietary products of Brother Industries, Ltd. ("BROTHER"). This agreement shall be available for use at a time. Except as otherwise provided herein, CUSTOMER may not: • Allow more than one embroidery machine at any one time. • Reproduce, modify, publish,...Use the CONTENT in combination with an embroidery machine to create embroidery. • Use the CONTENT in this package. "©DISNEY"). BY USING THE CONTENT, THE CUSTOMER ACCEPTS THE TERMS AND CONDITIONS OF THIS AGREEMENT. BROTHER retains ownership of all rights to CONTENT...
... and Marketing Dept. 6 The CONTENT are proprietary products of Brother Industries, Ltd. ("BROTHER"). This agreement shall be available for use at a time. Except as otherwise provided herein, CUSTOMER may not: • Allow more than one embroidery machine at any one time. • Reproduce, modify, publish,...Use the CONTENT in combination with an embroidery machine to create embroidery. • Use the CONTENT in this package. "©DISNEY"). BY USING THE CONTENT, THE CUSTOMER ACCEPTS THE TERMS AND CONDITIONS OF THIS AGREEMENT. BROTHER retains ownership of all rights to CONTENT...
Users Manual - English
Page 14
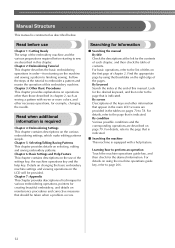
...condition Various possible conditions and the corresponding operations are described on the use Chapter 1: Getting Ready The setup of the embroidery machine and the various preparations required before use of the pages. Chapter 7: Appendix This chapter provides descriptions of techniques for various... of chapter 2. Details on changing the basic embroidery machine settings and viewing operations on the right edge of the settings key, the machine operations key and the help feature. By screen Descriptions of this embroidery machine. For details, refer to the page that ...
...condition Various possible conditions and the corresponding operations are described on the use Chapter 1: Getting Ready The setup of the embroidery machine and the various preparations required before use of the pages. Chapter 7: Appendix This chapter provides descriptions of techniques for various... of chapter 2. Details on changing the basic embroidery machine settings and viewing operations on the right edge of the settings key, the machine operations key and the help feature. By screen Descriptions of this embroidery machine. For details, refer to the page that ...
Users Manual - English
Page 18
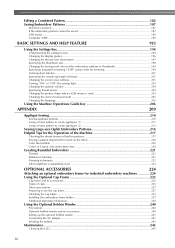
... Threads ...221 Stabilizers (backing) ...221 Hooping techniques...222 Fabric/stabilizer compatibility chart ...223 OPTIONAL ACCESSORIES 224 Attaching an optional embroidery frame for industrial embroidery machines 224 Using the Optional Cap Frame 225 Cap frame and its accessories...225 Types of caps ...226 Fabric precautions...227 Preparing to use the cap ...
... Threads ...221 Stabilizers (backing) ...221 Hooping techniques...222 Fabric/stabilizer compatibility chart ...223 OPTIONAL ACCESSORIES 224 Attaching an optional embroidery frame for industrial embroidery machines 224 Using the Optional Cap Frame 225 Cap frame and its accessories...225 Types of caps ...226 Fabric precautions...227 Preparing to use the cap ...
Users Manual - English
Page 19
... thread paths of the upper threads 248 Oiling the machine ...250 About the maintenance message...251 Troubleshooting ...252 On-screen troubleshooting ...252 Troubleshooting...253 Error messages ...261 If the machine does not respond when a key is pressed 269 Specifications ...270 Embroidery machine specifications...270 Upgrading Your Machine's Software 271 Upgrade procedure using USB media ...271...
... thread paths of the upper threads 248 Oiling the machine ...250 About the maintenance message...251 Troubleshooting ...252 On-screen troubleshooting ...252 Troubleshooting...253 Error messages ...261 If the machine does not respond when a key is pressed 269 Specifications ...270 Embroidery machine specifications...270 Upgrading Your Machine's Software 271 Upgrade procedure using USB media ...271...

Users Manual - English
Page 21
... preparations required before starting to "Accessories" on page 22, and check that all listed accessories are included. After checking that all accessories are included, the embroidery machine can be set up the machine 26 Adjusting the operation panel position 27 Preparing the thread guide assembly 28 Positioning the spool stand 29 Attaching the...
... preparations required before starting to "Accessories" on page 22, and check that all listed accessories are included. After checking that all accessories are included, the embroidery machine can be set up the machine 26 Adjusting the operation panel position 27 Preparing the thread guide assembly 28 Positioning the spool stand 29 Attaching the...

Users Manual - English
Page 25
... ● Always use accessories recommended for your nearest authorized dealer for a complete listing of optional accessories and embroidery cards available for this machine. ● All specifications are available as optional accessories. 1. 7 Flat frame 8 Bobbin winder set 6 ...set (Refer to page 225.) PRCF3 the touch pen holder on the country/area where the machine was purchased. ● Embroidery cards sold overseas are not compatible with this embroidery machine. ● Visit your machine. 6. 7. 8. 9. 10. 11. 12. Please be stored in 1 Advanced cap frame...
... ● Always use accessories recommended for your nearest authorized dealer for a complete listing of optional accessories and embroidery cards available for this machine. ● All specifications are available as optional accessories. 1. 7 Flat frame 8 Bobbin winder set 6 ...set (Refer to page 225.) PRCF3 the touch pen holder on the country/area where the machine was purchased. ● Embroidery cards sold overseas are not compatible with this embroidery machine. ● Visit your machine. 6. 7. 8. 9. 10. 11. 12. Please be stored in 1 Advanced cap frame...
Users Manual - English
Page 26
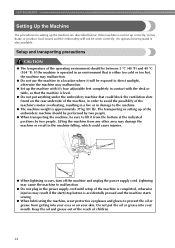
... or grease from getting into your skin. If the machine is also available. Do not put anything under the embroidery machine that the machine is approximately 37 kg (81 lb). An optional sewing stand is not set up the machine with the desk or table, so that could cause injuries... The temperature of children. 24 GETTING READY Setting Up the Machine The procedures for setting up of the embroidery machine should be between 5 °C (40 °F) and 40 °C (104 °F). The transporting or setting up the machine are described below. Keep the oil and grease out of ...
... or grease from getting into your skin. If the machine is also available. Do not put anything under the embroidery machine that the machine is approximately 37 kg (81 lb). An optional sewing stand is not set up the machine with the desk or table, so that could cause injuries... The temperature of children. 24 GETTING READY Setting Up the Machine The procedures for setting up of the embroidery machine should be between 5 °C (40 °F) and 40 °C (104 °F). The transporting or setting up the machine are described below. Keep the oil and grease out of ...
Users Manual - English
Page 28
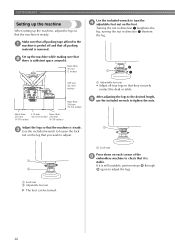
.... After adjusting the legs to the desired length, 5 use the included wrench to tighten the nuts. 1 Lock nut Press down on each corner of the 6 embroidery machine to adjust the legs. 1 Lock nut 2 Adjustable foot nut X The foot can be turned. 26 More than 250 mm (20-5/32 inches) 250 mm (9-7/8 inches...) (9-7/8 inches) Adjust the legs so that the machine is steady. 3 Use the included wrench to loosen the lock nut on the foot. turning the nut in direction 1 lengthens the leg; If it is...
.... After adjusting the legs to the desired length, 5 use the included wrench to tighten the nuts. 1 Lock nut Press down on each corner of the 6 embroidery machine to adjust the legs. 1 Lock nut 2 Adjustable foot nut X The foot can be turned. 26 More than 250 mm (20-5/32 inches) 250 mm (9-7/8 inches...) (9-7/8 inches) Adjust the legs so that the machine is steady. 3 Use the included wrench to loosen the lock nut on the foot. turning the nut in direction 1 lengthens the leg; If it is...
Users Manual - English
Page 33
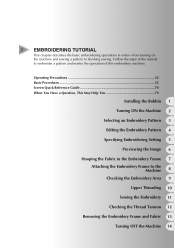
... the Embroidery 11 Checking the Thread Tension 12 Removing the Embroidery Frame and Fabric 13 Turning OFF the Machine 14 2 EMBROIDERING TUTORIAL This chapter describes the basic embroidering operations in the Embroidery Frame 7 Attaching the Embroidery Frame to finishing sewing. Follow the steps of the tutorial to embroider a pattern and master the operation of this embroidery machine.
... the Embroidery 11 Checking the Thread Tension 12 Removing the Embroidery Frame and Fabric 13 Turning OFF the Machine 14 2 EMBROIDERING TUTORIAL This chapter describes the basic embroidering operations in the Embroidery Frame 7 Attaching the Embroidery Frame to finishing sewing. Follow the steps of the tutorial to embroider a pattern and master the operation of this embroidery machine.
Users Manual - English
Page 34
...to observe the following occur, turn off the embroidery machine and unplug the power supply cord, otherwise a fire, an electric shock or damage to the machine may result. ● When unplugging the power supply cord, be sure to first turn off the machine, and then grasp the plug when unplugging the... when there is a loose or cut , damaged, modified, forcefully bent, pulled, twisted, or bundled. If it or result in any of this machine in with extension cords or multi-plug adapters with wet hands, otherwise an electric shock may result. • When you are firmly inserted into the...
...to observe the following occur, turn off the embroidery machine and unplug the power supply cord, otherwise a fire, an electric shock or damage to the machine may result. ● When unplugging the power supply cord, be sure to first turn off the machine, and then grasp the plug when unplugging the... when there is a loose or cut , damaged, modified, forcefully bent, pulled, twisted, or bundled. If it or result in any of this machine in with extension cords or multi-plug adapters with wet hands, otherwise an electric shock may result. • When you are firmly inserted into the...

Users Manual - English
Page 36
...After approximately 10 minutes, the display should reach its normal level of the display while using it is recommended that rayon or polyester embroidery thread be difficult to read. EMBROIDERING TUTORIAL Upper thread recommendations Be sure to observe the following recommendations concerning the use a mechanical ... to observe the following recommendations concerning the upper thread. If thicker fabric is sewn, the needle may be dark immediately after the embroidery machine is necessary.) 34 Do not use of the display and is up to sit in front of brightness. • If you ...
...After approximately 10 minutes, the display should reach its normal level of the display while using it is recommended that rayon or polyester embroidery thread be difficult to read. EMBROIDERING TUTORIAL Upper thread recommendations Be sure to observe the following recommendations concerning the use a mechanical ... to observe the following recommendations concerning the upper thread. If thicker fabric is sewn, the needle may be dark immediately after the embroidery machine is necessary.) 34 Do not use of the display and is up to sit in front of brightness. • If you ...
Users Manual - English
Page 37
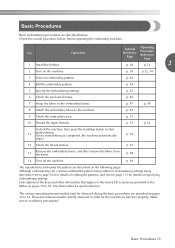
...Page Operating Procedure Reference Page p. 36 p.33 2 2 Turn on the machine. Descriptions of the keys and other information that must be observed during the basic procedures are provided in the embroidery frame. Make sure to 78. Check the overall procedure below . Step ... operations to function properly. p. 68 14 Turn off the machine. p. 47 p. 34 8 Attach the embroidery frame to page 115 for the machine to embroider the pattern are described below , before operating the embroidery machine. Although embroidering can continue without the pattern being edited or ...
...Page Operating Procedure Reference Page p. 36 p.33 2 2 Turn on the machine. Descriptions of the keys and other information that must be observed during the basic procedures are provided in the embroidery frame. Make sure to 78. Check the overall procedure below . Step ... operations to function properly. p. 68 14 Turn off the machine. p. 47 p. 34 8 Attach the embroidery frame to page 115 for the machine to embroider the pattern are described below , before operating the embroidery machine. Although embroidering can continue without the pattern being edited or ...

Users Manual - English
Page 38
Insert a bobbin wound with extreme force. 36 Installing the bobbin Memo ● This embroidery machine is remaining. For details on oiling the machine, refer to "Oiling the machine" on page 247. Memo ● Thread picker is a device that there is enough bobbin thread for embroidering. For ...use. 1 Thread Picker To gain access to the bobbin case easily, pull the thread picker toward you. 1 Latch ■ Oiling the machine After removing the bobbin case, apply oil to embroider make sure that is changed. For precautions concerning the bobbin, refer to page 23, ...
Insert a bobbin wound with extreme force. 36 Installing the bobbin Memo ● This embroidery machine is remaining. For details on oiling the machine, refer to "Oiling the machine" on page 247. Memo ● Thread picker is a device that there is enough bobbin thread for embroidering. For ...use. 1 Thread Picker To gain access to the bobbin case easily, pull the thread picker toward you. 1 Latch ■ Oiling the machine After removing the bobbin case, apply oil to embroider make sure that is changed. For precautions concerning the bobbin, refer to page 23, ...
Users Manual - English
Page 40
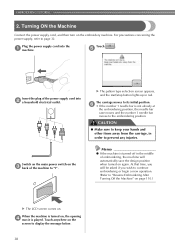
...the power supply cord, and then turn on the screen to "I". Memo ● If the machine is played. Touch anywhere on the embroidery machine. Touch . 5 Insert the plug of the machine to display the message below. 38 At that time, you will automatically save the design position when... turned on the 3 back of the power supply cord into the 1 machine. When the machine is not already ...
...the power supply cord, and then turn on the screen to "I". Memo ● If the machine is played. Touch anywhere on the embroidery machine. Touch . 5 Insert the plug of the machine to display the message below. 38 At that time, you will automatically save the design position when... turned on the 3 back of the power supply cord into the 1 machine. When the machine is not already ...

Users Manual - English
Page 41
...change the embroidery machine settings. p. 61 6 Settings key Touch this key to the initial pattern group selection screen. Reference Page 2 Pattern display area This area displays the selected pattern. key p.206 5 Needle bar move or thread a selected needle bar. Understanding the screens When the machine is ...turned on and is available in any screen. The embroidery frame indications, area line the grid lines and other display settings can be used in most of the...
...change the embroidery machine settings. p. 61 6 Settings key Touch this key to the initial pattern group selection screen. Reference Page 2 Pattern display area This area displays the selected pattern. key p.206 5 Needle bar move or thread a selected needle bar. Understanding the screens When the machine is ...turned on and is available in any screen. The embroidery frame indications, area line the grid lines and other display settings can be used in most of the...
Users Manual - English
Page 43
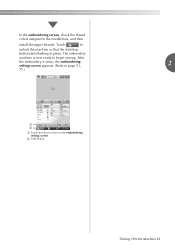
After the embroidery is now ready to the needle bars, and then install the upper threads. Touch to the embroidering settings screen. 2 Unlock key Turning ON the Machine 41 In the embroidering screen, check the thread colors assigned to begin sewing. The embroidery machine is sewn, the embroidering settings screen appears. (Refer to page 53, 2 77.) 1 2 1 Touch this key to return to unlock the machine so that the start/stop button starts flashing in green.
After the embroidery is now ready to the needle bars, and then install the upper threads. Touch to the embroidering settings screen. 2 Unlock key Turning ON the Machine 41 In the embroidering screen, check the thread colors assigned to begin sewing. The embroidery machine is sewn, the embroidering settings screen appears. (Refer to page 53, 2 77.) 1 2 1 Touch this key to return to unlock the machine so that the start/stop button starts flashing in green.
Users Manual - English
Page 50
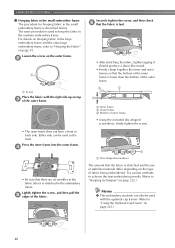
...methods to achieve the best embroidering results. (Refer to hoop the fabric in the medium embroidery frame. For details on hooping fabric in the large embroidery frame and the extra-large embroidery frame, refer to "Using the Optional Cap Frame" on page 225.) 48 Lightly tighten... stretched in the embroidery frame. EMBROIDERING TUTORIAL ■ Hooping fabric in the small embroidery frame The procedure for hooping fabric in the small embroidery frame is stretched and the use of stabilizer material differ depending on page 222.) Memo ● This embroidery machine can be used with...
...methods to achieve the best embroidering results. (Refer to hoop the fabric in the medium embroidery frame. For details on hooping fabric in the large embroidery frame and the extra-large embroidery frame, refer to "Using the Optional Cap Frame" on page 225.) 48 Lightly tighten... stretched in the embroidery frame. EMBROIDERING TUTORIAL ■ Hooping fabric in the small embroidery frame The procedure for hooping fabric in the small embroidery frame is stretched and the use of stabilizer material differ depending on page 222.) Memo ● This embroidery machine can be used with...
Users Manual - English
Page 51
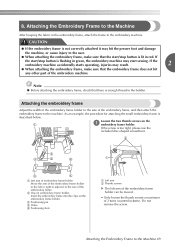
..., please use the included disc-shaped screwdriver. 1 Left arm of embroidery frame holder Move the arm of the embroidery frame holder to the embroidery machine. Attaching the embroidery frame Adjust the width of the embroidery frame holder to the machine. Loosen the two thumb screws on the embroidery frame holder. 3 Positioning pin 4 Holes 5 Positioning slots 1 Left arm 2 Thumb...
..., please use the included disc-shaped screwdriver. 1 Left arm of embroidery frame holder Move the arm of the embroidery frame holder to the embroidery machine. Attaching the embroidery frame Adjust the width of the embroidery frame holder to the machine. Loosen the two thumb screws on the embroidery frame holder. 3 Positioning pin 4 Holes 5 Positioning slots 1 Left arm 2 Thumb...


