

Users Manual - English
Page 5
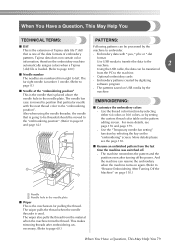
... this manual. IMPORTANT SAFETY INSTRUCTIONS 3 Use only a mouse designed specifically for household use. The contents of this manual and specifications of the operation manual to clean the case. 7 For a longer service life: • When storing this machine in any way, otherwise a fire, electric shock or injuries may result. • If the light unit is damaged, it must be used. • Always consult the operation manual when replacing or installing any assemblies, needle...
... this manual. IMPORTANT SAFETY INSTRUCTIONS 3 Use only a mouse designed specifically for household use. The contents of this manual and specifications of the operation manual to clean the case. 7 For a longer service life: • When storing this machine in any way, otherwise a fire, electric shock or injuries may result. • If the light unit is damaged, it must be used. • Always consult the operation manual when replacing or installing any assemblies, needle...
Users Manual - English
Page 7
...; Changes or modifications not expressly approved by turning the equipment off and on a circuit different from that may cause harmful interference to radio or television reception, which the receiver is no guarantee that the product Product Name: Brother Embroidery Machine Model Number: PR-650 complies with the instructions, may cause undesired operation. This equipment generates, uses, and can be used in a residential installation...
...; Changes or modifications not expressly approved by turning the equipment off and on a circuit different from that may cause harmful interference to radio or television reception, which the receiver is no guarantee that the product Product Name: Brother Embroidery Machine Model Number: PR-650 complies with the instructions, may cause undesired operation. This equipment generates, uses, and can be used in a residential installation...
Users Manual - English
Page 11
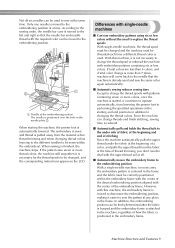
... thread spools with single-needle machines ■ Can sew embroidery patterns using six or less colors without the need to deal with the upper thread tail at the same time. Not all . ■ Automatically moves the embroidery frame to the embroidering position With a single-needle machine, in most cases, the embroidery pattern is positioned in the embroidery frame. Differences with patterns containing seven or more thread colors, the machine will come back to the needle that the needle bar and needle thread...
... thread spools with single-needle machines ■ Can sew embroidery patterns using six or less colors without the need to deal with the upper thread tail at the same time. Not all . ■ Automatically moves the embroidery frame to the embroidering position With a single-needle machine, in most cases, the embroidery pattern is positioned in the embroidery frame. Differences with patterns containing seven or more thread colors, the machine will come back to the needle that the needle bar and needle thread...
Users Manual - English
Page 15
...Setup location...25 Setting up the machine ...26 Adjusting the operation panel position...27 Preparing the thread guide assembly...28 Positioning the spool stand ...29 Attaching the embroidery frame holder...29 EMBROIDERING TUTORIAL 31 Operating Precautions...32 Power supply precautions ...32 Needle precautions...33 Checking the needle ...33 Bobbin precautions...33 Upper thread recommendations ...34 Fabric recommendations ...34 Display recommendations ...34 Basic Procedures ...35 Installing the Bobbin ...36 Removing the bobbin case...36 Installing the bobbin ...36 Installing the bobbin case...
...Setup location...25 Setting up the machine ...26 Adjusting the operation panel position...27 Preparing the thread guide assembly...28 Positioning the spool stand ...29 Attaching the embroidery frame holder...29 EMBROIDERING TUTORIAL 31 Operating Precautions...32 Power supply precautions ...32 Needle precautions...33 Checking the needle ...33 Bobbin precautions...33 Upper thread recommendations ...34 Fabric recommendations ...34 Display recommendations ...34 Basic Procedures ...35 Installing the Bobbin ...36 Removing the bobbin case...36 Installing the bobbin ...36 Installing the bobbin case...
Users Manual - English
Page 16
... the embroidering screen ...52 Upper Threading ...53 Checking the needle bars and thread colors 53 Upper threading ...55 Threading the needle ...59 Sewing the Embroidery 63 Starting embroidering ...63 Stopping embroidering ...65 Checking the Thread Tension 67 Removing the Embroidery Frame and Fabric 68 Removing the embroidery frame ...68 Removing the fabric ...68 Turning OFF the Machine 69 Screen Quick Reference Guide 70 Key displays ...70 Common screen controls ...70 Understanding the pattern type selection screen 71 Understanding the pattern list screen...
... the embroidering screen ...52 Upper Threading ...53 Checking the needle bars and thread colors 53 Upper threading ...55 Threading the needle ...59 Sewing the Embroidery 63 Starting embroidering ...63 Stopping embroidering ...65 Checking the Thread Tension 67 Removing the Embroidery Frame and Fabric 68 Removing the embroidery frame ...68 Removing the fabric ...68 Turning OFF the Machine 69 Screen Quick Reference Guide 70 Key displays ...70 Common screen controls ...70 Understanding the pattern type selection screen 71 Understanding the pattern list screen...
Users Manual - English
Page 18
... Sewing Large-size (Split) Embroidery Patterns 214 Helpful Tips for the Operation of the Machine 217 Checking the thread tension of built-in patterns 217 Sewing a pattern aligned with a mark on the fabric 218 Color thread table ...220 Colors of Tajima (.dst) embroidery data ...220 Creating Beautiful Embroidery 221 Threads ...221 Stabilizers (backing) ...221 Hooping techniques...222 Fabric/stabilizer compatibility chart ...223 OPTIONAL ACCESSORIES 224 Attaching an optional embroidery frame for industrial embroidery machines 224 Using the...
... Sewing Large-size (Split) Embroidery Patterns 214 Helpful Tips for the Operation of the Machine 217 Checking the thread tension of built-in patterns 217 Sewing a pattern aligned with a mark on the fabric 218 Color thread table ...220 Colors of Tajima (.dst) embroidery data ...220 Creating Beautiful Embroidery 221 Threads ...221 Stabilizers (backing) ...221 Hooping techniques...222 Fabric/stabilizer compatibility chart ...223 OPTIONAL ACCESSORIES 224 Attaching an optional embroidery frame for industrial embroidery machines 224 Using the...

Users Manual - English
Page 49
Hooping the Fabric in the Embroidery Frame 47 Note ● If the fabric is not attached to the machine, the embroidering area will not display the correct frame size. (Refer to page 49.) ■ Embroidery frame types There are used, the embroidery frame may hit the presser foot and damage the machine, or cause injury to the user. If the embroidery frame that you wish to page 34...
Hooping the Fabric in the Embroidery Frame 47 Note ● If the fabric is not attached to the machine, the embroidering area will not display the correct frame size. (Refer to page 49.) ■ Embroidery frame types There are used, the embroidery frame may hit the presser foot and damage the machine, or cause injury to the user. If the embroidery frame that you wish to page 34...
Users Manual - English
Page 66
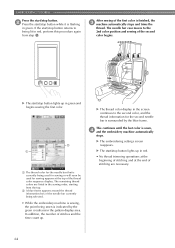
... be used for sewing appears at the end of stitching are listed in the sewing order, starting from step 1. If the start/stop button while it is flashing in the screen continues to the 2nd color position and sewing of the second color begins. The needle bar case moves to the second color, and the thread information for the second needle bar is sewn, 4 and the embroidery machine automatically...
... be used for sewing appears at the end of stitching are listed in the sewing order, starting from step 1. If the start/stop button while it is flashing in the screen continues to the 2nd color position and sewing of the second color begins. The needle bar case moves to the second color, and the thread information for the second needle bar is sewn, 4 and the embroidery machine automatically...
Users Manual - English
Page 68
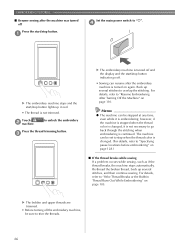
..., refer to "If the Thread Breaks or the Bobbin Thread Runs Out While Embroidering" on page 105. X The bobbin and upper threads are trimmed. • Before turning off Set the main power switch to "{". 4 Press the start/stop button. 1 X The embroidery machine stops and the start/stop when the thread color is changed , it is embroidering; Back up several stitches to trim the threads. 66 The machine can be sure to...
..., refer to "If the Thread Breaks or the Bobbin Thread Runs Out While Embroidering" on page 105. X The bobbin and upper threads are trimmed. • Before turning off Set the main power switch to "{". 4 Press the start/stop button. 1 X The embroidery machine stops and the start/stop when the thread color is changed , it is embroidering; Back up several stitches to trim the threads. 66 The machine can be sure to...
Users Manual - English
Page 80
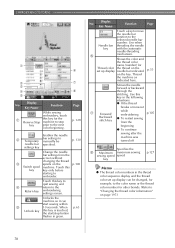
... sewing sewing speed speed. Unlocks the machine so it can be p. 130 needle bar specified. Use when threading the needle with the automatic needle-threading 6 mechanism. Moves the needle forward or backward through the stitching. Use this key in green. Page p. 128 Enables the needle 2 bar settings to Temporary manually be changed, for example, to stop button flashes in the following situations: ● If the thread breaks or runs out 7 Forward/ while embroidering p.105 Backward stitch...
... sewing sewing speed speed. Unlocks the machine so it can be p. 130 needle bar specified. Use when threading the needle with the automatic needle-threading 6 mechanism. Moves the needle forward or backward through the stitching. Use this key in green. Page p. 128 Enables the needle 2 bar settings to Temporary manually be changed, for example, to stop button flashes in the following situations: ● If the thread breaks or runs out 7 Forward/ while embroidering p.105 Backward stitch...
Users Manual - English
Page 81
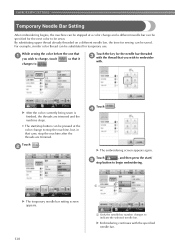
... embroidery cards - Use the "Temporary needle bar setting" function by digitizing software program - And the machine can be moved to the "embroidering position". (Refer to embroider. The far right needle is loaded. (Refer to page 220.) Using the USB cable, the data can resume the embroidery when the machine turns on page 110.) 1 Needle 2 Needle hole in the needle plate. Also when using the needle threader, the needle that particular needle EMBROIDERING: with *.pes, *.phc or *.dst patterns...
... embroidery cards - Use the "Temporary needle bar setting" function by digitizing software program - And the machine can be moved to the "embroidering position". (Refer to embroider. The far right needle is loaded. (Refer to page 220.) Using the USB cable, the data can resume the embroidery when the machine turns on page 110.) 1 Needle 2 Needle hole in the needle plate. Also when using the needle threader, the needle that particular needle EMBROIDERING: with *.pes, *.phc or *.dst patterns...
Users Manual - English
Page 132
... the color change to stop the machine, but, in that case, stop the machine after the threads are trimmed and the machine stops. • The start / 5 stop button to begin embroidering. Touch , and then press the start /stop button can be pressed at a color change and a different needle bar can be specified for sewing can be saved. By substituting upper thread already threaded on a different needle bar, the time for the...
... the color change to stop the machine, but, in that case, stop the machine after the threads are trimmed and the machine stops. • The start / 5 stop button to begin embroidering. Touch , and then press the start /stop button can be pressed at a color change and a different needle bar can be specified for sewing can be saved. By substituting upper thread already threaded on a different needle bar, the time for the...

Users Manual - English
Page 229
... 7 presser foot. Preparing to use the cap frame ■ Installing the cap frame driver Touch → → → in steps 4 through the ring of the 3 cap frame driver. Using the Optional Cap Frame 227 Remove the two upper thumb screws of the operation on the LCD (refer to page 206). 1 Upper thumb screws 2 Lower thumb screws Pass the machine bed through 7. 1 Thumb screws • The removed thumb screws remain attached...
... 7 presser foot. Preparing to use the cap frame ■ Installing the cap frame driver Touch → → → in steps 4 through the ring of the 3 cap frame driver. Using the Optional Cap Frame 227 Remove the two upper thumb screws of the operation on the LCD (refer to page 206). 1 Upper thumb screws 2 Lower thumb screws Pass the machine bed through 7. 1 Thumb screws • The removed thumb screws remain attached...
Users Manual - English
Page 255
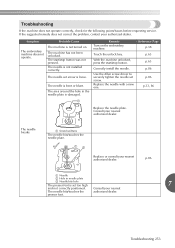
... start /stop button. Correctly install the needle. Troubleshooting 253 The needle is not installed correctly. Replace the needle with a new one. The needle breaks. 1 Scratches/Burrs The needle hits/touches the needle plate. Probable Cause The machine is damaged. The area around the hole in needle plate 3 Needle hits hole The presser foot is loose. Symptom The embroidery machine does not operate. Replace or consult your nearest authorized dealer. Remedy Turn on . Use the Allen screw driver to securely tighten the needle set...
... start /stop button. Correctly install the needle. Troubleshooting 253 The needle is not installed correctly. Replace the needle with a new one. The needle breaks. 1 Scratches/Burrs The needle hits/touches the needle plate. Probable Cause The machine is damaged. The area around the hole in needle plate 3 Needle hits hole The presser foot is loose. Symptom The embroidery machine does not operate. Replace or consult your nearest authorized dealer. Remedy Turn on . Use the Allen screw driver to securely tighten the needle set...
Users Manual - English
Page 257
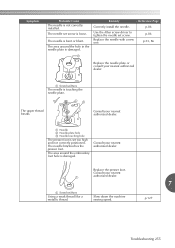
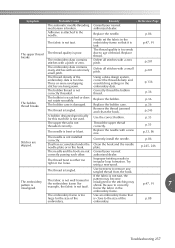
The area around the embroidery foot hole is damaged. Remedy Correctly install the needle. The needle hits/touches the presser foot. Slow down the machine sewing speed. 7 p.127 Troubleshooting 255 Replace the needle with a new one. The area around the hole in the needle plate is damaged. Consult your nearest authorized dealer. The needle set screw is set screw. The upper thread breaks. Consult your nearest authorized dealer. 1 Scratches/Burrs The needle is not correctly installed. Consult your nearest...
The area around the embroidery foot hole is damaged. Remedy Correctly install the needle. The needle hits/touches the presser foot. Slow down the machine sewing speed. 7 p.127 Troubleshooting 255 Replace the needle with a new one. The area around the hole in the needle plate is damaged. Consult your nearest authorized dealer. The needle set screw is set screw. The upper thread breaks. Consult your nearest authorized dealer. 1 Scratches/Burrs The needle is not correctly installed. Consult your nearest...
Users Manual - English
Page 259
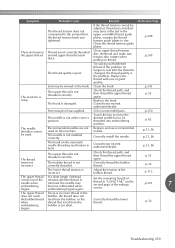
... embroidery data contains stitches with a pitch of the p.88 embroidery. Delete all stitches with an extremely small pitch. The thread is either too tight or too loose. Thread the upper thread correctly. embroidery. Troubleshooting 257 Replace the bobbin case. p.136 The bobbin thread is damaged. Correctly install the needle. authorized dealer. p.47, 91 The upper thread breaks. The bobbin case is not correctly threaded. Replace the bobbin. The needle is not used. Firmly set the fabric in the p.47, 91 7 embroidery...
... embroidery data contains stitches with a pitch of the p.88 embroidery. Delete all stitches with an extremely small pitch. The thread is either too tight or too loose. Thread the upper thread correctly. embroidery. Troubleshooting 257 Replace the bobbin case. p.136 The bobbin thread is damaged. Correctly install the needle. authorized dealer. p.47, 91 The upper thread breaks. The bobbin case is not correctly threaded. Replace the bobbin. The needle is not used. Firmly set the fabric in the p.47, 91 7 embroidery...
Users Manual - English
Page 261
.... Troubleshooting 259 p.248 There are not used . Thread is not threaded correctly. Try sewing with one of the settings screen. Check the thread path, and then thread the upper thread again. Replace the hook. The needle threader cannot be wound in the upper thread. Correctly install the needle. p.33, 86 The thread The upper thread is not correctly threaded around upper thread tension discs. Adjust the tension of the needle when embroidering begins. p.36 embroidering bobbin is incorrect. Rethread and make sure tension...
.... Troubleshooting 259 p.248 There are not used . Thread is not threaded correctly. Try sewing with one of the settings screen. Check the thread path, and then thread the upper thread again. Replace the hook. The needle threader cannot be wound in the upper thread. Correctly install the needle. p.33, 86 The thread The upper thread is not correctly threaded around upper thread tension discs. Adjust the tension of the needle when embroidering begins. p.36 embroidering bobbin is incorrect. Rethread and make sure tension...
Users Manual - English
Page 275
... removing 36 Bobbin winder 240 Changing character spacing 167 colors of the pattern 171 display guides 196 embroidering position 96 language 205 size 164 text arrangement of a character 167 thread color display 197 thread density 170 thread spools 103 units of measurements 205 Checking needle bars and thread colors 53 preview image 46 thread spool changes 101 thread tension 67 Cleaning around the needle plate 246 bobbin case 247 hook 245 LCD 245 machine surface 245 maintenance message 251 oiling machine...
... removing 36 Bobbin winder 240 Changing character spacing 167 colors of the pattern 171 display guides 196 embroidering position 96 language 205 size 164 text arrangement of a character 167 thread color display 197 thread density 170 thread spools 103 units of measurements 205 Checking needle bars and thread colors 53 preview image 46 thread spool changes 101 thread tension 67 Cleaning around the needle plate 246 bobbin case 247 hook 245 LCD 245 machine surface 245 maintenance message 251 oiling machine...

Users Manual - English
Page 276
... key 164 I Industrial embroidery frame 224 J Jump code 199 Jumpstitch trimming 199 L Language 195, 205 LCD 21, 34, 70 Lingerie 223 Lock stitching key 76, 122 Locking mechanism 63 Locking the needle bar 97 Low Profile (Low fitting 226 Lower thread guide 20 M Machine operations guide key 206 Main power switch 21, 38, 69 Maintenance 206, 245 Manual needle bar settings 132 Maximum sewing speed key 78 Middle thread guide 20 Monogram and frame designs 142 Mounting...
... key 164 I Industrial embroidery frame 224 J Jump code 199 Jumpstitch trimming 199 L Language 195, 205 LCD 21, 34, 70 Lingerie 223 Lock stitching key 76, 122 Locking mechanism 63 Locking the needle bar 97 Low Profile (Low fitting 226 Lower thread guide 20 M Machine operations guide key 206 Main power switch 21, 38, 69 Maintenance 206, 245 Manual needle bar settings 132 Maximum sewing speed key 78 Middle thread guide 20 Monogram and frame designs 142 Mounting...
Users Manual - English
Page 277
... fabric .......... 218 Sewing key 76 Sewing light 20, 203 Sewing order 77 Thread guide pins 20 Thread recommendations 34 Thread sensor 204 Thread spools 103 changing 103 easily changing 104 Thread tail length 201 Thread tension 112, 244 Thread tension disc 57 Thread tension knobs 20, 113 Thread trimming button 21, 66 Threading needle 59 upper thread 53, 55 Thumbnail size 198 Tips for machine operation 217 Touch panel 21 Trial sewing key 51, 76 Troubleshooting 206, 252 T-shirt 223 Sewing speed 127 Sewing the embroidery 63 U Sewing time...
... fabric .......... 218 Sewing key 76 Sewing light 20, 203 Sewing order 77 Thread guide pins 20 Thread recommendations 34 Thread sensor 204 Thread spools 103 changing 103 easily changing 104 Thread tail length 201 Thread tension 112, 244 Thread tension disc 57 Thread tension knobs 20, 113 Thread trimming button 21, 66 Threading needle 59 upper thread 53, 55 Thumbnail size 198 Tips for machine operation 217 Touch panel 21 Trial sewing key 51, 76 Troubleshooting 206, 252 T-shirt 223 Sewing speed 127 Sewing the embroidery 63 U Sewing time...


