
Users Manual - English
Page 4
...administered. • Do not use the machine near an open flame; Do not use bent or damaged needles. • Keep fingers away from the build up of all machine openings, such as near the needle bar case, otherwise injuries may fall, resulting in injuries. 5 Special care is required when sewing: &#... case and all moving parts. Special care is required around the machine needle. • While the machine is in the needle area, such as changing the needle. • Do not use a damaged or incorrect needle plate, as it could cause the garment being sewn to catch fire. • Do not place ...
...administered. • Do not use the machine near an open flame; Do not use bent or damaged needles. • Keep fingers away from the build up of all machine openings, such as near the needle bar case, otherwise injuries may fall, resulting in injuries. 5 Special care is required when sewing: &#... case and all moving parts. Special care is required around the machine needle. • While the machine is in the needle area, such as changing the needle. • Do not use a damaged or incorrect needle plate, as it could cause the garment being sewn to catch fire. • Do not place ...

Users Manual - English
Page 5
... this manual. Use only a mouse designed specifically for household use. For additional product information and updates, visit our website at www.brother.com SAVE THESE INSTRUCTIONS This machine is required, first follow the troubleshooting table in the back of this machine, avoid direct sunlight and...injuries may result. • If the light unit is damaged, it must be replaced by the manufacturer as described in any assemblies, needle, or other hot objects. • Use only neutral soaps or detergents to inspect and adjust the machine yourself. Use accessories recommended by ...
... this manual. Use only a mouse designed specifically for household use. For additional product information and updates, visit our website at www.brother.com SAVE THESE INSTRUCTIONS This machine is required, first follow the troubleshooting table in the back of this machine, avoid direct sunlight and...injuries may result. • If the light unit is damaged, it must be replaced by the manufacturer as described in any assemblies, needle, or other hot objects. • Use only neutral soaps or detergents to inspect and adjust the machine yourself. Use accessories recommended by ...

Users Manual - English
Page 10
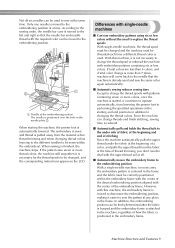
...The threads threaded on the screen. It can sew embroidery patterns that the machine does not always assign colors according to their corresponding needle bar number. This also means that contain several colors by a color that will be used on the next pattern the machine will ...assign the color to left: needle bar 1, needle bar 2, needle bar 3, needle bar 4, needle bar 5, and needle bar 6. The spool pins, thread tension knobs, thread takeup levers and thread paths, mentioned when threading the upper thread...
...The threads threaded on the screen. It can sew embroidery patterns that the machine does not always assign colors according to their corresponding needle bar number. This also means that contain several colors by a color that will be used on the next pattern the machine will ...assign the color to left: needle bar 1, needle bar 2, needle bar 3, needle bar 4, needle bar 5, and needle bar 6. The spool pins, thread tension knobs, thread takeup levers and thread paths, mentioned when threading the upper thread...
Users Manual - English
Page 11
... patterns containing six or less colors. If the pattern uses seven or more thread colors, the machine will come back to the needle that the needle bar and needle thread with the center of how the fabric is positioned in the frame. If total colors are less than 6 colors, and ...embroidering position, making it is moved to the left and right so that the machine is already used . When starting and end positions in the needle plate 2. However, with patterns containing seven or more than 7 times, machine will stop when it continues to operate automatically, from the material when...
... patterns containing six or less colors. If the pattern uses seven or more thread colors, the machine will come back to the needle that the needle bar and needle thread with the center of how the fabric is positioned in the frame. If total colors are less than 6 colors, and ...embroidering position, making it is moved to the left and right so that the machine is already used . When starting and end positions in the needle plate 2. However, with patterns containing seven or more than 7 times, machine will stop when it continues to operate automatically, from the material when...
Users Manual - English
Page 12
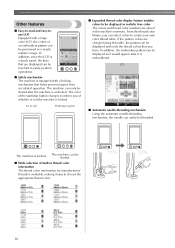
... be displayed as it would appear after the machine is available, making it is locked. The machine is embroidered. ■ Automatic needle-threading mechanism Using the automatic needle-threading mechanism, the needle can be displayed as realistic true color The colors and thread color numbers are stored in the machine's memory. Other features...
... be displayed as it would appear after the machine is available, making it is locked. The machine is embroidered. ■ Automatic needle-threading mechanism Using the automatic needle-threading mechanism, the needle can be displayed as realistic true color The colors and thread color numbers are stored in the machine's memory. Other features...
Users Manual - English
Page 13
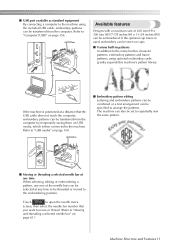
... computer by temporarily saving them on page 156. The machine can also be set to repeatedly sew the same pattern. ■ Moving or threading a selected needle bar at any time When selecting, editing or embroidering a pattern, any one of 200 mm (H) × 300 mm (W) (7-7/8 inches (H) × 11-3/4 inches (W)) ... number that the USB cable does not reach the computer, embroidery patterns can be specified to "Moving and threading a selected needle bar" on page 61.) Machine Structure and Features 11 ■ USB port available as standard equipment By connecting a computer to the machine ...
... computer by temporarily saving them on page 156. The machine can also be set to repeatedly sew the same pattern. ■ Moving or threading a selected needle bar at any time When selecting, editing or embroidering a pattern, any one of 200 mm (H) × 300 mm (W) (7-7/8 inches (H) × 11-3/4 inches (W)) ... number that the USB cable does not reach the computer, embroidery patterns can be specified to "Moving and threading a selected needle bar" on page 61.) Machine Structure and Features 11 ■ USB port available as standard equipment By connecting a computer to the machine ...
Users Manual - English
Page 14
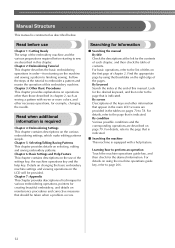
... be taken when a problem occurs. For details, refer to perform an operation Touch the machine operations guide key, and then check for example, changing the needle. Learning how to the page that should be provided. Manual Structure This manual is constructed as sewing a pattern with a help key. Read before starting to...
... be taken when a problem occurs. For details, refer to perform an operation Touch the machine operations guide key, and then check for example, changing the needle. Learning how to the page that should be provided. Manual Structure This manual is constructed as sewing a pattern with a help key. Read before starting to...
Users Manual - English
Page 15
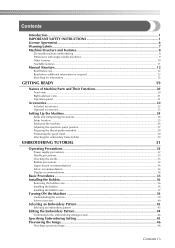
... IMPORTANT SAFETY INSTRUCTIONS 1 License Agreement ...6 Warning Labels...7 Machine Structure and Features 8 Six-needle machine embroidering ...8 Differences with single-needle machines ...9 Other features ...10 Available features ...11 Manual Structure...12 Read before use ...12......29 Attaching the embroidery frame holder...29 EMBROIDERING TUTORIAL 31 Operating Precautions...32 Power supply precautions ...32 Needle precautions...33 Checking the needle ...33 Bobbin precautions...33 Upper thread recommendations ...34 Fabric recommendations ...34 Display recommendations ...34 Basic Procedures...
... IMPORTANT SAFETY INSTRUCTIONS 1 License Agreement ...6 Warning Labels...7 Machine Structure and Features 8 Six-needle machine embroidering ...8 Differences with single-needle machines ...9 Other features ...10 Available features ...11 Manual Structure...12 Read before use ...12......29 Attaching the embroidery frame holder...29 EMBROIDERING TUTORIAL 31 Operating Precautions...32 Power supply precautions ...32 Needle precautions...33 Checking the needle ...33 Bobbin precautions...33 Upper thread recommendations ...34 Fabric recommendations ...34 Display recommendations ...34 Basic Procedures...
Users Manual - English
Page 16
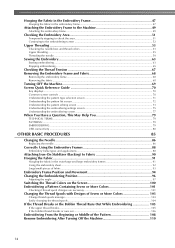
...check the area...51 Continuing to the embroidering screen ...52 Upper Threading ...53 Checking the needle bars and thread colors 53 Upper threading ...55 Threading the needle ...59 Sewing the Embroidery 63 Starting embroidering ...63 Stopping embroidering ...65 Checking the Thread Tension...You 79 TECHNICAL TERMS: ...79 PATTERNS: ...79 EMBROIDERING: ...79 USB connectivity ...80 OTHER BASIC PROCEDURES 85 Changing the Needle ...86 Replacing the needle...86 Correctly Using the Embroidery Frames 88 Embroidery frame types and applications ...88 Attaching Iron-On Stabilizer (Backing) to Fabric ...
...check the area...51 Continuing to the embroidering screen ...52 Upper Threading ...53 Checking the needle bars and thread colors 53 Upper threading ...55 Threading the needle ...59 Sewing the Embroidery 63 Starting embroidering ...63 Stopping embroidering ...65 Checking the Thread Tension...You 79 TECHNICAL TERMS: ...79 PATTERNS: ...79 EMBROIDERING: ...79 USB connectivity ...80 OTHER BASIC PROCEDURES 85 Changing the Needle ...86 Replacing the needle...86 Correctly Using the Embroidery Frames 88 Embroidery frame types and applications ...88 Attaching Iron-On Stabilizer (Backing) to Fabric ...
Users Manual - English
Page 17
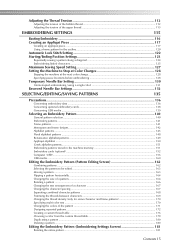
... at Color Changes 128 Stopping the machine at the next color change 128 Specifying pause locations before embroidering 128 Temporary Needle Bar Setting 130 Uninterrupted embroidering (using a single color 131 Reserved Needle Bar Settings 132 SELECTING/EDITING/SAVING PATTERNS 135 Precautions...136 Concerning embroidery data ...136 Concerning optional embroidery cards ...138 Concerning...
... at Color Changes 128 Stopping the machine at the next color change 128 Specifying pause locations before embroidering 128 Temporary Needle Bar Setting 130 Uninterrupted embroidering (using a single color 131 Reserved Needle Bar Settings 132 SELECTING/EDITING/SAVING PATTERNS 135 Precautions...136 Concerning embroidery data ...136 Concerning optional embroidery cards ...138 Concerning...
Users Manual - English
Page 19
Cleaning the machine surface ...245 Cleaning the hook ...245 Cleaning around the needle plate ...246 Cleaning the bobbin case ...247 Cleaning the thread paths of the upper threads 248 Oiling the machine ...250 About the maintenance message...251 ...
Cleaning the machine surface ...245 Cleaning the hook ...245 Cleaning around the needle plate ...246 Cleaning the bobbin case ...247 Cleaning the thread paths of the upper threads 248 Oiling the machine ...250 About the maintenance message...251 ...
Users Manual - English
Page 22
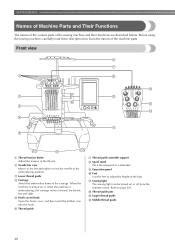
... stand Put 6 thread spools to embroider. 9 Operation panel 0 Feet Use the feet to adjust the height of the thread. 2 Needle bar case Moves to the left and right to move the needle to the embroidering position. 3 Lower thread guide 4 Carriage Attach the embroidery frame to the carriage. Refer to learn the names...
... stand Put 6 thread spools to embroider. 9 Operation panel 0 Feet Use the feet to adjust the height of the thread. 2 Needle bar case Moves to the left and right to move the needle to the embroidering position. 3 Lower thread guide 4 Carriage Attach the embroidery frame to the carriage. Refer to learn the names...
Users Manual - English
Page 23
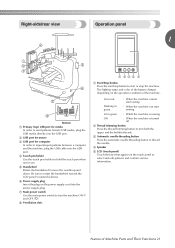
...off 2 Thread trimming button Press the thread trimming button to trim both the upper and the bobbin threads. 3 Automatic needle-threading button Press the automatic needle threading button to thread the needle. 4 Speaker 5 LCD (touch panel) Touch the keys that appear on the operation condition of Machine Parts and ... green : When the machine can start or stop button to start sewing Lit in use. 5 Handwheel Rotate the handwheel to move the needle up and down. The lighting status and color of the button changes depending on the touch panel to select and edit patterns and confirm ...
...off 2 Thread trimming button Press the thread trimming button to trim both the upper and the bobbin threads. 3 Automatic needle-threading button Press the automatic needle threading button to thread the needle. 4 Speaker 5 LCD (touch panel) Touch the keys that appear on the operation condition of Machine Parts and ... green : When the machine can start or stop button to start sewing Lit in use. 5 Handwheel Rotate the handwheel to move the needle up and down. The lighting status and color of the button changes depending on the touch panel to select and edit patterns and confirm ...

Users Manual - English
Page 24
... × 2 3 Prewound bobbin × 6 4 Spool net × 6 5 Seam ripper 6 Scissors 7 Tweezers 8 Touch pen 9 Needle changing tool (Threader) 10 Needle plate spacer 11 Phillips screwdriver 12 Standard screwdriver 13 Allen screwdriver 14 Offset screwdriver 15 Disc-shaped screwdriver 16 Wrench 13 × 10 17 Oiler ...
... × 2 3 Prewound bobbin × 6 4 Spool net × 6 5 Seam ripper 6 Scissors 7 Tweezers 8 Touch pen 9 Needle changing tool (Threader) 10 Needle plate spacer 11 Phillips screwdriver 12 Standard screwdriver 13 Allen screwdriver 14 Offset screwdriver 15 Disc-shaped screwdriver 16 Wrench 13 × 10 17 Oiler ...

Users Manual - English
Page 35
... Be sure to observe the following precautions concerning the correct choice of the needle on page 86.) ■ Good needle ■ Bad needle If the distance between the needle and the flat surface is not even, the needle is operating. Do not use prewound bobbin (COATS "L" type/TRU-SEW ...code: 100376-053). ● When winding the bobbin, be incorrect. COATS L Polyester ● When winding a bobbin, only use household embroidery needles. If the needle is bent or the tip of any other bobbin may result in injuries or damage to the machine. ● Use a bobbin thread that ...
... Be sure to observe the following precautions concerning the correct choice of the needle on page 86.) ■ Good needle ■ Bad needle If the distance between the needle and the flat surface is not even, the needle is operating. Do not use prewound bobbin (COATS "L" type/TRU-SEW ...code: 100376-053). ● When winding the bobbin, be incorrect. COATS L Polyester ● When winding a bobbin, only use household embroidery needles. If the needle is bent or the tip of any other bobbin may result in injuries or damage to the machine. ● Use a bobbin thread that ...

Users Manual - English
Page 36
..., if adjusting is not caught in front of the display while using it. (Refer to "Adjusting the operation panel position" on page 90 for the needle to the display screen may result. • The display may bend or break. ● When embroidering overlapping stitches, it is a normal characteristic of a malfunction....fabric, make sure that rayon or polyester embroidery thread be used (120 den x 2 / 135 dtex x 2 / 40 weight (in Americas and Europe) / #50 (in the needle bending or breaking. This is a normal characteristic of the backlight and is not a sign of the display and is sewn, the...
..., if adjusting is not caught in front of the display while using it. (Refer to "Adjusting the operation panel position" on page 90 for the needle to the display screen may result. • The display may bend or break. ● When embroidering overlapping stitches, it is a normal characteristic of a malfunction....fabric, make sure that rayon or polyester embroidery thread be used (120 den x 2 / 135 dtex x 2 / 40 weight (in Americas and Europe) / #50 (in the needle bending or breaking. This is a normal characteristic of the backlight and is not a sign of the display and is sewn, the...
Users Manual - English
Page 40
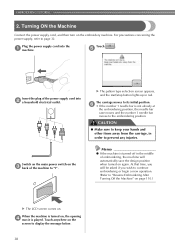
... ON the Machine Connect the power supply cord, and then turn on again. The carriage moves to its initial position. 6 • If the number 1 needle bar is played. CAUTION ● Make sure to keep your hands and other items away from the carriage, in order to "Resume Embroidering After Turning... Machine" on page 110.) X The LCD screen comes on , the opening 4 movie is not already at the embroidering position, the needle bar case moves and the number 1 needle bar moves to display the message below. 38 When the machine is turned on . Switch on the main power switch on the...
... ON the Machine Connect the power supply cord, and then turn on again. The carriage moves to its initial position. 6 • If the number 1 needle bar is played. CAUTION ● Make sure to keep your hands and other items away from the carriage, in order to "Resume Embroidering After Turning... Machine" on page 110.) X The LCD screen comes on , the opening 4 movie is not already at the embroidering position, the needle bar case moves and the number 1 needle bar moves to display the message below. 38 When the machine is turned on . Switch on the main power switch on the...

Users Manual - English
Page 41
... to check a machine operation. p. 194 * The keys in the table above appear and can be entered using the operation panel. key p.206 5 Needle bar move or thread a selected needle bar. Understanding the screens When the machine is turned on and is available in any screen. The operations described below will be specified...
... to check a machine operation. p. 194 * The keys in the table above appear and can be entered using the operation panel. key p.206 5 Needle bar move or thread a selected needle bar. Understanding the screens When the machine is turned on and is available in any screen. The operations described below will be specified...
Users Manual - English
Page 43
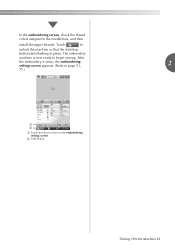
After the embroidery is now ready to the embroidering settings screen. 2 Unlock key Turning ON the Machine 41 The embroidery machine is sewn, the embroidering settings screen appears. (Refer to page 53, 2 77.) 1 2 1 Touch this key to return to begin sewing. Touch to the needle bars, and then install the upper threads. In the embroidering screen, check the thread colors assigned to unlock the machine so that the start/stop button starts flashing in green.
After the embroidery is now ready to the embroidering settings screen. 2 Unlock key Turning ON the Machine 41 The embroidery machine is sewn, the embroidering settings screen appears. (Refer to page 53, 2 77.) 1 2 1 Touch this key to return to begin sewing. Touch to the needle bars, and then install the upper threads. In the embroidering screen, check the thread colors assigned to unlock the machine so that the start/stop button starts flashing in green.

Users Manual - English
Page 55
... AB 7 6 1 5 2 4 3 9 8 1 Thread information for the first needle bar 2 Thread information for the second needle bar 3 Thread information for the third needle bar 4 Thread information for the fourth needle bar 5 Thread information for the fifth needle bar 6 Thread information for the thread spool to be changed appears framed in... page 103.) This message appears when it is not touched to be threaded with the color name that appears beside each needle bar number is not used. Upper Threading 53 Upper Threading Check the embroidering screen for the thread spools to close the ...
... AB 7 6 1 5 2 4 3 9 8 1 Thread information for the first needle bar 2 Thread information for the second needle bar 3 Thread information for the third needle bar 4 Thread information for the fourth needle bar 5 Thread information for the fifth needle bar 6 Thread information for the thread spool to be changed appears framed in... page 103.) This message appears when it is not touched to be threaded with the color name that appears beside each needle bar number is not used. Upper Threading 53 Upper Threading Check the embroidering screen for the thread spools to close the ...


