
Users Manual - English
Page 3
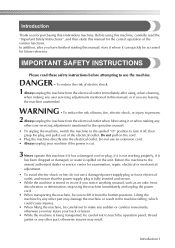
...for the correct operation of electric shock: 1 Always unplug the machine from the electrical outlet immediately after you have finished reading this manual for future reference. do not use a damaged power supply plug or loose electrical outlet, and ensure that the power supply plug is...bottom positions. Before using , when cleaning, when making any other part, otherwise injuries may damage the machine or result in the operation manual. • To unplug the machine, switch the machine to the symbol "O" position to the nearest authorized dealer or service center for ...
...for the correct operation of electric shock: 1 Always unplug the machine from the electrical outlet immediately after you have finished reading this manual for future reference. do not use a damaged power supply plug or loose electrical outlet, and ensure that the power supply plug is...bottom positions. Before using , when cleaning, when making any other part, otherwise injuries may damage the machine or result in the operation manual. • To unplug the machine, switch the machine to the symbol "O" position to the nearest authorized dealer or service center for ...

Users Manual - English
Page 5
...or other parts to assure correct installation. 8 For repair or adjustment: • Do not try to disassemble, repair or alter this manual. IMPORTANT SAFETY INSTRUCTIONS 3 Use only the interface cable (USB cable) included with this machine. For additional product information and updates, visit...specifications of the operation manual to inspect and adjust the machine yourself. Do not use as contained in this machine in the back of this machine, avoid direct sunlight and high humidity locations. If the problem persists, please consult your local authorized Brother dealer. 7 For ...
...or other parts to assure correct installation. 8 For repair or adjustment: • Do not try to disassemble, repair or alter this manual. IMPORTANT SAFETY INSTRUCTIONS 3 Use only the interface cable (USB cable) included with this machine. For additional product information and updates, visit...specifications of the operation manual to inspect and adjust the machine yourself. Do not use as contained in this machine in the back of this machine, avoid direct sunlight and high humidity locations. If the problem persists, please consult your local authorized Brother dealer. 7 For ...
Users Manual - English
Page 14
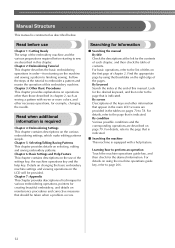
...screens are provided in order-from turning on operations other necessary operations, for example, changing the needle. By screen Descriptions of this manual. For basic operations, refer to finishing sewing. Find the appropriate page by using the machine operations guide key, refer to the ...For details on pages 70 to embroider a pattern and master the operation of contents. Learning how to the page that is indicated. Manual Structure This manual is constructed as sewing a pattern with a help key. Look for the contents of each chapter, and then check the table of...
...screens are provided in order-from turning on operations other necessary operations, for example, changing the needle. By screen Descriptions of this manual. For basic operations, refer to finishing sewing. Find the appropriate page by using the machine operations guide key, refer to the ...For details on pages 70 to embroider a pattern and master the operation of contents. Learning how to the page that is indicated. Manual Structure This manual is constructed as sewing a pattern with a help key. Look for the contents of each chapter, and then check the table of...
Users Manual - English
Page 15
... SAFETY INSTRUCTIONS 1 License Agreement ...6 Warning Labels...7 Machine Structure and Features 8 Six-needle machine embroidering ...8 Differences with single-needle machines ...9 Other features ...10 Available features ...11 Manual Structure...12 Read before use ...12 Read when additional information is required 12 Searching for information ...12 GETTING READY 19 Names of Machine Parts and...
... SAFETY INSTRUCTIONS 1 License Agreement ...6 Warning Labels...7 Machine Structure and Features 8 Six-needle machine embroidering ...8 Differences with single-needle machines ...9 Other features ...10 Available features ...11 Manual Structure...12 Read before use ...12 Read when additional information is required 12 Searching for information ...12 GETTING READY 19 Names of Machine Parts and...

Users Manual - English
Page 24
...mm (W) (4 inches (H) × 4 inches (W)) Embroidery sheet (small) 40 mm 28 (H) × 60 mm (W) (1-1/2 inches (H) × 2-3/8 inches (W)) 29 Operation manual 30 Quick reference guide 31 Spool mat × 6 32 Spool cap × 6 33 Card reader holder Part Code PRH300 PRH180 PRH100 PRH60 XC5704-051 XC5721...-051 XC5759-051 XC5761-051 This manual XE6282-001 XC7134-051 130012-054 XE6620-001 22 If any item is missing or damaged, contact your authorized dealer. 1. 2. 3. 4. 5. 6. ...
...mm (W) (4 inches (H) × 4 inches (W)) Embroidery sheet (small) 40 mm 28 (H) × 60 mm (W) (1-1/2 inches (H) × 2-3/8 inches (W)) 29 Operation manual 30 Quick reference guide 31 Spool mat × 6 32 Spool cap × 6 33 Card reader holder Part Code PRH300 PRH180 PRH100 PRH60 XC5704-051 XC5721...-051 XC5759-051 XC5761-051 This manual XE6282-001 XC7134-051 130012-054 XE6620-001 22 If any item is missing or damaged, contact your authorized dealer. 1. 2. 3. 4. 5. 6. ...

Users Manual - English
Page 41
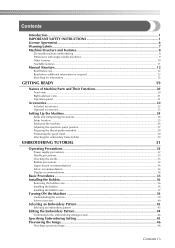
... Home key Function Touch this key to the initial pattern group selection screen. For precautions concerning the use of the screens described later in this manual. Reference Page 2 Pattern display area This area displays the selected pattern. Machine 4 operations guide Touch this key to move Touch this key to page 34...
... Home key Function Touch this key to the initial pattern group selection screen. For precautions concerning the use of the screens described later in this manual. Reference Page 2 Pattern display area This area displays the selected pattern. Machine 4 operations guide Touch this key to move Touch this key to page 34...
Users Manual - English
Page 80
... sewing embroidery, touch 1 this key in the thread color sequence display and the thread color set up display can start /stop key prior to Temporary manually be changed, for example, to the color name or the thread color number for Thread color the thread on the set up display needle bar...
... sewing embroidery, touch 1 this key in the thread color sequence display and the thread color set up display can start /stop key prior to Temporary manually be changed, for example, to the color name or the thread color number for Thread color the thread on the set up display needle bar...
Users Manual - English
Page 83
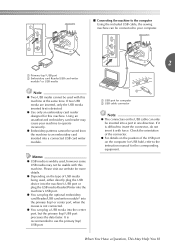
... visit our website for more details. ● Depending on the type of the USB port on the computer (or USB hub), refer to the instruction manual for this machine. Check the orientation of the connector. ● For details on the USB cable can only be inserted into the center port, but...
... visit our website for more details. ● Depending on the type of the USB port on the computer (or USB hub), refer to the instruction manual for this machine. Check the orientation of the connector. ● For details on the USB cable can only be inserted into the center port, but...

Users Manual - English
Page 134
... of the settings screen. Select the color to be assigned to a certain needle bar. Note ● This feature is cancelled. The manual needle bar settings can be specified in the direction of the arrow on the key that needle bar is touched. 1 Indicates the number of... the selected needle bar 132 however, a specific thread color can be manually assigned to the needle 3 bar. Touch , , and until the setting is not accessible through the embroidering screen. Once a manual needle bar setting is selected and its name X Highlighting a color square moves in page...
... of the settings screen. Select the color to be assigned to a certain needle bar. Note ● This feature is cancelled. The manual needle bar settings can be specified in the direction of the arrow on the key that needle bar is touched. 1 Indicates the number of... the selected needle bar 132 however, a specific thread color can be manually assigned to the needle 3 bar. Touch , , and until the setting is not accessible through the embroidering screen. Once a manual needle bar setting is selected and its name X Highlighting a color square moves in page...

Users Manual - English
Page 135
Touch , , , , or for the 1 number of the selected needle bar Reserved Needle Bar Settings 133 X This cancels the manual needle bar setting. 4 1 Indicates the number of the needle bar whose setting you wish to cancel. 1 1 The anchor disappears from the thread spool. Touch . 4 Touch . 2 1 1 X The color selected in step 3 is specified. 1 The selected color of thread and the anchor appear on the spool. ■ Cancelling the setting To change the setting, first cancel it, and then select the new setting.
Touch , , , , or for the 1 number of the selected needle bar Reserved Needle Bar Settings 133 X This cancels the manual needle bar setting. 4 1 Indicates the number of the needle bar whose setting you wish to cancel. 1 1 The anchor disappears from the thread spool. Touch . 4 Touch . 2 1 1 X The color selected in step 3 is specified. 1 The selected color of thread and the anchor appear on the spool. ■ Cancelling the setting To change the setting, first cancel it, and then select the new setting.
Users Manual - English
Page 138
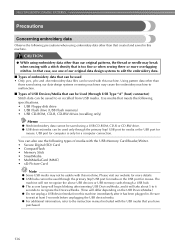
... purchased. 136 CAUTION ● While using embroidery data other than our original patterns, the thread or needle may cause the embroidery machine to the instruction manual included with the USB Memory Card Reader/Writer. • Secure Digital (SD) Card • CompactFlash • Memory Stick • SmartMedia • MultiMediaCard (MMC) • xD...
... purchased. 136 CAUTION ● While using embroidery data other than our original patterns, the thread or needle may cause the embroidery machine to the instruction manual included with the USB Memory Card Reader/Writer. • Secure Digital (SD) Card • CompactFlash • Memory Stick • SmartMedia • MultiMediaCard (MMC) • xD...

Users Manual - English
Page 140
...a registered trademark or a trademark of Fuji Photo Film Co. Ltd. • IBM is a registered trademark or a trademark of International Business Machines Corporation. • Microsoft, Windows and Windows Vista are registered trademarks or trademarks of Microsoft Corporation. • Each company ...whose software title is mentioned in this manual has a Software License Agreement specific to its proprietary programs. All other brands and product names mentioned in their respective companies....
...a registered trademark or a trademark of Fuji Photo Film Co. Ltd. • IBM is a registered trademark or a trademark of International Business Machines Corporation. • Microsoft, Windows and Windows Vista are registered trademarks or trademarks of Microsoft Corporation. • Each company ...whose software title is mentioned in this manual has a Software License Agreement specific to its proprietary programs. All other brands and product names mentioned in their respective companies....

Users Manual - English
Page 141
... unplug a USB device/media from speakers). • While embroidery data is not flashing (refer to page 160). • For additional information, refer to the instruction manual included with this machine immediately after it has been plugged in locations exposed to vibrations or impacts, direct sunlight, extreme dust (or lint), high temperatures...
... unplug a USB device/media from speakers). • While embroidery data is not flashing (refer to page 160). • For additional information, refer to the instruction manual included with this machine immediately after it has been plugged in locations exposed to vibrations or impacts, direct sunlight, extreme dust (or lint), high temperatures...

Users Manual - English
Page 159
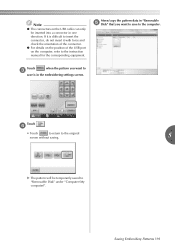
... connector. ● For details on the computer, refer to the machine. X The selected pattern appears in the "Removable Disk" folder is written to the instruction manual for the corresponding equipment. X Pattern data in the pattern display area. touch . Note ● The connectors on the computer, the connection is completed. Touch . 2 X The...
... connector. ● For details on the computer, refer to the machine. X The selected pattern appears in the "Removable Disk" folder is written to the instruction manual for the corresponding equipment. X Pattern data in the pattern display area. touch . Note ● The connectors on the computer, the connection is completed. Touch . 2 X The...
Users Manual - English
Page 193
... save to the computer. Move/copy the pattern data in the embroidering settings screen. Note ● The connectors on the computer, refer to the instruction manual for the corresponding equipment.
... save to the computer. Move/copy the pattern data in the embroidering settings screen. Note ● The connectors on the computer, refer to the instruction manual for the corresponding equipment.

Users Manual - English
Page 208
... from the four topics that appear to display the available information. ■ Contents of Categories Principal Parts Displays and explains principal parts of the Operation Manual, such as basic machine operations. Maintenance Instruction for problems solving. BASIC SETTINGS AND HELP FEATURE Using the Machine Operations Guide Key This machine contains information...
... from the four topics that appear to display the available information. ■ Contents of Categories Principal Parts Displays and explains principal parts of the Operation Manual, such as basic machine operations. Maintenance Instruction for problems solving. BASIC SETTINGS AND HELP FEATURE Using the Machine Operations Guide Key This machine contains information...

Users Manual - English
Page 216
... on recalling patterns, refer to "USB media" on creating large-size embroidery patterns and for more sections in the pattern, touch or to the operation manual included with PE-DESIGN Ver.7 or later. The following procedure describes how to be embroidered, then • Select the sections in alphabetical order. • A maximum...
... on recalling patterns, refer to "USB media" on creating large-size embroidery patterns and for more sections in the pattern, touch or to the operation manual included with PE-DESIGN Ver.7 or later. The following procedure describes how to be embroidered, then • Select the sections in alphabetical order. • A maximum...

Users Manual - English
Page 272
... (H) inches) Maximum / Tubular: 1,000 spm, Cap: 600 spm Speed range / Max.: 1,000 spm, Min.: 400 spm Vertical rotary hook Normal size (Type L) HA130EBBR / #11 6 needles Manual (Option) 60 mm (H) × 130 mm (W) (2-3/8 inches (H) × 5-1/8 inches (W)) (4 frames available) 200 mm (W) x 300 mm(H) (7-7/8 inches (H) x 11-3/4 inches (W)), 130 mm (W) x 180 mm(H) (5-1/8 inches (H) x 7-1/8 inches (W)), 100...
... (H) inches) Maximum / Tubular: 1,000 spm, Cap: 600 spm Speed range / Max.: 1,000 spm, Min.: 400 spm Vertical rotary hook Normal size (Type L) HA130EBBR / #11 6 needles Manual (Option) 60 mm (H) × 130 mm (W) (2-3/8 inches (H) × 5-1/8 inches (W)) (4 frames available) 200 mm (W) x 300 mm(H) (7-7/8 inches (H) x 11-3/4 inches (W)), 130 mm (W) x 180 mm(H) (5-1/8 inches (H) x 7-1/8 inches (W)), 100...

Users Manual - English
Page 276
... bar 97 Low Profile (Low fitting 226 Lower thread guide 20 M Machine operations guide key 206 Main power switch 21, 38, 69 Maintenance 206, 245 Manual needle bar settings 132 Maximum sewing speed key 78 Middle thread guide 20 Monogram and frame designs 142 Mounting jig cap frame 230 Mouse pointer...
... bar 97 Low Profile (Low fitting 226 Lower thread guide 20 M Machine operations guide key 206 Main power switch 21, 38, 69 Maintenance 206, 245 Manual needle bar settings 132 Maximum sewing speed key 78 Middle thread guide 20 Monogram and frame designs 142 Mounting jig cap frame 230 Mouse pointer...
Accessory Catalog - English
Page 18
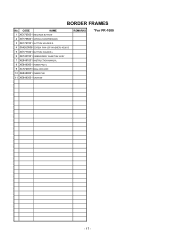
CODE NAME 1 XE1765001 RELEASE BUTTON 2 XE1766001 SPRING COMPRESSION 3 XE1767001 BUTTON HOLDER R 4 0A4260506 SCREW PAN (S/P WASHER) M2.6X5 5 XE1773001 BUTTON HOLDER L 6 XE7407001 EMBROIDERY SHEET BH ASSY 7 XE8491001 INSTRUCTION MANUAL 8 XE8490001 INNER PAD U 9 XC5720051 BAG 260X440H 10 XE8489001 INNER PAD 11 XE8493001 CARTON REMARKS *For PR-1000 - 17 - BORDER FRAMES No.
CODE NAME 1 XE1765001 RELEASE BUTTON 2 XE1766001 SPRING COMPRESSION 3 XE1767001 BUTTON HOLDER R 4 0A4260506 SCREW PAN (S/P WASHER) M2.6X5 5 XE1773001 BUTTON HOLDER L 6 XE7407001 EMBROIDERY SHEET BH ASSY 7 XE8491001 INSTRUCTION MANUAL 8 XE8490001 INNER PAD U 9 XC5720051 BAG 260X440H 10 XE8489001 INNER PAD 11 XE8493001 CARTON REMARKS *For PR-1000 - 17 - BORDER FRAMES No.


