
Users Manual - English
Page 3
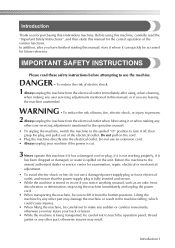
...off, then grasp the plug and pull it out of burns, fire, electric shock, or injury to persons: 2 Always unplug the machine from the electrical outlet immediately after you have finished reading this manual, store it where it has been dropped or damaged, or water... careful not to use an extension cord. • Always unplug your back or knees. • While the machine is being transported, be accessed for future reference. IMPORTANT SAFETY INSTRUCTIONS Please read the "Important Safety Instructions", and then study this embroidery machine. Introduction Thank you may result.
...off, then grasp the plug and pull it out of burns, fire, electric shock, or injury to persons: 2 Always unplug the machine from the electrical outlet immediately after you have finished reading this manual, store it where it has been dropped or damaged, or water... careful not to use an extension cord. • Always unplug your back or knees. • While the machine is being transported, be accessed for future reference. IMPORTANT SAFETY INSTRUCTIONS Please read the "Important Safety Instructions", and then study this embroidery machine. Introduction Thank you may result.
Users Manual - English
Page 7
... is no guarantee that the product Product Name: Brother Embroidery Machine Model Number: PR-650 complies with the limits for a Class B digital device. • Changes or modifications not expressly approved by Brother Industries, Ltd. IMPORTANT SAFETY INSTRUCTIONS 5 Federal Communications Commission (FCC) Declaration of Conformity (For USA Only) Responsible Party: Brother International Corporation 100 Somerset Corporate Boulevard Bridgewater, NJ...
... is no guarantee that the product Product Name: Brother Embroidery Machine Model Number: PR-650 complies with the limits for a Class B digital device. • Changes or modifications not expressly approved by Brother Industries, Ltd. IMPORTANT SAFETY INSTRUCTIONS 5 Federal Communications Commission (FCC) Declaration of Conformity (For USA Only) Responsible Party: Brother International Corporation 100 Somerset Corporate Boulevard Bridgewater, NJ...

Users Manual - English
Page 8
... CONTENT included in writing by regular mail, to Brother Industries, Ltd., 1-1-1 Kawagishi, Mizuho-ku, Nagoya 467-8562, Japan, Attention: P&H company Sales and Marketing Dept. 6 Nothing in combination with an embroidery machine to create embroidery. • Use the CONTENT in this agreement... constitutes a waiver of the rights of BROTHER under the terms and conditions of Brother Industries, Ltd. ("BROTHER"). BY USING THE CONTENT, THE CUSTOMER ACCEPTS THE...
... CONTENT included in writing by regular mail, to Brother Industries, Ltd., 1-1-1 Kawagishi, Mizuho-ku, Nagoya 467-8562, Japan, Attention: P&H company Sales and Marketing Dept. 6 Nothing in combination with an embroidery machine to create embroidery. • Use the CONTENT in this agreement... constitutes a waiver of the rights of BROTHER under the terms and conditions of Brother Industries, Ltd. ("BROTHER"). BY USING THE CONTENT, THE CUSTOMER ACCEPTS THE...
Users Manual - English
Page 14
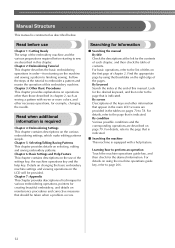
... chapter provides details on using the thumbtabs on pages 70 to embroider a pattern and master the operation of this embroidery machine. By condition Various possible conditions and the corresponding operations are provided in order-from turning on page 79. Chapter ...This chapter provides descriptions of techniques for various embroidering operations, pointers for creating beautiful embroidery, and details on the use Chapter 1: Getting Ready The setup of the embroidery machine and the various preparations required before use of contents. Chapter 2: Embroidering Tutorial This...
... chapter provides details on using the thumbtabs on pages 70 to embroider a pattern and master the operation of this embroidery machine. By condition Various possible conditions and the corresponding operations are provided in order-from turning on page 79. Chapter ...This chapter provides descriptions of techniques for various embroidering operations, pointers for creating beautiful embroidery, and details on the use Chapter 1: Getting Ready The setup of the embroidery machine and the various preparations required before use of contents. Chapter 2: Embroidering Tutorial This...
Users Manual - English
Page 18
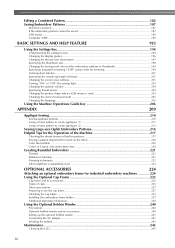
... Threads ...221 Stabilizers (backing) ...221 Hooping techniques...222 Fabric/stabilizer compatibility chart ...223 OPTIONAL ACCESSORIES 224 Attaching an optional embroidery frame for industrial embroidery machines 224 Using the Optional Cap Frame 225 Cap frame and its accessories...225 Types of caps ...226 Fabric precautions...227 Preparing to use the cap ...
... Threads ...221 Stabilizers (backing) ...221 Hooping techniques...222 Fabric/stabilizer compatibility chart ...223 OPTIONAL ACCESSORIES 224 Attaching an optional embroidery frame for industrial embroidery machines 224 Using the Optional Cap Frame 225 Cap frame and its accessories...225 Types of caps ...226 Fabric precautions...227 Preparing to use the cap ...
Users Manual - English
Page 19
... thread paths of the upper threads 248 Oiling the machine ...250 About the maintenance message...251 Troubleshooting ...252 On-screen troubleshooting ...252 Troubleshooting...253 Error messages ...261 If the machine does not respond when a key is pressed 269 Specifications ...270 Embroidery machine specifications...270 Upgrading Your Machine's Software 271 Upgrade procedure using USB media ...271...
... thread paths of the upper threads 248 Oiling the machine ...250 About the maintenance message...251 Troubleshooting ...252 On-screen troubleshooting ...252 Troubleshooting...253 Error messages ...261 If the machine does not respond when a key is pressed 269 Specifications ...270 Embroidery machine specifications...270 Upgrading Your Machine's Software 271 Upgrade procedure using USB media ...271...

Users Manual - English
Page 21
... all accessories are included, the embroidery machine can be set up the machine 26 Adjusting the operation panel position 27 Preparing the thread guide assembly 28 Positioning the spool stand 29 Attaching the embroidery frame holder 29 1 GETTING READY After unpacking the machine, first refer to sew are ...described in this chapter. The setup of Machine Parts and Their Functions 20 Front view ...20 Right-side/rear...
... all accessories are included, the embroidery machine can be set up the machine 26 Adjusting the operation panel position 27 Preparing the thread guide assembly 28 Positioning the spool stand 29 Attaching the embroidery frame holder 29 1 GETTING READY After unpacking the machine, first refer to sew are ...described in this chapter. The setup of Machine Parts and Their Functions 20 Front view ...20 Right-side/rear...

Users Manual - English
Page 25
Memo ● Always use accessories recommended for this embroidery machine. ● Visit your nearest authorized dealer for a complete listing of optional accessories and embroidery cards available for your machine. 6. 7. 8. 9. 10. 11. 12. Accessories 23 Note ● The part code may change without...pen can be aware that some specifications may vary depending on the country/area where the machine was purchased. ● Embroidery cards sold overseas are not compatible with this machine. ● All specifications are available as optional accessories. 1. 7 Flat frame 8 ...
Memo ● Always use accessories recommended for this embroidery machine. ● Visit your nearest authorized dealer for a complete listing of optional accessories and embroidery cards available for your machine. 6. 7. 8. 9. 10. 11. 12. Accessories 23 Note ● The part code may change without...pen can be aware that some specifications may vary depending on the country/area where the machine was purchased. ● Embroidery cards sold overseas are not compatible with this machine. ● All specifications are available as optional accessories. 1. 7 Flat frame 8 ...
Users Manual - English
Page 26
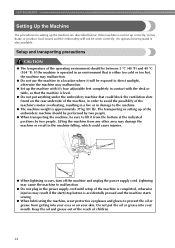
...Keep the oil and grease out of the reach of the embroidery machine should be sewn correctly. If the machine is operated in an environment that is either too cold or too hot, the machine may malfunction. ● Do not use the machine in a location where it will not be between 5 °...;C (40 °F) and 40 °C (104 °F). Do not put anything under the embroidery machine that could cause injuries. ● When lightning occurs, turn off the machine and unplug the power supply cord. The transporting or setting up correctly, it may malfunction. ● Set up the...
...Keep the oil and grease out of the reach of the embroidery machine should be sewn correctly. If the machine is operated in an environment that is either too cold or too hot, the machine may malfunction. ● Do not use the machine in a location where it will not be between 5 °...;C (40 °F) and 40 °C (104 °F). Do not put anything under the embroidery machine that could cause injuries. ● When lightning occurs, turn off the machine and unplug the power supply cord. The transporting or setting up correctly, it may malfunction. ● Set up the...
Users Manual - English
Page 28
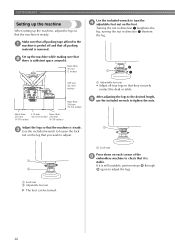
... the legs to the desired length, 5 use the included wrench to tighten the nuts. 1 Lock nut Press down on each corner of the 6 embroidery machine to adjust. 1 Adjustable foot nut • Adjust all four legs so that they securely contact the desk or table. Turning the nut in direction ...included wrench to adjust the legs. 1 Lock nut 2 Adjustable foot nut X The foot can be turned. 26 GETTING READY Setting up the machine When setting up the machine while making sure that 2 there is still unstable, perform steps 3 through 5 again to turn the 4 adjustable foot nut on the foot...
... the legs to the desired length, 5 use the included wrench to tighten the nuts. 1 Lock nut Press down on each corner of the 6 embroidery machine to adjust. 1 Adjustable foot nut • Adjust all four legs so that they securely contact the desk or table. Turning the nut in direction ...included wrench to adjust the legs. 1 Lock nut 2 Adjustable foot nut X The foot can be turned. 26 GETTING READY Setting up the machine When setting up the machine while making sure that 2 there is still unstable, perform steps 3 through 5 again to turn the 4 adjustable foot nut on the foot...
Users Manual - English
Page 33
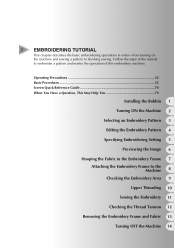
... the Embroidery 11 Checking the Thread Tension 12 Removing the Embroidery Frame and Fabric 13 Turning OFF the Machine 14 2 EMBROIDERING TUTORIAL This chapter describes the basic embroidering operations in the Embroidery Frame 7 Attaching the Embroidery Frame to finishing sewing. Follow the steps of the tutorial to embroider a pattern and master the operation of this embroidery machine.
... the Embroidery 11 Checking the Thread Tension 12 Removing the Embroidery Frame and Fabric 13 Turning OFF the Machine 14 2 EMBROIDERING TUTORIAL This chapter describes the basic embroidering operations in the Embroidery Frame 7 Attaching the Embroidery Frame to finishing sewing. Follow the steps of the tutorial to embroider a pattern and master the operation of this embroidery machine.
Users Manual - English
Page 34
... cord included with this machine. ● Do not plug this machine in with extension cords or multi-plug adapters with wet hands, otherwise an electric shock may result. ● When unplugging the power supply cord, be sure to first turn off the embroidery machine and unplug the power supply... cord, otherwise a fire, an electric shock or damage to the machine may result. • When you are away from the machine. • After using the machine, and then take the machine to your authorized dealer for repairs before...
... cord included with this machine. ● Do not plug this machine in with extension cords or multi-plug adapters with wet hands, otherwise an electric shock may result. ● When unplugging the power supply cord, be sure to first turn off the embroidery machine and unplug the power supply... cord, otherwise a fire, an electric shock or damage to the machine may result. • When you are away from the machine. • After using the machine, and then take the machine to your authorized dealer for repairs before...

Users Manual - English
Page 36
... mechanical pencil, screwdriver or any other hard or sharp object. If thicker fabric is sewn, the needle may be dark immediately after the embroidery machine is necessary.) 34 Note ● Attach stabilizers to thin or stretch fabrics. (Refer to "Attaching Iron-On Stabilizer (Backing) to Fabric... or break. ● When embroidering overlapping stitches, it . (Refer to read. Note ● It is recommended that rayon or polyester embroidery thread be difficult to "Adjusting the operation panel position" on page 90 for information.) ● When embroidering large pieces of the backlight and...
... mechanical pencil, screwdriver or any other hard or sharp object. If thicker fabric is sewn, the needle may be dark immediately after the embroidery machine is necessary.) 34 Note ● Attach stabilizers to thin or stretch fabrics. (Refer to "Attaching Iron-On Stabilizer (Backing) to Fabric... or break. ● When embroidering overlapping stitches, it . (Refer to read. Note ● It is recommended that rayon or polyester embroidery thread be difficult to "Adjusting the operation panel position" on page 90 for information.) ● When embroidering large pieces of the backlight and...
Users Manual - English
Page 37
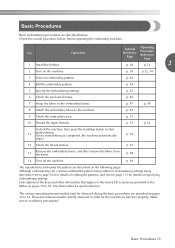
... Operating Procedure Reference Page p. 36 p.33 2 2 Turn on pages 32 to 78. p. 49 9 Check the embroidery area. Make sure to read these tables for the machine to embroider the pattern are described below , before operating the embroidery machine. Check the overall procedure below . Basic Procedures Basic embroidering procedures are described on the following pages...
... Operating Procedure Reference Page p. 36 p.33 2 2 Turn on pages 32 to 78. p. 49 9 Check the embroidery area. Make sure to read these tables for the machine to embroider the pattern are described below , before operating the embroidery machine. Check the overall procedure below . Basic Procedures Basic embroidering procedures are described on the following pages...

Users Manual - English
Page 38
.... 1 Thread Picker To gain access to the bobbin case easily, pull the thread picker toward you . 1 Latch ■ Oiling the machine After removing the bobbin case, apply oil to sew or when trimming the thread. CAUTION ● The thread picker can also be used... moved within a certain range. Insert a bobbin wound with extreme force. 36 Installing the bobbin Memo ● This embroidery machine is remaining. EMBROIDERING TUTORIAL 1. Installing the Bobbin When the machine is purchased, only the bobbin case is enough bobbin thread for embroidering. Before starting to "Oiling the...
.... 1 Thread Picker To gain access to the bobbin case easily, pull the thread picker toward you . 1 Latch ■ Oiling the machine After removing the bobbin case, apply oil to sew or when trimming the thread. CAUTION ● The thread picker can also be used... moved within a certain range. Insert a bobbin wound with extreme force. 36 Installing the bobbin Memo ● This embroidery machine is remaining. EMBROIDERING TUTORIAL 1. Installing the Bobbin When the machine is purchased, only the bobbin case is enough bobbin thread for embroidering. Before starting to "Oiling the...
Users Manual - English
Page 40
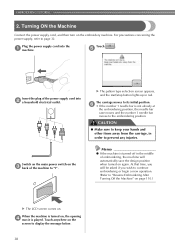
Memo ● If the machine is turned on the embroidery machine. When the machine is turned off in the middle of embroidering, the machine will be asked if you will automatically save the design position when turned on . X The pattern type selection screen appears, and ... the main power switch on the screen to "I". EMBROIDERING TUTORIAL 2. For precautions concerning the power supply, refer to "Resume Embroidering After Turning Off the Machine" on page 110.) X The LCD screen comes on again. At that time, you wish to continue embroidering or begin a new operation. (Refer...
Memo ● If the machine is turned on the embroidery machine. When the machine is turned off in the middle of embroidering, the machine will be asked if you will automatically save the design position when turned on . X The pattern type selection screen appears, and ... the main power switch on the screen to "I". EMBROIDERING TUTORIAL 2. For precautions concerning the power supply, refer to "Resume Embroidering After Turning Off the Machine" on page 110.) X The LCD screen comes on again. At that time, you wish to continue embroidering or begin a new operation. (Refer...

Users Manual - English
Page 41
... is touched, the pattern type selection screen appears. p. 61 6 Settings key Touch this key to change the embroidery machine settings. Reference Page 2 Pattern display area This area displays the selected pattern. The operations described below will be specified p. 196 ...from the machine settings screen. Machine 4 operations guide Touch this key to check a machine operation. key p.206 5 Needle bar move or thread a selected needle bar. Display 1 Key Name Home...
... is touched, the pattern type selection screen appears. p. 61 6 Settings key Touch this key to change the embroidery machine settings. Reference Page 2 Pattern display area This area displays the selected pattern. The operations described below will be specified p. 196 ...from the machine settings screen. Machine 4 operations guide Touch this key to check a machine operation. key p.206 5 Needle bar move or thread a selected needle bar. Display 1 Key Name Home...
Users Manual - English
Page 43
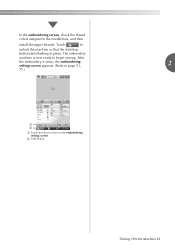
In the embroidering screen, check the thread colors assigned to unlock the machine so that the start/stop button starts flashing in green. Touch to the needle bars, and then install the upper threads. After the embroidery is now ready to the embroidering settings screen. 2 Unlock key Turning ON the Machine 41 The embroidery machine is sewn, the embroidering settings screen appears. (Refer to page 53, 2 77.) 1 2 1 Touch this key to return to begin sewing.
In the embroidering screen, check the thread colors assigned to unlock the machine so that the start/stop button starts flashing in green. Touch to the needle bars, and then install the upper threads. After the embroidery is now ready to the embroidering settings screen. 2 Unlock key Turning ON the Machine 41 The embroidery machine is sewn, the embroidering settings screen appears. (Refer to page 53, 2 77.) 1 2 1 Touch this key to return to begin sewing.
Users Manual - English
Page 50
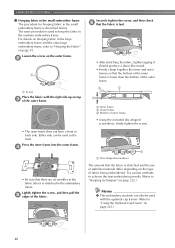
... methods to achieve the best embroidering results. (Refer to "Hooping techniques" on page 222.) Memo ● This embroidery machine can be used to hoop the fabric in the medium embroidery frame. Loosen the screw on the outer frame. 2 Securely tighten the screw, and then check 6 that the ...(Refer to "Hooping the Fabric" on page 225.) 48 EMBROIDERING TUTORIAL ■ Hooping fabric in the small embroidery frame The procedure for hooping fabric in the small embroidery frame is stretched and the use of stabilizer material differ depending on the type of fabric being embroidered. The...
... methods to achieve the best embroidering results. (Refer to "Hooping techniques" on page 222.) Memo ● This embroidery machine can be used to hoop the fabric in the medium embroidery frame. Loosen the screw on the outer frame. 2 Securely tighten the screw, and then check 6 that the ...(Refer to "Hooping the Fabric" on page 225.) 48 EMBROIDERING TUTORIAL ■ Hooping fabric in the small embroidery frame The procedure for hooping fabric in the small embroidery frame is stretched and the use of stabilizer material differ depending on the type of fabric being embroidered. The...
Users Manual - English
Page 51
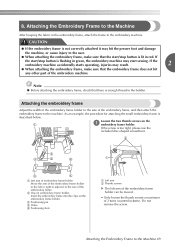
... does not hit any other part of the embroidery frame, and then attach the embroidery frame to the size of the embroidery machine. Note ● Before attaching the embroidery frame, check that there is not correctly attached it to the embroidery machine. Do not remove the screw. If the embroidery machine accidentally starts operating, injuries may hit the presser...
... does not hit any other part of the embroidery frame, and then attach the embroidery frame to the size of the embroidery machine. Note ● Before attaching the embroidery frame, check that there is not correctly attached it to the embroidery machine. Do not remove the screw. If the embroidery machine accidentally starts operating, injuries may hit the presser...


