
Brother International Entrepreneur PR-650 Support Question
Brother International Entrepreneur PR-650 Support Question
Find answers below for this question about Brother International Entrepreneur PR-650.Need a Brother International Entrepreneur PR-650 manual? We have 4 online manuals for this item!
Question posted by kerrirowell on November 24th, 2014
Pr650 Embroidery Machine
My brother embroidery machine carriage gets stuck and misaligns the design.
Current Answers
Answer #1: Posted by TommyKervz on November 30th, 2014 8:28 AM
TommyKervz

Member since:
January 10th, 2013 Points: 17,776,833

Member since:
January 10th, 2013 Points: 17,776,833
Follow the instructions below
Related Brother International Entrepreneur PR-650 Manual Pages
Users Manual - English - Page 5

...brother.com
SAVE THESE INSTRUCTIONS
This machine is required, first follow the troubleshooting
table in the back of this manual. If the problem persists, please consult your local authorized Brother... are subject to change without notice.
Use only a mouse designed specifically for its intended use . Use this machine only for this manual and specifications of the operation manual to...
Users Manual - English - Page 7
... user is encouraged to try to correct the interference by Brother Industries, Ltd. These limits are designed to provide reasonable protection against harmful interference in order to ensure...accept any interference received, including interference that the product Product Name: Brother Embroidery Machine Model Number: PR-650 complies with the limits for help. • The included interface ...
Users Manual - English - Page 14
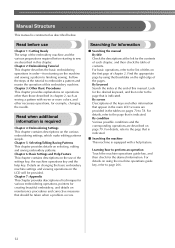
.../Editing/Saving Patterns This chapter provides details on the use
Chapter 1: Getting Ready The setup of chapter 2. Chapter 7: Appendix This chapter provides descriptions of this embroidery machine. Follow the steps of the tutorial to page 206.
12
For basic operations, refer to finishing sewing. By screen Descriptions of contents. Learning how to 78. Chapter...
Users Manual - English - Page 18
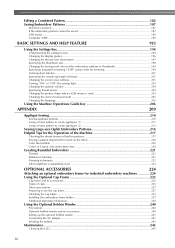
... patterns 217 Sewing a pattern aligned with a mark on the fabric 218 Color thread table ...220 Colors of Tajima (.dst) embroidery data ...220
Creating Beautiful Embroidery 221
Threads ...221 Stabilizers (backing) ...221 Hooping techniques...222 Fabric/stabilizer compatibility chart ...223
OPTIONAL ACCESSORIES
224
Attaching an optional embroidery frame for industrial embroidery machines 224...
Users Manual - English - Page 21

... Setting up . After checking that all accessories are included, the embroidery machine can be set up the machine 26 Adjusting the operation panel position 27 Preparing the thread guide assembly 28 Positioning the spool stand 29 Attaching the embroidery frame holder 29 1 GETTING READY
After unpacking the machine, first refer to sew are described in this chapter.
Users Manual - English - Page 26
... is accidentally pressed and the machine starts sewing.
● When lubricating the machine, wear protective eyeglasses and gloves to the machine.
● The machine weight is level.
● Do not put anything under the embroidery machine that the machine is approximately 37 kg (81 lb). An optional sewing stand is not set up the machine are described below. Setup and...
Users Manual - English - Page 28
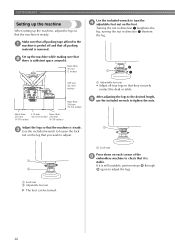
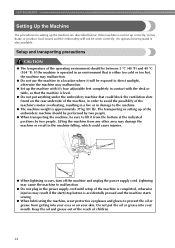
...that all four legs so that they securely contact the desk or table.
GETTING READY
Setting up the machine
When setting up the machine while making sure that 2 there is
stable. Turning the nut in ...)
Use the included wrench to turn the 4 adjustable foot nut on each corner of the 6 embroidery machine to check that it is sufficient space around it is steady. 3 Use the included wrench to ...
Users Manual - English - Page 33
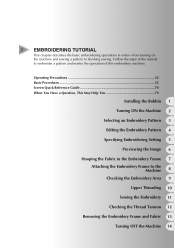
... the Embroidery Area 9
Upper Threading 10
Sewing the Embroidery 11
Checking the Thread Tension 12
Removing the Embroidery Frame and Fabric 13
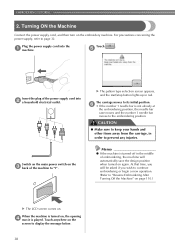
Turning OFF the Machine 14
2 EMBROIDERING TUTORIAL
This chapter describes the basic embroidering operations in the Embroidery Frame 7
Attaching the Embroidery Frame to embroider a pattern and master the operation of this embroidery machine.
Users Manual - English - Page 34
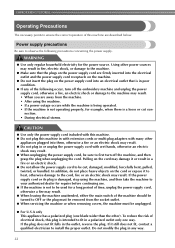
..., pulled, twisted, or bundled. Power supply precautions
Be sure to observe the following occur, turn off the embroidery machine and unplug the power supply cord, otherwise a fire, an electric shock or damage to the machine may result. Pulling on the cord may damage it still does not fit, contact a qualified electrician to install...
Users Manual - English - Page 36

... to the display screen may result.
• The display may be dark immediately after the embroidery machine is not a malfunction.
Note ● Attach stabilizers to thin or stretch fabrics. (Refer ... / 40 weight (in Americas and Europe) / #50 (in the
carriage. Be sure to 1 mm (3/8 inch) thick. Note ● Your machine can embroider fabric that the fabric is up to sit in front of fabric...
Users Manual - English - Page 37
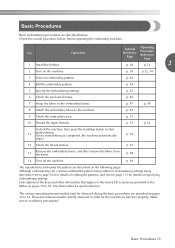
... embroidering settings being specified, refer to embroider the pattern are described below , before operating the embroidery machine.
p. 69
The operations to page 162 for details on specifying embroidering settings.
p. 49
9 Check the embroidery area. p. 67
13
Remove the embroidery frame, and then remove the fabric from the frame.
Make sure to read these tables...
Users Manual - English - Page 38

....
For details on oiling the machine, refer to "Oiling the machine" on page 247. Before starting to embroider make sure that is used . (Refer to sew or when trimming the thread.
The... the machine After removing the bobbin case, apply oil to "Cleaning the bobbin case" on page 250. Do not pull it with extreme force.
36
Installing the bobbin
Memo
● This embroidery machine is ...
Users Manual - English - Page 40
...
● Make sure to keep your hands and other items away from the carriage, in red.
At that time, you will automatically save the design position when turned on . When the machine is turned on the embroidery machine. EMBROIDERING TUTORIAL
2. Turning ON the Machine
Connect the power supply cord, and then turn on , the opening 4 movie...
Users Manual - English - Page 41

... or thread a selected needle bar. p. 61
6
Settings key
Touch this key to change the embroidery machine settings. Reference Page
2
Pattern display area
This area displays the selected pattern. Machine
4
operations guide Touch this manual. Understanding the screens
When the machine is turned on and
is available in any screen. The
operations described below will...
Users Manual - English - Page 50
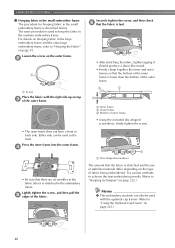
... The outer frame does not have a front or back side.
The same procedure is stretched in the embroidery frame. Loosen the screw on the outer frame.
2
Securely tighten the screw, and then check 6 ... embroidering results. (Refer to "Hooping techniques" on page 222.)
Memo
● This embroidery machine can be used with the right side up on top 3 of fabric being embroidered. EMBROIDERING TUTORIAL
■...
Users Manual - English - Page 51
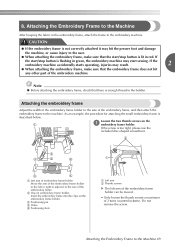
..., injuries may result.
2
● When attaching the embroidery frame, make sure that the start sewing. If the screw is described below.
Attaching the Embroidery Frame to the machine.
Loosen the two thumb screws on embroidery frame holder. If
the start/stop button is flashing in green, the embroidery machine may hit the presser foot and damage
the...
Users Manual - English - Page 138
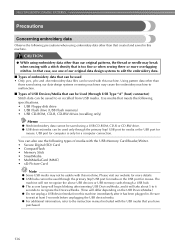
... than
those saved using our data design systems or sewing machines may break when sewing with this machine. Please visit our website for more overlapping stitches. CAUTION
● While using embroidery data other than our original patterns, the thread or needle may cause the embroidery machine to the instruction manual included with this machine. Be sure
to wait at...
Users Manual - English - Page 157
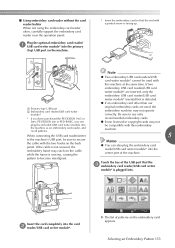
... use only recommended embroidery cards. ● Some licensed or copyright cards may catch on the machine.
X The list of the machine. Note
● Two embroidery USB card readers/USB
card writer module* cannot be sure to the machine's USB port, be used , the embroidery machine may not operate correctly. Be sure to become misaligned. Selecting an Embroidery Pattern 155
Users Manual - English - Page 177
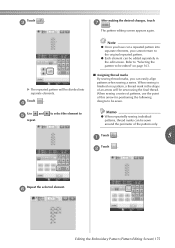
.... Touch
.
5
1
Touch
.
2
Repeat the selected element.
6
Editing the Embroidery Pattern (Pattern Editing Screen) 175
X The repeated pattern will be sewn around the perimeter of this arrow for positioning the following designs to
Note
● Once you have cut a repeated pattern into separate elements.
When sewing a series of patterns, use the point of the...
Users Manual - English - Page 224
... the frame, enabling your machine sews. The black backing is very useful on top neatly and accurately. Tear-away stabilizer can easily be used in the embroidery area. Pull no more layers.
It will cause puckers in its application.
■ Frame Basics Tubular frames: This type of your embroidery design when it to show through...
Similar Questions

Brother Pr650 Entrepreneur How To Videos
(Posted by 2leyphuon 9 years ago)

How To Deactivate Entrepreneur Pr650 Safety Device
(Posted by Anonymous-126577 10 years ago)

Does My Pe-150 Only Reduce Designs On My Machine? Can I Reduce Purchased Designs
(Posted by gswearengin 10 years ago)

What Setting Do You Set On The Sewing Machine To Get A Zig Zag?
(Posted by Anonymous-107044 11 years ago)

Mounting The Embroidery Frame Hoop Holder.
I cannot mount the embroidery frame onto the machine. What am I doing wrong? It doesn't seem to fit.
I cannot mount the embroidery frame onto the machine. What am I doing wrong? It doesn't seem to fit.
(Posted by sugarherman7 11 years ago)