
Users Manual - English
Page 3
... the machine unattended. DANGER - In addition, after using this machine, carefully read these safety instructions before attempting to use if you have finished reading this embroidery machine. To reduce the risk of electric shock: 1 Always unplug the machine from the bottom positions. To reduce the risk of burns, fire, electric shock...
... the machine unattended. DANGER - In addition, after using this machine, carefully read these safety instructions before attempting to use if you have finished reading this embroidery machine. To reduce the risk of electric shock: 1 Always unplug the machine from the bottom positions. To reduce the risk of burns, fire, electric shock...
Users Manual - English
Page 4
... machine near children. • This machine is not intended for use bent or damaged needles. • Keep fingers away from the build up of the embroidery frame could cause the needle to break. 6 This machine is not a toy: • Your close attention to the needle. Never allow children to play with...
... machine near children. • This machine is not intended for use bent or damaged needles. • Keep fingers away from the build up of the embroidery frame could cause the needle to break. 6 This machine is not a toy: • Your close attention to the needle. Never allow children to play with...
Users Manual - English
Page 7
... Rules. Federal Communications Commission (FCC) Declaration of Conformity (For USA Only) Responsible Party: Brother International Corporation 100 Somerset Corporate Boulevard Bridgewater, NJ 08807-0911 USA TEL : (908) 704-1700 declares that the product Product Name: Brother Embroidery Machine Model Number: PR-650 complies with the limits for a Class B digital device, pursuant to Part 15 of the... can radiate radio frequency energy and, if not installed and used in a residential installation. However, there is encouraged to try to correct the interference by Brother Industries, Ltd.
... Rules. Federal Communications Commission (FCC) Declaration of Conformity (For USA Only) Responsible Party: Brother International Corporation 100 Somerset Corporate Boulevard Bridgewater, NJ 08807-0911 USA TEL : (908) 704-1700 declares that the product Product Name: Brother Embroidery Machine Model Number: PR-650 complies with the limits for a Class B digital device, pursuant to Part 15 of the... can radiate radio frequency energy and, if not installed and used in a residential installation. However, there is encouraged to try to correct the interference by Brother Industries, Ltd.

Users Manual - English
Page 8
... direct all inquiries concerning this agreement constitutes a waiver of the rights of BROTHER under the terms and conditions of Brother Industries, Ltd. ("BROTHER"). BROTHER retains all rights to CONTENT and to create embroidery. • Use the CONTENT in writing by use at a time. BROTHER retains ownership of the CONTENT included in this Agreement in combination with...
... direct all inquiries concerning this agreement constitutes a waiver of the rights of BROTHER under the terms and conditions of Brother Industries, Ltd. ("BROTHER"). BROTHER retains all rights to CONTENT and to create embroidery. • Use the CONTENT in writing by use at a time. BROTHER retains ownership of the CONTENT included in this Agreement in combination with...

Users Manual - English
Page 10
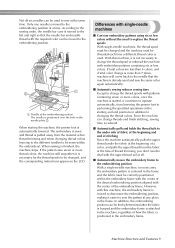
.... Machine Structure and Features Six-needle machine embroidering Your machine has six needles, each threaded with a different color of thread spool changes. It can sew embroidery patterns that moves the needles up and down is not necessarily performed in the needle bar case.
.... Machine Structure and Features Six-needle machine embroidering Your machine has six needles, each threaded with a different color of thread spool changes. It can sew embroidery patterns that moves the needles up and down is not necessarily performed in the needle bar case.
Users Manual - English
Page 11
...trimming and when changing thread colors (moving to the different needles to be changed and the machine must be correctly positioned within the embroidery). The embroidery is sewn and thread is pulled away from the fabric at the time of the desired embroidering position aligned with the required color... and the fabric must be moved to the embroidering position. 1 Needle at a time. However, with single-needle machines ■ Can sew embroidery patterns using six or less colors without the need to deal with the upper thread tail at the starting the machine, the presser foot is...
...trimming and when changing thread colors (moving to the different needles to be changed and the machine must be correctly positioned within the embroidery). The embroidery is sewn and thread is pulled away from the fabric at the time of the desired embroidering position aligned with the required color... and the fabric must be moved to the embroidering position. 1 Needle at a time. However, with single-needle machines ■ Can sew embroidery patterns using six or less colors without the need to deal with the upper thread tail at the starting the machine, the presser foot is...
Users Manual - English
Page 12
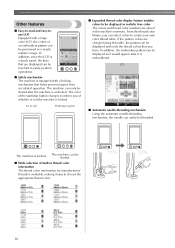
...; Easy-to-read and easy-touse LCD Equipped with a large color LCD, the colors of whether or not the machine is locked. In addition, the embroidery pattern can select colors to create your own color thread table. In addition, since the LCD is a touch panel, the keys that are changed using... this thread color library, you have. The color of the start/stop button changes to inform you of an embroidery pattern can be touched to choose the appropriate thread color. 10 If the pattern colors are displayed can be displayed as it easy to easily...
...; Easy-to-read and easy-touse LCD Equipped with a large color LCD, the colors of whether or not the machine is locked. In addition, the embroidery pattern can select colors to create your own color thread table. In addition, since the LCD is a touch panel, the keys that are changed using... this thread color library, you have. The color of the start/stop button changes to inform you of an embroidery pattern can be touched to choose the appropriate thread color. 10 If the pattern colors are displayed can be displayed as it easy to easily...
Users Manual - English
Page 13
...at a distance that you want to move screen, then select the needle bar number that the USB cable does not reach the computer, embroidery patterns can be threaded or moved to the embroidering position. The machine can also be set to repeatedly sew the same pattern. ■...Moving and threading a selected needle bar" on caps. ■ Various built-in patterns In addition to the many built-in character patterns, embroidery patterns and frame patterns, using the included USB cable, embroidery patterns can be specified to arrange the patterns. Refer to "USB media" on page 160. ■...
...at a distance that you want to move screen, then select the needle bar number that the USB cable does not reach the computer, embroidery patterns can be threaded or moved to the embroidering position. The machine can also be set to repeatedly sew the same pattern. ■...Moving and threading a selected needle bar" on caps. ■ Various built-in patterns In addition to the many built-in character patterns, embroidery patterns and frame patterns, using the included USB cable, embroidery patterns can be specified to arrange the patterns. Refer to "USB media" on page 160. ■...
Users Manual - English
Page 14
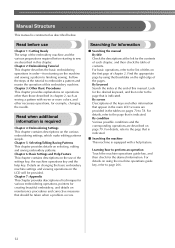
...to 78. Look for example, changing the needle. By condition Various possible conditions and the corresponding operations are provided in this embroidery machine. Learning how to the page that should be provided. Follow the steps of the tutorial to the page that is ... machine operations key and the help feature. Chapter 7: Appendix This chapter provides descriptions of contents. Details on changing the basic embroidery machine settings and viewing operations on page 79. Chapter 5: Selecting/Editing/Saving Patterns This chapter provides details on maintenance procedures and...
...to 78. Look for example, changing the needle. By condition Various possible conditions and the corresponding operations are provided in this embroidery machine. Learning how to the page that should be provided. Follow the steps of the tutorial to the page that is ... machine operations key and the help feature. Chapter 7: Appendix This chapter provides descriptions of contents. Details on changing the basic embroidery machine settings and viewing operations on page 79. Chapter 5: Selecting/Editing/Saving Patterns This chapter provides details on maintenance procedures and...
Users Manual - English
Page 15
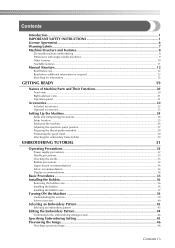
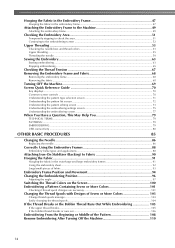
... Adjusting the operation panel position...27 Preparing the thread guide assembly...28 Positioning the spool stand ...29 Attaching the embroidery frame holder...29 EMBROIDERING TUTORIAL 31 Operating Precautions...32 Power supply precautions ...32 Needle precautions...33 Checking the needle ......37 Turning ON the Machine 38 Understanding the screens ...39 Screen overview ...40 Selecting an Embroidery Pattern 42 Selecting an embroidery pattern ...43 Editing the Embroidery Pattern 44 Continuing to the embroidering settings screen 44 Specifying Embroidering Setting 45 Previewing the Image ......
... Adjusting the operation panel position...27 Preparing the thread guide assembly...28 Positioning the spool stand ...29 Attaching the embroidery frame holder...29 EMBROIDERING TUTORIAL 31 Operating Precautions...32 Power supply precautions ...32 Needle precautions...33 Checking the needle ......37 Turning ON the Machine 38 Understanding the screens ...39 Screen overview ...40 Selecting an Embroidery Pattern 42 Selecting an embroidery pattern ...43 Editing the Embroidery Pattern 44 Continuing to the embroidering settings screen 44 Specifying Embroidering Setting 45 Previewing the Image ......
Users Manual - English
Page 16
... EMBROIDERING: ...79 USB connectivity ...80 OTHER BASIC PROCEDURES 85 Changing the Needle ...86 Replacing the needle...86 Correctly Using the Embroidery Frames 88 Embroidery frame types and applications ...88 Attaching Iron-On Stabilizer (Backing) to Fabric 90 Hooping the Fabric...91 Hooping the fabric in... the extra-large and large embroidery frames 91 Using the embroidery sheet...92 Large/small pieces of fabric ...93 Embroidery Frame Position and Movement 94 Changing the Embroidering Position 96 Adjusting the angle ...97 Switching...
... EMBROIDERING: ...79 USB connectivity ...80 OTHER BASIC PROCEDURES 85 Changing the Needle ...86 Replacing the needle...86 Correctly Using the Embroidery Frames 88 Embroidery frame types and applications ...88 Attaching Iron-On Stabilizer (Backing) to Fabric 90 Hooping the Fabric...91 Hooping the fabric in... the extra-large and large embroidery frames 91 Using the embroidery sheet...92 Large/small pieces of fabric ...93 Embroidery Frame Position and Movement 94 Changing the Embroidering Position 96 Adjusting the angle ...97 Switching...
Users Manual - English
Page 17
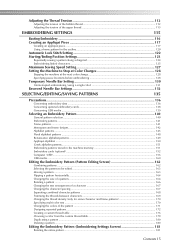
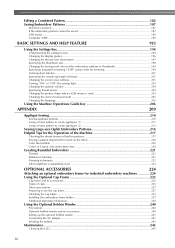
...112 Adjusting the tension of the bobbin thread 112 Adjusting the tension of the upper thread 113 EMBROIDERING SETTINGS 115 Basting Embroidery ...116 Creating an Appliqué Piece 117 Creating an appliqué piece ...117 Using a frame pattern for the... Bar Settings 132 SELECTING/EDITING/SAVING PATTERNS 135 Precautions...136 Concerning embroidery data ...136 Concerning optional embroidery cards ...138 Concerning USB media ...139 Selecting an Embroidery Pattern 140 General pattern selection ...140 Embroidery patterns ...141 Frame patterns ...141 Monogram and frame designs ...142...
...112 Adjusting the tension of the bobbin thread 112 Adjusting the tension of the upper thread 113 EMBROIDERING SETTINGS 115 Basting Embroidery ...116 Creating an Appliqué Piece 117 Creating an appliqué piece ...117 Using a frame pattern for the... Bar Settings 132 SELECTING/EDITING/SAVING PATTERNS 135 Precautions...136 Concerning embroidery data ...136 Concerning optional embroidery cards ...138 Concerning USB media ...139 Selecting an Embroidery Pattern 140 General pattern selection ...140 Embroidery patterns ...141 Frame patterns ...141 Monogram and frame designs ...142...
Users Manual - English
Page 18
... the display guides...196 Changing the thread color information ...197 Specifying the thumbnail size...198 Changing the background colors of the embroidery patterns or thumbnails 199 Specifying jumpstitch trimming / "DST" jump codes for trimming 199 Deleting short stitches ...201 Specifying the remaining...of caps ...226 Fabric precautions...227 Preparing to use the cap frame ...227 Attaching the cap frame ...232 Installing the embroidery frame holder ...237 Additional digitizing information...238 Using the Optional Bobbin Winder 240 Precautions ...240 Optional bobbin winder and its ...
... the display guides...196 Changing the thread color information ...197 Specifying the thumbnail size...198 Changing the background colors of the embroidery patterns or thumbnails 199 Specifying jumpstitch trimming / "DST" jump codes for trimming 199 Deleting short stitches ...201 Specifying the remaining...of caps ...226 Fabric precautions...227 Preparing to use the cap frame ...227 Attaching the cap frame ...232 Installing the embroidery frame holder ...237 Additional digitizing information...238 Using the Optional Bobbin Winder 240 Precautions ...240 Optional bobbin winder and its ...
Users Manual - English
Page 19
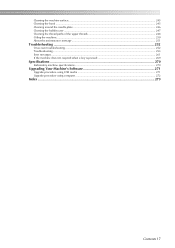
......251 Troubleshooting ...252 On-screen troubleshooting ...252 Troubleshooting...253 Error messages ...261 If the machine does not respond when a key is pressed 269 Specifications ...270 Embroidery machine specifications...270 Upgrading Your Machine's Software 271 Upgrade procedure using USB media ...271 Upgrade procedure using computer...272 Index ...273 Contents 17
......251 Troubleshooting ...252 On-screen troubleshooting ...252 Troubleshooting...253 Error messages ...261 If the machine does not respond when a key is pressed 269 Specifications ...270 Embroidery machine specifications...270 Upgrading Your Machine's Software 271 Upgrade procedure using USB media ...271 Upgrade procedure using computer...272 Index ...273 Contents 17

Users Manual - English
Page 21
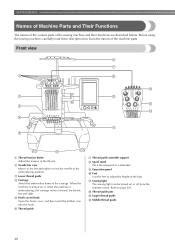
... be set up the machine 26 Adjusting the operation panel position 27 Preparing the thread guide assembly 28 Positioning the spool stand 29 Attaching the embroidery frame holder 29 The setup of Machine Parts and Their Functions 20 Front view ...20 Right-side/rear view 21 Operation panel 21 Accessories...22...
... be set up the machine 26 Adjusting the operation panel position 27 Preparing the thread guide assembly 28 Positioning the spool stand 29 Attaching the embroidery frame holder 29 The setup of Machine Parts and Their Functions 20 Front view ...20 Right-side/rear view 21 Operation panel 21 Accessories...22...
Users Manual - English
Page 22
... machine is embroidering, the carriage moves forward, backward, left and right to move the needle to the embroidering position. 3 Lower thread guide 4 Carriage Attach the embroidery frame to the carriage. Refer to learn the names of the legs. A Sewing light The sewing light can be turned on or when the machine...
... machine is embroidering, the carriage moves forward, backward, left and right to move the needle to the embroidering position. 3 Lower thread guide 4 Carriage Attach the embroidery frame to the carriage. Refer to learn the names of the legs. A Sewing light The sewing light can be turned on or when the machine...

Users Manual - English
Page 24
... (extra large) 200 25 mm (H) × 300 mm (W) (7-7/8 inches (H) × 11-3/4 inches (W)) Embroidery sheet (large) 130 mm 26 (H) × 180 mm (W) (5-1/8 inches (H) × 7-1/8 inches (W)) Embroidery sheet (medium) 100 27 mm (H) × 100 mm (W) (4 inches (H) × 4 inches (W)) Embroidery sheet (small) 40 mm 28 (H) × 60 mm (W) (1-1/2 inches (H) × 2-3/8 inches (W)) 29 Operation manual 30 Quick...
... (extra large) 200 25 mm (H) × 300 mm (W) (7-7/8 inches (H) × 11-3/4 inches (W)) Embroidery sheet (large) 130 mm 26 (H) × 180 mm (W) (5-1/8 inches (H) × 7-1/8 inches (W)) Embroidery sheet (medium) 100 27 mm (H) × 100 mm (W) (4 inches (H) × 4 inches (W)) Embroidery sheet (small) 40 mm 28 (H) × 60 mm (W) (1-1/2 inches (H) × 2-3/8 inches (W)) 29 Operation manual 30 Quick...

Users Manual - English
Page 25
... frame 2 set (Refer to page 225.) PRCF3 the touch pen holder on the country/area where the machine was purchased. ● Embroidery cards sold overseas are not compatible with this machine. ● All specifications are available as optional accessories. 1. 7 Flat frame 8 Bobbin... winder set (Refer to page 240.) 9 Metal bobbin PRF300 PRBW1 100376-053 10 Embroidery card reader SAECR1 11 Embroidery card - 12 USB mouse XE5334-001 2. 3. 4. 5. Refer to page 21. 3 Advanced cap frame 4 Mounting jig (Refer to page...
... frame 2 set (Refer to page 225.) PRCF3 the touch pen holder on the country/area where the machine was purchased. ● Embroidery cards sold overseas are not compatible with this machine. ● All specifications are available as optional accessories. 1. 7 Flat frame 8 Bobbin... winder set (Refer to page 240.) 9 Metal bobbin PRF300 PRBW1 100376-053 10 Embroidery card reader SAECR1 11 Embroidery card - 12 USB mouse XE5334-001 2. 3. 4. 5. Refer to page 21. 3 Advanced cap frame 4 Mounting jig (Refer to page...
Users Manual - English
Page 26
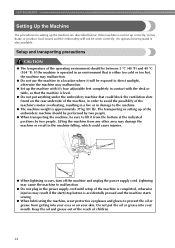
GETTING READY Setting Up the Machine The procedures for setting up of the embroidery machine should be between 5 °C (40 °F) and 40 °C (104 ...the machine is either too cold or too hot, the machine may shake or produce loud noises and the embroidery will be sewn correctly. If the machine is operated in an environment that is not set up correctly, it... adjustable feet completely in a location where it from getting into your skin. Do not put anything under the embroidery machine that the machine is level. ● Do not put the oil or grease into your eyes or ...
GETTING READY Setting Up the Machine The procedures for setting up of the embroidery machine should be between 5 °C (40 °F) and 40 °C (104 ...the machine is either too cold or too hot, the machine may shake or produce loud noises and the embroidery will be sewn correctly. If the machine is operated in an environment that is not set up correctly, it... adjustable feet completely in a location where it from getting into your skin. Do not put anything under the embroidery machine that the machine is level. ● Do not put the oil or grease into your eyes or ...
Users Manual - English
Page 27
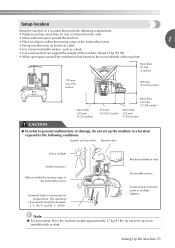
... more than 50 mm (2 inches) from the wall • Allow sufficient space around the machine • Place no objects within the moving range of the embroidery frame 1 • Set-up machine near an electrical outlet • Use a level and stable surface, such as a desk • Use a surface that meets the following... the weight of the machine (about 37 kg (81 lb)) • Allow open space around the ventilation slots found on the rear underside of the embroidery frame Extremely high or extremely low temperatures.
... more than 50 mm (2 inches) from the wall • Allow sufficient space around the machine • Place no objects within the moving range of the embroidery frame 1 • Set-up machine near an electrical outlet • Use a level and stable surface, such as a desk • Use a surface that meets the following... the weight of the machine (about 37 kg (81 lb)) • Allow open space around the ventilation slots found on the rear underside of the embroidery frame Extremely high or extremely low temperatures.


