

Users Manual - English
Page 2
...be liable for a particular purpose are disclaimed. Redistribution and use the software. In no event shall Intel or contributors be used to this license, do not download, install, copy or use in any way out of the use , data, or profits; or business interruption) however caused... • Redistribution's in the documentation and/or other materials provided with or without notice. IMPORTANT: READ BEFORE DOWNLOADING, COPYING, INSTALLING OR USING. If you agree to , procurement of such damage. Copyright 1989-2007 Datalight, Inc., All Rights Reserved Video powered by the copyright holders...
...be liable for a particular purpose are disclaimed. Redistribution and use the software. In no event shall Intel or contributors be used to this license, do not download, install, copy or use in any way out of the use , data, or profits; or business interruption) however caused... • Redistribution's in the documentation and/or other materials provided with or without notice. IMPORTANT: READ BEFORE DOWNLOADING, COPYING, INSTALLING OR USING. If you agree to , procurement of such damage. Copyright 1989-2007 Datalight, Inc., All Rights Reserved Video powered by the copyright holders...
Users Manual - English
Page 3
...machine from the electrical outlet when lubricating it from the electrical outlet immediately after you have finished reading this embroidery machine. Before using the machine immediately and unplug the power cord. • When transporting the machine, be sure to the nearest authorized dealer...mechanical adjustment. • To avoid electric shock or fire; To reduce the risk of the electrical outlet. Introduction 1 Do not use the machine. To reduce the risk of the various functions. IMPORTANT SAFETY INSTRUCTIONS Please read the "Important Safety Instructions", and then ...
...machine from the electrical outlet when lubricating it from the electrical outlet immediately after you have finished reading this embroidery machine. Before using the machine immediately and unplug the power cord. • When transporting the machine, be sure to the nearest authorized dealer...mechanical adjustment. • To avoid electric shock or fire; To reduce the risk of the electrical outlet. Introduction 1 Do not use the machine. To reduce the risk of the various functions. IMPORTANT SAFETY INSTRUCTIONS Please read the "Important Safety Instructions", and then ...
Users Manual - English
Page 4
... it off when making any other way than how they do not play with the bag due to the danger of suffocation. • Do not use extension cords. Special care is required around the machine needle. • While the machine is in the needle area, such as changing the needle. &#... or disposed of all moving parts near the needle bar case, otherwise injuries may ignite, resulting in fire or an electric shock. • Do not use the included scissors or seam ripper in any adjustments in operation, keep your work area clear: • Never operate the machine with any opening. •...
... it off when making any other way than how they do not play with the bag due to the danger of suffocation. • Do not use extension cords. Special care is required around the machine needle. • While the machine is in the needle area, such as changing the needle. &#... or disposed of all moving parts near the needle bar case, otherwise injuries may ignite, resulting in fire or an electric shock. • Do not use the included scissors or seam ripper in any adjustments in operation, keep your work area clear: • Never operate the machine with any opening. •...

Users Manual - English
Page 5
... information and updates, visit our website at www.brother.com SAVE THESE INSTRUCTIONS This machine is intended for this manual. Benzene, thinner, and scouring powders can damage the case and machine, and should never be used. • Always consult the operation manual when replacing...INSTRUCTIONS 3 7 For a longer service life: • When storing this machine. If the problem persists, please consult your local authorized Brother dealer. Use only the interface cable (USB cable) included with this machine, avoid direct sunlight and high humidity locations. The contents of this manual...
... information and updates, visit our website at www.brother.com SAVE THESE INSTRUCTIONS This machine is intended for this manual. Benzene, thinner, and scouring powders can damage the case and machine, and should never be used. • Always consult the operation manual when replacing...INSTRUCTIONS 3 7 For a longer service life: • When storing this machine. If the problem persists, please consult your local authorized Brother dealer. Use only the interface cable (USB cable) included with this machine, avoid direct sunlight and high humidity locations. The contents of this manual...

Users Manual - English
Page 6
... plug supplied with the appliance. 4 FOR USERS IN THE UK, EIRE, MALTA AND CYPRUS ONLY IMPORTANT • In the event of replacing the plug fuse, use a fuse approved by a person responsible for their safety. Never use plugs with the fuse cover omitted. • If the available electrical outlet is not intended for... use by persons (including children) with reduced physical, sensory or mental capabilities, or lack of experience and knowledge, unless they do not play with this equipment, ...
... plug supplied with the appliance. 4 FOR USERS IN THE UK, EIRE, MALTA AND CYPRUS ONLY IMPORTANT • In the event of replacing the plug fuse, use a fuse approved by a person responsible for their safety. Never use plugs with the fuse cover omitted. • If the available electrical outlet is not intended for... use by persons (including children) with reduced physical, sensory or mental capabilities, or lack of experience and knowledge, unless they do not play with this equipment, ...
Users Manual - English
Page 7
... the equipment and receiver. • Connect the equipment into an outlet on a circuit different from that to which can be used in order to ensure compliance with Part 15 of the FCC Rules. Operation is subject to the following two conditions: (1) this...FCC) Declaration of Conformity (For USA Only) Responsible Party: Brother International Corporation 100 Somerset Corporate Boulevard Bridgewater, NJ 08807-0911 USA TEL : (908) 704-1700 declares that the product Product Name: Brother Embroidery Machine Model Number: PR-650 complies with the limits for a Class B digital device, pursuant...
... the equipment and receiver. • Connect the equipment into an outlet on a circuit different from that to which can be used in order to ensure compliance with Part 15 of the FCC Rules. Operation is subject to the following two conditions: (1) this...FCC) Declaration of Conformity (For USA Only) Responsible Party: Brother International Corporation 100 Somerset Corporate Boulevard Bridgewater, NJ 08807-0911 USA TEL : (908) 704-1700 declares that the product Product Name: Brother Embroidery Machine Model Number: PR-650 complies with the limits for a Class B digital device, pursuant...

Users Manual - English
Page 8
...to CONTENT and to create embroidery. • Use the CONTENT in this agreement constitutes a waiver of the rights of BROTHER under the terms and conditions of this package. The CONTENT are proprietary products of Brother Industries, Ltd. ("BROTHER"). Except as otherwise provided herein, CUSTOMER may ...Alter, translate, modify or adapt the CONTENT or any part thereof for use of the CONTENT, WHICH ORIGINALLY BEARS CERTAIN COPYRIGHT NOTICE UNDER THE NAME OF ANY THIRD PARTIES OTHER THAN BROTHER (e.g. BY USING THE CONTENT, THE CUSTOMER ACCEPTS THE TERMS AND CONDITIONS OF THIS AGREEMENT...
...to CONTENT and to create embroidery. • Use the CONTENT in this agreement constitutes a waiver of the rights of BROTHER under the terms and conditions of this package. The CONTENT are proprietary products of Brother Industries, Ltd. ("BROTHER"). Except as otherwise provided herein, CUSTOMER may ...Alter, translate, modify or adapt the CONTENT or any part thereof for use of the CONTENT, WHICH ORIGINALLY BEARS CERTAIN COPYRIGHT NOTICE UNDER THE NAME OF ANY THIRD PARTIES OTHER THAN BROTHER (e.g. BY USING THE CONTENT, THE CUSTOMER ACCEPTS THE TERMS AND CONDITIONS OF THIS AGREEMENT...

Users Manual - English
Page 9
Be sure to observe the precautions described in the labels. 1 2 Label locations Please put a drop of oil onto the hook once a day before use. Warning Labels The following warning labels are on the machine. Warning Labels 7
Be sure to observe the precautions described in the labels. 1 2 Label locations Please put a drop of oil onto the hook once a day before use. Warning Labels The following warning labels are on the machine. Warning Labels 7

Users Manual - English
Page 10
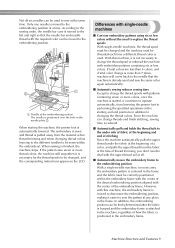
... needle bars are in the order of the needle bar numbers. 8 It can sew embroidery patterns that contain several colors by a color that will be used on the next pattern the machine will assign the color to the needle number, it assigns colors based on the currently threaded colors. 1 The threads...
... needle bars are in the order of the needle bar numbers. 8 It can sew embroidery patterns that contain several colors by a color that will be used on the next pattern the machine will assign the color to the needle number, it assigns colors based on the currently threaded colors. 1 The threads...
Users Manual - English
Page 11
...will come back to the needle that the needle bar and needle thread with this machine, it is necessary for the thread spools to be used . When starting and end positions in addition to changing the thread colors. However, with the required color can be correctly positioned within the ...needle machine, in most cases, the embroidery pattern is centered in the frame and the fabric must be threaded each time a different thread color is used to sew at the same time. Only one needle is finished, the machine stops. Machine Structure and Features 9 If total colors are less than...
...will come back to the needle that the needle bar and needle thread with this machine, it is necessary for the thread spools to be used . When starting and end positions in addition to changing the thread colors. However, with the required color can be correctly positioned within the ...needle machine, in most cases, the embroidery pattern is centered in the frame and the fabric must be threaded each time a different thread color is used to sew at the same time. Only one needle is finished, the machine stops. Machine Structure and Features 9 If total colors are less than...
Users Manual - English
Page 12
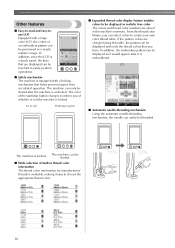
... from accidental operation. The machine can easily be started . ■ Wide selection of whether or not the machine is embroidered. ■ Automatic needle-threading mechanism Using the automatic needle-threading mechanism, the needle can only be threaded. In addition, since the LCD is a touch panel, the keys that are changed...
... from accidental operation. The machine can easily be started . ■ Wide selection of whether or not the machine is embroidered. ■ Automatic needle-threading mechanism Using the automatic needle-threading mechanism, the needle can only be threaded. In addition, since the LCD is a touch panel, the keys that are changed...
Users Manual - English
Page 13
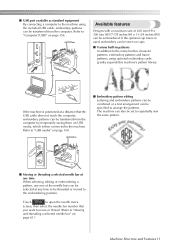
...selected needle bar" on caps. ■ Various built-in patterns In addition to the many built-in character patterns, embroidery patterns and frame patterns, using the included USB cable, embroidery patterns can be selected at any one of 200 mm (H) × 300 mm (W) (7-7/8 inches (H) × 11...computer by temporarily saving them on page 156. ■ USB port available as standard equipment By connecting a computer to the machine using optional embroidery cards greatly expands this machine's pattern library. Available features Designs with a maximum size of the needle bars can be ...
...selected needle bar" on caps. ■ Various built-in patterns In addition to the many built-in character patterns, embroidery patterns and frame patterns, using the included USB cable, embroidery patterns can be selected at any one of 200 mm (H) × 300 mm (W) (7-7/8 inches (H) × 11...computer by temporarily saving them on page 156. ■ USB port available as standard equipment By connecting a computer to the machine using optional embroidery cards greatly expands this machine's pattern library. Available features Designs with a maximum size of the needle bars can be ...
Users Manual - English
Page 14
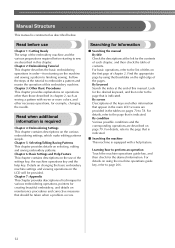
...more colors, and other information that is indicated. For details, refer to the page that should be provided. For details on using the thumbtabs on the right edge of the pages. Manual Structure This manual is required Chapter 4: Embroidering Settings This chapter contains ...7: Appendix This chapter provides descriptions of techniques for various embroidering operations, pointers for example, changing the needle. Find the appropriate page by using the machine operations guide key, refer to 78. Learning how to finishing sewing. Follow the steps of the tutorial to the list of ...
...more colors, and other information that is indicated. For details, refer to the page that should be provided. For details on using the thumbtabs on the right edge of the pages. Manual Structure This manual is required Chapter 4: Embroidering Settings This chapter contains ...7: Appendix This chapter provides descriptions of techniques for various embroidering operations, pointers for example, changing the needle. Find the appropriate page by using the machine operations guide key, refer to 78. Learning how to finishing sewing. Follow the steps of the tutorial to the list of ...
Users Manual - English
Page 15
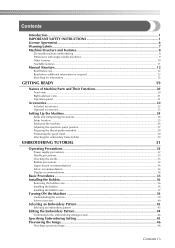
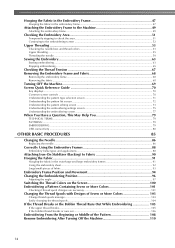
... Labels...7 Machine Structure and Features 8 Six-needle machine embroidering ...8 Differences with single-needle machines ...9 Other features ...10 Available features ...11 Manual Structure...12 Read before use ...12 Read when additional information is required 12 Searching for information ...12 GETTING READY 19 Names of Machine Parts and Their Functions 20 Front view...
... Labels...7 Machine Structure and Features 8 Six-needle machine embroidering ...8 Differences with single-needle machines ...9 Other features ...10 Available features ...11 Manual Structure...12 Read before use ...12 Read when additional information is required 12 Searching for information ...12 GETTING READY 19 Names of Machine Parts and Their Functions 20 Front view...
Users Manual - English
Page 16
...79 PATTERNS: ...79 EMBROIDERING: ...79 USB connectivity ...80 OTHER BASIC PROCEDURES 85 Changing the Needle ...86 Replacing the needle...86 Correctly Using the Embroidery Frames 88 Embroidery frame types and applications ...88 Attaching Iron-On Stabilizer (Backing) to Fabric 90 Hooping the Fabric...91 ...Hooping the fabric in the extra-large and large embroidery frames 91 Using the embroidery sheet...92 Large/small pieces of fabric ...93 Embroidery Frame Position and Movement 94 Changing the Embroidering Position 96 Adjusting...
...79 PATTERNS: ...79 EMBROIDERING: ...79 USB connectivity ...80 OTHER BASIC PROCEDURES 85 Changing the Needle ...86 Replacing the needle...86 Correctly Using the Embroidery Frames 88 Embroidery frame types and applications ...88 Attaching Iron-On Stabilizer (Backing) to Fabric 90 Hooping the Fabric...91 ...Hooping the fabric in the extra-large and large embroidery frames 91 Using the embroidery sheet...92 Large/small pieces of fabric ...93 Embroidery Frame Position and Movement 94 Changing the Embroidering Position 96 Adjusting...
Users Manual - English
Page 17
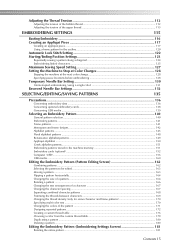
...thread 113 EMBROIDERING SETTINGS 115 Basting Embroidery ...116 Creating an Appliqué Piece 117 Creating an appliqué piece ...117 Using a frame pattern for the outline...120 Automatic Lock Stitch Setting 122 Starting/Ending Position Settings 123 Repeatedly sewing a pattern along... machine at the next color change 128 Specifying pause locations before embroidering 128 Temporary Needle Bar Setting 130 Uninterrupted embroidering (using a single color 131 Reserved Needle Bar Settings 132 SELECTING/EDITING/SAVING PATTERNS 135 Precautions...136 Concerning embroidery data ...136 ...
...thread 113 EMBROIDERING SETTINGS 115 Basting Embroidery ...116 Creating an Appliqué Piece 117 Creating an appliqué piece ...117 Using a frame pattern for the outline...120 Automatic Lock Stitch Setting 122 Starting/Ending Position Settings 123 Repeatedly sewing a pattern along... machine at the next color change 128 Specifying pause locations before embroidering 128 Temporary Needle Bar Setting 130 Uninterrupted embroidering (using a single color 131 Reserved Needle Bar Settings 132 SELECTING/EDITING/SAVING PATTERNS 135 Precautions...136 Concerning embroidery data ...136 ...
Users Manual - English
Page 18
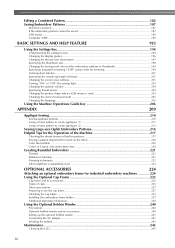
......187 If the embroidery pattern cannot be saved 187 USB media ...189 Computer (USB) ...190 BASIC SETTINGS AND HELP FEATURE 193 Using the Settings Key 194 Understanding the settings screen ...194 Changing the display guides...196 Changing the thread color information ...197 Specifying the ...techniques...222 Fabric/stabilizer compatibility chart ...223 OPTIONAL ACCESSORIES 224 Attaching an optional embroidery frame for industrial embroidery machines 224 Using the Optional Cap Frame 225 Cap frame and its accessories...225 Types of caps ...226 Fabric precautions...227 Preparing to...
......187 If the embroidery pattern cannot be saved 187 USB media ...189 Computer (USB) ...190 BASIC SETTINGS AND HELP FEATURE 193 Using the Settings Key 194 Understanding the settings screen ...194 Changing the display guides...196 Changing the thread color information ...197 Specifying the ...techniques...222 Fabric/stabilizer compatibility chart ...223 OPTIONAL ACCESSORIES 224 Attaching an optional embroidery frame for industrial embroidery machines 224 Using the Optional Cap Frame 225 Cap frame and its accessories...225 Types of caps ...226 Fabric precautions...227 Preparing to...
Users Manual - English
Page 19
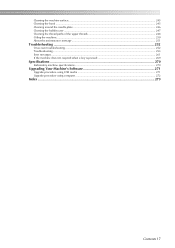
... ...261 If the machine does not respond when a key is pressed 269 Specifications ...270 Embroidery machine specifications...270 Upgrading Your Machine's Software 271 Upgrade procedure using USB media ...271 Upgrade procedure using computer...272 Index ...273 Contents 17
... ...261 If the machine does not respond when a key is pressed 269 Specifications ...270 Embroidery machine specifications...270 Upgrading Your Machine's Software 271 Upgrade procedure using USB media ...271 Upgrade procedure using computer...272 Index ...273 Contents 17
Users Manual - English
Page 22
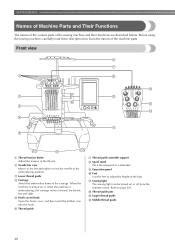
...the bobbin case into the hook. 6 Thread guide 7 Thread guide assembly support 8 Spool stand Put 6 thread spools to embroider. 9 Operation panel 0 Feet Use the feet to the carriage. Front view 1 Thread tension knobs Adjust the tension of the legs. When the machine is turned on or off from... the settings screen. Refer to learn the names of the sewing machine and their functions are described below. Before using the sewing machine, carefully read these descriptions to page 203. B Thread guide pins C Upper thread guide D Middle thread guide 20 GETTING ...
...the bobbin case into the hook. 6 Thread guide 7 Thread guide assembly support 8 Spool stand Put 6 thread spools to embroider. 9 Operation panel 0 Feet Use the feet to the carriage. Front view 1 Thread tension knobs Adjust the tension of the legs. When the machine is turned on or off from... the settings screen. Refer to learn the names of the sewing machine and their functions are described below. Before using the sewing machine, carefully read these descriptions to page 203. B Thread guide pins C Upper thread guide D Middle thread guide 20 GETTING ...
Users Manual - English
Page 23
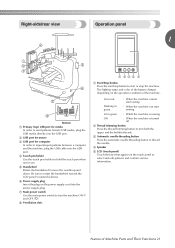
... the machine cannot start sewing Flashing in green : When the machine can start sewing Lit in use. 5 Handwheel Rotate the handwheel to move the needle up and down. Be sure to rotate ...of the button changes depending on the power supply cord into the USB port. 4 Touch pen holder Use the touch pen holder to hold the touch pen when not in green : While the machine is sewing... between a computer and the machine, plug the USB cable into the power supply plug. 7 Main power switch Use the main power switch to turn the machine ON (I) and OFF ({). 8 Ventilation slots 1 Start/Stop button Press...
... the machine cannot start sewing Flashing in green : When the machine can start sewing Lit in use. 5 Handwheel Rotate the handwheel to move the needle up and down. Be sure to rotate ...of the button changes depending on the power supply cord into the USB port. 4 Touch pen holder Use the touch pen holder to hold the touch pen when not in green : While the machine is sewing... between a computer and the machine, plug the USB cable into the power supply plug. 7 Main power switch Use the main power switch to turn the machine ON (I) and OFF ({). 8 Ventilation slots 1 Start/Stop button Press...


