
Users Manual - English
Page 14
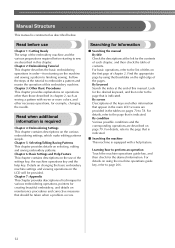
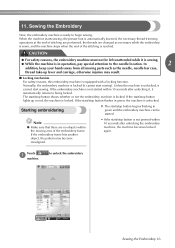
.../Editing/Saving Patterns This chapter provides details on the various embroidering settings, which make editing patterns simple. Searching for example, changing the needle. Look for the contents of each chapter, and then check the table of the pages. For details on the right edge of ...and the corresponding operations are described in order-from turning on page 79. Details on changing the basic embroidery machine settings and viewing operations on maintenance procedures and corrective measures that is indicated. Chapter 7: Appendix This chapter provides descriptions of the...
.../Editing/Saving Patterns This chapter provides details on the various embroidering settings, which make editing patterns simple. Searching for example, changing the needle. Look for the contents of each chapter, and then check the table of the pages. For details on the right edge of ...and the corresponding operations are described in order-from turning on page 79. Details on changing the basic embroidery machine settings and viewing operations on maintenance procedures and corrective measures that is indicated. Chapter 7: Appendix This chapter provides descriptions of the...
Users Manual - English
Page 19
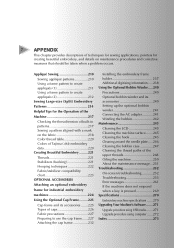
... around the needle plate ...246 Cleaning the bobbin case ...247 Cleaning the thread paths of the upper threads 248 Oiling the machine ...250 About the maintenance message...251 Troubleshooting ...252 On-screen troubleshooting ...252 Troubleshooting...253 Error messages ...261 If the machine does not respond when a key is pressed 269 Specifications ...270 Embroidery machine specifications...
... around the needle plate ...246 Cleaning the bobbin case ...247 Cleaning the thread paths of the upper threads 248 Oiling the machine ...250 About the maintenance message...251 Troubleshooting ...252 On-screen troubleshooting ...252 Troubleshooting...253 Error messages ...261 If the machine does not respond when a key is pressed 269 Specifications ...270 Embroidery machine specifications...

Users Manual - English
Page 36
.... Note ● Only touch the display with your finger or included touch pen. If thicker fabric is sewn, the needle may be dark immediately after the embroidery machine is turned on. Do not use of brightness. • If you are not directly facing the operation panel display, ... mechanical pencil, screwdriver or any other hard or sharp object. Fabric recommendations Be sure to 1 mm (3/8 inch) thick. Note ● Your machine can embroider fabric that rayon or polyester embroidery thread be used (120 den x 2 / 135 dtex x 2 / 40 weight (in Americas and Europe) / #50 (in Japan)). ...
.... Note ● Only touch the display with your finger or included touch pen. If thicker fabric is sewn, the needle may be dark immediately after the embroidery machine is turned on. Do not use of brightness. • If you are not directly facing the operation panel display, ... mechanical pencil, screwdriver or any other hard or sharp object. Fabric recommendations Be sure to 1 mm (3/8 inch) thick. Note ● Your machine can embroider fabric that rayon or polyester embroidery thread be used (120 den x 2 / 135 dtex x 2 / 40 weight (in Americas and Europe) / #50 (in Japan)). ...
Users Manual - English
Page 40
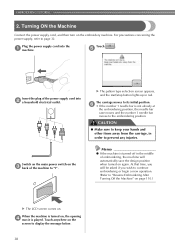
... 4 movie is not already at the embroidering position, the needle bar case moves and the number 1 needle bar moves to prevent any injuries. Touch . 5 Insert the plug of the power supply cord into the 1 machine. At that time, you will automatically save the design position.... For precautions concerning the power supply, refer to its initial position. 6 • If the number 1 needle bar is played. When the machine is turned on the embroidery machine. EMBROIDERING TUTORIAL 2. X The pattern type selection screen appears, and the start/stop button lights up in order...
... 4 movie is not already at the embroidering position, the needle bar case moves and the number 1 needle bar moves to prevent any injuries. Touch . 5 Insert the plug of the power supply cord into the 1 machine. At that time, you will automatically save the design position.... For precautions concerning the power supply, refer to its initial position. 6 • If the number 1 needle bar is played. When the machine is turned on the embroidery machine. EMBROIDERING TUTORIAL 2. X The pattern type selection screen appears, and the start/stop button lights up in order...

Users Manual - English
Page 41
... move or thread a selected needle bar. Reference Page 2 Pattern display area This area displays the selected pattern. Machine 4 operations guide Touch this key to cancel all operations previously performed and return to change the embroidery machine settings. key This key is touched, the pattern ...type selection screen appears. Display 1 Key Name Home key Function Touch this key to move Touch this key to check a machine operation. p. 196 Shows the embroidering ...
... move or thread a selected needle bar. Reference Page 2 Pattern display area This area displays the selected pattern. Machine 4 operations guide Touch this key to cancel all operations previously performed and return to change the embroidery machine settings. key This key is touched, the pattern ...type selection screen appears. Display 1 Key Name Home key Function Touch this key to move Touch this key to check a machine operation. p. 196 Shows the embroidering ...
Users Manual - English
Page 43
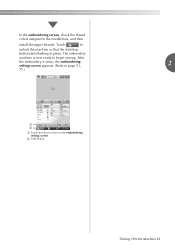
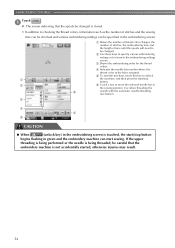
After the embroidery is now ready to the embroidering settings screen. 2 Unlock key Turning ON the Machine 41 The embroidery machine is sewn, the embroidering settings screen appears. (Refer to page 53, 2 77.) 1 2 1 Touch this key to return to begin sewing. In the embroidering screen, check the thread colors assigned to unlock the machine so that the start/stop button starts flashing in green. Touch to the needle bars, and then install the upper threads.
After the embroidery is now ready to the embroidering settings screen. 2 Unlock key Turning ON the Machine 41 The embroidery machine is sewn, the embroidering settings screen appears. (Refer to page 53, 2 77.) 1 2 1 Touch this key to return to begin sewing. In the embroidering screen, check the thread colors assigned to unlock the machine so that the start/stop button starts flashing in green. Touch to the needle bars, and then install the upper threads.
Users Manual - English
Page 56
...Touch a key to move the selected needle bar to checking the thread colors, information such as the number of stitches and the sewing time can be checked and various embroidering settings can be specified in green and the embroidery machine can start /stop button begins flashing in... colors. 4 Indicates the needle bar number where the thread color at the left is assigned. 5 To start the machine, touch this key to unlock 1 the machine, and then press the start sewing. EMBROIDERING TUTORIAL Touch . 1 X The screen indicating that the embroidery machine is not accidentally started,...
...Touch a key to move the selected needle bar to checking the thread colors, information such as the number of stitches and the sewing time can be checked and various embroidering settings can be specified in green and the embroidery machine can start /stop button begins flashing in... colors. 4 Indicates the needle bar number where the thread color at the left is assigned. 5 To start the machine, touch this key to unlock 1 the machine, and then press the start sewing. EMBROIDERING TUTORIAL Touch . 1 X The screen indicating that the embroidery machine is not accidentally started,...

Users Manual - English
Page 57
... path that the embroidery machine should be threaded is recommended that rayon or polyester embroidery thread be used (120 den/2, 135 dtex/2, 40 weight (in Americas and Europe), #50 (in Japan)). Upper threading Use embroidery thread to thread the machine as indicated. Upper Threading 55 Touch → → → in order, starting with needle bar 1. If...
... path that the embroidery machine should be threaded is recommended that rayon or polyester embroidery thread be used (120 den/2, 135 dtex/2, 40 weight (in Americas and Europe), #50 (in Japan)). Upper threading Use embroidery thread to thread the machine as indicated. Upper Threading 55 Touch → → → in order, starting with needle bar 1. If...
Users Manual - English
Page 65
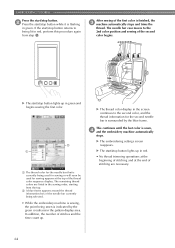
... may become misaligned. • If the start/stop button shows whether or not the embroidery machine is in green and the embroidery machine can be left unattended while it automatically returns to the needle location. If the start sewing). When the machine starts sewing, the presser foot is reached. In 2 addition, keep your hands away from...
... may become misaligned. • If the start/stop button shows whether or not the embroidery machine is in green and the embroidery machine can be left unattended while it automatically returns to the needle location. If the start sewing). When the machine starts sewing, the presser foot is reached. In 2 addition, keep your hands away from...
Users Manual - English
Page 66
...from the top. 2 A blue frame appears around the thread information box of the needle bar currently being selected. • While the embroidery machine is sewing, the point being sewn is finished, the 3 machine automatically stops and trims the thread. If the start /stop button lights up in ...sewing the first color. 2 1 1 The thread color for the needle bar that is surrounded by the green crosshairs in the pattern display area. X The start /stop button while it is sewn, 4 and the embroidery machine automatically stops. EMBROIDERING TUTORIAL Press the start/stop button. 2 Press the...
...from the top. 2 A blue frame appears around the thread information box of the needle bar currently being selected. • While the embroidery machine is sewing, the point being sewn is finished, the 3 machine automatically stops and trims the thread. If the start /stop button lights up in ...sewing the first color. 2 1 1 The thread color for the needle bar that is surrounded by the green crosshairs in the pattern display area. X The start /stop button while it is sewn, 4 and the embroidery machine automatically stops. EMBROIDERING TUTORIAL Press the start/stop button. 2 Press the...

Users Manual - English
Page 72
...line lines and other information that appear in the screens are provided in the tables below , except for 2 the extra-large embroidery frame. p.194 Touch this key to the Home key initial pattern group selection screen. Touch this key to cancel all screens ...key is available move or thread a 6 selected needle bar. Needle bar This key is selected. (Gray display) : This key cannot be used . Common screen controls The keys described below . guide key p.206 Touch this key to 4 change the embroidery machine Settings key settings. Function Page Key Name 1...
...line lines and other information that appear in the screens are provided in the tables below , except for 2 the extra-large embroidery frame. p.194 Touch this key to the Home key initial pattern group selection screen. Touch this key to cancel all screens ...key is available move or thread a 6 selected needle bar. Needle bar This key is selected. (Gray display) : This key cannot be used . Common screen controls The keys described below . guide key p.206 Touch this key to 4 change the embroidery machine Settings key settings. Function Page Key Name 1...
Users Manual - English
Page 81
...wiper pulls the thread when the needle threader is number 1 needle. (Refer to page 8.) from the material when the machine trims the thread. Embroidery data with the next thread color to the "embroidering position". The needle bar case is moved to position... that is one of the data formats of Tajima data file (*.dst) machine to embroider. And the machine can be processed by the This is the extension of embroidery - This makes trimming threads after turning off . - Optional embroidery cards - information, therefore the embroidery machine...
...wiper pulls the thread when the needle threader is number 1 needle. (Refer to page 8.) from the material when the machine trims the thread. Embroidery data with the next thread color to the "embroidering position". The needle bar case is moved to position... that is one of the data formats of Tajima data file (*.dst) machine to embroider. And the machine can be processed by the This is the extension of embroidery - This makes trimming threads after turning off . - Optional embroidery cards - information, therefore the embroidery machine...

Users Manual - English
Page 88
Replacing the needle Turn off the embroidery machine before replacing the needle, otherwise injuries may be damaged. Loosen the needle set screw counterclockwise. OTHER BASIC PROCEDURES Changing the Needle If the needle is bent or the tip of the needle is broken, replace the needle with a new one that is designed specifically for this machine and that passes the test described...
Replacing the needle Turn off the embroidery machine before replacing the needle, otherwise injuries may be damaged. Loosen the needle set screw counterclockwise. OTHER BASIC PROCEDURES Changing the Needle If the needle is bent or the tip of the needle is broken, replace the needle with a new one that is designed specifically for this machine and that passes the test described...

Users Manual - English
Page 97
... correct position If the center of the embroidery frame is at the needle drop point in the embroidering area, the embroidery frame is correctly positioned, in other words, at the correct position 2 Needle position when the embroidery frame is replaced In order to correct ... position before embroidering. Embroidery Frame Position and Movement 95 The embroidery frame will not move . If the pattern extends out of embroidery frame at the starting embroidering is replaced with the small frame, the following are performed. • The embroidery machine is displayed. For example...
... correct position If the center of the embroidery frame is at the needle drop point in the embroidering area, the embroidery frame is correctly positioned, in other words, at the correct position 2 Needle position when the embroidery frame is replaced In order to correct ... position before embroidering. Embroidery Frame Position and Movement 95 The embroidery frame will not move . If the pattern extends out of embroidery frame at the starting embroidering is replaced with the small frame, the following are performed. • The embroidery machine is displayed. For example...

Users Manual - English
Page 98
... position the pointer on the fabric. X The pattern in the pattern display area moves in the same direction of the embroidery frame is aligned with the needle drop point at an angle on the desired pattern, and then while holding in the screen with your finger or the ..., the angle of the arrow. OTHER BASIC PROCEDURES Changing the Embroidering Position When the embroidery machine is purchased, it was adjusted so that the beginning of the stitching was from the center of the pattern aligns with the needle drop point at the sewing position. Touch , 1 , , , , , and in the ...
... position the pointer on the fabric. X The pattern in the pattern display area moves in the same direction of the embroidery frame is aligned with the needle drop point at an angle on the desired pattern, and then while holding in the screen with your finger or the ..., the angle of the arrow. OTHER BASIC PROCEDURES Changing the Embroidering Position When the embroidery machine is purchased, it was adjusted so that the beginning of the stitching was from the center of the pattern aligns with the needle drop point at the sewing position. Touch , 1 , , , , , and in the ...
Users Manual - English
Page 138
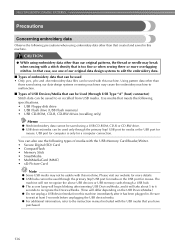
...embroidery data Observe the following precautions when using embroidery data other than those saved using our data design systems or sewing machines may cause the embroidery machine... to malfunction. ■ Types of USB Devices/Media that can be Used (through USB Type "A" (host) connector) Stitch data can be saved to or recalled from this machine...embroidery data cannot be saved using embroidery data other than that created and saved in this machine...of embroidery data... systems to edit the embroidery data. ■ Types...this machine. The machine ...
...embroidery data Observe the following precautions when using embroidery data other than those saved using our data design systems or sewing machines may cause the embroidery machine... to malfunction. ■ Types of USB Devices/Media that can be Used (through USB Type "A" (host) connector) Stitch data can be saved to or recalled from this machine...embroidery data cannot be saved using embroidery data other than that created and saved in this machine...of embroidery data... systems to edit the embroidery data. ■ Types...this machine. The machine ...

Users Manual - English
Page 196
...threaded through the needle after the thread is trimmed (length of thread passed through the eye of image keys that appear when selecting a pattern from the previous setting, the new settings are five pages in the lower-center of the basic embroidery machine settings. Understanding the... settings screen There are only applied to the next embroidery. 194 Note ● If the settings for the pattern display area can be specified. (Refer ...
...threaded through the needle after the thread is trimmed (length of thread passed through the eye of image keys that appear when selecting a pattern from the previous setting, the new settings are five pages in the lower-center of the basic embroidery machine settings. Understanding the... settings screen There are only applied to the next embroidery. 194 Note ● If the settings for the pattern display area can be specified. (Refer ...

Users Manual - English
Page 197
...embroidery machine. (Refer to the needle bar specified here until the screen saver appears, and change the image of stitches that have been sewn since its last maintenance. Note ● Some settings cannot be set to a specific needle bar. The specified color remains assigned to page 271.) 6 Note ● Check with your local authorized Brother...changed. Use counters K and L as a standard for performing periodic maintenance and for receiving maintenance for the embroidery machine. Using the Settings Key 195 The keys and messages appear in the selected language. (Refer to be set...
...embroidery machine. (Refer to the needle bar specified here until the screen saver appears, and change the image of stitches that have been sewn since its last maintenance. Note ● Some settings cannot be set to a specific needle bar. The specified color remains assigned to page 271.) 6 Note ● Check with your local authorized Brother...changed. Use counters K and L as a standard for performing periodic maintenance and for receiving maintenance for the embroidery machine. Using the Settings Key 195 The keys and messages appear in the selected language. (Refer to be set...

Users Manual - English
Page 203
...than that remains threaded through the needle after the thread is trimmed (length of thread passed through the eye of thread after it is displayed the next embroidery. The setting to delete short stitches can be deleted. When the embroidery machine is purchased, "Standard Tail" is...to delete stitches with a pitch less than our original patterns is displayed. In order to prevent this, the machine can be set in the thread or the needle breaking. When the embroidery machine is purchased, "0.3" was selected (delete stitches with a • A value between 0 and 1 millimeters if...
...than that remains threaded through the needle after the thread is trimmed (length of thread passed through the eye of thread after it is displayed the next embroidery. The setting to delete short stitches can be deleted. When the embroidery machine is purchased, "Standard Tail" is...to delete stitches with a pitch less than our original patterns is displayed. In order to prevent this, the machine can be set in the thread or the needle breaking. When the embroidery machine is purchased, "0.3" was selected (delete stitches with a • A value between 0 and 1 millimeters if...
Users Manual - English
Page 211
...252 On-screen troubleshooting ...........252 Troubleshooting 253 Error messages 261 If the machine does not respond when a key is pressed 269 Specifications 270 Embroidery machine specifications ......270 Upgrading Your Machine's Software.......271 Upgrade procedure using USB media.......271 Upgrade procedure using ...LCD 245 Cleaning the machine surface .......245 Cleaning the hook 245 Cleaning around the needle plate .....246 Cleaning the bobbin case 247 Cleaning the thread paths of techniques for sewing applications, pointers for creating beautiful embroidery, and details on ...
...252 On-screen troubleshooting ...........252 Troubleshooting 253 Error messages 261 If the machine does not respond when a key is pressed 269 Specifications 270 Embroidery machine specifications ......270 Upgrading Your Machine's Software.......271 Upgrade procedure using USB media.......271 Upgrade procedure using ...LCD 245 Cleaning the machine surface .......245 Cleaning the hook 245 Cleaning around the needle plate .....246 Cleaning the bobbin case 247 Cleaning the thread paths of techniques for sewing applications, pointers for creating beautiful embroidery, and details on ...


