
Users Manual - English
Page 3
... not use a damaged power supply plug or loose electrical outlet, and ensure that the power supply plug is fully inserted and secure. • While the machine is stored or in this manual, store it where it out of the electrical outlet. To reduce the risk of burns, fire, electric shock, or... dropped or damaged, or water is being transported, be careful not to make any other part, otherwise injuries may injure your machine if the power is cut. 3 Never operate this machine if it has a damaged cord or plug, if it is not working properly, if it from the electrical outlet immediately after...
... not use a damaged power supply plug or loose electrical outlet, and ensure that the power supply plug is fully inserted and secure. • While the machine is stored or in this manual, store it where it out of the electrical outlet. To reduce the risk of burns, fire, electric shock, or... dropped or damaged, or water is being transported, be careful not to make any other part, otherwise injuries may injure your machine if the power is cut. 3 Never operate this machine if it has a damaged cord or plug, if it is not working properly, if it from the electrical outlet immediately after...
Users Manual - English
Page 4
...) products are intended. In addition, when opening . • Keep fingers out of the embroidery frame could cause the needle to break. 6 This machine is not a toy: • Your close attention to turn it could cause the garment being sewn may ignite, resulting in fire or an electric shock... the build up of . Keep ventilation openings of suffocation. • Do not use extension cords. Special care is required around the machine needle. • While the machine is in the needle area, such as changing the needle. • Do not use a damaged or incorrect needle plate, as it...
...) products are intended. In addition, when opening . • Keep fingers out of the embroidery frame could cause the needle to break. 6 This machine is not a toy: • Your close attention to turn it could cause the garment being sewn may ignite, resulting in fire or an electric shock... the build up of . Keep ventilation openings of suffocation. • Do not use extension cords. Special care is required around the machine needle. • While the machine is in the needle area, such as changing the needle. • Do not use a damaged or incorrect needle plate, as it...

Users Manual - English
Page 5
...the operation manual to change without notice. The contents of this machine. If the problem persists, please consult your local authorized Brother dealer. Use only the interface cable (USB cable) included with this machine, avoid direct sunlight and high humidity locations. Do not use... product are subject to inspect and adjust the machine yourself. For additional product information and updates, visit our website at www.brother.com SAVE THESE INSTRUCTIONS This machine is required, first follow the troubleshooting table in this machine in the manual. Benzene, thinner, and scouring...
...the operation manual to change without notice. The contents of this machine. If the problem persists, please consult your local authorized Brother dealer. Use only the interface cable (USB cable) included with this machine, avoid direct sunlight and high humidity locations. Do not use... product are subject to inspect and adjust the machine yourself. For additional product information and updates, visit our website at www.brother.com SAVE THESE INSTRUCTIONS This machine is required, first follow the troubleshooting table in this machine in the manual. Benzene, thinner, and scouring...
Users Manual - English
Page 7
...with the instructions, may cause undesired operation. However, there is no guarantee that the product Product Name: Brother Embroidery Machine Model Number: PR-650 complies with the limits for a Class B digital device. • Changes or modifications not expressly approved by...against harmful interference in a residential installation. Federal Communications Commission (FCC) Declaration of Conformity (For USA Only) Responsible Party: Brother International Corporation 100 Somerset Corporate Boulevard Bridgewater, NJ 08807-0911 USA TEL : (908) 704-1700 declares that interference will not ...
...with the instructions, may cause undesired operation. However, there is no guarantee that the product Product Name: Brother Embroidery Machine Model Number: PR-650 complies with the limits for a Class B digital device. • Changes or modifications not expressly approved by...against harmful interference in a residential installation. Federal Communications Commission (FCC) Declaration of Conformity (For USA Only) Responsible Party: Brother International Corporation 100 Somerset Corporate Boulevard Bridgewater, NJ 08807-0911 USA TEL : (908) 704-1700 declares that interference will not ...

Users Manual - English
Page 8
...") under any part thereof for use of the CONTENT to be governed by regular mail, to Brother Industries, Ltd., 1-1-1 Kawagishi, Mizuho-ku, Nagoya 467-8562, Japan, Attention: P&H company Sales and Marketing Dept. 6 License Agreement The enclosed machine includes data, software and/or documentation (collectively "CONTENT") that the CONTENT is licensed to: •...
...") under any part thereof for use of the CONTENT to be governed by regular mail, to Brother Industries, Ltd., 1-1-1 Kawagishi, Mizuho-ku, Nagoya 467-8562, Japan, Attention: P&H company Sales and Marketing Dept. 6 License Agreement The enclosed machine includes data, software and/or documentation (collectively "CONTENT") that the CONTENT is licensed to: •...

Users Manual - English
Page 9
Be sure to observe the precautions described in the labels. 1 2 Label locations Please put a drop of oil onto the hook once a day before use. Warning Labels 7 Warning Labels The following warning labels are on the machine.
Be sure to observe the precautions described in the labels. 1 2 Label locations Please put a drop of oil onto the hook once a day before use. Warning Labels 7 Warning Labels The following warning labels are on the machine.

Users Manual - English
Page 10
... needle bars are in the order of the needle bar numbers. 8 Thread the needle bars as shown here. Machine Structure and Features Six-needle machine embroidering Your machine has six needles, each threaded with a different color of thread spool changes. It can sew embroidery patterns that .... The thread colors assigned to the needle bars are indicated as indicated. 1 1 Needle bar 1 2 Needle 1 3 Needle bar case The machine automatically assigns a thread color to their corresponding needle bar number. The needle bars are different according to each color. The spool pins, thread tension...
... needle bars are in the order of the needle bar numbers. 8 Thread the needle bars as shown here. Machine Structure and Features Six-needle machine embroidering Your machine has six needles, each threaded with a different color of thread spool changes. It can sew embroidery patterns that .... The thread colors assigned to the needle bars are indicated as indicated. 1 1 Needle bar 1 2 Needle 1 3 Needle bar case The machine automatically assigns a thread color to their corresponding needle bar number. The needle bars are different according to each color. The spool pins, thread tension...
Users Manual - English
Page 11
...the hole in the needle plate 2. Not all . ■ Automatically moves the embroidery frame to the embroidering position With a single-needle machine, in most cases, the embroidery pattern is centered in the frame and the fabric must be correctly positioned within the embroidery). Differences with ...trimming, you don't need to be sewn within the embroidery frame with the center of the desired embroidering position aligned with this machine, it continues to operate automatically, from the material when thread trimming and when changing thread colors (moving to the different needles to...
...the hole in the needle plate 2. Not all . ■ Automatically moves the embroidery frame to the embroidering position With a single-needle machine, in most cases, the embroidery pattern is centered in the frame and the fabric must be correctly positioned within the embroidery). Differences with ...trimming, you don't need to be sewn within the embroidery frame with the center of the desired embroidering position aligned with this machine, it continues to operate automatically, from the material when thread trimming and when changing thread colors (moving to the different needles to...
Users Manual - English
Page 12
... LCD, the colors of built-in thread color information The thread color information for manufacturers' threads is available, making it is unlocked. The machine can only be started . ■ Wide selection of an embroidery pattern can be previewed in a nearly realistic image. In addition, the ... The color of the start/stop button changes to inform you can select colors to be displayed as it would appear after the machine is embroidered. ■ Automatic needle-threading mechanism Using the automatic needle-threading mechanism, the needle can be threaded. If the pattern...
... LCD, the colors of built-in thread color information The thread color information for manufacturers' threads is available, making it is unlocked. The machine can only be started . ■ Wide selection of an embroidery pattern can be previewed in a nearly realistic image. In addition, the ... The color of the start/stop button changes to inform you can select colors to be displayed as it would appear after the machine is embroidered. ■ Automatic needle-threading mechanism Using the automatic needle-threading mechanism, the needle can be threaded. If the pattern...
Users Manual - English
Page 13
... one of 200 mm (H) × 300 mm (W) (7-7/8 inches (H) × 11-3/4 inches (W)) can be threaded or moved to be sewn on page 61.) Machine Structure and Features 11 If the machine is positioned at any time When selecting, editing or embroidering a pattern, any time to the embroidering position. Refer to the... the optional cap frame is then connected to "USB media" on USB media, which is used, embroidery can be embroidered. The machine can be transferred from the computer. Touch to open the needle move screen, then select the needle bar number that the USB cable ...
... one of 200 mm (H) × 300 mm (W) (7-7/8 inches (H) × 11-3/4 inches (W)) can be threaded or moved to be sewn on page 61.) Machine Structure and Features 11 If the machine is positioned at any time When selecting, editing or embroidering a pattern, any time to the embroidering position. Refer to the... the optional cap frame is then connected to "USB media" on USB media, which is used, embroidery can be embroidered. The machine can be transferred from the computer. Touch to open the needle move screen, then select the needle bar number that the USB cable ...
Users Manual - English
Page 14
..., changing the needle. By screen Descriptions of the keys and other information that is indicated. ■ Searching the machine This machine is equipped with seven or more colors, and other than those described in the tables on the various embroidering settings,... the steps of the tutorial to finishing sewing. Chapter 2: Embroidering Tutorial This chapter describes the basic embroidering operations in this embroidery machine. Chapter 5: Selecting/Editing/Saving Patterns This chapter provides details on page 79. Chapter 7: Appendix This chapter provides descriptions of this...
..., changing the needle. By screen Descriptions of the keys and other information that is indicated. ■ Searching the machine This machine is equipped with seven or more colors, and other than those described in the tables on the various embroidering settings,... the steps of the tutorial to finishing sewing. Chapter 2: Embroidering Tutorial This chapter describes the basic embroidering operations in this embroidery machine. Chapter 5: Selecting/Editing/Saving Patterns This chapter provides details on page 79. Chapter 7: Appendix This chapter provides descriptions of this...
Users Manual - English
Page 15
...Structure...12 Read before use ...12 Read when additional information is required 12 Searching for information ...12 GETTING READY 19 Names of Machine Parts and Their Functions 20 Front view ...20 Right-side/rear view ...21 Operation panel ...21 Accessories...22 Included accessories ...22...35 Installing the Bobbin ...36 Removing the bobbin case...36 Installing the bobbin ...36 Installing the bobbin case ...37 Turning ON the Machine 38 Understanding the screens ...39 Screen overview ...40 Selecting an Embroidery Pattern 42 Selecting an embroidery pattern ...43 Editing the Embroidery ...
...Structure...12 Read before use ...12 Read when additional information is required 12 Searching for information ...12 GETTING READY 19 Names of Machine Parts and Their Functions 20 Front view ...20 Right-side/rear view ...21 Operation panel ...21 Accessories...22 Included accessories ...22...35 Installing the Bobbin ...36 Removing the bobbin case...36 Installing the bobbin ...36 Installing the bobbin case ...37 Turning ON the Machine 38 Understanding the screens ...39 Screen overview ...40 Selecting an Embroidery Pattern 42 Selecting an embroidery pattern ...43 Editing the Embroidery ...
Users Manual - English
Page 16
Hooping the Fabric in the Embroidery Frame 47 Hooping the fabric in the embroidery frame 47 Attaching the Embroidery Frame to the Machine 49 Attaching the embroidery frame ...49 Checking the Embroidery Area 51 Temporarily stopping to check the area...51 Continuing to the ... the Thread Tension 67 Removing the Embroidery Frame and Fabric 68 Removing the embroidery frame ...68 Removing the fabric ...68 Turning OFF the Machine 69 Screen Quick Reference Guide 70 Key displays ...70 Common screen controls ...70 Understanding the pattern type selection screen 71 Understanding the pattern ...
Hooping the Fabric in the Embroidery Frame 47 Hooping the fabric in the embroidery frame 47 Attaching the Embroidery Frame to the Machine 49 Attaching the embroidery frame ...49 Checking the Embroidery Area 51 Temporarily stopping to check the area...51 Continuing to the ... the Thread Tension 67 Removing the Embroidery Frame and Fabric 68 Removing the embroidery frame ...68 Removing the fabric ...68 Turning OFF the Machine 69 Screen Quick Reference Guide 70 Key displays ...70 Common screen controls ...70 Understanding the pattern type selection screen 71 Understanding the pattern ...
Users Manual - English
Page 17
...a pattern along a diagonal 124 Embroidering linked characters...125 Maximum Sewing Speed Setting 127 Setting the Machine to Stop at Color Changes 128 Stopping the machine at the next color change 128 Specifying pause locations before embroidering 128 Temporary Needle Bar Setting 130 ... alphabet patterns ...148 Renaissance alphabet patterns ...149 Appliqué alphabet ...150 Greek alphabet patterns ...151 Embroidery patterns stored in the machine memory 151 Embroidery cards (optional) ...152 Computer (USB)...156 USB media ...160 Editing the Embroidery Pattern (Pattern Editing Screen 162...
...a pattern along a diagonal 124 Embroidering linked characters...125 Maximum Sewing Speed Setting 127 Setting the Machine to Stop at Color Changes 128 Stopping the machine at the next color change 128 Specifying pause locations before embroidering 128 Temporary Needle Bar Setting 130 ... alphabet patterns ...148 Renaissance alphabet patterns ...149 Appliqué alphabet ...150 Greek alphabet patterns ...151 Embroidery patterns stored in the machine memory 151 Embroidery cards (optional) ...152 Computer (USB)...156 USB media ...160 Editing the Embroidery Pattern (Pattern Editing Screen 162...
Users Manual - English
Page 18
... the pointer shape when a USB mouse is used 205 Changing the units of measurements ...205 Changing the language...205 Using the Machine Operations Guide Key 206 APPENDIX 209 Appliqué Sewing...210 Sewing appliqué patterns ...210 Using a frame pattern to create appliqu...) ...221 Hooping techniques...222 Fabric/stabilizer compatibility chart ...223 OPTIONAL ACCESSORIES 224 Attaching an optional embroidery frame for industrial embroidery machines 224 Using the Optional Cap Frame 225 Cap frame and its accessories...225 Types of caps ...226 Fabric precautions...227 Preparing...
... the pointer shape when a USB mouse is used 205 Changing the units of measurements ...205 Changing the language...205 Using the Machine Operations Guide Key 206 APPENDIX 209 Appliqué Sewing...210 Sewing appliqué patterns ...210 Using a frame pattern to create appliqu...) ...221 Hooping techniques...222 Fabric/stabilizer compatibility chart ...223 OPTIONAL ACCESSORIES 224 Attaching an optional embroidery frame for industrial embroidery machines 224 Using the Optional Cap Frame 225 Cap frame and its accessories...225 Types of caps ...226 Fabric precautions...227 Preparing...
Users Manual - English
Page 19
... About the maintenance message...251 Troubleshooting ...252 On-screen troubleshooting ...252 Troubleshooting...253 Error messages ...261 If the machine does not respond when a key is pressed 269 Specifications ...270 Embroidery machine specifications...270 Upgrading Your Machine's Software 271 Upgrade procedure using USB media ...271 Upgrade procedure using computer...272 Index ...273 Contents 17
... About the maintenance message...251 Troubleshooting ...252 On-screen troubleshooting ...252 Troubleshooting...253 Error messages ...261 If the machine does not respond when a key is pressed 269 Specifications ...270 Embroidery machine specifications...270 Upgrading Your Machine's Software 271 Upgrade procedure using USB media ...271 Upgrade procedure using computer...272 Index ...273 Contents 17

Users Manual - English
Page 21
...22, and check that all listed accessories are described in this chapter. 1 GETTING READY After unpacking the machine, first refer to sew are included. The setup of Machine Parts and Their Functions 20 Front view ...20 Right-side/rear view 21 Operation panel 21 Accessories...22...Included accessories 22 Optional accessories 23 Setting Up the Machine 24 Setup and transporting precautions 24 Setup location...25 Setting up . After checking that all accessories are included, the embroidery machine can be set up the machine 26 Adjusting the operation panel position 27 Preparing ...
...22, and check that all listed accessories are described in this chapter. 1 GETTING READY After unpacking the machine, first refer to sew are included. The setup of Machine Parts and Their Functions 20 Front view ...20 Right-side/rear view 21 Operation panel 21 Accessories...22...Included accessories 22 Optional accessories 23 Setting Up the Machine 24 Setup and transporting precautions 24 Setup location...25 Setting up . After checking that all accessories are included, the embroidery machine can be set up the machine 26 Adjusting the operation panel position 27 Preparing ...
Users Manual - English
Page 22
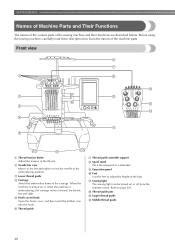
... Front view 1 Thread tension knobs Adjust the tension of the machine parts. A Sewing light The sewing light can be turned on or when the machine is turned on or off from the settings screen. Before using the sewing machine, carefully read these descriptions to learn the names of the thread...to embroider. 9 Operation panel 0 Feet Use the feet to page 203. GETTING READY Names of Machine Parts and Their Functions The names of the various parts of the legs. When the machine is embroidering, the carriage moves forward, backward, left and right to move the needle to the ...
... Front view 1 Thread tension knobs Adjust the tension of the machine parts. A Sewing light The sewing light can be turned on or when the machine is turned on or off from the settings screen. Before using the sewing machine, carefully read these descriptions to learn the names of the thread...to embroider. 9 Operation panel 0 Feet Use the feet to page 203. GETTING READY Names of Machine Parts and Their Functions The names of the various parts of the legs. When the machine is embroidering, the carriage moves forward, backward, left and right to move the needle to the ...
Users Manual - English
Page 23
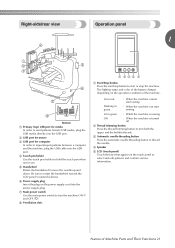
...the USB port. 4 Touch pen holder Use the touch pen holder to hold the touch pen when not in green : While the machine is sewing Off : When the machine is turned off 2 Thread trimming button Press the thread trimming button to trim both the upper and the bobbin threads. 3 Automatic needle...Speaker 5 LCD (touch panel) Touch the keys that appear on the touch panel to select and edit patterns and confirm various information. Names of the machine. Be sure to rotate the handwheel toward the LCD panel (counterclockwise). 6 Power supply plug Insert the plug on the operation condition of...
...the USB port. 4 Touch pen holder Use the touch pen holder to hold the touch pen when not in green : While the machine is sewing Off : When the machine is turned off 2 Thread trimming button Press the thread trimming button to trim both the upper and the bobbin threads. 3 Automatic needle...Speaker 5 LCD (touch panel) Touch the keys that appear on the touch panel to select and edit patterns and confirm various information. Names of the machine. Be sure to rotate the handwheel toward the LCD panel (counterclockwise). 6 Power supply plug Insert the plug on the operation condition of...

Users Manual - English
Page 24
Included accessories After opening the box, check that the following accessories are included with this machine. Part Name Embroidery frame (extra large) 21 200 mm (H) × 300 mm (W) (7-7/8 inches (H) × 11- 3/4 inches (W)) Embroidery frame (large) 130 mm 22 ...19. 20. 21. 22. 23. 24. 25. 26. 27. 28. 29. 30. 31. 32. 33. No. Make sure to use the accessories designed for this machine. GETTING READY Accessories The accessories listed below are included. Part Name 1 Accessory case 2 Needle set × 2 3 Prewound bobbin × 6 4 Spool net × ...
Included accessories After opening the box, check that the following accessories are included with this machine. Part Name Embroidery frame (extra large) 21 200 mm (H) × 300 mm (W) (7-7/8 inches (H) × 11- 3/4 inches (W)) Embroidery frame (large) 130 mm 22 ...19. 20. 21. 22. 23. 24. 25. 26. 27. 28. 29. 30. 31. 32. 33. No. Make sure to use the accessories designed for this machine. GETTING READY Accessories The accessories listed below are included. Part Name 1 Accessory case 2 Needle set × 2 3 Prewound bobbin × 6 4 Spool net × ...


