

Users Manual - English
Page 15
... precautions ...24 Setup location...25 Setting up the machine ...26 Adjusting the operation panel position...27 Preparing the thread guide assembly...28 Positioning the spool stand ...29 Attaching the embroidery frame holder...29 EMBROIDERING TUTORIAL 31 Operating Precautions...32 Power supply precautions ...32 Needle precautions...33 Checking the needle ...33 Bobbin...
... precautions ...24 Setup location...25 Setting up the machine ...26 Adjusting the operation panel position...27 Preparing the thread guide assembly...28 Positioning the spool stand ...29 Attaching the embroidery frame holder...29 EMBROIDERING TUTORIAL 31 Operating Precautions...32 Power supply precautions ...32 Needle precautions...33 Checking the needle ...33 Bobbin...

Users Manual - English
Page 21
..., the embroidery machine can be set up the machine 26 Adjusting the operation panel position 27 Preparing the thread guide assembly 28 Positioning the spool stand 29 Attaching the embroidery frame holder 29 1 GETTING READY After unpacking the machine, first refer to sew are described in this chapter.
..., the embroidery machine can be set up the machine 26 Adjusting the operation panel position 27 Preparing the thread guide assembly 28 Positioning the spool stand 29 Attaching the embroidery frame holder 29 1 GETTING READY After unpacking the machine, first refer to sew are described in this chapter.
Users Manual - English
Page 22
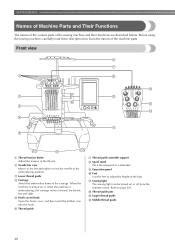
... and right. 5 Hook cover/Hook Open the hook cover, and then insert the bobbin case into the hook. 6 Thread guide 7 Thread guide assembly support 8 Spool stand Put 6 thread spools to embroider. 9 Operation panel 0 Feet Use the feet to the carriage. B Thread guide pins C Upper thread guide D Middle thread guide 20 When...
... and right. 5 Hook cover/Hook Open the hook cover, and then insert the bobbin case into the hook. 6 Thread guide 7 Thread guide assembly support 8 Spool stand Put 6 thread spools to embroider. 9 Operation panel 0 Feet Use the feet to the carriage. B Thread guide pins C Upper thread guide D Middle thread guide 20 When...
Users Manual - English
Page 26
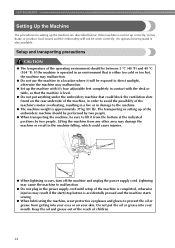
..., otherwise injuries may damage the machine or result in the machine falling, which could block the ventilation slots found on your mouth. An optional sewing stand is operated in an environment that could cause injuries. ● When lightning occurs, turn off the machine and unplug the power supply cord. If the...
..., otherwise injuries may damage the machine or result in the machine falling, which could block the ventilation slots found on your mouth. An optional sewing stand is operated in an environment that could cause injuries. ● When lightning occurs, turn off the machine and unplug the power supply cord. If the...
Users Manual - English
Page 31
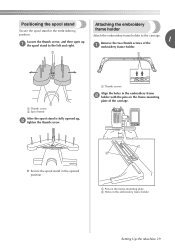
... Attach the embroidery frame holder to the left and right. X Secure the spool stand in the opened up 1 the spool stand to the carriage. 1 Remove the two thumb screws of the 1 embroidery frame holder. 1 Thumb screw 2 Spool stand After the spool stand is fully opened position. 1 Pins on the frame-mounting plate of the...
... Attach the embroidery frame holder to the left and right. X Secure the spool stand in the opened up 1 the spool stand to the carriage. 1 Remove the two thumb screws of the 1 embroidery frame holder. 1 Thumb screw 2 Spool stand After the spool stand is fully opened position. 1 Pins on the frame-mounting plate of the...

Users Manual - English
Page 38
..., refer to "Cleaning the bobbin case" on page 250. Insert a bobbin wound with a bobbin-winder. Use pre-wound (L type) bobbins. ● The optional bobbin winder (stand-alone type) and optional metal bobbins can only be oiled. Grab the bobbin case latch, and remove the 3 bobbin case. For details on cleaning the...
..., refer to "Cleaning the bobbin case" on page 250. Insert a bobbin wound with a bobbin-winder. Use pre-wound (L type) bobbins. ● The optional bobbin winder (stand-alone type) and optional metal bobbins can only be oiled. Grab the bobbin case latch, and remove the 3 bobbin case. For details on cleaning the...
Users Manual - English
Page 58
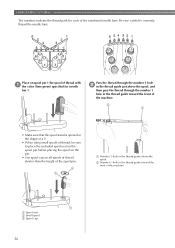
..., and then pass the thread through the number 1 hole in the thread guide toward the front of the machine. • Make sure that the spool stand is opened in the shape of a V. • When using small spools of the machine 1 Spool mat 2 Small spool 3 Spool cap 56 EMBROIDERING TUTORIAL The numbers...
..., and then pass the thread through the number 1 hole in the thread guide toward the front of the machine. • Make sure that the spool stand is opened in the shape of a V. • When using small spools of the machine 1 Spool mat 2 Small spool 3 Spool cap 56 EMBROIDERING TUTORIAL The numbers...
Users Manual - English
Page 102
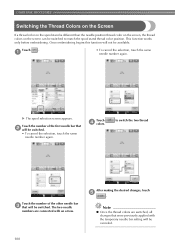
...needle bar setting will not be available. OTHER BASIC PROCEDURES Switching the Thread Colors on the Screen If a thread color on the spool stand is different than the needle position thread color on the screen, the thread colors on the screen can be switched. • To cancel... that 2 will be canceled. 100 Touch . 1 • To cancel the selection, touch the same needle number again. to match the spool stand thread color position. Once embroidering begins this function will be switched. Touch the number of the other needle bar 3 that will be switched to switch...
...needle bar setting will not be available. OTHER BASIC PROCEDURES Switching the Thread Colors on the Screen If a thread color on the spool stand is different than the needle position thread color on the screen, the thread colors on the screen can be switched. • To cancel... that 2 will be canceled. 100 Touch . 1 • To cancel the selection, touch the same needle number again. to match the spool stand thread color position. Once embroidering begins this function will be switched. Touch the number of the other needle bar 3 that will be switched to switch...
Users Manual - English
Page 277
... 81 Specifications 270 media 80 Split (large-size) embroidery patterns 214 mouse 82 Spool 56 USB media 160, 189 Spool change indicator 77, 102 Spool stand 20, 29 Stabilizer 90, 221, 223 Standard (Pro Style) caps 226 Standard Tail 194, 201 Start/stop button 21, 64 V Ventilation slots 21 Version 195...
... 81 Specifications 270 media 80 Split (large-size) embroidery patterns 214 mouse 82 Spool 56 USB media 160, 189 Spool change indicator 77, 102 Spool stand 20, 29 Stabilizer 90, 221, 223 Standard (Pro Style) caps 226 Standard Tail 194, 201 Start/stop button 21, 64 V Ventilation slots 21 Version 195...
