

Users Manual - English
Page 2
Copyright 1989-2007 Datalight, Inc., All Rights Reserved Video powered by the copyright holders and contributors "as is" and any time, without specific prior written permission. IMPORTANT: READ BEFORE DOWNLOADING, COPYING, INSTALLING OR USING. Third party copyrights are disclaimed. All information provided related to future Intel products and plans is preliminary and subject to this license, do not agree to change at any express or implied warranties, including, but not limited to , the implied warranties of merchantability and fitness for any way out of the use in source and ...
Copyright 1989-2007 Datalight, Inc., All Rights Reserved Video powered by the copyright holders and contributors "as is" and any time, without specific prior written permission. IMPORTANT: READ BEFORE DOWNLOADING, COPYING, INSTALLING OR USING. Third party copyrights are disclaimed. All information provided related to future Intel products and plans is preliminary and subject to this license, do not agree to change at any express or implied warranties, including, but not limited to , the implied warranties of merchantability and fitness for any way out of the use in source and ...
Users Manual - English
Page 3
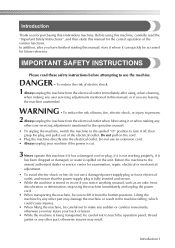
Introduction Thank you for the correct operation of the various functions. DANGER - To reduce the risk of burns, fire, electric shock, or injury to persons: 2 Always unplug the machine from the electrical outlet when lubricating it or when making any user servicing adjustments mentioned in the machine falling, which could cause injuries. • When lifting the machine, be careful not to touch the operation panel, thread guides or any other part may damage the machine or result in this machine if it has a damaged cord or plug, if it is stored or in the operation manual. • ...
Introduction Thank you for the correct operation of the various functions. DANGER - To reduce the risk of burns, fire, electric shock, or injury to persons: 2 Always unplug the machine from the electrical outlet when lubricating it or when making any user servicing adjustments mentioned in the machine falling, which could cause injuries. • When lifting the machine, be careful not to touch the operation panel, thread guides or any other part may damage the machine or result in this machine if it has a damaged cord or plug, if it is stored or in the operation manual. • ...
Users Manual - English
Page 4
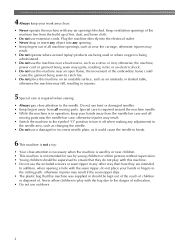
Do not use bent or damaged needles. • Keep fingers away from all machine openings, such as near the carriage, otherwise injuries may result if the seam ripper slips. • The plastic bag that they are being used by young children or infirm persons without supervision. • Young children should be supervised to the danger of lint, dust, and loose cloth. • Do not use outdoors. 2 In addition, when opening . • Keep fingers out of . Never allow children to play with this machine on an unstable surface, such as a stove or iron; otherwise, the ...
Do not use bent or damaged needles. • Keep fingers away from all machine openings, such as near the carriage, otherwise injuries may result if the seam ripper slips. • The plastic bag that they are being used by young children or infirm persons without supervision. • Young children should be supervised to the danger of lint, dust, and loose cloth. • Do not use outdoors. 2 In addition, when opening . • Keep fingers out of . Never allow children to play with this machine on an unstable surface, such as a stove or iron; otherwise, the ...

Users Manual - English
Page 5
... dealer. • In the event a malfunction occurs or adjustment is intended for this manual. For additional product information and updates, visit our website at www.brother.com SAVE THESE INSTRUCTIONS This machine is required, first follow the troubleshooting table in the back of this machine only for its intended use as... machine yourself. Use only the interface cable (USB cable) included with this machine. Do not use . If the problem persists, please consult your local authorized Brother dealer.
... dealer. • In the event a malfunction occurs or adjustment is intended for this manual. For additional product information and updates, visit our website at www.brother.com SAVE THESE INSTRUCTIONS This machine is required, first follow the troubleshooting table in the back of this machine only for its intended use as... machine yourself. Use only the interface cable (USB cable) included with this machine. Do not use . If the problem persists, please consult your local authorized Brother dealer.

Users Manual - English
Page 6
FOR USERS IN AC INPUT 220-240V COUNTRIES AND MEXICO This appliance is not suitable for the plug supplied with the appliance. 4 Never use plugs with the fuse cover omitted. • If the available electrical outlet is not intended for use by persons (including children) with reduced physical, sensory or mental capabilities, or lack of experience and knowledge, unless they do not play with this equipment, you should be supervised to ensure that they have been given supervision or instruction concerning use of replacing the plug fuse, use a fuse approved by a person responsible for ...
FOR USERS IN AC INPUT 220-240V COUNTRIES AND MEXICO This appliance is not suitable for the plug supplied with the appliance. 4 Never use plugs with the fuse cover omitted. • If the available electrical outlet is not intended for use by persons (including children) with reduced physical, sensory or mental capabilities, or lack of experience and knowledge, unless they do not play with this equipment, you should be supervised to ensure that they have been given supervision or instruction concerning use of replacing the plug fuse, use a fuse approved by a person responsible for ...
Users Manual - English
Page 7
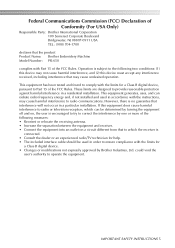
...ensure compliance with Part 15 of the FCC Rules. Federal Communications Commission (FCC) Declaration of Conformity (For USA Only) Responsible Party: Brother International Corporation 100 Somerset Corporate Boulevard Bridgewater, NJ 08807-0911 USA TEL : (908) 704-1700 declares that interference will not occur in... a particular installation. Operation is no guarantee that the product Product Name: Brother Embroidery Machine Model Number: PR-650 complies with the limits for help. • The included interface cable should be determined by...
...ensure compliance with Part 15 of the FCC Rules. Federal Communications Commission (FCC) Declaration of Conformity (For USA Only) Responsible Party: Brother International Corporation 100 Somerset Corporate Boulevard Bridgewater, NJ 08807-0911 USA TEL : (908) 704-1700 declares that interference will not occur in... a particular installation. Operation is no guarantee that the product Product Name: Brother Embroidery Machine Model Number: PR-650 complies with the limits for help. • The included interface cable should be determined by...

Users Manual - English
Page 8
...of Japan. BY USING THE CONTENT, THE CUSTOMER ACCEPTS THE TERMS AND CONDITIONS OF THIS AGREEMENT. Please direct all rights not expressly granted to Brother Industries, Ltd., 1-1-1 Kawagishi, Mizuho-ku, Nagoya 467-8562, Japan, Attention: P&H company Sales and Marketing Dept. 6 Except as otherwise ...part thereof for business, commercial or industrial purposes. • Sell or otherwise distribute the EMBROIDERY created by use of Brother Industries, Ltd. ("BROTHER"). The CONTENT are proprietary products of the CONTENT, WHICH ORIGINALLY BEARS CERTAIN COPYRIGHT NOTICE UNDER THE NAME OF ANY ...
...of Japan. BY USING THE CONTENT, THE CUSTOMER ACCEPTS THE TERMS AND CONDITIONS OF THIS AGREEMENT. Please direct all rights not expressly granted to Brother Industries, Ltd., 1-1-1 Kawagishi, Mizuho-ku, Nagoya 467-8562, Japan, Attention: P&H company Sales and Marketing Dept. 6 Except as otherwise ...part thereof for business, commercial or industrial purposes. • Sell or otherwise distribute the EMBROIDERY created by use of Brother Industries, Ltd. ("BROTHER"). The CONTENT are proprietary products of the CONTENT, WHICH ORIGINALLY BEARS CERTAIN COPYRIGHT NOTICE UNDER THE NAME OF ANY ...

Users Manual - English
Page 9
Warning Labels The following warning labels are on the machine. Warning Labels 7 Be sure to observe the precautions described in the labels. 1 2 Label locations Please put a drop of oil onto the hook once a day before use.
Warning Labels The following warning labels are on the machine. Warning Labels 7 Be sure to observe the precautions described in the labels. 1 2 Label locations Please put a drop of oil onto the hook once a day before use.

Users Manual - English
Page 10
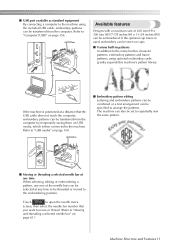
Machine Structure and Features Six-needle machine embroidering Your machine has six needles, each threaded with a different color of thread spool changes. If a needle is already threaded by automatically selecting the appropriate needle for each needle. The needle bars are different according to that the machine does not always assign colors according to left: needle bar 1, needle bar 2, needle bar 3, needle bar 4, needle bar 5, and needle bar 6. The spool pins, thread tension knobs, thread takeup levers and thread paths, mentioned when threading the upper thread, are named ...
Machine Structure and Features Six-needle machine embroidering Your machine has six needles, each threaded with a different color of thread spool changes. If a needle is already threaded by automatically selecting the appropriate needle for each needle. The needle bars are different according to that the machine does not always assign colors according to left: needle bar 1, needle bar 2, needle bar 3, needle bar 4, needle bar 5, and needle bar 6. The spool pins, thread tension knobs, thread takeup levers and thread paths, mentioned when threading the upper thread, are named ...
Users Manual - English
Page 11
If total colors are less than 6 colors, and if total color change is more than 7 times, machine will stop when it is necessary for the thread spools to be changed and the machine must be threaded each time a different thread color is reduced. ■ Automatically pulls and holds the thread tails to the under side of fabric at the beginning and end of stitching Since the machine automatically pulls the upper thread under the fabric at the beginning of the desired embroidering position aligned with this machine, it easier to sew the pattern at a time. When starting and end ...
If total colors are less than 6 colors, and if total color change is more than 7 times, machine will stop when it is necessary for the thread spools to be changed and the machine must be threaded each time a different thread color is reduced. ■ Automatically pulls and holds the thread tails to the under side of fabric at the beginning and end of stitching Since the machine automatically pulls the upper thread under the fabric at the beginning of the desired embroidering position aligned with this machine, it easier to sew the pattern at a time. When starting and end ...
Users Manual - English
Page 12
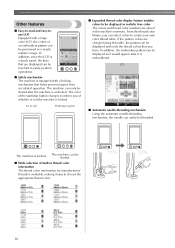
In addition, since the LCD is a touch panel, the keys that are displayed can be displayed with only the thread colors that helps prevent injuries from accidental operation. From this table, the pattern can be touched to easily perform operations. ■ Safety mechanism The machine is equipped with a locking mechanism that you have. The machine is locked. Lit in red Flashing in green ■ Expanded thread color display feature enables colors to be displayed as it would appear after the machine is unlocked. If the pattern colors are stored in thread color information The ...
In addition, since the LCD is a touch panel, the keys that are displayed can be displayed with only the thread colors that helps prevent injuries from accidental operation. From this table, the pattern can be touched to easily perform operations. ■ Safety mechanism The machine is equipped with a locking mechanism that you have. The machine is locked. Lit in red Flashing in green ■ Expanded thread color display feature enables colors to be displayed as it would appear after the machine is unlocked. If the pattern colors are stored in thread color information The ...
Users Manual - English
Page 13
■ USB port available as standard equipment By connecting a computer to the machine using the included USB cable, embroidery patterns can be sewn on caps. ■ Various built-in patterns In addition to the many built-in character patterns, embroidery patterns and frame patterns, using optional embroidery cards greatly expands this machine's pattern library. If the optional cap frame is used, embroidery can be transferred from the computer by temporarily saving them on page 156. Refer to "Computer (USB)" on USB media, which is positioned at a distance that you want to...
■ USB port available as standard equipment By connecting a computer to the machine using the included USB cable, embroidery patterns can be sewn on caps. ■ Various built-in patterns In addition to the many built-in character patterns, embroidery patterns and frame patterns, using optional embroidery cards greatly expands this machine's pattern library. If the optional cap frame is used, embroidery can be transferred from the computer by temporarily saving them on page 156. Refer to "Computer (USB)" on USB media, which is positioned at a distance that you want to...
Users Manual - English
Page 14
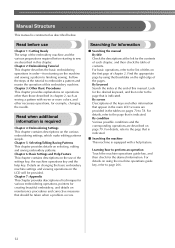
Chapter 3: Other Basic Procedures This chapter provides explanations on the machine and sewing a pattern to finishing sewing. Chapter 6: Basic Settings and Help Feature This chapter contains descriptions on the use Chapter 1: Getting Ready The setup of the embroidery machine and the various preparations required before use of this manual. Find the appropriate page by using the machine operations guide key, refer to sew are described in chapter 2, such as described below. Look for creating beautiful embroidery, and details on pages 70 to the page that is indicated. ■ ...
Chapter 3: Other Basic Procedures This chapter provides explanations on the machine and sewing a pattern to finishing sewing. Chapter 6: Basic Settings and Help Feature This chapter contains descriptions on the use Chapter 1: Getting Ready The setup of the embroidery machine and the various preparations required before use of this manual. Find the appropriate page by using the machine operations guide key, refer to sew are described in chapter 2, such as described below. Look for creating beautiful embroidery, and details on pages 70 to the page that is indicated. ■ ...
Users Manual - English
Page 15
Contents Introduction ...1 IMPORTANT SAFETY INSTRUCTIONS 1 License Agreement ...6 Warning Labels...7 Machine Structure and Features 8 Six-needle machine embroidering ...8 Differences with single-needle machines ...9 Other features ...10 Available features ...11 Manual Structure...12 Read before use ...12 Read when additional information is required 12 Searching for information ...12 GETTING READY 19 Names of Machine Parts and Their Functions 20 Front view ...20 Right-side/rear view ...21 Operation panel ...21 Accessories...22 Included accessories ...22 Optional accessories...23 Setting...
Contents Introduction ...1 IMPORTANT SAFETY INSTRUCTIONS 1 License Agreement ...6 Warning Labels...7 Machine Structure and Features 8 Six-needle machine embroidering ...8 Differences with single-needle machines ...9 Other features ...10 Available features ...11 Manual Structure...12 Read before use ...12 Read when additional information is required 12 Searching for information ...12 GETTING READY 19 Names of Machine Parts and Their Functions 20 Front view ...20 Right-side/rear view ...21 Operation panel ...21 Accessories...22 Included accessories ...22 Optional accessories...23 Setting...
Users Manual - English
Page 16
Hooping the Fabric in the Embroidery Frame 47 Hooping the fabric in the embroidery frame 47 Attaching the Embroidery Frame to the Machine 49 Attaching the embroidery frame ...49 Checking the Embroidery Area 51 Temporarily stopping to check the area...51 Continuing to the embroidering screen ...52 Upper Threading ...53 Checking the needle bars and thread colors 53 Upper threading ...55 Threading the needle ...59 Sewing the Embroidery 63 Starting embroidering ...63 Stopping embroidering ...65 Checking the Thread Tension 67 Removing the Embroidery Frame and Fabric 68 Removing the ...
Hooping the Fabric in the Embroidery Frame 47 Hooping the fabric in the embroidery frame 47 Attaching the Embroidery Frame to the Machine 49 Attaching the embroidery frame ...49 Checking the Embroidery Area 51 Temporarily stopping to check the area...51 Continuing to the embroidering screen ...52 Upper Threading ...53 Checking the needle bars and thread colors 53 Upper threading ...55 Threading the needle ...59 Sewing the Embroidery 63 Starting embroidering ...63 Stopping embroidering ...65 Checking the Thread Tension 67 Removing the Embroidery Frame and Fabric 68 Removing the ...
Users Manual - English
Page 17
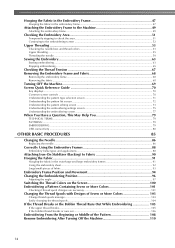
Adjusting the Thread Tension 112 Adjusting the tension of the bobbin thread 112 Adjusting the tension of the upper thread 113 EMBROIDERING SETTINGS 115 Basting Embroidery ...116 Creating an Appliqué Piece 117 Creating an appliqué piece ...117 Using a frame pattern for the outline...120 Automatic Lock Stitch Setting 122 Starting/Ending Position Settings 123 Repeatedly sewing a pattern along a diagonal 124 Embroidering linked characters...125 Maximum Sewing Speed Setting 127 Setting the Machine to Stop at Color Changes 128 Stopping the machine at the next color change 128 ...
Adjusting the Thread Tension 112 Adjusting the tension of the bobbin thread 112 Adjusting the tension of the upper thread 113 EMBROIDERING SETTINGS 115 Basting Embroidery ...116 Creating an Appliqué Piece 117 Creating an appliqué piece ...117 Using a frame pattern for the outline...120 Automatic Lock Stitch Setting 122 Starting/Ending Position Settings 123 Repeatedly sewing a pattern along a diagonal 124 Embroidering linked characters...125 Maximum Sewing Speed Setting 127 Setting the Machine to Stop at Color Changes 128 Stopping the machine at the next color change 128 ...
Users Manual - English
Page 18
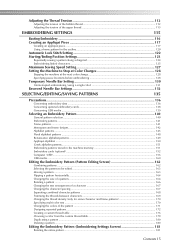
Editing a Combined Pattern 182 Saving Embroidery Patterns 187 Machine's memory ...187 If the embroidery pattern cannot be saved 187 USB media ...189 Computer (USB) ...190 BASIC SETTINGS AND HELP FEATURE 193 Using the Settings Key 194 Understanding the settings screen ...194 Changing the display guides...196 Changing the thread color information ...197 Specifying the thumbnail size...198 Changing the background colors of the embroidery patterns or thumbnails 199 Specifying jumpstitch trimming / "DST" jump codes for trimming 199 Deleting short stitches ...201 Specifying the remaining ...
Editing a Combined Pattern 182 Saving Embroidery Patterns 187 Machine's memory ...187 If the embroidery pattern cannot be saved 187 USB media ...189 Computer (USB) ...190 BASIC SETTINGS AND HELP FEATURE 193 Using the Settings Key 194 Understanding the settings screen ...194 Changing the display guides...196 Changing the thread color information ...197 Specifying the thumbnail size...198 Changing the background colors of the embroidery patterns or thumbnails 199 Specifying jumpstitch trimming / "DST" jump codes for trimming 199 Deleting short stitches ...201 Specifying the remaining ...
Users Manual - English
Page 19
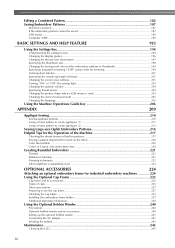
Cleaning the machine surface ...245 Cleaning the hook ...245 Cleaning around the needle plate ...246 Cleaning the bobbin case ...247 Cleaning the thread paths of the upper threads 248 Oiling the machine ...250 About the maintenance message...251 Troubleshooting ...252 On-screen troubleshooting ...252 Troubleshooting...253 Error messages ...261 If the machine does not respond when a key is pressed 269 Specifications ...270 Embroidery machine specifications...270 Upgrading Your Machine's Software 271 Upgrade procedure using USB media ...271 Upgrade procedure using computer...272 Index ...273 ...
Cleaning the machine surface ...245 Cleaning the hook ...245 Cleaning around the needle plate ...246 Cleaning the bobbin case ...247 Cleaning the thread paths of the upper threads 248 Oiling the machine ...250 About the maintenance message...251 Troubleshooting ...252 On-screen troubleshooting ...252 Troubleshooting...253 Error messages ...261 If the machine does not respond when a key is pressed 269 Specifications ...270 Embroidery machine specifications...270 Upgrading Your Machine's Software 271 Upgrade procedure using USB media ...271 Upgrade procedure using computer...272 Index ...273 ...

Users Manual - English
Page 21
After checking that all accessories are included, the embroidery machine can be set up the machine 26 Adjusting the operation panel position 27 Preparing the thread guide assembly 28 Positioning the spool stand 29 Attaching the embroidery frame holder 29 1 GETTING READY After unpacking the machine, first refer to sew are described in this chapter. Names of the machine and the various preparations required before starting to "Accessories" on page 22, and check that all listed accessories are included. The setup of Machine Parts and Their Functions 20 Front view ...20 Right-...
After checking that all accessories are included, the embroidery machine can be set up the machine 26 Adjusting the operation panel position 27 Preparing the thread guide assembly 28 Positioning the spool stand 29 Attaching the embroidery frame holder 29 1 GETTING READY After unpacking the machine, first refer to sew are described in this chapter. Names of the machine and the various preparations required before starting to "Accessories" on page 22, and check that all listed accessories are included. The setup of Machine Parts and Their Functions 20 Front view ...20 Right-...
Users Manual - English
Page 22
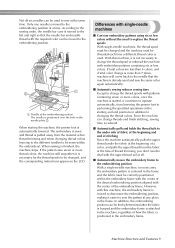
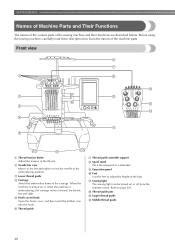
GETTING READY Names of Machine Parts and Their Functions The names of the various parts of the legs. A Sewing light The sewing light can be turned on or when the machine is embroidering, the carriage moves forward, backward, left and right to move the needle to the embroidering position. 3 Lower thread guide 4 Carriage Attach the embroidery frame to the carriage. Refer to adjust the height of the sewing machine and their functions are described below. When the machine is turned on or off from the settings screen. B Thread guide pins C Upper thread guide D Middle thread guide 20 ...
GETTING READY Names of Machine Parts and Their Functions The names of the various parts of the legs. A Sewing light The sewing light can be turned on or when the machine is embroidering, the carriage moves forward, backward, left and right to move the needle to the embroidering position. 3 Lower thread guide 4 Carriage Attach the embroidery frame to the carriage. Refer to adjust the height of the sewing machine and their functions are described below. When the machine is turned on or off from the settings screen. B Thread guide pins C Upper thread guide D Middle thread guide 20 ...