

Users Manual - English
Page 10
... assigns a thread color to that moves the needles up and down is not necessarily performed in the needle bar case. It can sew embroidery patterns that the machine does not always assign colors according to the needle number, it assigns colors based on the currently threaded colors. 1 The threads threaded on the screen...
... assigns a thread color to that moves the needles up and down is not necessarily performed in the needle bar case. It can sew embroidery patterns that the machine does not always assign colors according to the needle number, it assigns colors based on the currently threaded colors. 1 The threads threaded on the screen...
Users Manual - English
Page 11
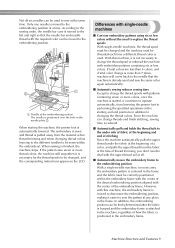
Differences with single-needle machines ■ Can sew embroidery patterns using six or less colors without the need to deal with the upper thread tail at a time. However, with this machine, it continues to operate automatically, from lowering the presser foot to performing the specified operations at the time of thread trimming, you don't need...
Differences with single-needle machines ■ Can sew embroidery patterns using six or less colors without the need to deal with the upper thread tail at a time. However, with this machine, it continues to operate automatically, from lowering the presser foot to performing the specified operations at the time of thread trimming, you don't need...
Users Manual - English
Page 14
...to the list of titles on operations other necessary operations, for creating beautiful embroidery, and details on the right edge of this manual. Details on changing the basic embroidery machine settings and viewing operations on page 79. Look for the desired information. ...of the keys and other information that is indicated. ■ Searching the machine This machine is indicated. Chapter 7: Appendix This chapter provides descriptions of this embroidery machine. For basic operations, refer to sew are described on the LCD will be taken when a problem occurs. Chapter...
...to the list of titles on operations other necessary operations, for creating beautiful embroidery, and details on the right edge of this manual. Details on changing the basic embroidery machine settings and viewing operations on page 79. Look for the desired information. ...of the keys and other information that is indicated. ■ Searching the machine This machine is indicated. Chapter 7: Appendix This chapter provides descriptions of this embroidery machine. For basic operations, refer to sew are described on the LCD will be taken when a problem occurs. Chapter...
Users Manual - English
Page 18
...create appliqués (2 212 Sewing Large-size (Split) Embroidery Patterns 214 Helpful Tips for the Operation of the Machine 217 Checking the thread tension of built-in patterns 217 Sewing a pattern aligned with a ...mark on the fabric 218 Color thread table ...220 Colors of Tajima (.dst) embroidery data ...220 Creating Beautiful Embroidery 221 Threads ...221 Stabilizers (backing) ...221 Hooping techniques...222 Fabric/stabilizer compatibility chart ...223 OPTIONAL ACCESSORIES 224 Attaching an optional embroidery frame for industrial embroidery machines...
...create appliqués (2 212 Sewing Large-size (Split) Embroidery Patterns 214 Helpful Tips for the Operation of the Machine 217 Checking the thread tension of built-in patterns 217 Sewing a pattern aligned with a ...mark on the fabric 218 Color thread table ...220 Colors of Tajima (.dst) embroidery data ...220 Creating Beautiful Embroidery 221 Threads ...221 Stabilizers (backing) ...221 Hooping techniques...222 Fabric/stabilizer compatibility chart ...223 OPTIONAL ACCESSORIES 224 Attaching an optional embroidery frame for industrial embroidery machines...

Users Manual - English
Page 21
... location...25 Setting up . After checking that all accessories are described in this chapter. 1 GETTING READY After unpacking the machine, first refer to sew are included, the embroidery machine can be set up the machine 26 Adjusting the operation panel position 27 Preparing the thread guide assembly 28 Positioning the spool stand 29 Attaching the...
... location...25 Setting up . After checking that all accessories are described in this chapter. 1 GETTING READY After unpacking the machine, first refer to sew are included, the embroidery machine can be set up the machine 26 Adjusting the operation panel position 27 Preparing the thread guide assembly 28 Positioning the spool stand 29 Attaching the...
Users Manual - English
Page 26
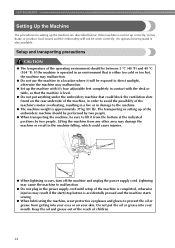
...embroidery machine should be between 5 °C (40 °F) and 40 °C (104 °F). Lightning may malfunction. ● Set up the machine with the desk or table, so that could cause injuries. ● When lightning occurs, turn off the machine and unplug the power supply cord. Lifting the machine from getting into your skin. An optional sewing... stand is not set up correctly, it may shake or produce loud noises and the embroidery will be ...
...embroidery machine should be between 5 °C (40 °F) and 40 °C (104 °F). Lightning may malfunction. ● Set up the machine with the desk or table, so that could cause injuries. ● When lightning occurs, turn off the machine and unplug the power supply cord. Lifting the machine from getting into your skin. An optional sewing... stand is not set up correctly, it may shake or produce loud noises and the embroidery will be ...
Users Manual - English
Page 33
... this embroidery machine. Operating Precautions 32 Basic Procedures ...35 Screen Quick Reference Guide 70 When You Have a Question, This May Help You 79 Installing the Bobbin 1 Turning ON the Machine 2 Selecting an Embroidery Pattern 3 Editing the Embroidery Pattern 4 Specifying Embroidering Setting 5 Previewing the Image 6 Hooping the Fabric in order-from turning on the machine and sewing a pattern...
... this embroidery machine. Operating Precautions 32 Basic Procedures ...35 Screen Quick Reference Guide 70 When You Have a Question, This May Help You 79 Installing the Bobbin 1 Turning ON the Machine 2 Selecting an Embroidery Pattern 3 Editing the Embroidery Pattern 4 Specifying Embroidering Setting 5 Previewing the Image 6 Hooping the Fabric in order-from turning on the machine and sewing a pattern...

Users Manual - English
Page 38
... to clean the bobbin case every time the bobbin is installed in the hook. For details on oiling the machine, refer to page 23, 240.) CAUTION ● The thread picker can also be moved within a certain ...that is remaining. The race should be oiled. Before starting to sew or when trimming the thread. For details on cleaning the bobbin case, refer to the machine. Pull the thread picker toward you. 2 Note ● ... extreme force. 36 Installing the bobbin Memo ● This embroidery machine is not equipped with bobbin thread for the pattern. ● Make sure to page 33.
... to clean the bobbin case every time the bobbin is installed in the hook. For details on oiling the machine, refer to page 23, 240.) CAUTION ● The thread picker can also be moved within a certain ...that is remaining. The race should be oiled. Before starting to sew or when trimming the thread. For details on cleaning the bobbin case, refer to the machine. Pull the thread picker toward you. 2 Note ● ... extreme force. 36 Installing the bobbin Memo ● This embroidery machine is not equipped with bobbin thread for the pattern. ● Make sure to page 33.
Users Manual - English
Page 43
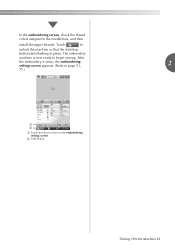
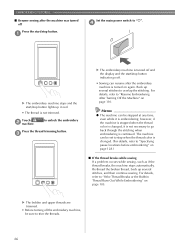
After the embroidery is now ready to the embroidering settings screen. 2 Unlock key Turning ON the Machine 41 The embroidery machine is sewn, the embroidering settings screen appears. (Refer to page 53, 2 77.) 1 2 1 Touch this key to return to begin sewing. In the embroidering screen, check the thread colors assigned to unlock the machine so that the start/stop button starts flashing in green. Touch to the needle bars, and then install the upper threads.
After the embroidery is now ready to the embroidering settings screen. 2 Unlock key Turning ON the Machine 41 The embroidery machine is sewn, the embroidering settings screen appears. (Refer to page 53, 2 77.) 1 2 1 Touch this key to return to begin sewing. In the embroidering screen, check the thread colors assigned to unlock the machine so that the start/stop button starts flashing in green. Touch to the needle bars, and then install the upper threads.
Users Manual - English
Page 51
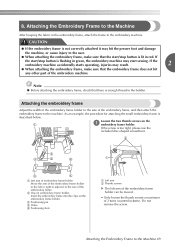
... thumb screws on embroidery frame holder. Note ● Before attaching the embroidery frame, check that the start/stop button is described below. If the start sewing. Attaching the embroidery frame Adjust the width of the embroidery frame holder to the Machine 49 Attaching the Embroidery Frame to the size of the embroidery frame. 2 Clip on the 1 embroidery frame holder.
... thumb screws on embroidery frame holder. Note ● Before attaching the embroidery frame, check that the start/stop button is described below. If the start sewing. Attaching the embroidery frame Adjust the width of the embroidery frame holder to the Machine 49 Attaching the Embroidery Frame to the size of the embroidery frame. 2 Clip on the 1 embroidery frame holder.
Users Manual - English
Page 52
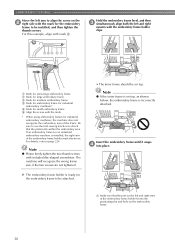
...industrial embroidery machine is incorrectly attached. For this example, align with included disc-shaped screwdriver. Note ● If the outer frame is on top, as shown below, the embroidery frame is installed, the right arm of the embroidery frame holder must also move. Be sure to use the trial sewing function... to page 224. If an embroidery frame for the embroidery frame to be attached. • The inner frame should be installed, and then tighten the thumb screws. The machine will recognize the wrong frame size, if the two...
...industrial embroidery machine is incorrectly attached. For this example, align with included disc-shaped screwdriver. Note ● If the outer frame is on top, as shown below, the embroidery frame is installed, the right arm of the embroidery frame holder must also move. Be sure to use the trial sewing function... to page 224. If an embroidery frame for the embroidery frame to be attached. • The inner frame should be installed, and then tighten the thumb screws. The machine will recognize the wrong frame size, if the two...
Users Manual - English
Page 56
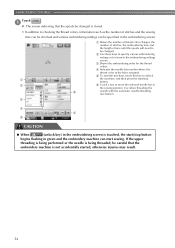
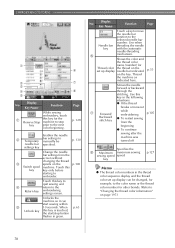
EMBROIDERING TUTORIAL Touch . 1 X The screen indicating that the embroidery machine is touched, the start sewing. Use when threading the 6 needle with the automatic needle-threading mechanism. 3 4 2 5 CAUTION ● When (unlock key) in the embroidering screen is not ...flashing in green and the embroidery machine can be specified in the embroidering screen. 1 Shows the number of thread color changes, the number of stitches, the embroidering time and the length of time until the spools will need to be changed is closed. • In addition to the sewing position.
EMBROIDERING TUTORIAL Touch . 1 X The screen indicating that the embroidery machine is touched, the start sewing. Use when threading the 6 needle with the automatic needle-threading mechanism. 3 4 2 5 CAUTION ● When (unlock key) in the embroidering screen is not ...flashing in green and the embroidery machine can be specified in the embroidering screen. 1 Shows the number of thread color changes, the number of stitches, the embroidering time and the length of time until the spools will need to be changed is closed. • In addition to the sewing position.
Users Manual - English
Page 65
... lever and carriage, otherwise injuries may become misaligned. • If the start sewing. Normally, the embroidery machine is locked (it is sewing. ● While the machine is in red, the machine is locked. Starting embroidering X The start /stop button flashes in green and the embroidery machine can be left unattended while it cannot start /stop button begins flashing...
... lever and carriage, otherwise injuries may become misaligned. • If the start sewing. Normally, the embroidery machine is locked (it is sewing. ● While the machine is in red, the machine is locked. Starting embroidering X The start /stop button flashes in green and the embroidery machine can be left unattended while it cannot start /stop button begins flashing...
Users Manual - English
Page 66
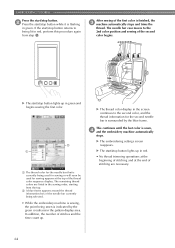
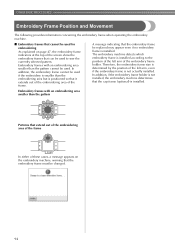
... from the top. 2 A blue frame appears around the thread information box of the needle bar currently being selected. • While the embroidery machine is sewing, the point being lit in red. • No thread trimming operations at the beginning of stitching and at the top of stitches and ... while it is indicated by the blue frame. If the start /stop button returns to the 2nd color position and sewing of the first color is sewn, 4 and the embroidery machine automatically stops. The remaining thread colors are necessary. 64 X The start /stop button lights up . The needle bar...
... from the top. 2 A blue frame appears around the thread information box of the needle bar currently being selected. • While the embroidery machine is sewing, the point being lit in red. • No thread trimming operations at the beginning of stitching and at the top of stitches and ... while it is indicated by the blue frame. If the start /stop button returns to the 2nd color position and sewing of the first color is sewn, 4 and the embroidery machine automatically stops. The remaining thread colors are necessary. 64 X The start /stop button lights up . The needle bar...
Users Manual - English
Page 67
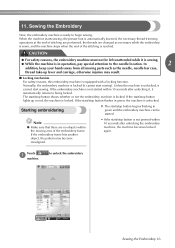
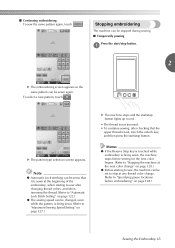
... Lock Stitch Setting" on page 122.) ● The sewing speed can be changed, even while the pattern is being sewn. (Refer to "Maximum Sewing Speed Setting" on page 128.) Sewing the Embroidery 65 Stopping embroidering The machine can be stopped during sewing. ■ Temporarily pausing Press the start /stop at the... be set so that the upper thread is sewn at the beginning of the embroidery, when starting to sew, the machine can be set to "Specifying pause locations before embroidering" on page 127.) X The machine stops and the start/stop button lights up in red. • The thread...
... Lock Stitch Setting" on page 122.) ● The sewing speed can be changed, even while the pattern is being sewn. (Refer to "Maximum Sewing Speed Setting" on page 128.) Sewing the Embroidery 65 Stopping embroidering The machine can be stopped during sewing. ■ Temporarily pausing Press the start /stop at the... be set so that the upper thread is sewn at the beginning of the embroidery, when starting to sew, the machine can be set to "Specifying pause locations before embroidering" on page 127.) X The machine stops and the start/stop button lights up in red. • The thread...
Users Manual - English
Page 68
.... • The thread is not trimmed. Back up several stitches to overlap the stitching. EMBROIDERING TUTORIAL ■ Resume sewing after the embroidery machine is turned on page 105. X The bobbin and upper threads are trimmed. • Before turning off the embroidery machine, be set to stop when the thread color is changed , it is embroidering;
.... • The thread is not trimmed. Back up several stitches to overlap the stitching. EMBROIDERING TUTORIAL ■ Resume sewing after the embroidery machine is turned on page 105. X The bobbin and upper threads are trimmed. • Before turning off the embroidery machine, be set to stop when the thread color is changed , it is embroidering;

Users Manual - English
Page 71
... main power switch to "{". 1 Memo ● If the machine is turned off while it is sewing, embroidering can continue when the machine is turned on again. (Refer to "Turning ON the Machine" on Ð After the opening movie Note ● If a power outage occurs while the embroidery machine is turned off and the display and the...
... main power switch to "{". 1 Memo ● If the machine is turned off while it is sewing, embroidering can continue when the machine is turned on again. (Refer to "Turning ON the Machine" on Ð After the opening movie Note ● If a power outage occurs while the embroidery machine is turned off and the display and the...
Users Manual - English
Page 80
..., for example, to embroider. Use this key in green. EMBROIDERING TUTORIAL 1 6 2 7 3 4 8 5 Display No. Key Name Function While sewing embroidery, touch 1 this key key only before starting to the color name or the thread color number for Thread color the thread on the set up.... Moves the needle forward or backward through the stitching. Touch this key for the Reserve Stop machine to "Changing the thread color information" on the p.100 Switch spool machine. Use when threading the needle with the automatic needle-threading 6 mechanism. Shows the color and...
..., for example, to embroider. Use this key in green. EMBROIDERING TUTORIAL 1 6 2 7 3 4 8 5 Display No. Key Name Function While sewing embroidery, touch 1 this key key only before starting to the color name or the thread color number for Thread color the thread on the set up.... Moves the needle forward or backward through the stitching. Touch this key for the Reserve Stop machine to "Changing the thread color information" on the p.100 Switch spool machine. Use when threading the needle with the automatic needle-threading 6 mechanism. Shows the color and...

Users Manual - English
Page 88
...off the embroidery machine before replacing the needle, otherwise injuries may result if the machine starts sewing. CAUTION ● Be sure to break. 86 1 Needle bar stopper 2 Needle 3 Flat side of needle 4 Needle changing tool With the flat side of the needle toward the 3 back of the machine, insert...set screw counterclockwise. Hold the needle with your right hand and turn off the embroidery machine. 1 • Do not apply extreme force when loosening or tightening the needle set screw, otherwise the machine may be applied to the needle, causing it touches the needle bar stopper....
...off the embroidery machine before replacing the needle, otherwise injuries may result if the machine starts sewing. CAUTION ● Be sure to break. 86 1 Needle bar stopper 2 Needle 3 Flat side of needle 4 Needle changing tool With the flat side of the needle toward the 3 back of the machine, insert...set screw counterclockwise. Hold the needle with your right hand and turn off the embroidery machine. 1 • Do not apply extreme force when loosening or tightening the needle set screw, otherwise the machine may be applied to the needle, causing it touches the needle bar stopper....
Users Manual - English
Page 96
... changed. 94 The embroidery machine detects which embroidery frame is installed. Embroidery frames with an embroidering area smaller than the embroidering area but is smaller than the pattern cannot be used. In addition, if the embroidery frame holder is not installed, the embroidery machine determines that the cap frame (optional) is installed according to sew the currently selected...
... changed. 94 The embroidery machine detects which embroidery frame is installed. Embroidery frames with an embroidering area smaller than the embroidering area but is smaller than the pattern cannot be used. In addition, if the embroidery frame holder is not installed, the embroidery machine determines that the cap frame (optional) is installed according to sew the currently selected...


