
Users Manual - English
Page 4
...attention is necessary when the machine is used by young children or infirm persons without supervision. • Young children should be supervised to the needle. otherwise, the machine, power cord or garment being sewn may ignite, resulting in injuries. 5 Special care is being sewn to catch fire.... fingers out of the machine free from all moving parts near an open flame; Never allow children to play with this machine near the needle bar case, otherwise injuries may result. • Do not operate where aerosol (spray) products are intended. Keep ventilation openings of all ...
...attention is necessary when the machine is used by young children or infirm persons without supervision. • Young children should be supervised to the needle. otherwise, the machine, power cord or garment being sewn may ignite, resulting in injuries. 5 Special care is being sewn to catch fire.... fingers out of the machine free from all moving parts near an open flame; Never allow children to play with this machine near the needle bar case, otherwise injuries may result. • Do not operate where aerosol (spray) products are intended. Keep ventilation openings of all ...

Users Manual - English
Page 5
...it must be replaced by the manufacturer as described in the back of this machine. If the problem persists, please consult your local authorized Brother dealer. Use accessories recommended by an authorized dealer. • In the event a malfunction occurs or adjustment is intended for household use. Use...this manual and specifications of the operation manual to clean the case. Do not use as contained in this machine in any assemblies, needle, or other hot objects. • Use only neutral soaps or detergents to inspect and adjust the machine yourself. For additional product ...
...it must be replaced by the manufacturer as described in the back of this machine. If the problem persists, please consult your local authorized Brother dealer. Use accessories recommended by an authorized dealer. • In the event a malfunction occurs or adjustment is intended for household use. Use...this manual and specifications of the operation manual to clean the case. Do not use as contained in this machine in any assemblies, needle, or other hot objects. • Use only neutral soaps or detergents to inspect and adjust the machine yourself. For additional product ...

Users Manual - English
Page 10
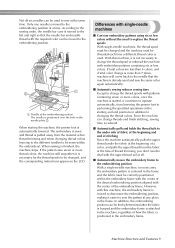
...pins, thread tension knobs, thread takeup levers and thread paths, mentioned when threading the upper thread, are named from right to the needle number, it assigns colors based on the currently threaded colors. 1 The threads threaded on the screen. The mechanism that the machine ...does not always assign colors according to left: needle bar 1, needle bar 2, needle bar 3, needle bar 4, needle bar 5, and needle bar 6. Thread the needle bars as shown here. The thread colors assigned to that will be used on the next pattern the...
...pins, thread tension knobs, thread takeup levers and thread paths, mentioned when threading the upper thread, are named from right to the needle number, it assigns colors based on the currently threaded colors. 1 The threads threaded on the screen. The mechanism that the machine ...does not always assign colors according to left: needle bar 1, needle bar 2, needle bar 3, needle bar 4, needle bar 5, and needle bar 6. Thread the needle bars as shown here. The thread colors assigned to that will be used on the next pattern the...
Users Manual - English
Page 11
...colors are less than 6 colors, and if total color change is more than 7 times, machine will come back to the needle that the needle bar and needle thread with the required color can change the thread spool or rethread the machine with the center of the embroidery frame. Machine ...of a color, and pulls the upper thread from the material when thread trimming and when changing thread colors (moving to the different needles to be sewn within the embroidery frame with the center of the desired embroidering position aligned with embroidery patterns containing six or less colors....
...colors are less than 6 colors, and if total color change is more than 7 times, machine will come back to the needle that the needle bar and needle thread with the required color can change the thread spool or rethread the machine with the center of the embroidery frame. Machine ...of a color, and pulls the upper thread from the material when thread trimming and when changing thread colors (moving to the different needles to be sewn within the embroidery frame with the center of the desired embroidering position aligned with embroidery patterns containing six or less colors....
Users Manual - English
Page 12
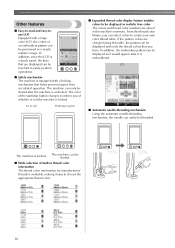
... for manufacturers' threads is equipped with a locking mechanism that helps prevent injuries from accidental operation. The machine is embroidered. ■ Automatic needle-threading mechanism Using the automatic needle-threading mechanism, the needle can be threaded. The color of the start/stop button changes to inform you of whether or not the machine is...
... for manufacturers' threads is equipped with a locking mechanism that helps prevent injuries from accidental operation. The machine is embroidered. ■ Automatic needle-threading mechanism Using the automatic needle-threading mechanism, the needle can be threaded. The color of the start/stop button changes to inform you of whether or not the machine is...
Users Manual - English
Page 13
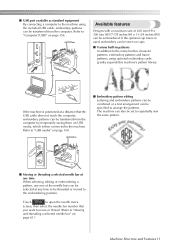
... then connected to "USB media" on USB media, which is positioned at a distance that you want to move screen, then select the needle bar number that the USB cable does not reach the computer, embroidery patterns can be transferred from the computer. Available features Designs with a ...; 300 mm (W) (7-7/8 inches (H) × 11-3/4 inches (W)) can be selected at any time When selecting, editing or embroidering a pattern, any one of the needle bars can be threaded or moved to arrange the patterns. The machine can also be set to repeatedly sew the same pattern. ■ Moving or...
... then connected to "USB media" on USB media, which is positioned at a distance that you want to move screen, then select the needle bar number that the USB cable does not reach the computer, embroidery patterns can be transferred from the computer. Available features Designs with a ...; 300 mm (W) (7-7/8 inches (H) × 11-3/4 inches (W)) can be selected at any time When selecting, editing or embroidering a pattern, any one of the needle bars can be threaded or moved to arrange the patterns. The machine can also be set to repeatedly sew the same pattern. ■ Moving or...
Users Manual - English
Page 14
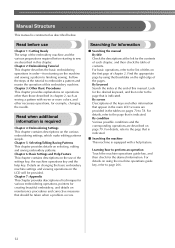
... by using the machine operations guide key, refer to perform an operation Touch the machine operations guide key, and then check for example, changing the needle. Learning how to page 206. 12 Manual Structure This manual is constructed as sewing a pattern with a help key. Read before starting to embroider a pattern and...
... by using the machine operations guide key, refer to perform an operation Touch the machine operations guide key, and then check for example, changing the needle. Learning how to page 206. 12 Manual Structure This manual is constructed as sewing a pattern with a help key. Read before starting to embroider a pattern and...
Users Manual - English
Page 15
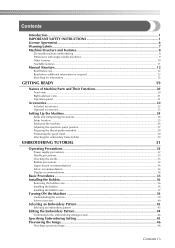
... IMPORTANT SAFETY INSTRUCTIONS 1 License Agreement ...6 Warning Labels...7 Machine Structure and Features 8 Six-needle machine embroidering ...8 Differences with single-needle machines ...9 Other features ...10 Available features ...11 Manual Structure...12 Read before use ...12......29 Attaching the embroidery frame holder...29 EMBROIDERING TUTORIAL 31 Operating Precautions...32 Power supply precautions ...32 Needle precautions...33 Checking the needle ...33 Bobbin precautions...33 Upper thread recommendations ...34 Fabric recommendations ...34 Display recommendations ...34 Basic Procedures...
... IMPORTANT SAFETY INSTRUCTIONS 1 License Agreement ...6 Warning Labels...7 Machine Structure and Features 8 Six-needle machine embroidering ...8 Differences with single-needle machines ...9 Other features ...10 Available features ...11 Manual Structure...12 Read before use ...12......29 Attaching the embroidery frame holder...29 EMBROIDERING TUTORIAL 31 Operating Precautions...32 Power supply precautions ...32 Needle precautions...33 Checking the needle ...33 Bobbin precautions...33 Upper thread recommendations ...34 Fabric recommendations ...34 Display recommendations ...34 Basic Procedures...
Users Manual - English
Page 16
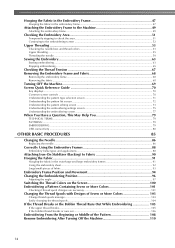
...check the area...51 Continuing to the embroidering screen ...52 Upper Threading ...53 Checking the needle bars and thread colors 53 Upper threading ...55 Threading the needle ...59 Sewing the Embroidery 63 Starting embroidering ...63 Stopping embroidering ...65 Checking the Thread Tension...You 79 TECHNICAL TERMS: ...79 PATTERNS: ...79 EMBROIDERING: ...79 USB connectivity ...80 OTHER BASIC PROCEDURES 85 Changing the Needle ...86 Replacing the needle...86 Correctly Using the Embroidery Frames 88 Embroidery frame types and applications ...88 Attaching Iron-On Stabilizer (Backing) to Fabric ...
...check the area...51 Continuing to the embroidering screen ...52 Upper Threading ...53 Checking the needle bars and thread colors 53 Upper threading ...55 Threading the needle ...59 Sewing the Embroidery 63 Starting embroidering ...63 Stopping embroidering ...65 Checking the Thread Tension...You 79 TECHNICAL TERMS: ...79 PATTERNS: ...79 EMBROIDERING: ...79 USB connectivity ...80 OTHER BASIC PROCEDURES 85 Changing the Needle ...86 Replacing the needle...86 Correctly Using the Embroidery Frames 88 Embroidery frame types and applications ...88 Attaching Iron-On Stabilizer (Backing) to Fabric ...
Users Manual - English
Page 17
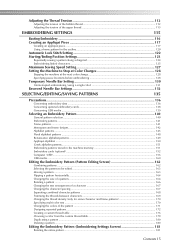
... at Color Changes 128 Stopping the machine at the next color change 128 Specifying pause locations before embroidering 128 Temporary Needle Bar Setting 130 Uninterrupted embroidering (using a single color 131 Reserved Needle Bar Settings 132 SELECTING/EDITING/SAVING PATTERNS 135 Precautions...136 Concerning embroidery data ...136 Concerning optional embroidery cards ...138 Concerning...
... at Color Changes 128 Stopping the machine at the next color change 128 Specifying pause locations before embroidering 128 Temporary Needle Bar Setting 130 Uninterrupted embroidering (using a single color 131 Reserved Needle Bar Settings 132 SELECTING/EDITING/SAVING PATTERNS 135 Precautions...136 Concerning embroidery data ...136 Concerning optional embroidery cards ...138 Concerning...
Users Manual - English
Page 19
Cleaning the machine surface ...245 Cleaning the hook ...245 Cleaning around the needle plate ...246 Cleaning the bobbin case ...247 Cleaning the thread paths of the upper threads 248 Oiling the machine ...250 About the maintenance message...251 ...
Cleaning the machine surface ...245 Cleaning the hook ...245 Cleaning around the needle plate ...246 Cleaning the bobbin case ...247 Cleaning the thread paths of the upper threads 248 Oiling the machine ...250 About the maintenance message...251 ...
Users Manual - English
Page 22
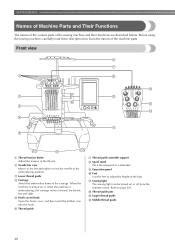
...these descriptions to adjust the height of the legs. When the machine is embroidering, the carriage moves forward, backward, left and right to move the needle to the embroidering position. 3 Lower thread guide 4 Carriage Attach the embroidery frame to page 203. Front view 1 Thread tension knobs Adjust the ...tension of the thread. 2 Needle bar case Moves to the left and right. 5 Hook cover/Hook Open the hook cover, and then insert the bobbin case into the hook. 6 ...
...these descriptions to adjust the height of the legs. When the machine is embroidering, the carriage moves forward, backward, left and right to move the needle to the embroidering position. 3 Lower thread guide 4 Carriage Attach the embroidery frame to page 203. Front view 1 Thread tension knobs Adjust the ...tension of the thread. 2 Needle bar case Moves to the left and right. 5 Hook cover/Hook Open the hook cover, and then insert the bobbin case into the hook. 6 ...
Users Manual - English
Page 23
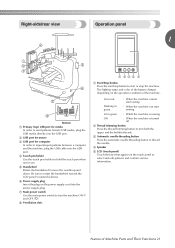
.... 4 Touch pen holder Use the touch pen holder to hold the touch pen when not in use. 5 Handwheel Rotate the handwheel to move the needle up and down. Right-side/rear view Operation panel 1 Bottom 1 Primary (top) USB port for media In order to send patterns from/to USB... off 2 Thread trimming button Press the thread trimming button to trim both the upper and the bobbin threads. 3 Automatic needle-threading button Press the automatic needle threading button to thread the needle. 4 Speaker 5 LCD (touch panel) Touch the keys that appear on the touch panel to rotate the handwheel toward ...
.... 4 Touch pen holder Use the touch pen holder to hold the touch pen when not in use. 5 Handwheel Rotate the handwheel to move the needle up and down. Right-side/rear view Operation panel 1 Bottom 1 Primary (top) USB port for media In order to send patterns from/to USB... off 2 Thread trimming button Press the thread trimming button to trim both the upper and the bobbin threads. 3 Automatic needle-threading button Press the automatic needle threading button to thread the needle. 4 Speaker 5 LCD (touch panel) Touch the keys that appear on the touch panel to rotate the handwheel toward ...

Users Manual - English
Page 24
... for this machine. GETTING READY Accessories The accessories listed below are included. Part Name 1 Accessory case 2 Needle set × 2 3 Prewound bobbin × 6 4 Spool net × 6 5 Seam ripper 6 Scissors 7 Tweezers 8 Touch pen 9 Needle changing tool (Threader) 10 Needle plate spacer 11 Phillips screwdriver 12 Standard screwdriver 13 Allen screwdriver 14 Offset screwdriver 15 Disc...
... for this machine. GETTING READY Accessories The accessories listed below are included. Part Name 1 Accessory case 2 Needle set × 2 3 Prewound bobbin × 6 4 Spool net × 6 5 Seam ripper 6 Scissors 7 Tweezers 8 Touch pen 9 Needle changing tool (Threader) 10 Needle plate spacer 11 Phillips screwdriver 12 Standard screwdriver 13 Allen screwdriver 14 Offset screwdriver 15 Disc...

Users Manual - English
Page 35
... 74 dtex/2 and 100 dtex/2). Operating Precautions 33 Bent needles can easily break, possibly resulting in injuries. ● Never use household embroidery needles. If the needle is bent or the tip of the needle is broken, replace the needle with a bent needle is extremely dangerous since the needle may break or the thread tension will be sure...
... 74 dtex/2 and 100 dtex/2). Operating Precautions 33 Bent needles can easily break, possibly resulting in injuries. ● Never use household embroidery needles. If the needle is bent or the tip of the needle is broken, replace the needle with a bent needle is extremely dangerous since the needle may break or the thread tension will be sure...

Users Manual - English
Page 36
... • The display may bend or break. ● When embroidering overlapping stitches, it . (Refer to read. If thicker fabric is sewn, the needle may be dark immediately after the embroidery machine is necessary.) 34 This is a normal characteristic of the backlight and is not a sign of the display... and is not caught in the needle bending or breaking. After approximately 10 minutes, the display should reach its normal level of fabric, make sure that the fabric is not a ...
... • The display may bend or break. ● When embroidering overlapping stitches, it . (Refer to read. If thicker fabric is sewn, the needle may be dark immediately after the embroidery machine is necessary.) 34 This is a normal characteristic of the backlight and is not a sign of the display... and is not caught in the needle bending or breaking. After approximately 10 minutes, the display should reach its normal level of fabric, make sure that the fabric is not a ...
Users Manual - English
Page 40
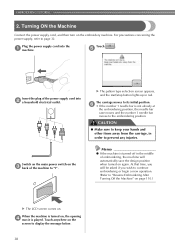
..." on page 110.) X The LCD screen comes on , the opening 4 movie is not already at the embroidering position, the needle bar case moves and the number 1 needle bar moves to "I". X The pattern type selection screen appears, and the start/stop button lights up in the middle of the ... to display the message below. 38 Switch on the main power switch on the screen to its initial position. 6 • If the number 1 needle bar is played. For precautions concerning the power supply, refer to prevent any injuries. When the machine is turned on . Touch anywhere on the 3...
..." on page 110.) X The LCD screen comes on , the opening 4 movie is not already at the embroidering position, the needle bar case moves and the number 1 needle bar moves to "I". X The pattern type selection screen appears, and the start/stop button lights up in the middle of the ... to display the message below. 38 Switch on the main power switch on the screen to its initial position. 6 • If the number 1 needle bar is played. For precautions concerning the power supply, refer to prevent any injuries. When the machine is turned on . Touch anywhere on the 3...

Users Manual - English
Page 41
... frame indications, area line the grid lines and other display settings can be specified p. 196 from the machine settings screen. key p.206 5 Needle bar move or thread a selected needle bar. key This key is touched, the pattern type selection screen appears. Turning ON the Machine 39 Display 1 Key Name Home key Function...
... frame indications, area line the grid lines and other display settings can be specified p. 196 from the machine settings screen. key p.206 5 Needle bar move or thread a selected needle bar. key This key is touched, the pattern type selection screen appears. Turning ON the Machine 39 Display 1 Key Name Home key Function...
Users Manual - English
Page 43
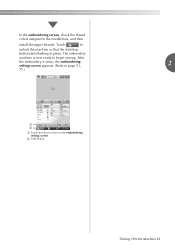
The embroidery machine is sewn, the embroidering settings screen appears. (Refer to page 53, 2 77.) 1 2 1 Touch this key to return to the needle bars, and then install the upper threads. Touch to begin sewing. After the embroidery is now ready to unlock the machine so that the start/stop button starts flashing in green. In the embroidering screen, check the thread colors assigned to the embroidering settings screen. 2 Unlock key Turning ON the Machine 41
The embroidery machine is sewn, the embroidering settings screen appears. (Refer to page 53, 2 77.) 1 2 1 Touch this key to return to the needle bars, and then install the upper threads. Touch to begin sewing. After the embroidery is now ready to unlock the machine so that the start/stop button starts flashing in green. In the embroidering screen, check the thread colors assigned to the embroidering settings screen. 2 Unlock key Turning ON the Machine 41

Users Manual - English
Page 55
...spools from the previous time be threaded with the color name that appears beside each needle bar number is displayed, that needle bar. If a thread color had been assigned to the needle bar on a previously sewn design, the needle bar will show the previously assigned color. 8 Change thread spools message. (Refer... Red 5: Yellow If there is no thread color name is threaded on which thread colors, and then thread the upper threads. Checking the needle bars and thread colors In the embroidering settings screen, touch to display the embroidering screen and the message instructing that the...
...spools from the previous time be threaded with the color name that appears beside each needle bar number is displayed, that needle bar. If a thread color had been assigned to the needle bar on a previously sewn design, the needle bar will show the previously assigned color. 8 Change thread spools message. (Refer... Red 5: Yellow If there is no thread color name is threaded on which thread colors, and then thread the upper threads. Checking the needle bars and thread colors In the embroidering settings screen, touch to display the embroidering screen and the message instructing that the...


