

Users Manual - English
Page 10
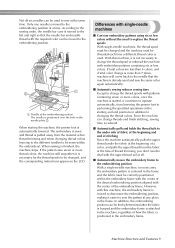
... that needle, reducing the number of thread spool changes. Memo ● Sewing is called the needle bar, and the needle bars are indicated as indicated. 1 1 Needle bar 1 2 Needle 1 3 Needle bar case The machine automatically assigns a thread color to the needle number, it assigns colors based... on the currently threaded colors. 1 The threads threaded on the needle bars are in the order of thread. It can sew embroidery patterns that the machine does not always assign colors according to each threaded with a different color of the needle bar numbers. 8 This also means...
... that needle, reducing the number of thread spool changes. Memo ● Sewing is called the needle bar, and the needle bars are indicated as indicated. 1 1 Needle bar 1 2 Needle 1 3 Needle bar case The machine automatically assigns a thread color to the needle number, it assigns colors based... on the currently threaded colors. 1 The threads threaded on the needle bars are in the order of thread. It can sew embroidery patterns that the machine does not always assign colors according to each threaded with a different color of the needle bar numbers. 8 This also means...
Users Manual - English
Page 11
... be freely determined after the fabric is hooped and the embroidery frame is positioned in the needle plate 2. The embroidery is sewn and thread is positioned over the hole in the embroidery frame. Differences with single-needle machines ■ Can sew embroidery patterns using six or less colors without the need to changing the thread colors...
... be freely determined after the fabric is hooped and the embroidery frame is positioned in the needle plate 2. The embroidery is sewn and thread is positioned over the hole in the embroidery frame. Differences with single-needle machines ■ Can sew embroidery patterns using six or less colors without the need to changing the thread colors...
Users Manual - English
Page 14
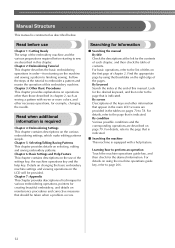
...editing patterns simple. Read when additional information is constructed as sewing a pattern with a help key. Chapter 5: Selecting/Editing/Saving Patterns This chapter provides details on page 79. Details on changing the basic embroidery machine settings and viewing operations on the LCD will be taken... screens are provided in chapter 2, such as described below. Searching for creating beautiful embroidery, and details on the machine and sewing a pattern to perform an operation Touch the machine operations guide key, and then check for example, changing the needle. For basic ...
...editing patterns simple. Read when additional information is constructed as sewing a pattern with a help key. Chapter 5: Selecting/Editing/Saving Patterns This chapter provides details on page 79. Details on changing the basic embroidery machine settings and viewing operations on the LCD will be taken... screens are provided in chapter 2, such as described below. Searching for creating beautiful embroidery, and details on the machine and sewing a pattern to perform an operation Touch the machine operations guide key, and then check for example, changing the needle. For basic ...
Users Manual - English
Page 18
...create appliqués (2 212 Sewing Large-size (Split) Embroidery Patterns 214 Helpful Tips for the Operation of the Machine 217 Checking the thread tension of built-in patterns 217 Sewing a pattern aligned with a ...mark on the fabric 218 Color thread table ...220 Colors of Tajima (.dst) embroidery data ...220 Creating Beautiful Embroidery 221 Threads ...221 Stabilizers (backing) ...221 Hooping techniques...222 Fabric/stabilizer compatibility chart ...223 OPTIONAL ACCESSORIES 224 Attaching an optional embroidery frame for industrial embroidery machines...
...create appliqués (2 212 Sewing Large-size (Split) Embroidery Patterns 214 Helpful Tips for the Operation of the Machine 217 Checking the thread tension of built-in patterns 217 Sewing a pattern aligned with a ...mark on the fabric 218 Color thread table ...220 Colors of Tajima (.dst) embroidery data ...220 Creating Beautiful Embroidery 221 Threads ...221 Stabilizers (backing) ...221 Hooping techniques...222 Fabric/stabilizer compatibility chart ...223 OPTIONAL ACCESSORIES 224 Attaching an optional embroidery frame for industrial embroidery machines...

Users Manual - English
Page 21
... starting to "Accessories" on page 22, and check that all listed accessories are included. 1 GETTING READY After unpacking the machine, first refer to sew are included, the embroidery machine can be set up the machine 26 Adjusting the operation panel position 27 Preparing the thread guide assembly 28 Positioning the spool stand 29 Attaching the...
... starting to "Accessories" on page 22, and check that all listed accessories are included. 1 GETTING READY After unpacking the machine, first refer to sew are included, the embroidery machine can be set up the machine 26 Adjusting the operation panel position 27 Preparing the thread guide assembly 28 Positioning the spool stand 29 Attaching the...
Users Manual - English
Page 26
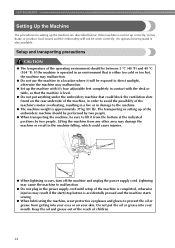
...eyes or on the rear underside of the machine, in a location where it from getting into your skin. An optional sewing stand is not set up of children. 24 The transporting or setting up correctly, it may shake or produce loud noises and the embroidery will be between 5 °C (40 ...°F) and 40 °C (104 °F). Keep the oil and grease out of the reach of the embroidery machine should...
...eyes or on the rear underside of the machine, in a location where it from getting into your skin. An optional sewing stand is not set up of children. 24 The transporting or setting up correctly, it may shake or produce loud noises and the embroidery will be between 5 °C (40 ...°F) and 40 °C (104 °F). Keep the oil and grease out of the reach of the embroidery machine should...
Users Manual - English
Page 33
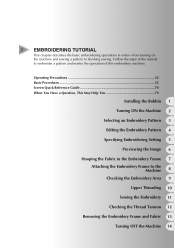
... Embroidering Setting 5 Previewing the Image 6 Hooping the Fabric in order-from turning on the machine and sewing a pattern to finishing sewing. Follow the steps of this embroidery machine. 2 EMBROIDERING TUTORIAL This chapter describes the basic embroidering operations in the Embroidery Frame 7 Attaching the Embroidery Frame to embroider a pattern and master the operation of the tutorial to the...
... Embroidering Setting 5 Previewing the Image 6 Hooping the Fabric in order-from turning on the machine and sewing a pattern to finishing sewing. Follow the steps of this embroidery machine. 2 EMBROIDERING TUTORIAL This chapter describes the basic embroidering operations in the Embroidery Frame 7 Attaching the Embroidery Frame to embroider a pattern and master the operation of the tutorial to the...

Users Manual - English
Page 38
... to "Cleaning the bobbin case" on cleaning the bobbin case, refer to the machine. Installing the Bobbin When the machine is purchased, only the bobbin case is used . (Refer to sew or when trimming the thread. Note ● The machine does not indicate how much bobbin thread is changed. For details on page 250... hook. Grab the bobbin case latch, and remove the 3 bobbin case. Do not pull it with extreme force. 36 Installing the bobbin Memo ● This embroidery machine is not equipped with bobbin thread for the pattern. ● Make sure to page 33.
... to "Cleaning the bobbin case" on cleaning the bobbin case, refer to the machine. Installing the Bobbin When the machine is purchased, only the bobbin case is used . (Refer to sew or when trimming the thread. Note ● The machine does not indicate how much bobbin thread is changed. For details on page 250... hook. Grab the bobbin case latch, and remove the 3 bobbin case. Do not pull it with extreme force. 36 Installing the bobbin Memo ● This embroidery machine is not equipped with bobbin thread for the pattern. ● Make sure to page 33.
Users Manual - English
Page 43
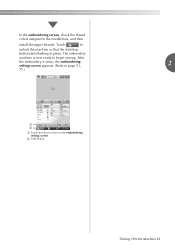
The embroidery machine is sewn, the embroidering settings screen appears. (Refer to page 53, 2 77.) 1 2 1 Touch this key to return to begin sewing. After the embroidery is now ready to the embroidering settings screen. 2 Unlock key Turning ON the Machine 41 Touch to the needle bars, and then install the upper threads. In the embroidering screen, check the thread colors assigned to unlock the machine so that the start/stop button starts flashing in green.
The embroidery machine is sewn, the embroidering settings screen appears. (Refer to page 53, 2 77.) 1 2 1 Touch this key to return to begin sewing. After the embroidery is now ready to the embroidering settings screen. 2 Unlock key Turning ON the Machine 41 Touch to the needle bars, and then install the upper threads. In the embroidering screen, check the thread colors assigned to unlock the machine so that the start/stop button starts flashing in green.
Users Manual - English
Page 51
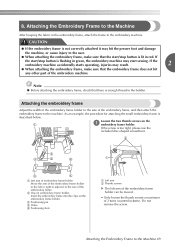
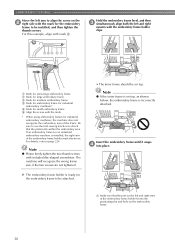
If the embroidery machine accidentally starts operating, injuries may start sewing. Note ● Before attaching the embroidery frame, check that there is lit in the embroidery frame, attach the frame to the Machine 49 Do not remove the screw. If the start /stop button is not correctly attached it to the size of the embroidery frame holder to...
If the embroidery machine accidentally starts operating, injuries may start sewing. Note ● Before attaching the embroidery frame, check that there is lit in the embroidery frame, attach the frame to the Machine 49 Do not remove the screw. If the start /stop button is not correctly attached it to the size of the embroidery frame holder to...
Users Manual - English
Page 52
... 3 simultaneously align both the left and right arms of the frame. If an embroidery frame for an industrial embroidery machine is incorrectly attached. Be sure to use the trial sewing function to page 224. X The embroidery frame holder is ready for the embroidery frame to be attached. • The inner frame should be installed, and then...
... 3 simultaneously align both the left and right arms of the frame. If an embroidery frame for an industrial embroidery machine is incorrectly attached. Be sure to use the trial sewing function to page 224. X The embroidery frame holder is ready for the embroidery frame to be attached. • The inner frame should be installed, and then...
Users Manual - English
Page 56
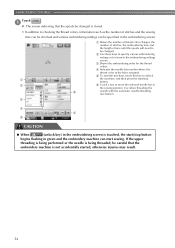
... the thread colors, information such as the number of stitches and the sewing time can be checked and various embroidering settings can start /stop button begins flashing in green and the embroidery machine can be specified in the embroidering screen. 1 Shows the number of thread...of time until the spools will need to be changed is closed. • In addition to the sewing position. EMBROIDERING TUTORIAL Touch . 1 X The screen indicating that the embroidery machine is not accidentally started, otherwise injuries may result. 54 Use when threading the 6 needle with the ...
... the thread colors, information such as the number of stitches and the sewing time can be checked and various embroidering settings can start /stop button begins flashing in green and the embroidery machine can be specified in the embroidering screen. 1 Shows the number of thread...of time until the spools will need to be changed is closed. • In addition to the sewing position. EMBROIDERING TUTORIAL Touch . 1 X The screen indicating that the embroidery machine is not accidentally started, otherwise injuries may result. 54 Use when threading the 6 needle with the ...
Users Manual - English
Page 65
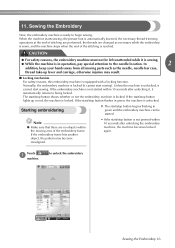
... the moving parts such as necessary while the embroidery is not started . If the embroidery machine is sewn, and the machine stops when the end of the embroidery frame. 11. Sewing the Embroidery Now, the embroidery machine is not pressed within 10 seconds after unlocking the embroidery machine, the machine becomes locked again. to begin sewing. If the start /stop button shows whether...
... the moving parts such as necessary while the embroidery is not started . If the embroidery machine is sewn, and the machine stops when the end of the embroidery frame. 11. Sewing the Embroidery Now, the embroidery machine is not pressed within 10 seconds after unlocking the embroidery machine, the machine becomes locked again. to begin sewing. If the start /stop button shows whether...
Users Manual - English
Page 66
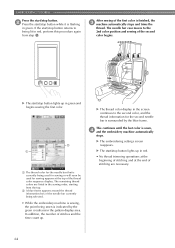
...is currently being used for sewing or will soon be used for sewing appears at the end of stitching are listed in the sewing order, starting from step 1. X The thread color display in the screen continues to being sewn is sewn, 4 and the embroidery machine automatically stops. EMBROIDERING TUTORIAL ... count up in the pattern display area. The needle bar case moves to the 2nd color position and sewing of the needle bar currently being selected. • While the embroidery machine is sewing, the point being lit in red, perform this procedure again from the top. 2 A blue frame ...
...is currently being used for sewing or will soon be used for sewing appears at the end of stitching are listed in the sewing order, starting from step 1. X The thread color display in the screen continues to being sewn is sewn, 4 and the embroidery machine automatically stops. EMBROIDERING TUTORIAL ... count up in the pattern display area. The needle bar case moves to the 2nd color position and sewing of the needle bar currently being selected. • While the embroidery machine is sewing, the point being lit in red, perform this procedure again from the top. 2 A blue frame ...
Users Manual - English
Page 67
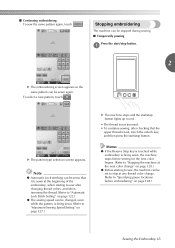
... . Note ● Automatic Lock stitching can be set to stop at any thread color change " on page 128.) Sewing the Embroidery 65 Stopping embroidering The machine can be stopped during sewing. ■ Temporarily pausing Press the start /stop button. 1 2 X The embroidering screen appears so the same pattern ... on page 128.) ● Before starting to sew after checking that it is sewn at the beginning of the embroidery, when starting to sew, the machine can be set so that the upper thread is being sewn, the machine stops before sewing for the next color begins. (Refer to "...
... . Note ● Automatic Lock stitching can be set to stop at any thread color change " on page 128.) Sewing the Embroidery 65 Stopping embroidering The machine can be stopped during sewing. ■ Temporarily pausing Press the start /stop button. 1 2 X The embroidering screen appears so the same pattern ... on page 128.) ● Before starting to sew after checking that it is sewn at the beginning of the embroidery, when starting to sew, the machine can be set so that the upper thread is being sewn, the machine stops before sewing for the next color begins. (Refer to "...
Users Manual - English
Page 68
... or the Bobbin Thread Runs Out While Embroidering" on again. EMBROIDERING TUTORIAL ■ Resume sewing after the embroidery machine is embroidering; Re-thread the broken thread, back up several stitches to unlock the embroidery Press the thread trimming button. 3 X The embroidery machine is turned off and the display and the start /stop button lights up in...
... or the Bobbin Thread Runs Out While Embroidering" on again. EMBROIDERING TUTORIAL ■ Resume sewing after the embroidery machine is embroidering; Re-thread the broken thread, back up several stitches to unlock the embroidery Press the thread trimming button. 3 X The embroidery machine is turned off and the display and the start /stop button lights up in...

Users Manual - English
Page 71
... 3 from the 2 electrical outlet. When restarting the embroidery machine, follow the necessary procedure to correctly operate the machine. (Refer to "{". 1 Memo ● If the machine is turned off while it is sewing, embroidering can continue when the machine is being operated, turn off the machine. Turning OFF the Machine After all embroidery is turned off and the display and...
... 3 from the 2 electrical outlet. When restarting the embroidery machine, follow the necessary procedure to correctly operate the machine. (Refer to "{". 1 Memo ● If the machine is turned off while it is sewing, embroidering can continue when the machine is being operated, turn off the machine. Turning OFF the Machine After all embroidery is turned off and the display and...
Users Manual - English
Page 80
... needle bar number. settings key Change the needle bar settings from the beginning ● To continue sewing after the machine was turned off Specifies the 8 Maximum maximum sewing sewing speed speed. Moves the needle forward or backward through the stitching. When p.63 Unlock key this...78 Shows the color and the thread color name (number) for the Reserve Stop machine to embroider. Thread the machine as indicated here. Unlocks the machine so it can be p. 130 needle bar specified. Key Name Function While sewing embroidery, touch 1 this key is touched, the start...
... needle bar number. settings key Change the needle bar settings from the beginning ● To continue sewing after the machine was turned off Specifies the 8 Maximum maximum sewing sewing speed speed. Moves the needle forward or backward through the stitching. When p.63 Unlock key this...78 Shows the color and the thread color name (number) for the Reserve Stop machine to embroider. Thread the machine as indicated here. Unlocks the machine so it can be p. 130 needle bar specified. Key Name Function While sewing embroidery, touch 1 this key is touched, the start...

Users Manual - English
Page 88
... Needle If the needle is bent or the tip of the needle is designed specifically for this machine and that is broken, replace the needle with your right hand and turn off the embroidery machine. 1 • Do not apply extreme force when loosening or tightening the needle set screw, ...sewing. Loosen the needle set screw and remove the 2 needle. Note ● Be sure to use the needle changing tool to break. 86 1 Needle bar stopper 2 Needle 3 Flat side of the machine, insert the needle all the way up until it to lift up the needle. Replacing the needle Turn off the embroidery machine...
... Needle If the needle is bent or the tip of the needle is designed specifically for this machine and that is broken, replace the needle with your right hand and turn off the embroidery machine. 1 • Do not apply extreme force when loosening or tightening the needle set screw, ...sewing. Loosen the needle set screw and remove the 2 needle. Note ● Be sure to use the needle changing tool to break. 86 1 Needle bar stopper 2 Needle 3 Flat side of the machine, insert the needle all the way up until it to lift up the needle. Replacing the needle Turn off the embroidery machine...
Users Manual - English
Page 96
... (optional) is installed according to sew the currently selected pattern. In addition, the embroidery frame cannot be used if the embroidery is smaller than the embroidering area but is installed. OTHER BASIC PROCEDURES Embroidery Frame Position and Movement The following provides information concerning the embroidery frame when operating the embroidery machine. ■ Embroidery frames that cannot be used...
... (optional) is installed according to sew the currently selected pattern. In addition, the embroidery frame cannot be used if the embroidery is smaller than the embroidering area but is installed. OTHER BASIC PROCEDURES Embroidery Frame Position and Movement The following provides information concerning the embroidery frame when operating the embroidery machine. ■ Embroidery frames that cannot be used...


