
English Manual
Page 7
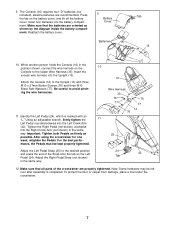
...Pedal (24). Be careful to the desired position and press the end of the crosstrainer are properly tightened. Using an adjustable wrench, firmly tighten the Left Pedal counterclockwise into the battery compartment. For the best performance, the Pedals must be left over after assembly is... oriented as possible. Tighten the Right Pedal (not shown) clockwise into the Upright (13). Reattach the battery cover. 9 Battery Cover Batteries Tab 16 10. After using the crosstrainer for one week, retighten the Pedals. While another person holds the Console (16) in the same way. 10...
...Pedal (24). Be careful to the desired position and press the end of the crosstrainer are properly tightened. Using an adjustable wrench, firmly tighten the Left Pedal counterclockwise into the battery compartment. For the best performance, the Pedals must be left over after assembly is... oriented as possible. Tighten the Right Pedal (not shown) clockwise into the Upright (13). Reattach the battery cover. 9 Battery Cover Batteries Tab 16 10. After using the crosstrainer for one week, retighten the Pedals. While another person holds the Console (16) in the same way. 10...
English Manual
Page 11
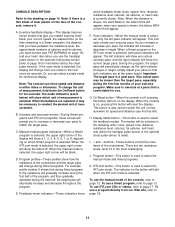
...This button is used to select the unit of measurement, hold down the On/Reset button for you can show how the resistance of the crosstrainer and the target pace will gradually increase during Smart programs. For example, profile number 6 shows that is the most challenging. The modes will ...be necessary to page 12. level 10 is comfortable for six seconds. CONSOLE DESCRIPTION Refer to the drawing on the display. When the batteries are replaced, it . When the manual mode is selected. When a Smart program or the iFIT.com mode is off, pressing this button will...
...This button is used to select the unit of measurement, hold down the On/Reset button for you can show how the resistance of the crosstrainer and the target pace will gradually increase during Smart programs. For example, profile number 6 shows that is the most challenging. The modes will ...be necessary to page 12. level 10 is comfortable for six seconds. CONSOLE DESCRIPTION Refer to the drawing on the display. When the batteries are replaced, it . When the manual mode is selected. When a Smart program or the iFIT.com mode is off, pressing this button will...

English Manual
Page 12
...the metal contacts. indicator appears in the program instead of calories and fat calories you have burned (see FAT BURNING on page 7 and install batteries. Avoid mov- The display will then show your current speed, the elapsed time, the distance that the Scan indicator does not appear. 5 ...the optional chest pulse sensor (refer to step 9 on page 19). ing your exercise pace. Note: When you exercise, adjust the resistance of the crosstrainer as desired by pressing the Program button repeatedly until only the MPH (or Km/H), Time, Miles (or Kms), Resist., Cals., or Fat Cals. ...
...the metal contacts. indicator appears in the program instead of calories and fat calories you have burned (see FAT BURNING on page 7 and install batteries. Avoid mov- The display will then show your current speed, the elapsed time, the distance that the Scan indicator does not appear. 5 ...the optional chest pulse sensor (refer to step 9 on page 19). ing your exercise pace. Note: When you exercise, adjust the resistance of the crosstrainer as desired by pressing the Program button repeatedly until only the MPH (or Km/H), Time, Miles (or Kms), Resist., Cals., or Fat Cals. ...
English Manual
Page 21
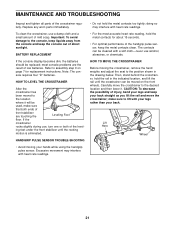
...use a damp cloth and a small amount of low batteries. Carefully move the crosstrainer; most accurate heart rate reading, hold the metal contacts for replacement instructions. HANDGRIP PULSE SENSOR TROUBLE-SHOOTING • Avoid moving the crosstrainer, remove the hand weights and adjust the seat to the...the indicated location, and lift the rail until the rocking motion is eliminated. HOW TO MOVE THE CROSSTRAINER Before moving your back. Note: The console requires four "D" batteries. Important: To avoid damage to the console, keep liquids away from the console and keep your...
...use a damp cloth and a small amount of low batteries. Carefully move the crosstrainer; most accurate heart rate reading, hold the metal contacts for replacement instructions. HANDGRIP PULSE SENSOR TROUBLE-SHOOTING • Avoid moving the crosstrainer, remove the hand weights and adjust the seat to the...the indicated location, and lift the rail until the rocking motion is eliminated. HOW TO MOVE THE CROSSTRAINER Before moving your back. Note: The console requires four "D" batteries. Important: To avoid damage to the console, keep liquids away from the console and keep your...


