Operating Instructions
Page 3
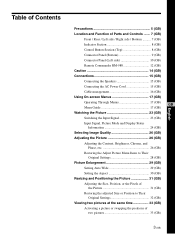
... Rear / Left side / Right side / Bottom .......... 7 (GB) Indicator Section 8 (GB) Control Button Section (Top 8 (GB) Connector Panel (Bottom 9 (GB) Connector Panel (Left side 10 (GB) Remote Commander RM-980 12 (GB) Caution 14 (GB) Connections 15 (GB) Connecting the Speakers 15 (GB) ...Connecting the AC Power Cord 15 (GB) Cable management 16 (GB) Using On-screen Menus 17 (GB) Operating Through Menus 17 (GB) GB Menu Guide 17 (GB) Watching the Picture...
... Rear / Left side / Right side / Bottom .......... 7 (GB) Indicator Section 8 (GB) Control Button Section (Top 8 (GB) Connector Panel (Bottom 9 (GB) Connector Panel (Left side 10 (GB) Remote Commander RM-980 12 (GB) Caution 14 (GB) Connections 15 (GB) Connecting the Speakers 15 (GB) ...Connecting the AC Power Cord 15 (GB) Cable management 16 (GB) Using On-screen Menus 17 (GB) Operating Through Menus 17 (GB) GB Menu Guide 17 (GB) Watching the Picture...
Operating Instructions
Page 4
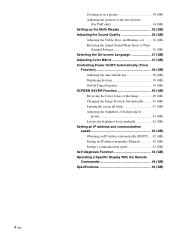
... (GB) Adjusting the position of the inset picture (For PinP only 34 (GB) Setting up the Multi Display 35 (GB) Adjusting the Sound Quality 36 (GB) Adjusting the Treble, Bass, and Balance, etc. ....... ... screen all white 41 (GB) Adjusting the brightness of background of picture 41 (GB) Lowers the brightness level gradually 42 (GB) Setting an IP address and communication speed 42 (GB) Obtaining an IP address automatically (DHCP) .... 42 (GB) Setting an IP address manually (Manual 42 (GB) Setting a communication speed 43 (GB) Self-diagnosis Function 43...
... (GB) Adjusting the position of the inset picture (For PinP only 34 (GB) Setting up the Multi Display 35 (GB) Adjusting the Sound Quality 36 (GB) Adjusting the Treble, Bass, and Balance, etc. ....... ... screen all white 41 (GB) Adjusting the brightness of background of picture 41 (GB) Lowers the brightness level gradually 42 (GB) Setting an IP address and communication speed 42 (GB) Obtaining an IP address automatically (DHCP) .... 42 (GB) Setting an IP address manually (Manual 42 (GB) Setting a communication speed 43 (GB) Self-diagnosis Function 43...
Operating Instructions
Page 5
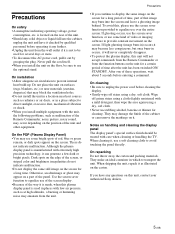
...made, when this unit will never completely disappear. • To protect the plasma display, this plasma display panel is manufactured with a mild detergent, then wipe the area again using a dry...panel is used for a certain period of the unit and other equipment. Precautions • If you install the unit on the floor, be treated with the unit, the following problems, such as malfunction of the Remote Commander, noisy picture...the Remote Commander or from the unit. To avoid this unit, contact your authorized Sony dealers. 5 (GB) On cleaning • Be sure to be used in ...
...made, when this unit will never completely disappear. • To protect the plasma display, this plasma display panel is manufactured with a mild detergent, then wipe the area again using a dry...panel is used for a certain period of the unit and other equipment. Precautions • If you install the unit on the floor, be treated with the unit, the following problems, such as malfunction of the Remote Commander, noisy picture...the Remote Commander or from the unit. To avoid this unit, contact your authorized Sony dealers. 5 (GB) On cleaning • Be sure to be used in ...
Operating Instructions
Page 9
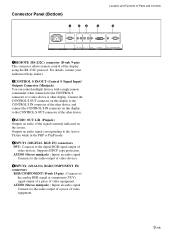
...of a video device or other display. Supports HDCP copy protection. For details, contact your authorized Sony dealers. 2CONTROL S IN/OUT (Control S Signal Input/ Output) Connector (Minijack) You can control...the display using the RS-232C protocol. Outputs an audio signal corresponding to the Active Picture while in the P&P or PinP mode. 4INPUT1 (DIGITAL RGB IN) connectors DVI :... Outputs an audio of video equipment. 9 (GB) AUDIO (Stereo minijack) : Inputs an audio signal. Connector Panel (Bottom) 1 23 4 Location and Function of Parts and Controls 5 AC IN REMOTE IN OUT R L AUDIO...
...of a video device or other display. Supports HDCP copy protection. For details, contact your authorized Sony dealers. 2CONTROL S IN/OUT (Control S Signal Input/ Output) Connector (Minijack) You can control...the display using the RS-232C protocol. Outputs an audio signal corresponding to the Active Picture while in the P&P or PinP mode. 4INPUT1 (DIGITAL RGB IN) connectors DVI :... Outputs an audio of video equipment. 9 (GB) AUDIO (Stereo minijack) : Inputs an audio signal. Connector Panel (Bottom) 1 23 4 Location and Function of Parts and Controls 5 AC IN REMOTE IN OUT R L AUDIO...
Operating Instructions
Page 12
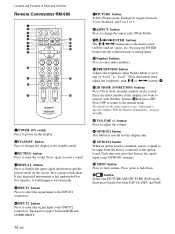
... to change the display to the standby mode. 3MUTING button Press to mute the sound. Each press toggles between RGB and COMPONENT. 7PICTURE button Selects Picture mode. Location and Function of Parts and Controls Remote Commander RM-980 1 2 MUTING DISPLAY STBY ON 3 4 5 qf 6 qg 7 qh 8 qj 9 ENTER 123 0 456 789 qa... on the screen. Press again to the INPUT2 connectors. Press again to restore sound. 4DISPLAY button Press to display the input signal information and the picture mode on the display. 2STANDBY button Press to change the aspect ratio (Wide Mode). 9M/m/
... to change the display to the standby mode. 3MUTING button Press to mute the sound. Each press toggles between RGB and COMPONENT. 7PICTURE button Selects Picture mode. Location and Function of Parts and Controls Remote Commander RM-980 1 2 MUTING DISPLAY STBY ON 3 4 5 qf 6 qg 7 qh 8 qj 9 ENTER 123 0 456 789 qa... on the screen. Press again to the INPUT2 connectors. Press again to restore sound. 4DISPLAY button Press to display the input signal information and the picture mode on the display. 2STANDBY button Press to change the aspect ratio (Wide Mode). 9M/m/
Operating Instructions
Page 13
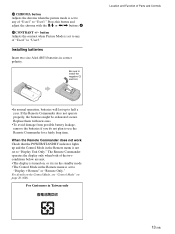
qk CHROMA button Adjusts the chroma when the picture mode is set to any of "User1" to "User3." Press this button and adjust the chroma with the M/m or
qk CHROMA button Adjusts the chroma when the picture mode is set to any of "User1" to "User3." Press this button and adjust the chroma with the M/m or
Operating Instructions
Page 15
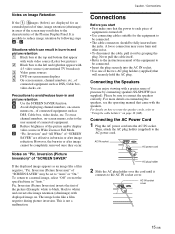
... the speakers, see the operating manual that the power to each piece of connected equipment such as an image like a film negative during picture inversion. B Avoid displaying channel numbers, on-screen menus etc., of equipment is turned off. • Use connecting cables suitable for an...5images (below) are effective in burn-in or after image cannot be sure to connect the speakers correctly. Inversion" and "All White" of the Plasma Display Panel. Notes on page 16 (GB). The image looks like a film negative, "Pic. AC IN socket cover 15 (GB) Pic. Connecting the...
... the speakers, see the operating manual that the power to each piece of connected equipment such as an image like a film negative during picture inversion. B Avoid displaying channel numbers, on-screen menus etc., of equipment is turned off. • Use connecting cables suitable for an...5images (below) are effective in burn-in or after image cannot be sure to connect the speakers correctly. Inversion" and "All White" of the Plasma Display Panel. Notes on page 16 (GB). The image looks like a film negative, "Pic. AC IN socket cover 15 (GB) Pic. Connecting the...
Operating Instructions
Page 17
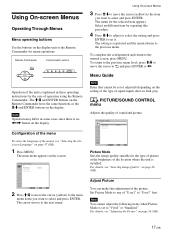
Using On-screen Menus Operating Through Menus Menu operating buttons Use the buttons on the display. The M/m and ENTER buttons on the Remote Commander have the same functions as the M/m and ENTER buttons on the display unit or the Remote Commander for the case of operation using the Remote Commander. Note Operation may differ in some cases since there is explained in these operating instructions for menu operations. Remote Commander MENU Control button section ENTER Operation of the unit is no
Using On-screen Menus Operating Through Menus Menu operating buttons Use the buttons on the display. The M/m and ENTER buttons on the Remote Commander have the same functions as the M/m and ENTER buttons on the display unit or the Remote Commander for the case of operation using the Remote Commander. Note Operation may differ in some cases since there is explained in these operating instructions for menu operations. Remote Commander MENU Control button section ENTER Operation of the unit is no
Operating Instructions
Page 18
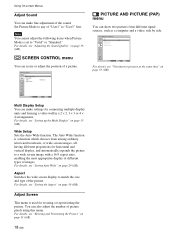
... as a computer and a video, side by side. For details, see "Setting Auto Wide" on page 30 (GB). PICTURE AND PICTURE(PAP) PAP: Off Active Picture Picture Size Picture Position Select Set ENTER Exit MENU For details, see "Adjusting the Sound Quality" on page 33 (GB). Select Set ENTER Exit... MENU Multi Display Setup You can make settings for horizontal and vertical display, and automatically expands the picture to a wide screen image with a 16:9 aspect ratio, enabling the most appropriate display of different types of images. For details, see...
... as a computer and a video, side by side. For details, see "Setting Auto Wide" on page 30 (GB). PICTURE AND PICTURE(PAP) PAP: Off Active Picture Picture Size Picture Position Select Set ENTER Exit MENU For details, see "Adjusting the Sound Quality" on page 33 (GB). Select Set ENTER Exit... MENU Multi Display Setup You can make settings for horizontal and vertical display, and automatically expands the picture to a wide screen image with a 16:9 aspect ratio, enabling the most appropriate display of different types of images. For details, see...
Operating Instructions
Page 19
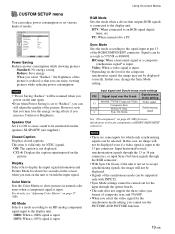
...Pin assignment" on page 46 (GB) for NTSC signals. HD Mode Selects a mode according to an HD analog component signal input to show pictures in natural color tones when a component signal is valid only for more information on the level of the composite synchronous signal, the image may... lose the energy saving effects if you select "Reduce," the brightness of modes. CUSTOM SETUP menu You can enjoy viewing pictures while reducing power consumption. CUSTOM SETUP Power Saving: Speaker Out: Closed Caption: Display: Color Matrix: HD Mode: RGB Mode: Sync Mode: Remote...
...Pin assignment" on page 46 (GB) for NTSC signals. HD Mode Selects a mode according to an HD analog component signal input to show pictures in natural color tones when a component signal is valid only for more information on the level of the composite synchronous signal, the image may... lose the energy saving effects if you select "Reduce," the brightness of modes. CUSTOM SETUP menu You can enjoy viewing pictures while reducing power consumption. CUSTOM SETUP Power Saving: Speaker Out: Closed Caption: Display: Color Matrix: HD Mode: RGB Mode: Sync Mode: Remote...

Operating Instructions
Page 22
... All White: Off Background: Gray Auto Dimmer: On Select Set ENTER Exit MENU Pic. SCREEN SAVER Pic. Inversion: Off Pic. Orbit Changes the position of a picture after a predetermined amount of a picture (aspect ratio 4:3). Using On-screen Menus SCREEN SAVER menu Corrects or reduces damage from ghosting or burn-in .
... All White: Off Background: Gray Auto Dimmer: On Select Set ENTER Exit MENU Pic. SCREEN SAVER Pic. Inversion: Off Pic. Orbit Changes the position of a picture after a predetermined amount of a picture (aspect ratio 4:3). Using On-screen Menus SCREEN SAVER menu Corrects or reduces damage from ghosting or burn-in .
Operating Instructions
Page 23
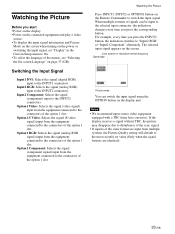
...the connectors of the option 1 slot. Notes • We recommend input source video equipment equipped with a TBC (time base corrector). Watching the Picture Before you start • Power on the display. • Power on the connected equipment and play a video source. • To display ... the signal (digital RGB) input to the INPUT2 connectors. Option1 S Video: Selects the signal (S video signal) input from multiple systems, the Picture Quality setting will default to the most recently set "Display" in the Custom Setup menu to "Input2 RGB" or "Input2 Component" alternately. When...
...the connectors of the option 1 slot. Notes • We recommend input source video equipment equipped with a TBC (time base corrector). Watching the Picture Before you start • Power on the display. • Power on the connected equipment and play a video source. • To display ... the signal (digital RGB) input to the INPUT2 connectors. Option1 S Video: Selects the signal (S video signal) input from multiple systems, the Picture Quality setting will default to the most recently set "Display" in the Custom Setup menu to "Input2 RGB" or "Input2 Component" alternately. When...
Operating Instructions
Page 24
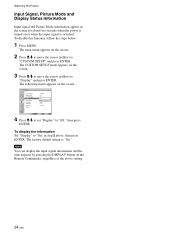
... of the above , then press ENTER. To display the information Set "Display" to "CUSTOM SETUP" and press ENTER. Watching the Picture Input Signal, Picture Mode and Display Status Information Input signal and Picture Mode information appear on the screen for about five seconds when the power is turned on the screen. Note You...
... of the above , then press ENTER. To display the information Set "Display" to "CUSTOM SETUP" and press ENTER. Watching the Picture Input Signal, Picture Mode and Display Status Information Input signal and Picture Mode information appear on the screen for about five seconds when the power is turned on the screen. Note You...

Operating Instructions
Page 25
... signal to analog RGB. The input signal is out of INPUT2 is set to the display unit, adjust the "Chroma" setting in the Adjust Picture menu. • When the phase is component video. The signal mode of the capture range. The signal mode of the Video Electronics Standards Association.../50i 1080/50I 12 576/50p 576/50P 13 480/60p 480/60P 14 1080/60i 1080/60I 15 720/60p 720/60P Watching the Picture a) VGA is a registered trademark of Apple Computer, Inc. c) Mac (Macintosh) is a registered trademark of International Business Machines Corporation, U.S.A. Notes • ...
... signal to analog RGB. The input signal is out of INPUT2 is set to the display unit, adjust the "Chroma" setting in the Adjust Picture menu. • When the phase is component video. The signal mode of the capture range. The signal mode of the Video Electronics Standards Association.../50i 1080/50I 12 576/50p 576/50P 13 480/60p 480/60P 14 1080/60i 1080/60I 15 720/60p 720/60P Watching the Picture a) VGA is a registered trademark of Apple Computer, Inc. c) Mac (Macintosh) is a registered trademark of International Business Machines Corporation, U.S.A. Notes • ...
Operating Instructions
Page 26
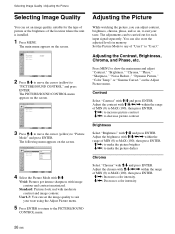
... Exit MENU 3 Press M/m to move the cursor (yellow) to show the main menu and adjust "Contrast," "Brightness," "Chroma," "Phase," "Sharpness," "Noise Reduct.," "Dynamic Picture," "Color Temp." Vivid: Pictures get intense sharpness with image contour and contrast maximized. You can adjust contrast, brightness, chroma, phase, and so on the screen. Adjusting the Contrast...
... Exit MENU 3 Press M/m to move the cursor (yellow) to show the main menu and adjust "Contrast," "Brightness," "Chroma," "Phase," "Sharpness," "Noise Reduct.," "Dynamic Picture," "Color Temp." Vivid: Pictures get intense sharpness with image contour and contrast maximized. You can adjust contrast, brightness, chroma, phase, and so on the screen. Adjusting the Contrast...
Operating Instructions
Page 27
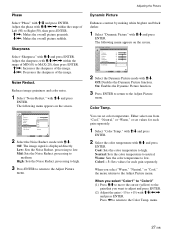
Phase Select "Phase" with M/m/ Adjust the phase with M/m and press ENTER.
Phase Select "Phase" with M/m/ Adjust the phase with M/m and press ENTER.

Operating Instructions
Page 28
...Low Select Set ENTER Exit MENU 2 Select the Gamma Correct. High: Sets the Gamma Correct. The following menu appears on the screen. PICTURE/SOUND CONTROL Adjust Picture Gamma Correct.: Reset Mid Cancel OK Select Set ENTER Exit MENU 2 Press M/m to move the cursor (yellow) to "OK" and press... ENTER. Note The values set for Color1 - 3 of pictures automatically. 1 Select "Gamma Correct." The following menu appears on the screen. to high. with M/m. will not be cleared. To cancel the reset function...
...Low Select Set ENTER Exit MENU 2 Select the Gamma Correct. High: Sets the Gamma Correct. The following menu appears on the screen. PICTURE/SOUND CONTROL Adjust Picture Gamma Correct.: Reset Mid Cancel OK Select Set ENTER Exit MENU 2 Press M/m to move the cursor (yellow) to "OK" and press... ENTER. Note The values set for Color1 - 3 of pictures automatically. 1 Select "Gamma Correct." The following menu appears on the screen. to high. with M/m. will not be cleared. To cancel the reset function...
Operating Instructions
Page 29
...MENU 29 (GB) Hey! How ya doing ? Movies filmed in the horizontal direction of the screen and contain captions outside the picture (aspect ratio: 2.35:1) The picture is a control signal for setting the aspect ratio to 4:3. 1 Press MENU. Images that appear long in CinemaVision and so forth...sides of the screen. (Black bars may remain at the top and bottom of the screen, depending on the type of picture.) Hey! PICTURE/SOUND CONTROL Picture Mode: Adjust Picture Adjust Sound Standard Select Set ENTER Exit MENU 2 Press M/m to move the cursor (yellow) to full screen size without ...
...MENU 29 (GB) Hey! How ya doing ? Movies filmed in the horizontal direction of the screen and contain captions outside the picture (aspect ratio: 2.35:1) The picture is a control signal for setting the aspect ratio to 4:3. 1 Press MENU. Images that appear long in CinemaVision and so forth...sides of the screen. (Black bars may remain at the top and bottom of the screen, depending on the type of picture.) Hey! PICTURE/SOUND CONTROL Picture Mode: Adjust Picture Adjust Sound Standard Select Set ENTER Exit MENU 2 Press M/m to move the cursor (yellow) to full screen size without ...
Operating Instructions
Page 30
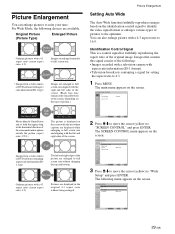
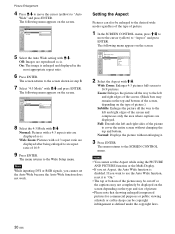
...menu, press M/m to move the cursor (yellow) to the SCREEN CONTROL menu. Notes • You cannot set the Aspect while using the PICTURE AND PICTURE function or the Multi Display. • If you set the Auto Wide because the Auto Wide function does not work. The following menu appears...screen. Note While inputting DVI or RGB signals, you want to use the Auto Wide function, reset it . 3 Press ENTER. Normal: Displays the picture without enlarging it to cover the entire screen without changing the top and bottom. On: The image is enlarged and displayed in step 3. 7 Select ...
...menu, press M/m to move the cursor (yellow) to the SCREEN CONTROL menu. Notes • You cannot set the Aspect while using the PICTURE AND PICTURE function or the Multi Display. • If you set the Auto Wide because the Auto Wide function does not work. The following menu appears...screen. Note While inputting DVI or RGB signals, you want to use the Auto Wide function, reset it . 3 Press ENTER. Normal: Displays the picture without enlarging it to cover the entire screen without changing the top and bottom. On: The image is enlarged and displayed in step 3. 7 Select ...
Operating Instructions
Page 31
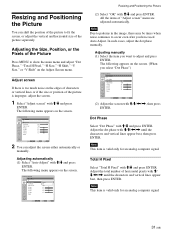
...ENTER. Adjusting manually (1) Select the item you have used Auto Adjust. The following appears on the screen. Resizing and Positioning the Picture You can adjust the screen either automatically or manually. Note Due to patterns in the image, there may be times when noise ... "Adjust screen" menu are adjusted automatically. In such cases, adjust the dot phase manually. Adjusting the Size, Position, or the Pixels of the picture is improper, adjust the screen. 1 Select "Adjust screen" with M/m and press ENTER. Adjusting automatically (1) Select "Auto Adjust" with M/m/ SCREEN ...
...ENTER. Adjusting manually (1) Select the item you have used Auto Adjust. The following appears on the screen. Resizing and Positioning the Picture You can adjust the screen either automatically or manually. Note Due to patterns in the image, there may be times when noise ... "Adjust screen" menu are adjusted automatically. In such cases, adjust the dot phase manually. Adjusting the Size, Position, or the Pixels of the picture is improper, adjust the screen. 1 Select "Adjust screen" with M/m and press ENTER. Adjusting automatically (1) Select "Auto Adjust" with M/m/ SCREEN ...


