Operating Instructions
Page 12
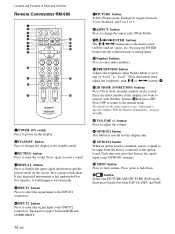
... 6 qg 7 qh 8 qj 9 ENTER 123 0 456 789 qa 0 qk qs ON SET qd ql MONITOR RM-980 1POWER ON switch Press to power on the screen. Press again to the INPUT2 connectors. Press again to restore sound. 4DISPLAY button Press to display the input signal information and the picture mode on...
... 6 qg 7 qh 8 qj 9 ENTER 123 0 456 789 qa 0 qk qs ON SET qd ql MONITOR RM-980 1POWER ON switch Press to power on the screen. Press again to the INPUT2 connectors. Press again to restore sound. 4DISPLAY button Press to display the input signal information and the picture mode on...
Operating Instructions
Page 17
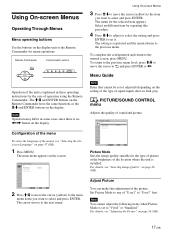
Using On-screen Menus Operating Through Menus Menu operating buttons Use the buttons on the display. Note Operation may differ in these operating instructions for menu operations. The M/m and ENTER buttons on the Remote Commander have the same functions as the M/m and ENTER buttons on the display unit or the Remote Commander for the case of the unit is explained in some cases since there is no Remote Commander MENU Control button section ENTER Operation of operation using the Remote Commander.
Using On-screen Menus Operating Through Menus Menu operating buttons Use the buttons on the display. Note Operation may differ in these operating instructions for menu operations. The M/m and ENTER buttons on the Remote Commander have the same functions as the M/m and ENTER buttons on the display unit or the Remote Commander for the case of the unit is explained in some cases since there is no Remote Commander MENU Control button section ENTER Operation of operation using the Remote Commander.
Operating Instructions
Page 24
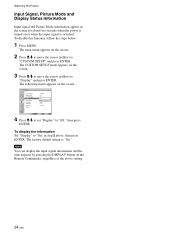
... "CUSTOM SETUP" and press ENTER. Note You can display the input signal information and the time anytime by pressing the DISPLAY button on the screen. 3 Press M/m to move the cursor (yellow) to "Display" and press ENTER. The factory default setting is switched. To display the information Set "Display" to "Off," then ...the steps below. 1 Press MENU. Watching the Picture Input Signal, Picture Mode and Display Status Information Input signal and Picture Mode information appear on the screen for about five seconds when the power is turned on or when the input signal is "On."
... "CUSTOM SETUP" and press ENTER. Note You can display the input signal information and the time anytime by pressing the DISPLAY button on the screen. 3 Press M/m to move the cursor (yellow) to "Display" and press ENTER. The factory default setting is switched. To display the information Set "Display" to "Off," then ...the steps below. 1 Press MENU. Watching the Picture Input Signal, Picture Mode and Display Status Information Input signal and Picture Mode information appear on the screen for about five seconds when the power is turned on or when the input signal is "On."
Operating Instructions
Page 26
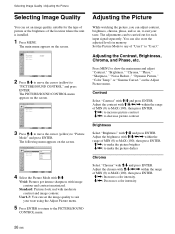
... You can adjust contrast, brightness, chroma, phase, and so on the screen. Contrast Select "Contrast" with M/m. PICTURE/SOUND CONTROL Picture Mode: Adjust Picture Adjust Sound Standard Select Set ENTER Exit MENU 3 Press M/m to move the cursor (yellow) to the PICTURE/SOUND CONTROL menu. The main menu ...appears on the screen. You can be carried out for the type of picture or the brightness of "User1" ...
... You can adjust contrast, brightness, chroma, phase, and so on the screen. Contrast Select "Contrast" with M/m. PICTURE/SOUND CONTROL Picture Mode: Adjust Picture Adjust Sound Standard Select Set ENTER Exit MENU 3 Press M/m to move the cursor (yellow) to the PICTURE/SOUND CONTROL menu. The main menu ...appears on the screen. You can be carried out for the type of picture or the brightness of "User1" ...
Operating Instructions
Page 27
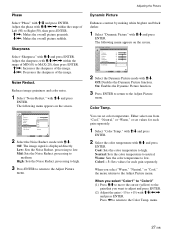
Adjust the phase with M/m and press ENTER. Phase Select "Phase" with M/m/
Adjust the phase with M/m and press ENTER. Phase Select "Phase" with M/m/

Operating Instructions
Page 28
...: Sets the Gamma Correct. Mid: Sets the Gamma Correct. The following menu appears on the screen. PICTURE/SOUND CONTROL Adjust Picture Gamma Correct.: Reset Mid Cancel OK Select Set ENTER Exit MENU 2 Press M/m to move the cursor (yellow) to "OK" and press ENTER. will not be cleared. PICTURE/SOUND ...light and dark portions of Color Temp. The Adjust Picture menu items are restored to high. The following menu appears on the screen. Low: Sets the Gamma Correct. Restoring the Adjust Picture Menu Items to Their Original Settings 1 In the Adjust Picture menu, press M/m to...
...: Sets the Gamma Correct. Mid: Sets the Gamma Correct. The following menu appears on the screen. PICTURE/SOUND CONTROL Adjust Picture Gamma Correct.: Reset Mid Cancel OK Select Set ENTER Exit MENU 2 Press M/m to move the cursor (yellow) to "OK" and press ENTER. will not be cleared. PICTURE/SOUND ...light and dark portions of Color Temp. The Adjust Picture menu items are restored to high. The following menu appears on the screen. Low: Sets the Gamma Correct. Restoring the Adjust Picture Menu Items to Their Original Settings 1 In the Adjust Picture menu, press M/m to...
Operating Instructions
Page 29
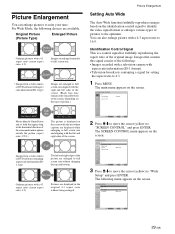
... Sound Standard Select Set ENTER Exit MENU 2 Press M/m to move the cursor (yellow) to full screen size without being enlarged. SCREEN CONTROL Multi Display Setup Wide Setup Aspect: Adjust Screen Wide Zoom Select Set ENTER Exit MENU 3 Press M/m to move the cursor (yellow) to full screen size. Original Picture (Picture Type) Enlarged Picture Wide Zoom Ordinary...
... Sound Standard Select Set ENTER Exit MENU 2 Press M/m to move the cursor (yellow) to full screen size without being enlarged. SCREEN CONTROL Multi Display Setup Wide Setup Aspect: Adjust Screen Wide Zoom Select Set ENTER Exit MENU 3 Press M/m to move the cursor (yellow) to full screen size. Original Picture (Picture Type) Enlarged Picture Wide Zoom Ordinary...
Operating Instructions
Page 30
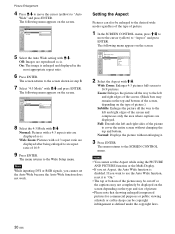
... Zoom Select Set ENTER Exit MENU 5 Select the Auto Wide setting with a 4:3 aspect ratio are reproduced as -is. The screen returns to the screen shown in the most appropriate aspect ratio. 6 Press ENTER. The following menu appears on the type of picture.) Subtitle: Enlarges ... "4:3 Mode" with a 4:3 aspect ratio are displayed. Wide Zoom: Enlarges 4:3 pictures full-screen to the SCREEN CONTROL menu. Full: Extends the left and right edges of picture. 1 In the SCREEN CONTROL menu, press M/m to move the cursor (yellow) to "Auto Wide" and press ENTER. Notes • You cannot...
... Zoom Select Set ENTER Exit MENU 5 Select the Auto Wide setting with a 4:3 aspect ratio are reproduced as -is. The screen returns to the screen shown in the most appropriate aspect ratio. 6 Press ENTER. The following menu appears on the type of picture.) Subtitle: Enlarges ... "4:3 Mode" with a 4:3 aspect ratio are displayed. Wide Zoom: Enlarges 4:3 pictures full-screen to the SCREEN CONTROL menu. Full: Extends the left and right edges of picture. 1 In the SCREEN CONTROL menu, press M/m to move the cursor (yellow) to "Auto Wide" and press ENTER. Notes • You cannot...

Operating Instructions
Page 32
Adjust the horizontal size of the picture with M/m and press ENTER. Resizing and Positioning the Picture H Size Select "H Size" with M/m/
Adjust the horizontal size of the picture with M/m and press ENTER. Resizing and Positioning the Picture H Size Select "H Size" with M/m/
Operating Instructions
Page 33
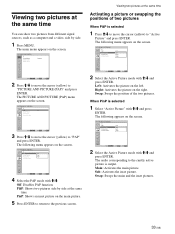
... ENTER. Main: Activates the main picture. Left: Activates the picture on the screen. PICTURE AND PICTURE(PAP) PAP: Off Active Picture Picture Size Picture Position Select Set ENTER Exit MENU 3 Press M/m to move the cursor (yellow) to the currtly active picture is selected 1 Select "Active... Picture" with M/m and press ENTER. The following menu appears on the screen. PinP: Shows an inset picture on the screen. The audio corresponding to "Active Picture"...
... ENTER. Main: Activates the main picture. Left: Activates the picture on the screen. PICTURE AND PICTURE(PAP) PAP: Off Active Picture Picture Size Picture Position Select Set ENTER Exit MENU 3 Press M/m to move the cursor (yellow) to the currtly active picture is selected 1 Select "Active... Picture" with M/m and press ENTER. The following menu appears on the screen. PinP: Shows an inset picture on the screen. The audio corresponding to "Active Picture"...
Operating Instructions
Page 36
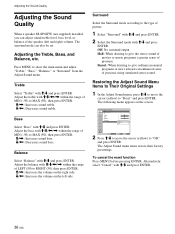
Adjusting the Treble, Bass, and Balance, etc. Adjust the treble with M/m and press ENTER. The surround mode can adjust sound treble level, bass level, or balance of the speaker (left and right) volume. Press MENU to show the main menu and adjust "Treble," "Bass," "Balance," or "Surround" from the Adjust Sound menu. Treble Select "Treble" with M/m/ Adjusting the Sound Quality Adjusting the Sound Quality When a speaker SS-SP42FW (not supplied) installed, you can also be set.
Adjusting the Treble, Bass, and Balance, etc. Adjust the treble with M/m and press ENTER. The surround mode can adjust sound treble level, bass level, or balance of the speaker (left and right) volume. Press MENU to show the main menu and adjust "Treble," "Bass," "Balance," or "Surround" from the Adjust Sound menu. Treble Select "Treble" with M/m/ Adjusting the Sound Quality Adjusting the Sound Quality When a speaker SS-SP42FW (not supplied) installed, you can also be set.
Operating Instructions
Page 37
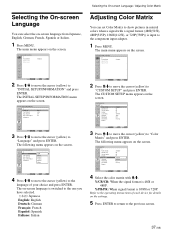
... DOeffutsch FOrnançais Español IDtaHliCanPo Select Set ENTER Exit MENU 4 Press M/m to move the cursor (yellow) to the language of each device for details on the screen. The following menu appears on the settings. 5 Press ENTER to return to "Color Matrix" ...SOUND CONTROL Picture Mode: Adjust Picture Adjust Sound Standard Select Set ENTER Exit MENU 2 Press M/m to move the cursor (yellow) to the previous screen. 37 (GB) The following menu appears on -screen language from Japanese, English, German, French, Spanish or Italian. 1 Press MENU. CUSTOM SETUP Power Saving...
... DOeffutsch FOrnançais Español IDtaHliCanPo Select Set ENTER Exit MENU 4 Press M/m to move the cursor (yellow) to the language of each device for details on the screen. The following menu appears on the settings. 5 Press ENTER to return to "Color Matrix" ...SOUND CONTROL Picture Mode: Adjust Picture Adjust Sound Standard Select Set ENTER Exit MENU 2 Press M/m to move the cursor (yellow) to the previous screen. 37 (GB) The following menu appears on -screen language from Japanese, English, German, French, Spanish or Italian. 1 Press MENU. CUSTOM SETUP Power Saving...
Operating Instructions
Page 38
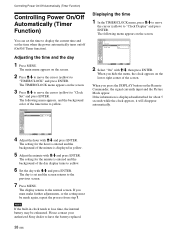
... with M/m, then press ENTER. If you hide the menu, the clock appears on the screen. 3 Press M/m to move the cursor (yellow) to yellow. 6 Set the day with M/m and press ENTER. Please contact your authorized Sony dealer to the normal screen. The TIMER/CLOCK menu appears on the lower right corner of the day display...
... with M/m, then press ENTER. If you hide the menu, the clock appears on the screen. 3 Press M/m to move the cursor (yellow) to yellow. 6 Set the day with M/m and press ENTER. Please contact your authorized Sony dealer to the normal screen. The TIMER/CLOCK menu appears on the lower right corner of the day display...

Operating Instructions
Page 39
.... When "Every day" is selected, you set to and press ENTER. The following menu appears on the screen. On/Off Timer Function 1 In the TIMER/CLOCK menu, press M/m to move the cursor (yellow) to the screen shown in step 2. When "Day of Week" with the radio button set the On Time. 9 Press ENTER.... Press < to return to the screen shown in step 2. 8 Set the Off Time as you can set the On...
.... When "Every day" is selected, you set to and press ENTER. The following menu appears on the screen. On/Off Timer Function 1 In the TIMER/CLOCK menu, press M/m to move the cursor (yellow) to the screen shown in step 2. When "Day of Week" with the radio button set the On Time. 9 Press ENTER.... Press < to return to the screen shown in step 2. 8 Set the Off Time as you can set the On...
Operating Instructions
Page 40
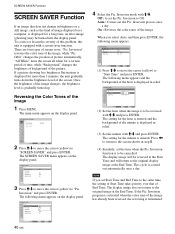
The main menu appears on the display panel. The SCREEN SAVER menu appears on the display panel. Orbit All White: Off Background: Gray Auto Dimmer: On Select Set ENTER Exit MENU 3 Press M/m to move the cursor (yellow) to the screen shown in relief. (3) Set the minute with M/m. Inversion mode with M/m and press ENTER. Press < to return...
The main menu appears on the display panel. The SCREEN SAVER menu appears on the display panel. Orbit All White: Off Background: Gray Auto Dimmer: On Select Set ENTER Exit MENU 3 Press M/m to move the cursor (yellow) to the screen shown in relief. (3) Set the minute with M/m. Inversion mode with M/m and press ENTER. Press < to return...
Operating Instructions
Page 41
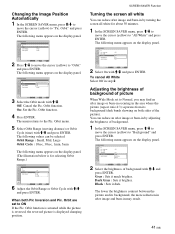
Changing the Image Position Automatically 1 In the SCREEN SAVER menu, press M/m to move the cursor (yellow) to "Orbit" and press ENTER. SCREEN SAVER Pic. On: Set the Pic. The following menu appears on the display panel. (The illustration below is displayed changing position. Orbit...5 Select Orbit Range (moving distance) or Orbit Cycle (time) with M/m. Orbit Range : Small, Mid, Large Orbit Cycle : 10sec, 30sec, 1min, 5min The following menu appears on the display panel. Orbit are set to the Pic. SCREEN SAVER Function Turning the screen all 30sec Select Set ENTER...
Changing the Image Position Automatically 1 In the SCREEN SAVER menu, press M/m to move the cursor (yellow) to "Orbit" and press ENTER. SCREEN SAVER Pic. On: Set the Pic. The following menu appears on the display panel. (The illustration below is displayed changing position. Orbit...5 Select Orbit Range (moving distance) or Orbit Cycle (time) with M/m. Orbit Range : Small, Mid, Large Orbit Cycle : 10sec, 30sec, 1min, 5min The following menu appears on the display panel. Orbit are set to the Pic. SCREEN SAVER Function Turning the screen all 30sec Select Set ENTER...
Operating Instructions
Page 42
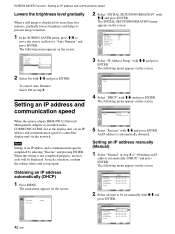
...minutes, gradually lowers brightness and helps to prevent image retention. 1 In the SCREEN SAVER menu, press M/m to move the cursor (yellow) to control the display unit via the network. The following menu appears on the...screen. Setting an IP address manually (Manual) 1 Select "Manual" in step 2. Orbit All White: Off Background: Gray Auto Dimmer: Ofnf On Select Set ENTER Exit MENU 2 Select On with M/m and press ENTER. Obtaining an IP address automatically (DHCP) 1 Press MENU. PICTURE/SOUND CONTROL Picture Mode: Adjust Picture Adjust Sound Standard Select 42...
...minutes, gradually lowers brightness and helps to prevent image retention. 1 In the SCREEN SAVER menu, press M/m to move the cursor (yellow) to control the display unit via the network. The following menu appears on the...screen. Setting an IP address manually (Manual) 1 Select "Manual" in step 2. Orbit All White: Off Background: Gray Auto Dimmer: Ofnf On Select Set ENTER Exit MENU 2 Select On with M/m and press ENTER. Obtaining an IP address automatically (DHCP) 1 Press MENU. PICTURE/SOUND CONTROL Picture Mode: Adjust Picture Adjust Sound Standard Select 42...

Operating Instructions
Page 43
... and repeat the same procedure and press ENTER. 6 After values are set for your authorized Sony dealer of the number of flashes is set an appropriate communication speed for all the desired items..., the count for the first box with M/m on the display unit or numeric keys on the screen. 2 Press ENTER and select a communication speed with M/m and press ENTER. For example, the ...indicator flashes twice, followed by the flashing of the POWER/ STANDBY indicator. The cursor moves to 255) for the number of flashes. 1 In the INITIAL SETUP/INFORMATION menu, select "Speed ...
... and repeat the same procedure and press ENTER. 6 After values are set for your authorized Sony dealer of the number of flashes is set an appropriate communication speed for all the desired items..., the count for the first box with M/m on the display unit or numeric keys on the screen. 2 Press ENTER and select a communication speed with M/m and press ENTER. For example, the ...indicator flashes twice, followed by the flashing of the POWER/ STANDBY indicator. The cursor moves to 255) for the number of flashes. 1 In the INITIAL SETUP/INFORMATION menu, select "Speed ...


